background image

32

ZoomBrowser EX Windows

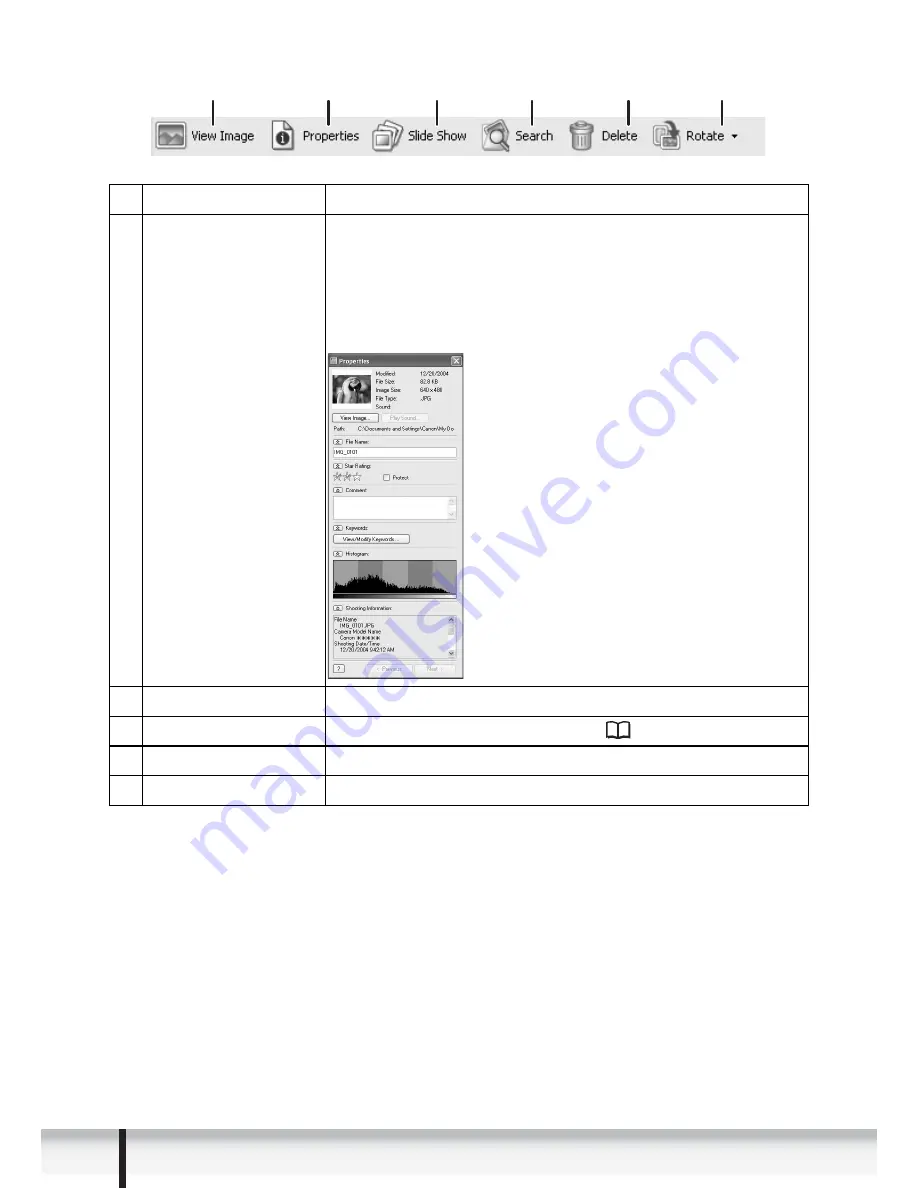
6 Application Tool Bar

1

View Image

Displays a selected image in the [Image Viewer] window.

2

Properties

Displays properties of the selected image. When you 
select a different image while the [Properties] window is 
open, the information switches to the one of the selected 
image.
The [Properties] window cannot be displayed in [Preview 
Mode].

3

Slide Show

Displays still images in a slide show.

4

Search

Allows you to search for images (

38).

5

Delete

Deletes selected images.

6

Rotate

Rotates selected still images. A movie cannot be rotated.

1

2

3

4

5

6

Summary of Contents for ELURA 90

Page 1: ...s Videocamara digital Manual de Instrucciones I Espanoll LU A90 LU A85 LU A80 Mini t Di9ital Video Cassette rJ BUBBLE JET DIREcr DIREQ PRINT t PictBridge Please read also the following instruction manual Veuillez lire aussi Ie manuel d instruction suivant Lea tambien el manual de instrucciones siguiente Digital Video Software ...

Page 2: ...rning the equipment off and on the user is encouraged to try to correct the interference by one or more of the following measures Reorient or relocate the receiving antenna Increase the separation between the equipment and receiver Connect the equipment into an outlet on a circuit different from that to which the receiver is connected Consult the dealer or an experienced radio TV technician for he...

Page 3: ... the product and cart combination to overturn 10 Power Sources The CA 570 Compact Power Adapter should be operated only from the type of power source indicated on the marking label If you are not sure of the type of power supply to your home consult your product dealer or local power company Regarding other power sources such as battery power refer to instructions in this manual 11 Polarization Th...

Page 4: ... not operate normally even if you follow the operating instructions Adjust only those controls that are covered by the operation instructions Improper adjustment of other controls may result in damage and will often require extensive work by a qualified technician to restore the product to its normal operation e If the product has been dropped or the cabinet has been damaged f When the product exh...

Page 5: ...yourcamcorder or when you have replaced the backupbaltery SettingJhe Time ZQnelPay ightSavingTime Operating modes see below I _ 1_ Menu item showing at its default position 1 EM ZONE DST N Y I ffl M op m lMrn 11 Button and switches to be operated Q 2 SET dial to select SYSTEM and press the r i The operating modes are determined by the position of the POWER switch and the TAPE CARD switch Operating...

Page 6: ...usting the Volume 35 Playing Back on a TV Screen 36 Advanced Functions Menus and Settings 38 Recording Using the Recording Programs 46 Using the Night Modes 49 Skin Detail Function 51 Adjusting Exposure Manually 52 Adjusting the Focus Manually 53 Setting the White Balance 55 Setting the Shutter Speed 57 Using the Self Timer 59 Changing the Recording Mode SP LP 60 Audio Recording 61 Using Digital E...

Page 7: ...oint 103 Selecting the Drive Mode 104 Recording Panoramic Images Stitch Assist Mode 106 Playing Back a Memory Card 108 Protecting Images 110 Erasing Images 111 Combining Images Card Mix 112 Formatting a Memory Card 116 Creating a Start up Image 117 Direct Printing Printing Still Images 118 Selecting the Print Settings 121 Trimming Settings 126 Printing with Print Order Settings 127 Transferring Im...

Page 8: ...AL VIDEO Card SOLUTION DISK WA 34 Wide Attachment 8 The serial number of this product can be found at the battery attachment unit of the camcorder Write down the number and other information here and retain this book as a permanent record of your purchase to aid identification in case of theft Date of Purchase Model Name ELURA90 ELURA85 ELURA80 A Purchased From Serial No Dealer Address Dealer Phon...

Page 9: ...on OJ 81 flash button OJ 97 I 11 play pause button OJ 33 j NIGHT MODE button OJ 49 I stop button OJ 33 ELURA90 ELURA85 only If _ _ EXP button OJ 52 I END SEARCH button OJ 72 CARD MIX button OJ 112 I cQ stitch assist button OJ 106 I SLIDE SHOW button OJ 109 LCD BACKLIGHT button OJ 21 LCD screen OJ 21 OPEN button OJ 25 SET dial OJ 38 MENU button OJ 38 BATTERY RELEASE button OJ 13 Battery attachment ...

Page 10: ...tch CD 5 134 ltV print share button CD 119 130 Accessory shoe CD 62 Zoom lever CD 30 PHOTO button OJ 93 _ I I TAPE CARD switch CD 5 Using a tape Od Using a memory card Program selector CD 46 IBEasy recording fJ Program AE Speaker CD 35 Strap mount CD 19 Grip belt OJ 18 Cassette compartment CD 16 OPEN EJECT switch OJ 16 Cassette compartment cover OJ 16 ...

Page 11: ...terminal OJ 36 I phones terminal OJ 35 61 0 DV terminal OJ 79 88 USB terminal OJ 118 129 Flash OJ 97 ELURA90 ELURA85 only Bottom View Stereo microphone I m D Mini video light assist lamp OJ 49 mmJDAssist lamp OJ 49 Remote sensor OJ 20 Tripod socket OJ 32 11 ...

Page 12: ...s aJ 74 REW button aJ 33 II button aJ 34 j PAUSE II button aJ 34 SLOW I button aJ 34 AUDIO DUB button aJ 85 ZERO SET MEMORY button aJ 73 jJ PHOTO button aJ 93 Zoom buttons aJ 30 PLAY button aJ 33 FF button aJ 34 STOP button aJ 33 11 button aJ 34 x 2 button aJ 34 TV SCREEN button OJ 135 ...

Page 13: ...harging is complete disconnect the power adapter from the camcorder Unplug the power cord from the power outlet and disconnect it from the adapter 5 Remove the battery pack after use Press the BATTERY RELEASE button to remove the battery 1 Turn the POWER switch to OFF 2 Move the viewfinder upward 3 Attach the battery pack to the camcorder Remove the terminal cover of the battery pack Press lightly...

Page 14: ...are not expressly recommended to the camcorder s DC IN terminal or to the power adapter o You may hear some noise from the power adapter during use This is not a malfunction o Do not disconnect and reconnect the power cord while charging a battery pack Charging may stop The battery pack may not be charged correctly even if the CHARGE indicator glows steady The battery pack may also not be charged ...

Page 15: ...in Approximate times for recording with repeated operations such as starUstop zooming power on off Actual time may be shorter a We recommend charging the battery pack in temperatures between 10 C and 30 C 50 OF and 86 OF Outside the temperature range of 0 C to 40 C 32 OF to 104 OF the CHARGE indicator flashes rapidly and charging stops a A lithium ion battery pack can be charged at any charge stat...

Page 16: ... out 3 Press the mark on the cassette compartment until it clicks 4 Wait for the cassette compartment to retract automatically and close the cassette compartment cover o Do not interfere with the cassette compartment while it is opening or closing automatically or attempt to close the cover before the cassette compartment has fully retracted o Be careful not to get your fingers caught in the casse...

Page 17: ... power source to the camcorder when replacing the backup battery to retain the settings 1 Press the OPEN button to open the LCD panel 2 PuII out the battery holder 3 Place the lithium battery with the side facing downward into the battery holder 4 Insert the battery holder 5 Close the LCD panel _ The backup battery has a life span of about a year flashes in red to inform you that it needs to be re...

Page 18: ...iewfinder back in 1 Attach the cord to the lens cap 2 Pass the grip belt through the loop on the cord i r t ekn h n h anp JfIJ on the grip belt while you are recording and place it over the lens when you have finished 18 Hold the camcorder with your right hand and adjust the belt with your left Adjust the grip belt so that you can reach the zoom lever with your index finger and the start stop butt...

Page 19: ...er strong light sources through the wide attachment It could damage your eyesight o If you zoom to telephoto the picture will not be in focus o The wide attachment may obstruct the remote sensor the range of the wireless controller narrows or may cause a shadow to appear on the picture when recording with the assist lamp o Filters cannot be used with the wide attachment o If dust accumulates on th...

Page 20: ...attery holder 2 Place the lithium button battery with the side facing up 3 Insert the battery holder o The wireless controller may not work properly when the remote sensor is sUbjected to strong light sources or direct sunlight o If the wireless controller does not work check if the remote sensor is set to OFF I CiJ 77 c When the camcorder cannot be operated with the wireless controller or when it...

Page 21: ...tness of the LCD screen between normal and bright by pressing the LCD BACKLIGHT button This is useful for outdoor recordings LCD BACKLIGHT button Press the LCD BACKLIGHT button o This setting does not affect the brightness of the recording or the viewfinder screen o When using a battery pack the camcorder retains the setting even if you change the position of the POWER switch o The battery usage t...

Page 22: ... time zone setting appears see table on the next page The default setting is New York 4 Turn the SET dial to select the setting option that represents your time zone and press the SET dial To adjust for daylight saving time select the time zone with the next to the area Setting the Oat and Time I I D TIME SET JAN 1 2005 12 00 AM ISYSTEM MENU 038 5 Turn the SET dial to select D TIME SET and press t...

Page 23: ...es ill KARACHI 0 DENVER IT DACCA um CHICAGO ID BANGKOK J NY New York ill H KONG Hong Kong CARACAS Q TOKYO llJ RIO Rio de Janeiro ill SYDNEY FERNAN Fernando de Noronha TIl SOLOMON AZORES rdI Once you have set time zone date and time you do not need to reset the clock 8 each time you travel to another time zone Just set the time zone to the one of your destination and the camcorder automatically adj...

Page 24: ... 1 Press the MENU button to open the menu CAMERA I DISPLAY OFF CAMERA I I DIT L _ I DISPLAY SETUP MENU III 38 2 Turn the SET dial to select DISPLAY SETUP and press the SET dial 3 Turn the SET dial to select D T DISPLAY and press the SET dial 4 Turn the SET dial to select ON 5 Press the MENU button to close the menu 24 ...

Page 25: ...MERA mode Set the POWER switch to CAMERA and the TAPE CARD switch to 3 Push the OPEN button at the LCD panel and open the LCD panel 4 Press the start stop button to begin recording Press the start stop button again to pause recording K PLAY VCR CAMERA Jt When You Have Finished Recording 1 Turn the POWER switch to OFF 2 Close the LCD panel 3 Replace the lens cap 4 Unload the cassette 5 Disconnect t...

Page 26: ...ordings even if you turn the camcorder off o Bright light may make it difficult to use the LCD screen In such case use the viewfinder instead o When recording near loud sounds such as fireworks drums or concerts sound may become distorted or may be recorded not in the actual sound level This is not a malfunction MENU I IDISPLAY SETUP H LCD MIRROR ON 1 Press the MENU button to open the menu All gwi...

Page 27: ...raJ When LCD MIRROR is set to ON only tape or card operation and self timer displays appear on the LCD screen all displays appear on the viewfinder screen 27 ...

Page 28: ...y L l starts flashing in red when the battery pack is empty When you attach an empty battery pack the power may turn off without displaying The actual battery charge may not be indicated accurately depending on the condition under which battery pack and camcorder are used flashes in red when the lithium button battery is not installed or when it needs replacing The camcorder counts from 1 to 10 se...

Page 29: ... camcorder rewinds the tape plays back the last few seconds and returns to record pause mode Record Search I In record pause mode this function allows you to play back the tape forward or reverse to locate the point where you wish to begin recording Press and hold the REC SEARCH button forward or button reverse Release the button at the point you wish to begin recording The camcorder returns to re...

Page 30: ...e Move it toward T to zoom in telephoto Press the zoom lever slightly for a slow zoom Press harder for a faster zoom 30 _ a You can also use the T and W buttons on the wireless controller However you cannot control the zoom speed a The zoom speed is slightly faster in record pause mode a Keep at least 1 m 3 3 ft to the subject At wide angle you can focus on a subject as close as 1 cm 0 39 in ...

Page 31: ...the SET dial to select D ZOOM and press the SET dial 4 Turn the SET dial to select a setting option 5 Press the MENU button to close the menu i CAMERA SETUP I I D ZOOM OFF 1 Press the MENU button to open the menu _ 0 Digital zoom cannot be used in the night modes 0 Digital zoom cannot be used in Stitch Assist mode or when the multi image screen is selected o A zoom indicator appears for 4 seconds ...

Page 32: ...or lens For More Stability Put the camcorder on a table Lean against a wall It Lie on your elbow Kneel on one knee 0 i Ii Use a tripod i I I 11 I Z IJ l Lighting When recording outdoors we recommend recording with the sun at your back 32 _ o When using a tripod do not leave the viewfinder exposed to direct sunlight as it may melt due to concentration of the light by the lens o Do not use tripods w...

Page 33: ...ode Set the POWER switch to PLAY VCR and the TAPE CARD switch to 2 Open the LCD panel 3 Press the button to rewind the tape 4 Press the II button to begin playback 5 Press the button to stop playback qEC SEARCH NIGH MODE o To use the viewfinder close the LCD panel o About the screen display During playback the time code gives the hours minutes seconds and frames The remaining tape time may not app...

Page 34: ...yback pause Press and hold it to play back continuous frame advance frame reverse SLOW I Slow Forward Slow Reverse Plays back at about 1 3 normal speed Press the button on the wireless controller during normal or reverse playback Press the play button to return to normal playback x2 Forward x2 Playback Reverse x2 Playback Plays back at 2 times normal speed Press the button on the wireless controll...

Page 35: ...f not change the setting following the procedure below I IVCR SETUP H AV PHONES AV Open the menu and select VCR SETUP Select AV PHONES 0 set it to PHONES 0 and close the menu n 0 The speaker does not sound when 0 is displayed n 0 Do not connect headphones unless 0 is displayed as it produces noise I Turn the SET dial up to increase the volume and down to lower the volume A volume bar appears for 2...

Page 36: ...rn off all devices before starting the connections 2 Connect the STV 250N Stereo Video Cable to the camcorder s AV terminal and the audio video terminals on the TV VCR Connect the white plug to the white audio terminal L left the red plug to the red audio terminal R right and the yellow plug to the yellow video terminal VIDEO 3 If connecting to a TV set the input selector to VIDEO If connecting to...

Page 37: ...the menu 2 Turn the SET dial to select AUDIO SETUP and press the SET dial 3 Turn the SET dial to select OUTPUT CH and press the SET dial 4 Turn the SET dial to select a setting option L R Stereo L R channels Bilingual Main Sub L L Stereo L channel Bilingual Main R R Stereo R channel Bilingual Sub 5 Press the MENU button to close the menu _ The setting resets to the L R setting when you turn the ca...

Page 38: ...enu and press the SET dial 3 Turn the SET dial to select a menu item and press the SET dial 4 Turn the SET dial to select a setting option 5 Press the MENU button to close the menu When setting the white balance shutter speed or language press the SET dial first before pressing the MENU button o Pressing the MENU button at any time closes the menu o Items that are not available appear in purple EN...

Page 39: ...TE SLOW M S SPLIT 4 9 16 CAMERA SETUP SHUTTER AUTO 1 60 1 100 1 250 1 500 1 1000 57 1 2000 A SL SHUTTER ON OFF 58 D ZOOM mmD I 3liblbt43lii ui 31 OFF 80X 400X I OFF 72X 360X IMG STAB Ill ON OFF 78 WHITE BAL AUTO SET b d INDOOR l OUTDOOR 55 AF AST LAMP AUTO OFF 98 SELF TIMER ON OFF 59 NIGHT MODE NIGHT NIGHT l S NIGHT 49 SKIN DETAIL SOFT NORMAL 51 STILL I REC OFF Od FINE Od NORMAL 95 VCR SETUP REC M...

Page 40: ...6 TV SCREEN ON OFF 135 D T DISPLAY ON OFF 24 LANGUAGE See list of languages 76 DATE FORMAT 76 DEMO MODE ON OFF 78 SYSTEM WL REMOTE ON OFF I J 77 BEEP ON OFF 77 T ZONE DST See list of time zones 22 D TIME SET 22 MY CAMERA S UP SOUND OFF DEFAULT MY SOUND 75 SHTR SOUND OPER SOUND SELF T SOUND ...

Page 41: ...ES AV PHONES 36 AV DV ON OFF 84 AUDIO SETUP OUTPUT CH L1R L L R R 37 AUDIO DUB AUDIO IN MIC IN 85 WIND SCREEN AUTO OFF 62 AUDIO MODE 16bit 12bit 61 12bit AUDIO STERE01 STERE02 MIX FIXED MIX 87 VARI MIX BALANCE 87 CARD SETUP IMG QUALITY SUPER FINE FINE NORMAL 90 MOVIE SIZE 320x240 160x120 91 FILE NOS RESET CONTINUOUS 92 DISPLAY SETUP BRIGHTNESS 77 TV SCREEN ON OFF 135 DISPLAYS ON OFF PLAYBK 135 6SE...

Page 42: ...nu Menu Item Setting Options CD SYSTEM WL REMOTE ON OFF laID 77 BEEP ON OFF 77 T ZONE DST See list of time zones 22 D TIME SET 22 MY CAMERA S UP SOUND OFF DEFAULT MY SOUND 75 SHTR SOUND OPER SOUND SELF T SOUND ...

Page 43: ...F 59 ND AUTO OFF 94 NIGHT MODE NIGHT NIGHT is NIGHT 49 SKIN DETAIL SOFT NORMAL 51 REVIEW OFF 2sec 4see 6see 8see 10see 99 CARD SETUP IMG QUALITY SUPER FINE FINE NORMAL 90 IMAGE SIZE 1280x960 640x480 90 MOVIE SIZE 320x240 160x120 91 FILE NOS RESET CONTINUOUS 92 VCR SETUP AV PHONESO AV PHONESO 61 AUDIO SETUP WIND SCREEN AUTO OFF 62 OVOLUME 61 DISPLAY SETUP BRIGHTNESS 77 LCD MIRROR ON OFF 26 TV SCREE...

Page 44: ...bmenu Menu Item Setting Options CD SYSTEM WL REMOTE ON OFF 77 BEEP ON OFF 77 T ZONE DST See list of time zones 22 D TIME SET 22 MY CAMERA S UP SOUND OFF DEFAULT MY SOUND 75 SHTR SOUND OPER SOUND SELF T SOUND ...

Page 45: ... SETUP AV PHONESO AV PHONESO 36 DISPLAY SETUPI BRIGHTNESS 77 TV SCREEN ON OFF 135 DISPLAYS ON OFF PLAYBK 135 D TIME SEL DATE TIME DATE TIME 70 LANGUAGE See list of languages 76 DATE FORMAT 76 SYSTEM WL REMOTE ON OFF 77 BEEP ON OFF 77 T ZONE DST See list of time zones 22 D TIME SET 22 MY CAMERA CREATE START UP IMAGE 117 SEL S UP IMG NO IMAGE CANON LOGO MY IMAGE 75 S UP SOUND OFF DEFAULT MY SOUND 75...

Page 46: ...s mode to record sports scenes such as tennis or golf or moving objects such as roller coasters Portrait Use this mode to give accent to your subject by blurring the background or foreground The blur effect increases the more you zoom to telephoto mSpotlight Use this mode to record spotlit scenes or fireworks r fl Sand Snow Use this mode in bright places such as a sunny beach or ski resort It pr v...

Page 47: ...e Stabilizer x 0 Focus x A 0 White Balance x A 0 Shutter Speed x A 0 I x A Exposure Lock x 0 Digital Effects x 0 Card Mix x 0 0 Available X Not available A Auto setting Shaded area Can be used only in CAMERA mode The setting is automatically set to ON Set the program selector to EASY 0 EASY appears 47 ...

Page 48: ... o Do not change the mode during recording as the brightness of the image may change abruptly o Sports Portrait mode The picture may not appear smooth when played back o Sand Snow mode The subject may become overexposed in dark surroundings Check the image on the screen The picture may not appear smooth when played back o Low Light mode Moving subjects may leave a trailing afterimage Picture quali...

Page 49: ... without sacrificing color The assist lamp lights up automatically responding to the surrounding brightness Night Mode LU A 90 LU A85 Night Mode Super Night Mode I I NIGHT MODE NIGHT LU A 90 LU A85 MENU I CD 38 CAMERA SETUP 1 Set the program selector to f 2 Open the menu and select CAMERA SETUP Select NIGHT MODE select a setting option and close the menu 3 Press the NIGHT MODE button The symbol of...

Page 50: ... light for a long time o Do not use the mini video light close to people s eyes o Moving subjects may leave atrailing afterimage o Picture quality may not be as good as in other modes o White points may appear on the screen o Autofocus may not work as well as in other modes In such case adjust the focus manually o Digital zoom and multi image screen cannot be used while a night mode is activated o...

Page 51: ...L Open the menu and select CAMERA SETUP Select SKIN DETAIL set it to SOFT and close the menu o Skin detail function cannot be used when the program selector is set to EASY o SKIN DETAIL resets to NORMAL when you change the position of the POWER switch or the program selector o To obtain the best effect use this function when recording a person in close up Note that areas similar to the skin color ...

Page 52: ...K O appears on the screen When you operate the zoom during exposure lock the brightness of the image may change cQ OSEARCH 52 When the exposure is locked you can adjust it manually to handle difficult lighting conditions The camcorder s iris can be set to any position from fully closed to fully open I Turn the SET dial to adjust the brightness of the image The adjustment range depends on the brigh...

Page 53: ...ws Night Scenes n i J Program selector I M1 ZI I FOCUS button 1 Set the program selector to fJ 2 Adjust the zoom When you operate the zoom after adjusting the focus the subject may not stay in focus Adjust the zoom before the focus 3 Press the FOCUS button MF appears FOCUS DATACODE 4 Turn the SET dial to adjust the focus Turn the SET dial up or down until the image appears focused Press the FOCUS ...

Page 54: ... the camcorder Infln it y EQCYS Use this function when you wish to focus on faraway subjects such as mountains or fireworks Press the FOCUS button more than 2 seconds after step 2 in Adjusting the Focus Manually MF 00 appears When you operate the zoom or turn the SET dial 00 disappears and the camcorder changes to manual focus ...

Page 55: ...ts or sodium lamps Use this mode for recording night scenes fireworks sunrise or sunset White sheet or paper Zoom lever I MENU I II CIJ 38 CAMERA SETUP WHITE BAL AUTO 1 Set the program selector to E 2 For custom white balance Point the camcorder at a white object and zoom in until it fills the whole screen Keep the camcorder zoomed at the white object until step 3 is completed 3 Open the menu and ...

Page 56: ... TAPE CARD switch o When you have set the custom white balance Depending on the light source may keep flashing The result will still be better than with the auto setting Reset the white balance when the lighting condition changes Turn off the digital zoom o Custom white balance may provide better results in the following cases Changing lighting conditions Close ups SUbjects in a single color sky s...

Page 57: ... may flicker when recording with high shutter speeds o Recording under fluorescent lights CAMERA mode In Easy Recording Auto mode or the night modes the camcorder automatically detects the flicker of fluorescent lighting and adjusts the shutter speed accordingly However if the screen starts to flicker select AUTO mode and set the shutter speed to 1 100 o The setting resets to the auto setting when...

Page 58: ...f fi Only when the flash mode is set to C flash off ICAMERA SETUP H A SL SHUTTER ON Open the menu and select CAMERA SETUP Select A SL SHUTTER set it to OFF and close the menu _ a When set to ON moving subjects may leave a trailing afterimage a The camcorder retains the setting separately in CAMERA and CARD CAMERA mode a The setting cannot be changed when exposure is locked a If camcorder shake war...

Page 59: ...order starts recording after a 10 second countdown 2 seconds when using the wireless controller The count down appears on the screen To record a still image press the PHOTO button CO 93 o To cancel the self timer set SELF TIMER to OFF Once the countdown has begun you can also press the start stop button when recording movies or the PHOTO button when recording still image to cancel the self timer o...

Page 60: ...t be used for audio dubbing o Depending on the nature and usage condition of the tape picture and sound recorded in LP mode may be distorted We recommend using the SP mode for important recordings o If you record in both SP and LP modes on the same tape the playback picture may become distorted and the time code may not be written correctly o If you play back a tape that has been recorded in LP mo...

Page 61: ...gu iiCg B g Q gicg The headphones terminal also serves as AV terminal Headphones can only be used when 0 is displayed on the screen If not change the setting following the procedure below I IVCR SETUP I I AV PHONES AV Open the menu and select VCR SETUP Select AV PHONES 0 set it to PHONES 0 and close the menu Adjusting the Headphone Volume I IAUDIO SETUP I I VOLUME anO llIJ Open the menu and select...

Page 62: ...O i t Q g b g g You can attach a commercially available microphone equipped with an accessory shoe Refer also to the instruction manual of the microphone 1 Attach the microphone to the accessory shoe 2 When using a commercially available microphone connect it to the MIC terminal o When recording in silent places the built in microphone may pick up the motor noise of the camcorder In such case we r...

Page 63: ...Using Digital Effects Faders co 65 Begin or end scenes with a fade to or from black Fade Trigger FADE T Flip FLIP Zigzag ZIGZAG Wipe WIPE 63 ...

Page 64: ...BLACK WHITE J I v t Ball BALL o Color Mask COLOR MASK 1 v II Sepia SEPIA Cube CUBE J 1 j Mirror MIRROR Multi Image Screen CD 66 Captures moving subjects in 4 9 or 16 sequences of still images and displays them at one time Sound will be recorded normally 64 4 Sequences 9 Sequences 16 Sequences r r ...

Page 65: ...e name of the selected fader flashes CAMERA mode 4 Fade in In record pause mode press the D EFFECTS button and begin recording by pressing the startlstop button Fade out During recording press the D EFFECTS button and pause recording by pressing the startl stop button The fader can be activated deactivated by pressing the D EFFECTS button D EFFECTS PLAY VCR mode 4 Fade in In playback pause mode pr...

Page 66: ...tton Selecting an Effect in CARD CAMERA Mode D EFFECTS I 1 Open the menu and select D EFFECT SETUP Select EFFECT set it to BLACK WHITE and close the menu BLK WHT flashes 2 Press the D EFFECTS button BLK WHT stops flashing The effect can be activated deactivated by pressing the D EFFECTS button MENU Q l S I D EFFECTS 66 You can operate the multi image screen only in the following playback modes Whe...

Page 67: ...LOW The set number of images will be captured at the set speed To cancel the multi image screen press the D EFFECTS button 6 Press the start stop button to begin recording The multi image screen is recorded on the tape o Turn off the digital effect when you do not use it o The camcorder retains the setting even if you turn it off or change the program AE moGe o The image quality may be slightly lo...

Page 68: ...USE 68 o When you turn off the image stabilizer you will get a larger horizontal angle of view o The multi image screen cannot be used when the widescreen mode is selected o Simultaneous recording on a memory card cannot be used when the widescreen mode is selected o If you play back a widescreen recording on a normal TV the image appears horizontally squeezed o If you connect the camcorder to a T...

Page 69: ...e move the zoom lever toward T To shrink the image below 2 times magnification move the zoom lever toward W 2 Select the magnified area with the SET dial Turn the SET dial to move the image to the right and left or up and down Pressing the SET dial switches between the directions To cancel the magnification move the zoom lever toward W until the frame disappears R Movies played back from a memory ...

Page 70: ... you can display the data code and select the data code combination you wish to display DATA CODE button IDISPLAY SETUP I I D TIME SEL DATE TIME Open the menu and select DISPLAY SETUP Select D TIME SEL set it to DATE or TIME and close the menu IDISPLAY SETUP I I DATA CODE DATE TIME Open the menu and select DISPLAY SETUP Select DATA CODE set it to CAMERA DATA or CAM D T and close the menu ...

Page 71: ...u turn on the camcorder 0 Only date and time appear in CARD PLAY mode Date and time appear for 6 seconds when you begin playback or to indicate that date or time zone has changed I IDISPLAY SETUP 1 16SEC DATE OFF Open the menu and select DISPLAY SETUP Select 6SEC DATE set it to ON and close the menu 71 ...

Page 72: ... END SEARCH appears The camcorder rewinds fast forwards the tape plays back the last few seconds of the recording and stops the tape Pressing the button again cancels the search _ 0 End search cannot be used once you unload the cassette 0 End search may not work properly if a blank section exists on the tape o You cannot use end search to locate the editing end of audio dubbing ...

Page 73: ...LAY button III III button o STOP ZERO SET l button MEMORY OGO button I 1 Press the ZERO SET MEMORY button at the point you wish to return to later 0 00 00 lm appears To cancel press the ZERO SET MEMORY button again 2 When you have finished playback rewind the tape RTN appears The tape stops automatically at 0 00 00 The tape counter changes to time code rat The zero set memory may not function corr...

Page 74: ...earching Date Search You can locate the change of the date time zone with the date search function This function is operated with the wireless controller I 9 DATE SEARCH III buttons b STOP button 000 74 _ 0 A recording of longer than a minute per date area is required 0 Date search may not function if the data code is not correctly displayed ...

Page 75: ...T SOUND DEFAULT 1 Open the menu and select MY CAMERA 2 Select the menu item you wish to change When selecting a start up image set the camcorder to CARD PLAY mode 3 Select a setting option and close the menu rat 0 You can save your original images or the images and sounds contained in the supplied software ZoomBrowser EX for Windows or ImageBrowser for Macintosh to the setting options MY IMAGE and...

Page 76: ...n I i DISPLAY SETUP H LANGUAGE ENGLISH To change the display language open the menu and select DISPLAY SETUP Select LANGUAGE select a language and close the menu o If you have mistakenly changed the language follow the mark next to the menu item to change the setting o The displays and at the bottom of the screen refer to the button names on the camcorder and will not change when you change the la...

Page 77: ...f I ISYSTEM H BEEp ON To turn the beep off open the menu and select SYSTEM Select BEEP set it to OFF and close the menu IDISPLAY SETUP H BRIGHTNESS c t Open the menu and select DISPLAY SETUP Select BRIGHTNESS adjust the brightness level and close the menu _ Changing the brightness of the LCD screen does not affect that of the viewfinder or the recordings ISYSTEM H WL REMOTE ON Open the menu and se...

Page 78: ...e image stabilizer is designed to compensate a normal degree of camcorder shake o The image stabilizer might not be as effective when using the night modes The demonstration mode displays the camcorder s main features It starts automatically when you leave the camcorder turned on without loading a recording media for more than 5 minutes However you can set the camcorder not to start the demonstrat...

Page 79: ...so to the instruction manual of the digital video device DV I Signal flow q Commercially available DV cable m a 5 to I 1 Set the camcorder to PLAY VCR mode and load a recorded cassette If you are connecting via AV terminal check the setting OJ 36 2 Connected device Load a blank cassette and set the device to record pause mode 3 Locate the scene you wish to copy and pause playback shortly before th...

Page 80: ...digital video device If the picture does not appear reconnect the DV cable or turn the camcorder off and back on again Proper operation cannot be guaranteed for all digital video devices equipped with a DV terminal If operation does not work use the AV terminal o We recommend powering the camcorder from a household power source ...

Page 81: ...ou can check the picture on the screen 5 Connected device Play back the tape 6 Press the II button when the scene you wish to record appears Recording starts 7 Press the button to stop recording Press the I II button to pause recording Press the III button again to restart recording 8 Connected device Stop playback NIGHT MODE m a i cc o Headphones cannot be used during analog line in recording o D...

Page 82: ...op recording Press the III button to pause recording Press the III button again to restart recording 8 Connected Device Stop playback o Blank sections may be recorded as anomalous picture o If the picture does not appear reconnect the OV cable or turn the camcorder off and back on again o You can only record signals from devices with the IW logo recording in SO system in SP or LP format note that ...

Page 83: ... and output the digital signals via the DV terminal The DV terminal serves as output terminal only Turn off all devices before starting the connections Unload the tape from the camcorder Refer also to the instruction manual of the connected device Signal flow c lJ ill ln uJJ VIDEO l L I AUDIO 1 IDJ IIJIII e tlmllllillb STV 250N Stereo Video R Cable supplied Commercially available DV cable 83 ...

Page 84: ...digital signals might not work properly e g signals that include copyright protective signals or anomalous signals such as ghost signals o For normal use set AV DV to OFF If it is set to ON digital signals cannot be input via the camcorder s DV terminal o Depending on the software and the specifications of your computer you may not be able to transfer converted signals via the DV terminal We recom...

Page 85: ...ecording with an External Microphone OJ 62 m c 5 c o 1 S2 DD sc3 II AUuluDUB j iiWoW TVSCREEN r r r Signal flow q I STV 250N Stereo Video Cable supplied Audio device e g CD player MENU IAUDIO SETUP I I AUDIO DUB AUDIO IN 0 038 1 Set the camcorder to PLAY VCR mode and load a recorded cassette Use a tape recorded in SP 12 bit mode with this camcorder 2 Open the menu and select AUDIO SETUP Select AUD...

Page 86: ...mode or 16 bit mode a i3 iuh3 i When using the built in microphone do not connect any devices to the MIC terminal a You cannot use the DV terminal for audio dubbing a If you add sound to a tape not recorded with this camcorder sound quality may decrease a Sound quality may decrease when you add sound to the same scene for more than 3 times a You can check the picture on the LCD screen a When you c...

Page 87: ...s back the original sound STERE02 Plays back the added sound MIX FIXED Plays back Stereo 1 and Stereo 2 in the same level MIX VARI Plays back Stereo 1 and Stereo 2 The mix balance can be adjusted 2 If you have selected MIX VARI adjust the mix level Open the menu and select AUDIO SETUP Select MIX BALANCE adjust the balance with the SET dial and close the menu Turn the SET dial down to increase the ...

Page 88: ...ble DV cable II Jgp 6 pin I 4 pin o Operation may not work correctly depending on the software and the specifications settings of your computer o If the computer freezes while you have connected the camcorder disconnect and reconnect the DV cable If the problem persists disconnect the interface cable turn off camcorder and computer turn camcorder and computer back on and reconnect them o Before co...

Page 89: ...it Remove the memory card 4 Close the cover 1 Turn off the camcorder 2 Open the cover 3 Insert the memory card all the way into the memory card slot 4 Close the cover Do not close the cover forcefully without having the card correctly inserted Card access indicator o This camcorder is compatible with SO Memory Cards or MultiMediaCards only Do not use any other types of memory cards o Proper operat...

Page 90: ...SIZE 1280x960 Open the menu and select CARD SETUP Select IMAGE SIZE set it to 640x480 and close the menu o Still images are recorded with JPEG Joint Photographic Experts Group compression o Estimated Capacity of an 8 MB Memory Card s 1280 x 960 640 x 480 No of File Size No of File Size Image Quality Images per Image Images per Image Superfine 6 850 KB 34 175 KB Fine 10 550 KB 50 120 KB Normal 18 3...

Page 91: ...ect CARD SETUP Select MOVIE SIZE set it to 160x120 and close the menu _ 0 Movies are recorded with Motion JPEG compression 0 Maximum recording time on a 8 MB SO Memory Card Image Size Recording Time File Size per Second 8 MB 320 x 240 approx 20 sec 250 KB sec 160 x 120 approx 50 sec 120 KB sec c J 5 to Q s CD 3 o Q a 91 ...

Page 92: ...iles the consecutive file number will be assigned The camcorder memorizes the file number of the last image and assigns the consecutive file number to the next image even when a new memory card is inserted If a higher file number already exists on the memory card the consecutive number will be assigned There will be no duplication of file numbers This is useful for organizing images on a computer ...

Page 93: ...p sounds twice The picture may appear out of focus for a moment while the camcorder is focusing Exposure is locked When you press the PHOTO button on the wireless controller recording starts immediately 3 Press the PHOTO button fully 0 and focusing frame disappear and you hear a shutter sound The card access indicator flashes and the card access display appears The still image shown on the screen ...

Page 94: ...urn green it may take up to 2 seconds until focus is adjusted and the still image can be recorded to the memory card Up to 4 seconds in the Low Light and the night modes If the subject is not suitable for autofocus the focusing frame turns yellow and locks the focus Adjust the focus manually with the SET dial o When the Focus Priority mode is set to OFF No focusing frame appears In step 2 0 turns ...

Page 95: ...he still image cannot be recorded on a memory card when a fader effect or the multi image screen is activated a The still image cannot be recorded on a memory card when the widescreen mode is selected a rn ijii appears when you press the PHOTO button when STILL I REC is set to OFF 1 Play back the tape 2 Press the PHOTO button halfway when the scene you wish to record appears The camcorder pauses p...

Page 96: ...ded cassette and play back the tape 3 Press the PHOTO button halfway when the scene you wish to record appears The still image remaining image capacity and other information appear When you press the PHOTO button on the wireless controller recording starts immediately 4 Press the PHOTO button fully The card access indicator flashes o When recording from a tape in the camcorder or other video devic...

Page 97: ...ges with each press of the button The symbol of the selected flash mode appears on the screen A disappears after 4 seconds A auto red eye reduction auto flash on flash off The flash fires automatically according to the brightness of the subject The flash fires automatically according to the brightness of the subject and the assist lamp lights up to reduce the red eye effect The flash always fires ...

Page 98: ...ding movies on a tape When STILL I REC is set to OFF in CAMERA mode When a shutter speed of 1 2000 is set in A auto or red eye reduction auto and in CAMERA mode When the multi image screen is selected During auto exposure bracketing When an abnormality occurs during charging a When flash on is selected and a shutter speed of 1 2000 is set in CAMERA mode the shutter speed becomes set to 1 1000 and ...

Page 99: ...e the menu o A still image is displayed as long as you hold the PHOTO button after recording o The FILE OPER menu appears when you press the SET dial while you are reviewing a still image or when you press the SET dial right after recording In this menu you can protect CD 110 or erase CD 111 the image o REVIEW cannot be selected when continuous shooting high speed continuous shooting or auto expos...

Page 100: ... or remove the memory card while the card access indicator is flashing Doing so could result in data damage a When you are using a SO Memory Card make sure that the protect switch is set to allow recording a Do not load unload a cassette during recording a We recommend using a Canon SO Memory Card or a SO Memory Card with a transfer rate of more than 2 MB sec right after you have formatted it with...

Page 101: ...g R e kgrdicg f Qm Qlbg ideg Dgyike You can record movies from devices connected via the AV terminal analog line in function or via the DV terminal on a memory card For connecting instructions refer to page 36 and 79 I 1 Set the camcorder to PLAY VCR mode If a cassette is loaded make sure the tape is stopped When recording via the AV terminal make sure that AV DV is displayed on the screen When re...

Page 102: ... tape in the camcorder or other video devices o A movie recorded from an image in widescreen mode will be vertically compressed o The data code of the movie will reflect the date and time it has been recorded on the memory card ...

Page 103: ... the left Turn off the Focus Priority mode if you wish to put timing ahead of focus c C 5 0 Q s CD 3 o Q a I a The focusing frame gives an indication of the focusing point Depending on the size of the subject or the distance the camcorder may focus outside the frame a When you operate the zoom lever the frames other than the selected one disappear a The focusing point can be selected only when Foc...

Page 104: ... PHOTO button A series of still images will be recorded as long as you hold the PHOTO button Still Image Size Frames per Second Maximum Number Normal speed High speed of Continuous Shots 1280 x 960 3 frames 5 frames 10 images 640 x 480 3 frames 5 frames 60 images _ 0 Maximum number of continuous shots at one time These figures are approximate and vary with the recording conditions and subjects Suf...

Page 105: ...I ARD AMERA Press the PHOTO button Three still images in different exposures are recorded to the memory card _ Make sure that there is sufficient space on the memory card diI c J i cc Q S CD 3 o Q a 105 ...

Page 106: ...ges them Try to include a distinctive item landmark etc in the overlapping portion 1 Press the cQ button 2 Select the direction with the CARD button CARD button clockwise CARD button counterclockwise Q p fr XI 8L1DESHOW 106 3 Select the program AE mode and zoom on the subject Adjust focus and exposure manually as necessary Once the sequence has started you cannot change the program AE mode exposur...

Page 107: ...s can be recorded 6 Press the cQ button after the last image For details on how to merge these images refer to the Digital Video Software Instruction Manual o Compose each image so that it overlaps 30 to 50 of the adjoining image Try to keep the vertical misalignment within 10 o Do not include a moving subject in the overlapping portion o Do not try to stitch images that include both distant and c...

Page 108: ...button during playback pauses the playback Press the II button again to restart playback Pressing the button displays the first scene of the movie Press the CARD button or the REW FF button on the wireless controller for 8x fast forward fast rewind playback o Images not recorded with this camcorder uploaded from a computer except the sample images CD 114 edited on a computer and images whose file ...

Page 109: ...ill image You can locate images without displaying them one by one The number in the upper right of the screen indicates the image number of the current image by the total number of images c CIl i cc Q s t 3 o n Q C 3 Move the zoom lever toward T The index screen is canceled and the selected image is displayed 2 Turn the SET dial to select an image Move the Cff to the image you wish to view You ca...

Page 110: ...D CAMERA mode the menu appears when you press the SET dial while you are reviewing a still image or when you press the SET dial right after recording 3 Select On PROTECT n appears and now the image cannot be erased To cancel the protection press the SET dial 4 Select RETURN to close the menu MENU I 38 I_C_A_RD_OP_E_R_AT_I_ON_S H On PROTECT 110 1 Move the zoom lever toward W Up to 6 images appear S...

Page 111: ...cted YES appears in purple 4 Select YES The image is erased and the previous image appears 5 Select RETURN to close the menu I CARD OPERATIONS H_I_MA_G_E_E_R_A_SE _ 1 Open the menu and select CARD OPERATIONS 2 Select IMAGE ERASE 3 Select SINGLE or ALL When erasing a single image ERASE THIS IMAGE NO and YES appears If an image is protected YES appears in purple When erasing all images ERASE ALL IMA...

Page 112: ... The live video recording will appear in place of the light area of the card mix image Mix level adjustment light area of the still image Live video recording Card mix image Camera Chroma Key CAM CHROMA Combines backgrounds with your recordings Record your subject in front of a blue curtain and the subject not blue will be superimposed on the card mix image Mix level adjustment blue area of the li...

Page 113: ... CHROMA CARD LUMI CAM CHROMA and C ANIMATION appears 7 Select the mix type matching the sample image you have selected The screen shows the combined image When you have selected C ANIMATION select ANIMAT TYPE and select between CORNER STRAIGHT and RANDOM MENU 1 0 38 ID EFFECT SETUP I I_ _C_AR_D_MI_X J IMIX TyPE CARD CHROMA 1 Upload a sample image from the DIGITAL VIDEO SOLUTION DISK to the memory ...

Page 114: ...ops flashing The combined image appears _ 0 Card mix cannot be used when STILL I REC is set to cg FINE or cgNORMAL o Movies recorded on a memory card cannot be combined with camcorder recordings Below are some sample images provided on the supplied DIGITAL VIDEO SOLUTION DISK Card Chroma Key Card Luminance Key kY 114 Camera Chroma Key Card Animation ...

Page 115: ... purposes PhotoEssentials Royalty Free Stock Photography The PhotoEssentials suite of royalty free images on CD ROM features premium quality assignment photography and is ideally suited for use in advertising brochures reports multimedia websites books packaging and more For more information please visit their website www photoessentials com c l 0 OJ s CD 3 o C OJ a 115 ...

Page 116: ...ages o Images erased by formatting cannot be recovered o If you use a memory card other than the supplied one format it with the camcorder I I CARD OPERATIONS HL F_OR_M_AT _ 1 Open the menu and select CARD OPERATIONS 2 Select FORMAT CANCEL and EXECUTE appears 3 Select EXECUTE ALL DATA WILL BE ERASED FORMAT THIS CARD NO and YES appears 4 Select YES and close the menu Formatting starts Selecting NO ...

Page 117: ...e menu and select MY CAMERA 3 Select CREATE START UP IMAGE SET THIS AS START UP IMAGE YES and NO appears 4 Select YES OVERWRITE MY IMAGE NO and YES appears 5 Select YES The still image will be saved and the image that was saved to MY IMAGE is erased Retain the original data of the still image you have set as the start up image on your computer or removable disk c CJ 5 cc S CD 3 o a 117 ...

Page 118: ...P Printer DIREa PRINT PictBridge compliant non Canon Printer t PictBridge Includes the CP 330 CP 220 CP 300 CP 200 K PLAY VCR r Ifi CAMERA I Printer with direct print function 118 1 Turn off the camcorder and insert a memory card that contains still images 2 Turn on the printer 3 Set the camcorder to CARD PLAY mode 4 Connect the camcorder to the printer using the cable appears and changes to or wh...

Page 119: ...er also to the instruction manual of the respective printer o The print setting menu may differ slightly depending on the connected printer el ic tilJg w i 11J tb I e t iD tlSb ate a uttg 1J You can print an image without changing the settings by simply pressing the ltV print share button I 1 Select the still image you wish to print with the CARD button 2 Press the VI print share button Printing s...

Page 120: ...e SET dial Canon Printer Printing stops even if it is incomplete and the paper is fed through Canon CP Printer CP 1 0 CP 1 00 A print in progress cannot be stopped Printing stops when the current print is finished and the remaining prints are canceled a Printing Errors If an error occurs during the printing process an error message appears OJ 139 Canon Printer Resolve the error When printing does ...

Page 121: ...OTO FAST PHOTO DEFAULT PAGE LAYOUT BORDERLESS BORDERED DEFAULT 8 UP e date print ON OFF DEFAULT print effect ON OFF VIVID NR VIVID NR DEFAULT o Print setting options and DEFAULT settings vary depending on the printer model For details refer to the instruction manual of your printer o BORDERED The image area remains relatively unchanged from the recorded image when it is printed BORDERLESS 8 UP The...

Page 122: ...er set in your printer 3 Turn the SET dial to select the paper type and press the SET dial Select the paper type of the paper set in your printer 4 Turn the SET dial to select a layout option and press the SET dial Including the Date in the Print 1 In the print setting menu turn the SET dial to select e date and press the SET dial 2 Turn the SET dial to select a date print option and press the SET...

Page 123: ... on paper type refer to the Bubble Jet Printer User Guide BORDERS IBORDERLESS Prints right to the edges of the page IBORDERED Prints with a border Recommended paper size BORDERED The image area remains relatively unchanged from the recorded image when it is printed BORDERLESS The center portion of the recorded image is printed at an enlarged size The image s top bottom and sides may be cropped sli...

Page 124: ...l image per page MULTIPLE Prints 8 copies of the same still image on one page BORDERS BORDERLESS Prints right to the edges of the page BORDERED Prints with a border _ 0 BORDERED The image area remains relatively unchanged from the recorded image when it is printed BORDERLESS MULTIPLE The center portion of the recorded image is printed at an enlarged size The image s top bottom and sides may be cro...

Page 125: ...age style and press the SET dial Pressing the MENU button brings you back to the print settings menu Selecting the Borders 2 Turn the SET dial to select Ei BORDERS and press the SET dial 3 Turn the SET dial to select a borders option and press the SET dial Pressing the MENU button brings you back to the print settings menu 125 ...

Page 126: ...the SET dial to switch between the directions up down or right left Pressing the MENU button brings you back to the print settings menu o About the color of the trimming frame Canon CP Printers only White No trimming settings Green Recommended trimming size The trimming frame may not appear in green depending on the image size paper size or borders settings Red The image is magnified beyond recomm...

Page 127: ...Select the still image you wish to print 2 Press the SET dial to open the FILE OPER menu 3 Select PRINT ORDR 4 Select the number of copies appears on the image To cancel the print order set the number of copies to o 5 Select RETURN to close the menu Selecting in Index Screen Display MENU CIJ 38 I I_C_AR_D_OP_E_R_AT_I_ON_S I PRINT ORDER 1 Move the zoom lever toward W Up to 6 images appear Select th...

Page 128: ...select PRINT without having set the print order 3 Make sure that PRINT is selected and press the SET dial Printing starts The print setting menu disappears when printing is complete o Depending on the connected printer you can select style or paper settings before step 3 o Cancel Printing Printing Errors CD 120 o Restarting Printing Open the CARD PLAY menu and select PRINT Select RESUME in the pri...

Page 129: ... specifications settings of your computer o The image files on your memory card and the image files saved on the hard disk drive of your computer are valuable original data files If you wish to use image files on your computer make copies of them first and use the copied file retaining the original o Make sure that camcorder and computer are not connected with a DV cable before connecting the camc...

Page 130: ...e first time you connect the camcorder to the computer you need to install the software and set the auto launch setting I 130 1 Install the supplied Digital Video Software See Installing the Software in the Digital Video Software Instruction Manual 2 Set the camcorder to CARD PLAY mode 3 Connect the camcorder to the computer using the USB cable See Connecting the Camcorder to a Computer in the Dig...

Page 131: ...ton 1 Turn the SET dial to select WALLPAPER 2 Press the ltV button 3 Select the still image you wish to transfer as wallpaper with the CARD button 4 Press the ltV button The selected image is transferred to the computer and displayed on the desktop Pressing the MENU button brings you back to the transfer menu 1 Turn the SET dial to select SELECT TRANSFER 2 Press the ltV button 3 Select the image y...

Page 132: ...ct OK and press the SET dial o When transferring with the button the camcorder retains the transfer setting even if you turn it off or change the position of the TAPE CARD switch When you have selected C SELECT TRANSFER or lWALLPAPERJ the screen to select a still image appears Press the MENU button to display the direct transfer menu o When the protect switch of the SD Memory Card is activated dur...

Page 133: ...ET dial g appears on the image To cancel the transfer order press the SET dial again 4 Select RETURN to close the menu MENU 0 038 I I_C_AR_D_OP_E_R_AT_I_ON_S I I I2r TRANSFER ORDER 1 Move the zoom lever toward W Up to 6 images appear 2 Open the menu and select CARD OPERATIONS Select TRANSFER ORDER 3 Press the SET dial on the image you wish to transfer appears on the image To cancel the transfer or...

Page 134: ...e camcorder to the computer using a DV cable NETWORK MODE appears on the camcorder screen 5 Start DV Messenger K PLAY VCR CAMERA UNLOCK if 134 Before connecting the camcorder to the computer using a DV cable make sure that camcorder and computer are not connected with a USB cable and that no other 1394 device is connected to the computer o In NETWORK mode the camcorder can only be operated from th...

Page 135: ...peration displays appear for 2 seconds Displays cannot be hidden on the index screen 1 I j g i CQ Sb Qw i DQ ll b e D j g l a Q IJ tb I S f te g When you connect a TV for recording you can select to hide the camcorder displays on the TV screen For playback you can show the camcorder displays on the TV screen CZARD CZA 1ERA I CZAMERA IDISPLAY SETUP H TV SCREEN ON Open the menu and select DISPLAY SE...

Page 136: ...dphones CO 61 Wind screen CD 62 Audio mode CD 61 Widescreen mode CD 68 Remaining card capacity for still images CD 95 TAPE MODE if MIX VARI 0 00 24 28 60min END SEARCH tJ o Fl 8 1 250 12 00 AM JAN 1 2005 OV I CD 12 bit audio CD 87 End search CD 72 I Date search CD 74 I Audio dubbing CD 85 Data code CD 70 DV connection CD 82 Volume level of speaker or headphones CD 35 136 REC PAUSE STOP EJECT FF RE...

Page 137: ... frame CD 103 Flash CD 97 Camcorder shake warning CD 58 Drive mode CD 104 ELURA90 ELURA85 only CARD PLAY Mode CD Slide show CD 109 Data code CD 70 Lap time Length of the movie Current image total images File number CD 92 J Protect mark CD 110 137 ...

Page 138: ...FORMAT You attempted to play back a tape recorded in HD format PLAYBACK NOT POSSIBLE CHECK THE CASSETTE You attempted to perform audio dubbing on a tape recorded in HD WRONG FORMAT format HEADS DIRTY USE Video heads are dirty Clean the video heads 142 CLEANING CASSETTE COPYRIGHT PROTECTED You attempted to play back a copyright protected tape 82 PLAYBACK IS RESTRICTED COPYRIGHT You attempted to dub...

Page 139: ... paper output tray is open NO PAPER Paper is not correctly inserted or there is no paper If the printer is equipped with a photo paper cassette specify the paper feed location using the Paper Feed switch PAPER JAM The paper jammed during printing Select STOP to cancel printing After removing the paper set some paper again and press the resume button on the printer PAPER HAS BEEN Paper size has bee...

Page 140: ...nt settings HARDWARE ERROR Cancel printing Turn off the printer and turn it back on Check the printer status If the printer is equipped with a battery it might be exhausted In such case turn off the printer replace the battery and turn it back on If the error persists consult your dealer or a Canon Service Center listed in the Contact List provided with the printer or the printer manual RECHARGE T...

Page 141: ...e Do not subject the camcorder to shocks or vibration as this may cause damage o Avoid sudden changes in temperature Moving the camcorder rapidly between hot and cold temperatures may cause condensation to form on its internal surfaces OJ 142 Storage o If you do not intend to use the camcorder for a long time store it in a place free of dust in low humidity and at temperatures not higher than 30 C...

Page 142: ...ected Continued use may damage the camcorder Condensation may form in the following cases When the camcorder IS moved from an When the camcorder is moved trom a air conditioned room to warm hum d cold place to a warm room place When the camcorder is left in a humid room When a cold room is heated rapidly 142 How to avoid condensation o Unload the cassette place the camcorder in an airtight plastic...

Page 143: ...long time about 1 year can shorten its lifecycle or affect performance we recommend to discharge the battery pack fUlly and to store it in a dry place at temperatures no higher than 30 C 86 OF If you do not use the battery pack for long periods charge and discharge it fully at least once a year If you have more than 1 battery pack perform these precautions at the same time for all battery packs o ...

Page 144: ...isk of explosion C setteH ndling Precauti on o Rewind tapes after use If the tape becomes slack and damaged it may cause picture and sound distortion o Return cassettes in the case and store them upright o Do not leave the cassette in the camcorder after use o Do not use spliced tapes or nonstandard cassettes as they may damage the camcorder o Do not use tapes that have been jammed as video heads ...

Page 145: ...ces If condensation forms on the card put it aside until the droplets have evaporated completely o Do not touch or expose the terminals to dust or dirt o Check the direction before inserting the memory card Forcing a memory card backwards into the slot may damage the memory card or the camcorder o Do not remove the label from the memory card or affix other labels on the memory card UsingtheCalllGo...

Page 146: ...e battery 13 and off pack Battery pack will not charge Battery packs will not charge Charge the battery pack in outside the temperature temperatures between 0 C range of 0 C and 40 C and 40 C 32 OF and 104 OF 32 of and 104 OF Battery packs become hot Wait until the battery pack with use and may not charge temperature is below 40 C 104 OF and retry charging The battery pack is damaged Use a differe...

Page 147: ...d the tape or replace 16 END flashes on the the cassette screen Cassette is protected Change the position of the 144 flashes on the screen protect switch Camcorder is set to a mode Set the camcorder to 25 other than the CAMERA CAMERA mode mode Camcorder will not focus Autofocus does not work on Focus manually 53 that subject Viewfinder is not adjusted Adjust the viewfinder with the 18 dioptric adj...

Page 148: ...ape is running but image will TV VIDEO selector on the TV Set the selector to VIDEO 36 not appear on the TV screen is not set to VIDEO Video heads are dirty Clean the video heads 142 You attempted to play back or Stop playback dubbing dub copyright protected tape No sound from the built in Speaker volume is turned off Adjust the volume with the 35 speaker SET dial Noise comes out of the AV PHONES ...

Page 149: ...ory card cannot be Camcorder is not set to Set the camcorder to CARD 108 played back CARD PLAY mode PLAY mode Memory card is not inserted Insert a memory card 89 Image cannot be erased Image is protected Cancel the protection 110 SO memory card is protected Change the position of the 89 protect switch Od flashes red Card error occurred Turn off the camcorder 116 Remove and reinsert the memory card...

Page 150: ...rter TL H34 Tele converter CD m3 WA 34 Wide Attachment D D J E TV STV 250N Stereo Video Cable I 5 I J VCR iSlik if NSlid y i Stereo Microphone commercially available D BP 900 Series Battery Pack VL 10Li Battery Video Light tC P OJ I J Commercially available D t I 0 e OV Cable Igi a eVlc m SOC 128 PC Card Adapter h SO Memo L USB Reader Writer I MUlti Lcard tJ IFC 300PCU Computer USB Cable riIil s J...

Page 151: ...k Please note that this warranty does not apply to repairs arising out of the malfunction of non genuine Canon accessories although you may request such repairs on a chargeable basis Battery Packs When you need extra battery packs select from the following NB 2L NB 2LH BP 2L12 BP 2L14 CB 2LT Battery Charger Use the battery charger for charging the battery packs It plugs directly into a power outle...

Page 152: ... shots or panoramic views UlifUiltfAWklUiWhen the Wide converter is attached a shadow may appear in the picture when you record with flash or assist lamp FS 34U Filter Set Neutral density and MC protector filters help you to control difficult lighting conditions VL 10Li Battery Video Light This compact yet powerful video light can be used for both indoor and outdoor shooting It attaches to the SA ...

Page 153: ...accessories SC A50 Soft Carrying Case This lightweight bag keeps the camcorder within easy reach without weighing you down or getting in the way This mark identifies genuine Canon video accessories When you use Canon video equipment we recommend Canon brand accessories or products bearing the same mark 153 ...

Page 154: ...35mm equivalent Tape 4 3 recording 50 5 1 010 mm 16 9 recording image stabilizer ON 44 6 892 mm 16 9 recording image stabilizer OFF 41 3 826 mm Card 37 9 758 mm ELURA85 ELURA80 f 3 5 63 mm f 1 8 3 4 18x power zoom 35mm equivalent Tape 4 3 recording 50 5 909 mm 16 9 recording image stabilizer ON 44 6 803 mm 16 9 recording image stabilizer OFF 41 3 743 mm Card 37 9 682 mm 10 elements in 8 groups 34m...

Page 155: ...kohms or more 03 5 mm stereo mini jack mini B 7 4 V DC 2 6W using viewfinder 3 2W using LCD screen normal brightness 0 40 C 32 104 OF 72 x 78 x 131 mm 2 8 x 3 1 x 5 2 in excluding protrusions 500g 1 1Ib 100 240 V AC 50 60 Hz 17W 8 4 V DC 1 5 A 0 40 C 32 104 OF 52 x 90 x 29 mm 2 1 x 3 5 x 1 1 in Battery type Rated voltage Operating temperature Battery capacity Dimensions Rechargeable Lithium Ion Ba...

Page 156: ...onverter WO H34 Wide converter FS 34U Filter Set WS 20 Wrist Strap SC 2000 Soft Carrying Case SC 1000 Soft Carrying Case SC A50 Soft Carrying Case VL 10Li Battery Video Light JR 7 2V 10WF Halogen Bulb OVM CL OV Cleaning Cassette 052 0260 000 8468A002AA 9612A001AA 3067A002AA 082 0590 201 081 1470 000 083 0712 000 6906A001AA 055 0240 000 7871A002AA 9582A002AA 7302A001AA 7303A001AA 7873A002AA 9583A00...

Page 157: ...ode 26 LCD screen 21 Lens cap 18 Low light mode 46 LP mode 60 109 112 _88 129 _142 36 _ __ 104 82 21 17 151 13 77 77 70 22 76 74 78 63 31 118 130 104 DI Card jump Card mix Computer Condensation Connections TV VCR Continuous shooting Copyright signals D Abroad using the camcorder 145 Accessories 8 151 AF assist lamp 98 Analog line in 81 Analog digital converter 83 Assist lamp 49 Audio dubbing 85 Au...

Page 158: ...d review 29 Record search 29 Recording movies memory card 100 Recording movies tape 25 Recording programs 46 Recording still images memory card 93 Remote sensor 77 Review 99 Rewind 33 118 129 D Playback Memory card Playback pause Playback Tape Portrait mode Power adapter Print order Program AE Protect 108 34 33 46 13 127 46 110 I I USB terminal I I Video heads Video light Videocassettes Viewfinder...

Page 159: ...re to follow operating instructions B If the equipment is defective as a result of leaking batteries sand dirt or water damage C If defects or damages are caused by the use of unauthorized parts or by service other than our authorized agent D If the equipment is used for commercial or industrial use This Limited Warranty does not cover cabinet exterior finish video cassette tape head cleanings nor...

Page 160: ...al Video equipment is used for commercial profeSSional or industrial purposes This limited warranty does not cover the cabinet exterior finish of the digital video equipment video cassette tapes head cleanings nor does it apply to digital video equipment purchased outSide Canada TO OBTAIN WARRANTY SERVICE Ship your Canon digital video equipment in its original carton box or equivalent properly pac...

Page 161: ...lgary Alberta T2E 7K7 CANON CANADA INC MONTREAL 5990 Cote de Liesse Quebec H4T 1V7 If you have any questions call the Canon Canada Information Center toll free at 1 800 828 4040 CANADA only 1 800 828 4040 CANADA seulement CANON MEXICANA S DE R L DE C V Periferico Sur No 4124 Col Ex Rancho de Anzaldo C P 01900 Mexico OF Mexico CANON U S A INC NEW JERSEY OFFICE 100 Jamesburg Road Jamesburg NJ 08831 ...

Page 162: ...nload images from a memory card to a computer Ce manuel d instruction explique comment installer Ie logiciel et Ie pilote Canon USB Video Driver Windows XP uniquement connecter Ie camescope aI ordinateur et transferer des images apartir d une carte memoire sur un ordinateur En este manual de instrucciones se explica como instalar el software y el controlador Canon USB Video Driver Windows XP solam...

Page 163: ...LOAN CONVEY OR OTHERWISE USE TRANSFER COPY TRANSLATE CONVERT TO ANOTHER PROGRAMMING LANGUAGE ALTER MODIFY DECOMPILE OR DISASSEMBLE THE SOFTWARE IN WHOLE OR IN PART EXCEPT AS EXPRESSLY PROVIDED IN THIS AGREEMENT 2 BACK UP COpy You may make one copy of the SOFTWARE solely for back up purposes or copy the SOFTWARE onto the permanent storage device e g a hard disk of your computer and retain the origi...

Page 164: ...opyright interests In the SOFTWARE unless earlier terminated You may terminate this Agreement by destroying the SOFTWARE This Agreement will also terminate without notice to you if you fail to comply with any of the terms of this Agreement and you must then promptly return the SOFTWARE In addition Canon may enforce its other legal rights 6 U S GOVERNMENT RESTRICTED RIGHTS NOTICE The SOFTWARE is a ...

Page 165: ...ectual property of Canon Nothing contained in Paragraph 1 shall be construed to give Canon any ownership rights in any images graphics or textual material that you save in connection with the Software You may not mOdify remove or delete any or all copyright notices i which are contained in the Software including any copy thereof and ii which are on the original CD ROM and on the medium of a back u...

Page 166: ...o Download Images Direct Transfer Function 25 Setting the Direct Transfer Function 26 Using a PC Card ReaderlWriter 28 Functions and System Requirements of Canon USB Video Driver 29 Functions 29 Camcorder Categories 29 System Requirements 29 Installing the Canon USB Video Driver OPTURA 60 30 IMacintosh I System Requirements for Macintosh 34 What is Digital Video Software 35 Installing the Digital ...

Page 167: ... IWindows I 1 Set the DIGITAL VIDEO SOLUTION DISK in the computer s CD ROM drive If the installer panel opens click Exit to close it 2 Select My Computer from the start menu 3 Right Click the CD ROM icon and select Open from the displayed menu 4 Double click the MANUAL folder followed by the ENGLISH and DIGITAL VIDEO SOFTWARE folders 5 Double click DIGITAL VIDEOV15_16WENG N PDF The PDF manual open...

Page 168: ...al devices or due to use of a memory card not formatted by a Canon camcorder Trademark Acknowledgments Macintosh and Mac OS are trademarks of Apple Computer Inc registered in the United States and other countries iPhoto and QuickTime are trademarks of Apple Computer Inc Microsoft and Windows are either registered trademarks or trademarks of Microsoft Corporation in the United States and or other c...

Page 169: ...d images from a memory card to your computer o IFC 300PCU USB Cable DIGITAL VIDEO SOLUTION DISK Windows users Move on to p g o Macintosh users Move on to p 34 The explanations in this manual use mainly Windows XP and Mac OS X version 10 3 screen shots ...

Page 170: ...evious version Computers that come with above as preinstalled and have built in USB ports Pentium 500 MHz or better Windows 98 Windows Me 128 MB or more Windows 2000 Windows XP 256 MB or more USB only preinstalled Windows 98 Windows Me Windows 2000 Windows XP systems with built in USB ports Canon Utilities ZoomBrowser EX 250 MB or more Including the PhotoRecord printing program PhotoStitch 40 MB o...

Page 171: ...on a memory card OJ 24 Applying DPOF Digital Print Order Format settings Uploading My Camera settings to the camcorder re 0 The Remote Capture function is not supported by your camcorder 0 The slide show function of the camcorder cannot be used PhotoStitch Merging a series of overlapping still images into a single seamless panorama PhotoRecord Printing still images with background frame title and ...

Page 172: ...tape to the computer Recording movies that have been edited on a computer to the tape Converting analog signals from a connected VCR or 8mm camcorder to digital signals and transferring them to the computer For details refer to the camcorder instruction manual This instruction manual explains how to install the software and Canon USB Video Driver Windows XP only connect the camcorder to a computer...

Page 173: ...images Images protected on the camcorder may lose this setting once they are downloaded to the computer 1 Check a camcorder is not connected to the computer While a camcorder is connected to the computer the software cannot be installed normally If a camcorder is connected detach the USB cable from the computer 2 Close any programs that are running 3 Set the DIGITAL VIDEO SOLUTION DISK in the comp...

Page 174: ...Click Digital Video Software Install Installer Panel DIGITAL VIDEO Solution Disk QUiCkTime If the following dialog appears click Restart to restart the computer After restarting the computer installation automatically continues ...

Page 175: ...m Installation When you select Custom Installation select a USB driver Windows XP The USB driver supplied with the Windows operating system is used You do not need to install a USB driver Windows 98 Windows 2000 Canon DV TWAIN Driver Windows Me Canon DV WIA Driver SelupType Choose the setlJp t Pe that best suits your need Click the type of Setup you prefer 8 Select your country region and click Ne...

Page 176: ...uter has restarted and the regular desktop screen is displayed remove the DIGITAL VIDEO SOLUTION DISK from the CD ROM drive When installation is complete remove the DIGITAL VIDEO SOLUTION DISK before you connect the camcorder to the computer Windows 98 Windows Me Windows 2000 At this point the files for the TWAIN Driver or WIA Driver have only been copied to your computer To download images via US...

Page 177: ...l for the location of the computer s USB ports o See your camcorder instrUction manual for connecting instructions 1 Insert a memory card containing images into the camcorder 2 Connect the power adapter to the camcorder 3 Turn the POWER switch to PLAY VCR and move the TAPEI CARD switch to CARD Wait until the card access indicator stops flashing 4 Attach the supplied USB cable to the computer s USB...

Page 178: ...t ZoomBrowser EX and download images to the computer see Downloading Images ZoomBrowser EX CO 18 USB Terminal on the Camcorder USB Cable Camcorder End Computer End USB Port on the Computer E r nnn pl finfl the Camcorder to a Computer ...

Page 179: ... of the file first before working on it on your computer o For Windows XP Users Do not rotate the image in the Windows Picture and Fax Viewer or in the explorer view The data for the original image will be changed and the image can no longer be displayed in ZoomBrowser EX or on the camcorder A movie file exceeding 210MB cannot be downloaded If the Server Busy window appears when you connect the ca...

Page 180: ... is displayed and click OK oA V iay use this program for this action Windows XP If the window does not appear or if PC CONNECT does not appear on the camcorder screen click the Windows start menu and select All Programs Canon Utilities CameraWindow and CameraWindow Camera Control window Press the camera s button Starts to download images Lets you select and download images Starts to download image...

Page 181: ...s please refer to the instruction manual of your camcorder o If the camcorder is already connected to the computer you can start the CameraWindow and display the Camera Control window by clicking Acquire Camera Settings followed by Acquire Images in the ZoomBrowser EX Main Window o To start ZoomBrowser EX click the Windows start menu and select All Programs Canon tilities ZoomBrowser EX and ZoomBr...

Page 182: ...he image type and the destination folder 1 In the Camera Control window click the Acquire Images tab and click Preferences 2 Select Change auto download settings and click Next Which download method do you want to perform setup for Change direct transfer dOllmload destination folder Change auto do mload settings ...

Page 183: ...ed even having selected New images and downloaded Select the image type to be downloaded Images whose print order settings Nere specified l ith the carnera Images whose transfer settings Nere specified lith the camera 4 Specify the destination folder settings and click Next Destination Folder Select rnp configuration of the subfolder Specify the location at which to save the image ...

Page 184: ...low window will be displayed when you select Perform selected processes consecutively You can redisplay the window by clicking Select Select a process to perform after the image is downloaded and click OK View as a Slide ShQl o 1 Ci La out Print Contact Sheet Print ...

Page 185: ...to the computer when you connect the camcorder Enable or disable the image auto download function oImages are aIJtomaticall9 downloaded to compl ter INhile c Jrnera is connected _ _ J r I Back II Firti hl Cancel 1 Downloading the Selected Images from the CameraWindow 1 Click Lets you select and download images in the Camera Control window The CameraWindow opens ...

Page 186: ...Confirm the settings and click Starts Download ZoomBrowser EX starts and the downloaded images appear in the Main Window Click Finish to close the Camera Control window C1I t 6 1 Using the Camcorder to Download Images Direct Transfer Function If your camcorder supports the Direct Transfer Function you can use the camcorder to download images ...

Page 187: ... on how to change the destination folder and the folder name see step 3 in Auto Downloading Settings OJ 21 The tIVI button cannot be used when it is not lighted You can set the action that is carried out for direct transfer Right click the CameraWindow Launcher icon on the taskbar and select an action from the displayed menu Show image s in fullscreen mode ShOll 1 imaIJe s in fullscreen mode Displ...

Page 188: ...perform setup for Change direct t ransfer dO l mload dettination folder Change aut o download settings 3 Specify the destination folder settings and click Finish Click Finish to close the Camera Control window Destination Select the II configuration of the subfolder Specify the location at which to save the image ...

Page 189: ...ams Canon Utilities CameraWindow and CameraWindow Windows XP When a window appears allowing you to select an application program to start select Download View Images using Canon CameraWindow and click OK The Camera Control window opens 3 Select a downloading method Starts to download images The progress bar will be displayed and images will be downloaded to the computer and ZoomBrowser EX starts F...

Page 190: ...ation is not guaranteed on a dual CPU PC or on a user built PC o Proper operation is not guaranteed on any particular system even if it meets the requirements outlined above o Do not connect two or more camcorders to the computer at the same time The connection may not work correctly o Connect the USB cable directly to one of the computer s main USB ports The interface may not function correctly i...

Page 191: ... from the start menu 2 Right click the CD ROM icon and select Open from the displayed menu 3 Double click the Setup exe icon Depending on the setting of your computer the file extension exe may not appear 2 Select your language 3 Click Canon USB Video Driver Install Installer Panel DIGITAL VIDEO Solution Disk Digital Video Software Canon USB Video Driver Windows XP only 4 Select your language and ...

Page 192: ...onfirmation window appears click Yes Pledsedisconnect dilDVCdmcorders before continuing with the setup Are you sure to continue Choose Destination Location SelecllolderwhereSelupwiliinslalilileo C ProgramFiles Canon USB Video Driver Selupv riliinslallCI NONUSBVideoDriverinlheloliowinglolder I s folder click Ne To inslalilo a dillerenllolder click Browse and selecl 8 Confirm the target folder and c...

Page 193: ...nect the camcorder to the computer Setup has completedin lallingCANON USB Video Driver 1 Connect the power adapter to the camcorder 11 Set the camcorder to PLAY VCR mode 12Connect the camcorder to the computer using the USB cable 1 Select Install the software automatically Recommended and click Next ...

Page 194: ...non USB Video Record will be installed automatically 15Check if the driver has been installed correctly From the start menu select My Computer and check if the Canon USB Video icon appears If the icon does not appear the installation has not been completed properly Uninstall and reinstall the driver ...

Page 195: ... 200 MB or more PhotoStitch 40 MB or more 1024 x 768 pixels 32 OOO colors or better o Proper operation is not guaranteed on a user built PC o Proper operation is not guaranteed on any particular system even if it meets the requirements outlined above o ImageBrowser and PhotoStitch do not operate on disks formatted with the Unix File System UFS o A CD ROM drive is required to install the software S...

Page 196: ...eraWindow Selecting a method to download images in the Camera Control window CD 42 Viewing images recorded in a memory card CD 46 Applying DPOF Digital Print Order Format settings Uploading My Camera settings to the camcorder Q The Remote Capture function is not supported by your camcorder 0 The slide show function of the camcorder cannot be used PhotoStitch Merging a series of overlapping still i...

Page 197: ...mcorder for example MVI_0001 AVI and MVI_0001 THM MVI_0001 THM files cannot be downloaded but movies can still be played back on the computer o Mac OS X version 10 2 The Exif version may change to 2 1 and image information may be modified when downloading images with Image Capture To download images without any information changes use the following procedures 1 Connect the camcorder to the compute...

Page 198: ...on Select an in tallation type and dick Next Customlnstallation letsyouselecrt beprogramsyouwanttoinst aILWel cornmendthisopt iol1 for users famHiarwith the inst lllation 6 Read the license agreement and click Agree 7 Review the installation settings and click Next Installation starts Insrallationwill begin using the settings listed beiow Ciick INexrj to start copying mes ...

Page 199: ...8 When the Installation has finished message appears click OK Installation has finished 9 After the installation is complete restart the computer as prompted ...

Page 200: ...he camcorder o Do not connect two or more camcorders to the same computer via the USB interface The connections may not operate correctly o Never allow the computer to go into standby sleep mode while a camcorder is connected via the USB interface o Refer to your computer manual for the location of the computer s USB ports o See your camcorder instruction manual for connecting instructions 1 Inser...

Page 201: ...card Failure to do so may cause memory card data to become corrupted Do not open the memory card cover remove the memory card or detach the USB cable Do not turn off the camcorder or the computer Do not change the position of the POWER switch or the TAPE CARD switch o Images recorded onto the memory card or downloaded to the hard disk are important original data files Create a copy of the file fir...

Page 202: ...3 Select Other from When a camera is connected open 4 Select CameraWindow and click Open CameraWindow is normally installed in Applications Canon Utilities CameraWindow E 5 Click OK ...

Page 203: ...pen 4 Close Image Capture Auto downloading 1 Connect the camcorder to the computer OJ 39 2 Click Starts to download images ImageBrowser starts To start ImageBrowser manually double click the folder in which you installed the program followed by the Canon Utilities and lmageBrowser folders and the lmageBrowser file or double click the ImageBrowser icon on the Desktop ...

Page 204: ... Settings This task allows you to apply auto downloading settings You can specify the types of images and the destination folder 1 In the Camera Control window click the Acquire Images tab and click Preferences Starts to download images lets you select and download images ...

Page 205: ...05e print order settings were specified with the camera C Images whose transfer settings were specified with the camera 3 Specify the destination folder settings and click Next Specifv H Ie location at V Jhicll to save tile image Destination FO derLAneW folder will for each of the images shooting dates in the following folder and the be saved there T t hH O U id y r v v _ _ _ _ v _ Browse Click th...

Page 206: ...to perform after the image is downloaded and click OK Select the process to be performed after downloading the image 5 Click Finish ImageBrowser starts To start ImageBrowser manually double click the folder in which you installed the program followed by the Canon Utilities and lmageBrowser folders and the lmageBrowser file or double click the ImageBrowser icon on the Desktop Placing a check mark n...

Page 207: ...auto do lvnload function Downloading the Selected Images 1 Connect the camcorder to the computer CO 39 2 Click Lets you select and download images CameraWindow appears Starts to download images Lets you select and download images ...

Page 208: ...images Clicking on different images while holding down the Shift key selects multiple images 4 Confirm the settings and click Start Download ImageBrowser starts and Browser Window appears AssigIl5 2qu 2llceblo r Jumberof X X Ext 2lltioll tvpe of il11age file is IJllchallg 2d Saveto Fold 2rr lame Click this button to browse where I you want to save the images Select to specify the configuration of ...

Page 209: ... appears and the images in the memory card are downloaded To apply auto downloading settings refer to Applying Auto downloading Settings OJ 43 Lets you select and download images CameraWindow appears and the images in the memory card are shown as thumbnails Starts to download images lets you select and download Images ...

Page 210: ...ANON 1 800 652 2666 Canon Hongkong Co Ltd 19 F The Metropolis Tower 10 Metropolis Drive Hunghom Kowloon Hong Kong Phone 852 2170 2828 Fax 852 2723 9684 _ Printed on 100 reused paper Document realise avec du papier recycle a 100 El papel aqui utilizado es 100 reciclado PUB DIM 674 1204Ni6 0 CANON INC 2005 DY8 9120 465 000 PRINTED IN JAPAN IMPRIME AU JAPON IMPRESO EN JAPON ...

Page 211: ...E Digital Video Software Version 15 Version 16 Instruction Manual Canon Please Select Language English Franc ais Espanol Exit ...

Page 212: ...ICENSE RENT LEASE LOAN CONVEY OR OTHERWISE USE TRANSFER COPY TRANSLATE CONVERT TO ANOTHER PROGRAMMING LANGUAGE ALTER MODIFY DECOMPILE OR DISASSEMBLE THE SOFTWARE IN WHOLE OR IN PART EXCEPT AS EXPRESSLY PROVIDED IN THIS AGREEMENT 2 BACK UP COPY You may make one copy of the SOFTWARE solely for back up purposes or copy the SOFTWARE onto the permanent storage device e g a hard disk of your computer an...

Page 213: ...effect until expiration of all copyright interests in the SOFTWARE unless earlier terminated You may terminate this Agreement by destroying the SOFTWARE This Agreement will also terminate without notice to you if you fail to comply with any of the terms of this Agreement and you must then promptly return the SOFTWARE In addition Canon may enforce its other legal rights 6 U S GOVERNMENT RESTRICTED ...

Page 214: ...for any intellectual property of Canon Nothing contained in Paragraph 1 shall be construed to give Canon any ownership rights in any images graphics or textual material that you save in connection with the Software You may not modify remove or delete any or all copyright notices i which are contained in the Software including any copy thereof and ii which are on the original CD ROM and on the medi...

Page 215: ...Images 35 Renaming Multiple Files 36 Searching for Images 38 Applying Star Ratings and Keywords 40 Editing Movies 42 Editing Movies 42 Playing Back Movies 46 Exporting Images 48 Changing the File Type and Save 48 Exporting Movies 51 Saving on CD R RW Disks Windows XP Only 53 Adding Still Images from Your Computer to the Memory Card 55 Adding Still Images to the Memory Card 55 Adding Sample Images ...

Page 216: ...oomBrowser EX 84 Uninstalling the TWAIN Driver WIA Driver 85 Functions and System Requirements of Canon USB Video Driver 86 Functions 86 Camcorder Categories 86 System Requirements 86 Installing the Canon USB Video Driver OPTURA 60 87 Uninstallation of the Canon USB Video Driver OPTURA 60 91 Troubleshooting 94 ...

Page 217: ...of the camcorder the software memory cards MultiMediaCards or SD Memory Cards personal computers or peripheral devices or due to use of a memory card not formatted by a Canon camcorder Trademark Acknowledgments QuickTime is a trademark of Apple Computer Inc Microsoft and Windows are either registered trademarks or trademarks of Microsoft Corporation in the United States and or other countries Othe...

Page 218: ...sories to download recorded images from a memory card to your computer IFC 300PCU USB Cable DIGITAL VIDEO SOLUTION DISK The explanations in this manual use mainly Windows XP screen shots The steps and windows may vary depending on your computer and the version of software ...

Page 219: ...ed from a previous version Computer Model Computers that come with above OS preinstalled and have built in USB ports CPU Pentium 500 MHz or better RAM Windows 98 Windows Me 128 MB or more Windows 2000 Windows XP 256 MB or more Interface USB only preinstalled Windows 98 Windows Me Windows 2000 Windows XP systems with built in USB ports Free Hard Disk Space Canon Utilities ZoomBrowser EX 250 MB or m...

Page 220: ...wing images recorded on a memory card 24 Applying DPOF Digital Print Order Format settings 79 Uploading My Camera settings to the camcorder 71 The Remote Capture function is not supported by your camcorder The slide show function of the camcorder cannot be used PhotoStitch Merging a series of overlapping still images into a single seamless panorama 63 PhotoRecord Printing still images with backgro...

Page 221: ...r 87 OPTURA 60 If your camcorder is listed in Camcorder Categories 86 you can perform the followings by connecting the camcorder to a computer with preinstalled Hi Speed USB 2 0 using a USB cable Capturing movies from the tape to the computer Recording movies that have been edited on a computer to the tape Converting analog signals from a connected VCR or 8mm camcorder to digital signals and trans...

Page 222: ... you can download images Images protected on the camcorder may lose this setting once they are downloaded to the computer 1 Check a camcorder is not connected to the computer While a camcorder is connected to the computer the software cannot be installed normally If a camcorder is connected detach the USB cable from the computer 2 Close any programs that are running 3 Set the DIGITAL VIDEO SOLUTIO...

Page 223: ...o Software Windows 4 Select your language 5 Click Digital Video Software Install If the following dialog appears click Restart to restart the computer After restarting the computer installation automatically continues Installer Panel ...

Page 224: ...Installation When you select Custom Installation select a USB driver Windows XP The USB driver supplied with the Windows operating system is used You do not need to install a USB driver Windows 98 Windows 2000 Canon DV TWAIN Driver Windows Me Canon DV WIA Driver 8 Select your country region and click Next 9 Read the license agreement and click Yes ...

Page 225: ...nd the regular desktop screen is displayed remove the DIGITAL VIDEO SOLUTION DISK from the CD ROM drive When installation is complete remove the DIGITAL VIDEO SOLUTION DISK before you connect the camcorder to the computer Windows 98 Windows Me Windows 2000 At this point the files for the TWAIN Driver or WIA Driver have only been copied to your computer To download images via USB connection finish ...

Page 226: ...face Refer to your computer manual for the location of the computer s USB ports See your camcorder instruction manual for connecting instructions 1 Insert a memory card containing images into the camcorder 2 Connect the power adapter to the camcorder 3 Turn the POWER switch to PLAY VCR and move the TAPE CARD switch to CARD Wait until the card access indicator stops flashing 4 Attach the supplied U...

Page 227: ...a Computer Windows For instructions on how to start ZoomBrowser EX and download images to the computer see Downloading Images ZoomBrowser EX 18 USB Cable USB Terminal on the Camcorder Camcorder End Computer End USB Port on the Computer ...

Page 228: ...files Create a copy of the file first before working on it on your computer For Windows XP Users Do not rotate the image in the Windows Picture and Fax Viewer or in the explorer view The data for the original image will be changed and the image can no longer be displayed in ZoomBrowser EX or on the camcorder A movie file exceeding 210 MB cannot be downloaded If the Server Busy window appears when ...

Page 229: ...s allowing you to select the camcorder model Confirm that Canon Camera or your camcorder model name is displayed and click OK Windows XP If the window does not appear or if PC CONNECT does not appear on the camcorder screen click the Windows start menu and select All Programs Canon Utilities CameraWindow and CameraWindow Starts to download images The CameraWindow opens and images will be downloade...

Page 230: ...der For details please refer to the instruction manual of your camcorder If the camcorder is already connected to the computer you can start the CameraWindow and display the Camera Control window by clicking Acquire Camera Settings followed by Acquire Images in the ZoomBrowser EX Main Window To start ZoomBrowser EX click the Windows start menu and select All Programs Canon Utilities ZoomBrowser EX...

Page 231: ...ttings Select the setting for downloading images by operating your computer You can change the image type and the destination folder 1 In the Camera Control window click the Acquire Images tab and click Preferences 2 Select Change auto download settings and click Next ...

Page 232: ...f the SD Memory Card is activated those downloaded new images will not be marked as already transferred even having selected New images and downloaded 4 Specify the destination folder settings and click Next Click this button to specify the destination folder Destination Folder Select the configuration of the subfolder ...

Page 233: ... a process to perform after the image is downloaded Below window will be displayed when you select Perform selected processes consecutively You can redisplay the window by clicking Select Select a process to perform after the image is downloaded and click OK ...

Page 234: ...matically downloaded to computer while camera is connected downloads memory card images automatically to the computer when you connect the camcorder Downloading the Selected Images from the CameraWindow 1 Click Lets you select and download images in the Camera Control window The CameraWindow opens ...

Page 235: ... settings and click Starts Download ZoomBrowser EX starts and the downloaded images appear in the Main Window For detailed information about the Main Window see ZoomBrowser EX Windows 29 Click Finish to close the Camera Control window Using the Camcorder to Download Images Direct Transfer Function If your camcorder supports the Direct Transfer Function you can use the camcorder to download images ...

Page 236: ... the camcorder to transfer images For instructions on how to change the destination folder and the folder name see step 3 in Auto Downloading Settings 21 The button cannot be used when it is not lighted You can set the action that is carried out for direct transfer Right click the CameraWindow Launcher icon on the taskbar and select an action from the displayed menu Show image s in fullscreen mode...

Page 237: ...transfer download destination folder and click Next 3 Specify the destination folder settings and click Finish Click Finish to close the Camera Control window Click this button to specify the destination folder Destination Folder Select the configuration of the subfolder ...

Page 238: ...Windows Start menu and select Programs Canon Utilities CameraWindow and CameraWindow Windows XP When a window appears allowing you to select an application program to start select Download View Images using Canon CameraWindow and click OK The Camera Control window opens 3 Select a downloading method Starts to download images The progress bar will be displayed and images will be downloaded to the c...

Page 239: ...om the File menu Main Window ZoomBrowser EX s Main Window features various buttons and an image display area 1 Task Area Acquire Camera Settings Use this to display the Camera Control window to download images and configure the camcorder settings View Classify Use this to view and organize images Edit Use this to edit images Export Use this to change the data for still images and save them as new ...

Page 240: ...ges between the 2 images Clicking on different images while holding down the Ctrl key selects multiple images When the All Folders tab is selected Select a folder and click Add to Favorites When the Favorite Folders tab is selected Click Add and select a folder This area displays the images contained in the selected folder 1 Previous Next Displays the previous next image in the current folder 2 Up...

Page 241: ...es are displayed next to the folder name Clicking a folder displays enlarged images Selecting Preferences from the Tools menu opens the Properties window on which you can select the hierarchy of folders Preview Mode A large image is displayed along with detailed information You can change file name and comments To display another image click Previous Next or select an image shown at the bottom of ...

Page 242: ...select a different image while the Properties window is open the information switches to the one of the selected image The Properties window cannot be displayed in Preview Mode 3 Slide Show Displays still images in a slide show 4 Search Allows you to search for images 38 5 Delete Deletes selected images 6 Rotate Rotates selected still images A movie cannot be rotated 1 2 3 4 5 6 ...

Page 243: ...ultiple images are selected 3 Show Allows you to display multiple images at the same time 4 Synchronize Synchronizes the View functions across all displayed images 5 Zoom In Zoom Out Enlarges decreases an image 6 Pan When the image is larger than the window you can move the image in the desired direction 7 Fit to Window Matches the image size to the size of the Image Viewer Window 8 Zoom Slider Al...

Page 244: ... the Edit menu or the icon allows you to change the brightness saturation contrast and RGB of the image Crop Window Selecting Crop from the Edit menu or the icon allows you to crop an image Either drag the mouse on the image or specify the cropping area and click Crop Image 1 Auto Mode Clicking Start corrects the red eye effect automatically 2 Manual Mode Point the cursor on a red eye so that the ...

Page 245: ...assifying the Images This task allows you to classify selected images according to the shooting date 1 Click View Classify in the Main Window 2 Click Classify into Folder 3 Select the images you wish to classify and click Specify Classification Settings ...

Page 246: ...ish The selected images are classified into the specified folder Renaming Multiple Files This task allows you to rename multiple files at the same time or to rename and copy multiple files 1 Click View Classify in the Main Window 2 Click Rename Multiple Files ...

Page 247: ...and click Specify Rename Settings 4 Specify the settings and click Finish The images are renamed according to the settings specified To rename a folder select a folder and open the Rename Folder window by selecting Rename from the File menu Input the new name and click OK ...

Page 248: ...or Images This task allows you to search for images by Star Rating Modification Date Shooting Date Comment or Keywords 1 Click View Classify in the Main Window 2 Select folders and images from which you wish to search and click Search ...

Page 249: ...arch conditions and click Start Search The search results are displayed as thumbnails Select at least one search condition 4 Click Finish To change the search parameters and perform another search click Specify Search Condition and repeat steps 3 4 ...

Page 250: ... Ratings and Keywords This task allows you to apply ratings to your images from one star to three stars The Star Rating can be used as one of the search conditions or for the selection of images to be displayed in the Browser Window The keyword can be used as one of the search conditions The default setting of the Star Rating is two stars 1 Select the image to which you wish to apply the Star Rati...

Page 251: ...h to apply or click on the stars for rating You can display images according to Star Rating by selecting Filter by Star Rating from the View menu You can add and delete keywords or change the keyword list in the Manage Keyword window by selecting Manage Keyword from the Tools menu ...

Page 252: ...d movies and save them as new files Editing Movies QuickTime 5 0 or a later version is required to edit movies If it is not already installed on your computer install it from the DIGITAL VIDEO SOLUTION DISK Place the disk in the CD ROM drive and click QuickTime Install in the installer panel 1 Click Edit in the Main Window 2 Click Edit Movie ...

Page 253: ...images and click Apply Effect To change the order of images select an image in the Storyboard Area and click Move Left or Move Right Storyboard Area Displays thumbnails of the selected images The images will be linked from left to right Transition Box Displays the symbol of the transition effect between linked images Plays back the movies being edited ...

Page 254: ...ed size Transition Effect Opens the Transition Effect Settings window You can set the transition effect type and display time and preview the effect To set a transition effect you need to select a transition box in the Storyboard Area 6 Set the audio and click Save When you select Set Audio you can use the following functions Add Audio Opens the Add Audio window You can add a MP3 or a WAV file as ...

Page 255: ...E 45 Editing Movies Windows 7 Click Save Movies are saved in DCF format files with Motion JPEG AVI compression 8 Click Exit Destination Folder ...

Page 256: ...y installed on your computer install the QuickTime from the DIGITAL VIDEO SOLUTION DISK Place the disk in the CD ROM drive and click QuickTime Install in the installer panel Do not double click a movie file AVI extension in Windows Explorer That will start Windows Media Player which may not support this file type To play back movies double click the thumbnail with a movie icon in the Main Window s...

Page 257: ...E 47 Editing Movies Windows 2 Click the play button in the Image Viewer window The movie will be played back ...

Page 258: ...r use as a screen saver or a wallpaper You can also export selected movie and still image properties to a text file or copy and rename movies and still images Changing the File Type and Save 1 Click Export in the Main Window 2 Select the export type When you have selected Export Movies see Exporting Movies 51 3 Select images and click Specify Export Settings ...

Page 259: ...elected Export Still Images You can convert still images to another file type resize and save them as new files You can select the file type from BMP JPEG and TIFF You can also specify a prefix to be added to the exported still images When you have selected Export Shooting Properties You can select the information you wish to export and save as a text file ...

Page 260: ... Export as a Screen Saver You can export and save the image as a screen saver When you have selected Export as a Wallpaper You can export and save the image as Windows wallpaper This task cannot be performed if you have selected multiple images ...

Page 261: ...omputer install it from the DIGITAL VIDEO SOLUTION DISK Place the disk in the CD ROM drive and click QuickTime Install in the installer panel 1 Click Export in the Main Window 2 Click Export Movies 3 Select a movie and click Select the save format You can select multiple images or a folder to include all images in that folder Still images cannot be selected For instructions on how to export still ...

Page 262: ...ick Set the save format 5 Specify the export settings and click Specify name of file to be saved 6 Specify the file name and click Start export In each case specify the destination folder and file name of the movie to be exported Destination Folder ...

Page 263: ...ave images to CD R and CD RW disks The shooting information is copied along with the images This function can only be used on a computer that came with a CD R RW drive as standard equipment 1 Place a CD R RW disk in the computer s CD ROM drive 2 If the following window appears click Cancel 3 Click Export in the Main Window ...

Page 264: ...es 4 Click Backup to CD 5 Select the folders or images you wish to save and click Specify Backup Settings 6 Set the backup settings and click Start Backup The disk will be ejected from the drive when copying is complete ...

Page 265: ...ard You can save still images JPEG from the computer to a memory card of the camcorder and a PC card reader writer You can also save sample images for card mix from the DIGITAL VIDEO SOLUTION DISK Adding Still Images to the Memory Card 1 Connect the camcorder to the computer 16 2 Click Acquire Camera Settings in the Main Window 3 Click Set to Camera ...

Page 266: ...56 Exporting Images 4 Click Uploads Images to the Camera 5 Select the still images you wish to save and click Open ...

Page 267: ...ry Card You can save sample images for card mix to the memory card of the camcorder and a PC card reader writer CARD CHROMA CARD ANIMATION CARD LUMINANCE and CAMERA CHROMA are provided on the DIGITAL VIDEO SOLUTION DISK 1 Connect the camcorder to the computer 16 2 Insert the DIGITAL VIDEO SOLUTION DISK to the computer s CD ROM drive If the installer panel opens click Exit to close it 3 Click Acqui...

Page 268: ...4 Click Set to Camera 5 Click Uploads Images to the Camera 6 In Look in select the CD ROM icon and double click DVC CARD IMAGE Sample images or folders for CAMERA CHROMA CARD ANIMATION CARD CHROMA and CARD LUMINANCE appear ...

Page 269: ...E 59 Exporting Images Windows 7 Select the sample images you wish to save and click Open 8 In the Add image window click Add The sample images are saved in the memory card ...

Page 270: ...selected still images to an E mail message To use this function the e mail software must be enabled as MAPI client For details refer to the instruction manual of the e mail software 1 Click Internet in the Main Window 2 Click Email Images 3 Select the still images you wish to send and click Change Image Size ...

Page 271: ...l size of changed images You can check the compressed still image by pressing View Images 5 Select to send still images by e mail or to save the still images in a folder and click Finish If you selected Create a new email your e mail software starts and the selected still images appear as an attachment in the message window Input address subject and your comments and send the message E mail softwa...

Page 272: ...unning a Slide Show You can view selected still images in a slide show Movies cannot be selected for a slide show 1 Click View Classify in the Main Window 2 Click View as a Slide Show 3 Select the images and click Setup Slide Show ...

Page 273: ... click an effect you can check the effect in the preview window 5 Click Start Slide Show Click in the lower right corner to end the slide show Merging Panoramic Images PhotoStitch You can merge a series of overlapping still images into a single seamless panorama PhotoStitch automatically arranges still images recorded with the camcorder s Stitch Assist mode in their correct order and orientation m...

Page 274: ... Various Functions 1 Select images shot in Stitch Assist mode To use PhotoStitch images need to be shot in Stitch Assist mode To download images please refer to Downloading Images ZoomBrowser EX 18 2 Click Edit ...

Page 275: ...ng Various Functions Windows 3 Click Stitch Photos PhotoStitch starts 4 Arrange the order of the images and click 2 Merge Operational instructions are displayed in the upper section of the window 5 Click Start ...

Page 276: ...he disk in the CD ROM drive and click QuickTime Install in the installer panel Please refer to the PhotoStitch Help menu for more details Printing Still Images PhotoRecord PhotoRecord is a printing program You can use this program to lay out the still images for printing You can also create original albums and save them to your computer Movies cannot be printed Do not open the memory card cover re...

Page 277: ...ous Functions Windows 1 Click Print in the Main Window 2 Click Layout Print When you wish to print an index select Contact Sheet Print 3 Select the still image you wish to print and click Select Captions for Printing ...

Page 278: ...int PhotoRecord starts Place a check mark beside the items you wish include in the print If you wish to add a comment select a still image and enter a comment in the Properties window by clicking Properties 5 Click Select Printer Album Type and select a printer and album type Select the album type Select the printer ...

Page 279: ...vidually make sure to select the target page If you click Add Titles Captions you can add titles and text and change font font size justification and color Make sure to select the target page when performing these changes 7 Click Print confirm the number of copies and other print settings and click Print Printing starts PhotoRecord automatically performs image correction for images shot with Exif ...

Page 280: ...dit menu The Sound window appears 2 Click Add A window appears allowing you to select a file 3 Select the sound file and click Open 4 Click OK appears on the image The sound file will be copied to the same folder as the image To remove sound from an image select Remove on the Sound window in step 2 disappears and the copied sound file will be deleted To play back the sound select an image with a s...

Page 281: ... the My Camera window 74 or create original sounds files 75 When you start the My Camera window form the Camera Control window you can only change the My Camera Settings of the camcorder To create an original sound file and add it to the My Camera window start the My Camera window from ZoomBrowser EX For details see Creating an Original Sound File and Adding it to the My Camera Window 75 Observe f...

Page 282: ...pe of the My Camera Setttings For individual settings For setting in theme sets Displays the My Camera Settings saved on the computer Adds an image file to the My Computer lists Plays back the sound setting selected in the My Computer list Deletes a setting from the Camera list Deletes a setting from the My Computer list Saves the setting from the computer to the camcorder Saves the setting of the...

Page 283: ...u wish to change in the MyComputer list To change the settings individually select the Set individually tab and select the setting type in the Data Type list A start up image appears when you select a theme set and plays back the start up shutter operation and self timer sound 2 Select the setting you wish to replace in the Camera list and click Save to Camera ...

Page 284: ...etails Adding Still Images to the My Camera Window By adding an image to the My Computer list you can upload the image to the camcorder for use as Start up Image Only still images with JPEG compression can be added to the list To use still images recorded with your camcorder you need to download them to the computer before you can add them to the My Camera window 1 In the My Camera window click th...

Page 285: ... the Delete button below the MyComputer list Creating an Original Sound File and Adding it to the My Camera Window QuickTime is required to use My Camera Sound Maker and to play back the sound QuickTime is required to play back the sound If QuickTime is not already installed on your computer install the QuickTime from the DIGITAL VIDEO SOLUTION DISK Place the disk in the CD ROM drive and click Qui...

Page 286: ...ings from the Computer 2 Click Set individually and Create a My Camera Sound The My Camera Sound Maker window appears 3 Click the tab of the sound type you wish to create and click Record 4 To begin recording click the Start button ...

Page 287: ...utton When a message appears in the center of the window adjust the length of the recording to conform with the time limits by moving the blue and red switches and clicking the Cut button The following chart shows standard time lengths for My Camera sounds Sound Type Lengths in Seconds 11 025 kHz 8 000 kHz Start up Sound 1 0 sec or less 1 3 sec or less Shutter Sound 0 3 sec or less 0 4 sec or less...

Page 288: ...eated and click Save 8 Input a file name and click OK The created sound file appears in the MyComputer list You can now save the newly created sound file to the camcorder using the procedures described in Changing the My Camera Settings of the Camcorder 73 9 Click to close the My Camera Sound Maker window ...

Page 289: ...utomatic printing on a DPOF Digital Print Order Format compliant printer You can set the DPOF print settings also on the camcorder When you are using a SD memory card make sure the protect switch is set to allow recording 1 Connect the camcorder to the computer 16 2 Select Canon CameraWindow Downloads Images From Canon Camera and click OK ...

Page 290: ...w DPOF The slide show function of the camcorder cannot be used 4 Click Print Order DPOF and select a print type from the drop down list Standard Print Prints selected images in the specified number of copies Use the arrows next to the boxes to select the number of copies Index Print Both Standard Index and the option Titles of the Edit menu printing of date and file number are not supported by the...

Page 291: ...es 6 Click Save to Camera The DPOF print settings will be saved to the memory card The Edit Slide DPOF window allows print settings on up to 998 still mages With some camcorders DPOF print settings are limited to a maximum of 200 still images In that case all DPOF print settings on the 201st still image and onward will be erased ...

Page 292: ... the date time and owner settings of the camcorder You can also check the remaining memory card capacity or format the memory card 1 Connect the camcorder to the computer 16 2 Select Canon CameraWindow Downloads Images From Canon Camera and click OK 3 Click the Set to Camera tab and click Confirms changes camera settings ...

Page 293: ...ick OK Input a camcorder owner name here up to 31 characters Set the date and time here Click this button to synchronize the camcorder to the computer s date and time settings Click this button to format the memory card in the camcorder Check the remaining memory card capacity here Check the power status here ...

Page 294: ...d other programs Uninstalling ZoomBrowser EX 1 Click the Windows start menu and select All Programs Canon Utilities ZoomBrowser EX and ZoomBrowser EX Uninstall The uninstall utility starts and removes ZoomBrowser EX Uninstall all programs in Canon Utilities when you have uninstalled ZoomBrowser EX PhotoRecord and PhotoStitch can be removed with the same procedure RemoteCapture Task and RAW Image T...

Page 295: ...dows 2000 1 Delete Canon Camera from the Scanners and Cameras Properties list 2 Click OK to close the window 3 Turn the camcorder POWER switch to OFF and remove the USB cable from the computer 4 Click the Windows Start menu and select Programs Canon Utilities DV TWAIN Driver x x and TWAIN Driver Uninstall A version number appears in place of x x Windows Me 1 Delete the camcorder icon from the Scan...

Page 296: ...lined above Do not connect two or more camcorders to the computer at the same time The connection may not work correctly Connect the USB cable directly to one of the computer s main USB ports The interface may not function correctly if the camcorder is connected via a USB hub OPTURA 60 OPTURA500 OS Windows XP Home Edition or Professional Service Pack 1 or 2 required Proper operation is not guarant...

Page 297: ... installer panel does not open automatically use the following procedures to display it 1 Select My Computer from the start menu 2 Right click the CD ROM icon and select Open from the displayed menu 3 Double click the Setup exe icon Depending on the setting of your computer the file extension exe may not appear 2 Select your language 3 Click Canon USB Video Driver Install 4 Select your language an...

Page 298: ...Canon USB Video Driver OPTURA 60 5 When the InstallShield Wizard appears click Next 6 Read the license agreements and click Yes 7 When the confirmation window appears click Yes 8 Confirm the target folder and click Next ...

Page 299: ...ete remove the DIGITAL VIDEO SOLUTION DISK before you connect the camcorder to the computer 10Connect the power adapter to the camcorder 11Set the camcorder to PLAY VCR mode 12Connect the camcorder to the computer using the USB cable 13Select Install the software automatically Recommended and click Next ...

Page 300: ...en Canon USB Video and Canon USB Video Record will be installed automatically 15Check if the driver has been installed correctly From the start menu select My Computer and check if the Canon USB Video icon appears If the icon does not appear the installation has not been completed properly Uninstall and reinstall the driver ...

Page 301: ... driver Use the procedures below for the following circumstances too If you do not find the Scanners and Cameras icon in the Printers and Other Hardware If the Camera icon does not appear in the Scanners and Cameras folder 1 From the start menu select Control Panel 2 Click Performance and Maintenance 3 Click System 4 Click the Hardware tab on the System Properties ...

Page 302: ...n USB Video Control and Canon USB Video Record appear under the Sound video and game controllers use the following procedures to delete them 1 Right click the mouse button on the respective item and select Uninstall Depending on your camcorder model Canon USB Video Record may not be displayed In such case delete Canon USB Video and Canon USB Video Control ...

Page 303: ...tion of the Canon USB Video Driver OPTURA 60 Windows 2 In the confirmation dialog click OK and close System Properties and Device Manager 7 Close all windows and restart the computer The uninstall process is complete ...

Page 304: ... the computer and then reconnect the camcorder Î TWAIN Driver or WIA Driver is not installed properly First uninstall the TWAIN WIA Driver then reinstall the driver from the DIGITAL VIDEO SOLUTION DISK remove the check marks from the other programs when prompted to select the programs to be installed ZoomBrowser EX Operation Cannot download images Î The camcorder it not set to the correct mode Tur...

Page 305: ... does not appear in the Scanners and Cameras Properties or Scanners and Cameras If you connected the camcorder to the computer via the USB cable before installing the Digital Video Software Leave the camcorder connected to the computer 1 Click the Windows Start menu and select Settings and Control Panel 2 Double click the System icon The System Properties dialog appears 3 Click the Device Manager ...

Page 306: ...he camcorder connected to the computer 1 Click the Windows Start menu and select Settings and Control Panel 2 Double click the System icon 3 Click the Hardware tab 4 Click the Device Manager button 5 If Canon Camera or your camcorder model name appears under the Other Devices and or Imaging Devices categories use the following procedures to delete it 1 Select Canon Camera or the name of the camcor...

Page 307: ...ains Canon Camera Driver Setup File in its first line When you find the correct file note down its name and close the Notepad window 8 Delete the Oem file set Delete all Oem inf and Oem pnf files taking great care to delete the correct files If You Were Using ZoomBrowser EX Version 2 or 3 This manual explains version 5 Titles and comments added using a prior version than ZoomBrowser EX version 4 d...

Page 308: ...the Program Files folder under the folder in which you installed ZoomBrowser EX 4 or higher C Program Files Canon ZoomBrowser EX Program Image Library One 2 Select the image folder you wish to display and copy the folder to a different destination ...

Page 309: ...00 828 4040 Mon Fri 9 AM to 8 PM Eastern Time CANADA Canon CANADA Inc Tel Canada 1 800 OK CANON 1 800 652 2666 ASIA Canon Hongkong Co Ltd 19 F The Metropolis Tower 10 Metropolis Drive Hunghom Kowloon Hong Kong Phone 852 2170 2828 Fax 852 2723 9684 DIE 233W CANON INC 2005 ...

Page 310: ...tion and the subject Using SD Memory Card Maximum recording time Image Size Maximum recording time File Size per Image Supplied Card 128MB 512MB 320 x 240 1 minute 8 minutes 32 minutes 250KB 160 x 120 2 minutes 17 minutes 67 minutes 120KB These figures are approximate Using SD Memory Card The recording times specified above are the total amount of recording times with the supplied MultiMediaCard T...

Page 311: ...y be defective Stop using the cassette Availability differs from area to area Video heads may become dirty under the following conditions When using the camcorder in humid or hot places When using cassettes with damaged or dirty tape When using the camcorder in dusty places When using the video heads without cleaning them for a long time Note o Before you make important recordings clean the video ...

Page 312: ...C r g0 dB 51J LJ c77f tc G10 Use of g fHJ n C lnon accessories is recou nmended This product is designed to achieve excellent performance when used with genuine Canon accessories Canon shall not be liable for any damage to this product and or accidents such as fire etc caused by the malfunction of non genuine Canon accessories e g a leakage and or explosion of a battery pack Please note that this ...

Page 313: ...nt needs and preferences We ve enclosed this Product Registration Card to create a way our customers can communicate those needs to Canon The information you provide on this Product Registration Card will help us understand our customers better and will confirm the date of purchase of your new Canon Camcorder Thanks again for choosing Canon IMPORTANT Please complete and return this questionnaire i...

Page 314: ...2 0 Family Activities 5 0 School Educational Training 3 0 Recreational Sports 6 0 Other _ Spouse 1 0 2 0 3 0 4 0 5 0 6 0 Spouse 1 0 2 0 3 D 4 0 5 0 6 0 7 0 23 Are you or your spouse You A Homemaker 0 Retired 0 A Student 0 Self Employed Business Owner 0 Work from Home Office 0 In the Military 0 A Federal Employee 0 27 For your primary residence do you 1 0 Own 2 0 Rent 25 Level of education check hi...

Page 315: ...asis 01 0 Bicycling 02 0 Golf 03 0 Physical Fitness Exercise 04 0 Running Jogging 05 0 Snow Skiing 06 0 Tennis 07 0 Camping Hiking 08 0 Fishing 09 0 Hunting Shooting 10 0 Power Boating 11 0 Horseback Riding 12 0 Sailing 13 0 House Plants 14 0 Grandchildren 15 0 Needlework Knitting 16 0 Flower Gardening 17 0 Vegetable Gardening 18 0 Sewing 19 0 Crafts 20 0 Buy Pre Recorded Videos 31 Using the numbe...

Page 316: ...L SERIAL NO MODELE N DE SERlE ELURA 90 A KIT Model DIGITAL VIDEO CAMCORDER Modele CAMESCOPE ET LECTEUR VIDEO DIGITAL warranty coverage is sUbject to the country where the unit was purchased Please read all warranty information carefully If you have comments or questions about our product please call 1 800 828 4040 USA La garantie en vigueur dans Ie pays ou I achat a ete effectue s applique Veuille...

Page 317: ......

Reviews: