Canon ELURA 50 User Manual Download Page 242

69

E

Macintosh

7.

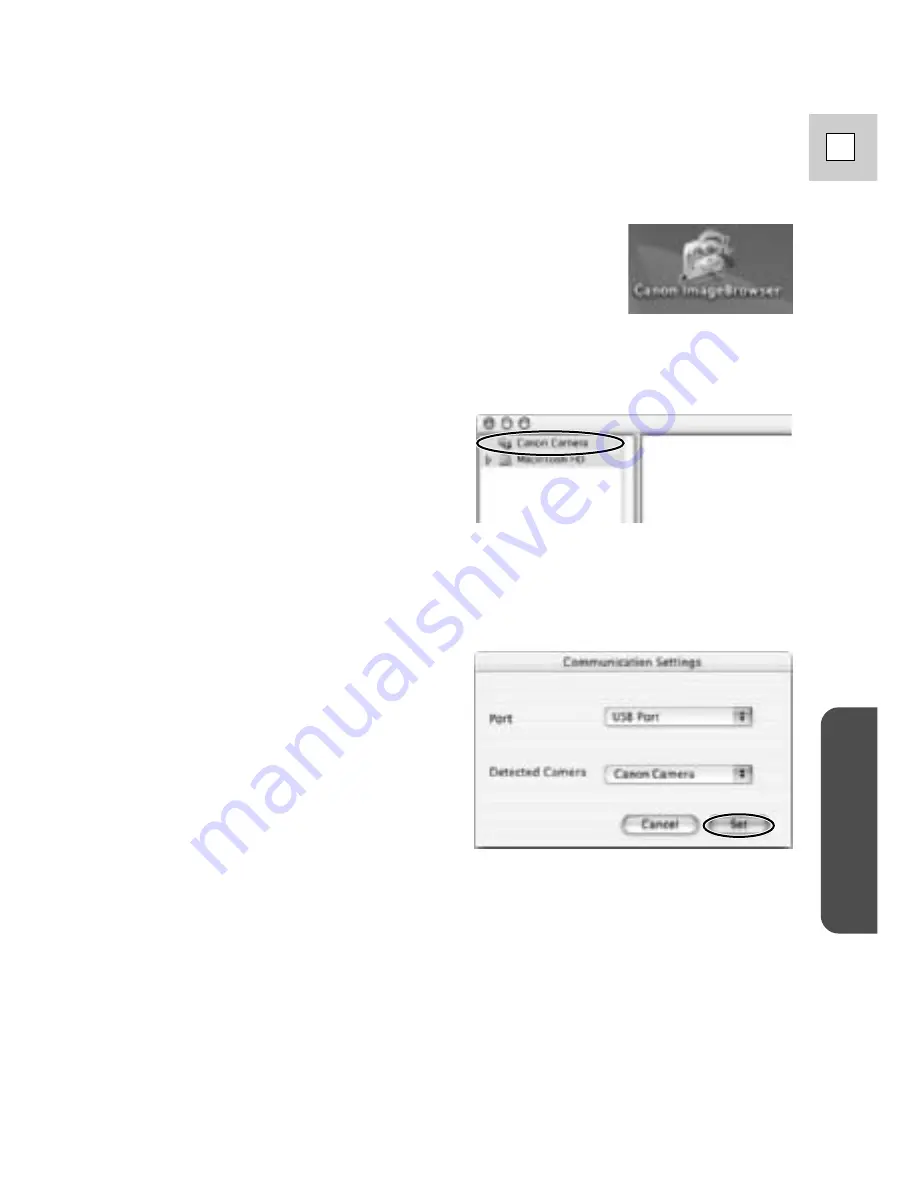
Confirm that [USB port] and [Canon Camera] are selected
and click [Set].

The Camera Window opens, displaying the camcorder images as
thumbnails (small images).

5.

Double-click the [Canon ImageBrowser] icon on the desktop.

If the Canon ImageBrowser icon does not appear on the desktop, double-
click the [Canon Utilities] folder on the drive on which the program was
installed, followed by the [ImageBrowser] folder and [ImageBrowser] icon.

6.

Click [Canon Camera] in the Explorer View section.

The Communications Settings window appears. This window only
appears the first time the camcorder is connected.

Summary of Contents for ELURA 50

Page 1: ... Digital Video Cassette NTSC PUB DIM 551 Digital video camcorder Instruction Manual Camescope vidéo numérique Manuel d instruction Videocámara digital Manual de Instrucciones ENGLISH FRANÇAIS ESPAÑOL E F Es ...

Page 2: ... outlet on a circuit different from that to which the receiver is connected Consult the dealer or an experienced radio TV technician for help Use of shielded cable is required to comply with class B limits in Subpart B of Part 15 of FCC Rules Do not make any changes or modifications to the equipment unless otherwise specified in the manual If such changes or modifications should be made you could ...

Page 3: ...ces may cause the product and cart combination to overturn 10 Power Sources The CA PS700 Compact Power Adapter should be operated only from the type of power source indicated on the marking label If you are not sure of the type of power supply to your home consult your product dealer or local power company Regarding other power sources such as battery power refer to instructions in this manual 11 ...

Page 4: ...those controls that are covered by the operation instructions Improper adjustment of other controls may result in damage and will often require extensive work by a qualified technician to restore the product to its normal operation e If the product has been dropped or the cabinet has been damaged f When the product exhibits a distinct change in performance This indicates a need for service 19 Repl...

Page 5: ...XP Users Only DV NETWORK SOLUTION DISK Software Instruction Manual This manual explains how to download upload images from to the memory card using a DV IEEE1394 cable You can also perform videoconference and file transfer over the Internet using the provided software Available functions depend upon the camcorder model of your contact and networking environment Trademark Acknowledgements Canon is ...

Page 6: ...he Multi Image Screen 67 Audio Recording 69 Setting the Self Timer 71 When Making Manual Adjustments Adjusting AE Shift 73 Setting the Shutter Speed 74 Adjusting Focus Manually 76 Setting the White Balance 77 For Playback Enlarging the Image During Playback 79 Displaying Date Time and Camcorder Data Data Code 80 Searching the Tape Photo Search Date Search 83 Returning to a Pre Marked Position 84 E...

Page 7: ... From Dealer Address Dealer Phone No Model Name ELURA50 Serial No Recording Still Images on a Memory Card 106 Recording Motion JPEG Movies on a Memory Card 111 Recording Panoramic Images Stitch Assist 114 Playing Back a Memory Card 116 Settings of Still Images Movies 119 Preventing Accidental Erasure Protect 122 Marking a Still Image for Printing Print Mark 123 Erasing Still Images Movies 125 Prin...

Page 8: ...corder Its advanced technology makes it very easy to use you will soon be making high quality videos which will give you pleasure for years to come To get the most out of your new camcorder we recommend that you read this manual thoroughly there are many sophisticated features which will add to your recording enjoyment Getting started WL D77 Wireless Controller Two AA batteries Lens cap and lens c...

Page 9: ... still images by connecting to a Canon Printer with Direct Print Function Refer to p 127 for printers that can be used with your camcorder Night Mode Allows recording even in dark places The Night mode adjusts automatically to the optimum shutter speed in TAPE CAMERA mode Stabilizes your recordings even in long telephoto shots in TAPE CAMERA mode Image Stabilizer This zoom range will more than tak...

Page 10: ...65 REC record SEARCH button p 38 Record review button p 38 rewind button p 29 CARD button p 117 REC SEARCH button p 38 fast forward button p 29 CARD button p 117 play pause button p 29 CARD MIX button p 136 stop button p 29 INDEX SCREEN button p 118 Battery attachment unit p 16 BATT battery RELEASE button p 16 Memory card compartment cover p 101 Card access indicator p 101 ...

Page 11: ...er p 144 Program selector p 57 P Easy Recording Program AE PHOTO button p 54 106 Zoom controller p 24 Selector dial p 32 40 TAPE CARD switch p 19 POWER indicator p 19 SET button p 40 MENU button p 40 Grip belt p 144 Backup battery cover p 147 Cassette compartment p 17 Cassette compartment cover p 17 Start Stop button p 20 CAMERA OFF PLAY VCR OPEN EJECT switch p 17 ...

Page 12: ...utton p 40 Digital effects ON OFF button p 65 MIX BALANCE buttons p 98 Controller buttons p 40 Search buttons p 83 SEARCH SELECT button p 83 AUDIO MONITOR button p 98 AUDIO DUB button p 97 AV INSERT button p 94 REMOTE SET button p 49 button p 30 button p 30 FF button p 29 PLAY button p 29 STOP button p 29 SLOW button p 30 REW button p 29 PAUSE button p 30 PHOTO button p 54 106 SLIDE SHOW button p ...

Page 13: ...ed product to the camcorder s DC terminal Likewise do not connect the power adapter to an unspecified product Connecting the camcorder to a Household Power Socket 2 3 4 1 Use the power adapter to provide your camcorder with instant power from a household power socket Always turn the camcorder off before connecting removing the power source 1 Set the POWER switch to OFF 2 Connect the power adapter ...

Page 14: ...Rated output 7 4V DC 2 0A Operating temperature range 32 F 104 F 0 C 40 C Dimensions 4 4 1 1 1 8 in 112 29 45mm Weight 6 6 oz 186g without power cable Weight and dimensions are approximate Errors and omissions excepted Subject to change without notice CA PS700 Compact Power Adapter ...

Page 15: ...de the battery pack into the charger to set it in place 2 Flip out the retractable plug Plug the AC plug into a household power socket According to the type of household power socket you have other sockets may be blocked while the charger is in use 3 The charge indicator lights in red and charging starts 4 The indicator light changes to green when the battery pack is fully charged 5 Unplug the cha...

Page 16: ...oz 86 g Attaching the battery pack 1 Turn the POWER switch to OFF 2 Align the front end of the battery pack with the line on the camcorder press lightly and slide the battery until it clicks into place 3 Remove the battery pack after use Press the BATT RELEASE button and remove the battery 1 2 3 1 CB 2LT Battery Charger Weight and dimensions are approximate Errors and omissions excepted Subject to...

Page 17: ...4 Press the P mark on the compartment until it clicks and wait for it to close 5 Click the cover back into place Notes Do not interfere with the cassette compartment while it is opening or closing automatically and do not attempt to close the cover until the cassette compartment has fully retracted After loading a cassette use record search 38 to find the point where you want to start recording Be...

Page 18: ...and damaged it may cause picture and sound distortion Return cassettes in the case and store them upright Do not leave the cassette in the camcorder after use Do not use cassettes with spliced tapes or nonstandard cassettes as they may damage the camcorder Do not insert anything into the small holes of the cassette or cover them with cellophane tape Handle cassettes with care Do not drop or subjec...

Page 19: ...the small button on the POWER switch and turn the POWER switch to CAMERA 2 Make sure the TAPE CARD switch is set to TAPE The camcorder automatically sets to record pause mode PAUSE appears in the display If you haven t set the date and time display SET THE TIME ZONE DATE AND TIME appears in the display For setting the time zone see p 51 For setting the date and time see p 53 The camcorder power in...

Page 20: ... the tape counter has stopped Replace the lens cap Return the LCD screen flush to the camcorder body Unload the cassette Turn the POWER switch to OFF Disconnect the power source Notes To check that the camcorder is recording correctly make a test recording first Before making important recordings clean the video heads using a Canon DVM CL Digital Video Head Cleaning Cassette or a commercially avai...

Page 21: ...e or sound distortion We recommend using the SP mode for important recordings We recommend recording in SP mode if you plan to transfer the images to a computer If you record in both modes on the same tape the image may become distorted during playback and the time code may not be written correctly If you playback a tape recorded on another digital equipment on this camcorder or vice versa image a...

Page 22: ...en you switch the 16 9 mode on You cannot use the 16 9 mode with the Easy Recording program You cannot use the multi image screen when setting the 16 9 mode on If you play back a recording made for 16 9 on a normal TV screen the image will appear to be vertically squashed compressed If you connect the camcorder to a TV with an S1 terminal or the Video ID 1 system recordings made in the 16 9 mode f...

Page 23: ...emonstration mode You can see a demonstration of the camcorder s main features To see the demonstration do either of the following With no cassette or memory card inserted turn the DEMO MODE on in the TAPE CAMERA menu or CARD CAMERA menu and close the menu Leave the camcorder with no cassette or memory card inserted for five minutes after turning it on CAMERA CARD CAMERA TAPE DEMO MODE ON DISP SET...

Page 24: ...e angle for each scene Move the zoom control towards W to zoom out to wide angle Move it towards T to zoom in to telephoto You can also control the speed of zooming Move the control slightly to zoom slowly Move it farther to zoom more quickly The farther you move the zoom control the faster the zoom speed The T and W buttons on the wireless controller adjust the picture angle but not the zoom spee...

Page 25: ...u cannot use digital zoom in the Night and Super Night recording program You cannot use digital zoom when the multi image screen is set The display becomes The zoom indicator appears for 4 seconds When the digital zoom is set to 40 the zoom indicator extends light blue When the digital zoom is set to 400 zoom the zoom indicator extends again a darker blue Because the image stabilizer cannot be use...

Page 26: ...d the viewfinder switches back on Opening and closing the LCD screen You can choose the angle of the screen that suits you best by opening and rotating the screen also you can rotate the LCD screen so that faces in the direction of the lens 28 Changing the angle of the LCD screen You can also push the panel flat against the camcorder until it is flush with the side with the screen facing outwards ...

Page 27: ...t points of light red blue or green may appear constantly on the LCD screen This is not a malfunction of the LCD screen and they are not recorded on the tape Effective dots more than 99 99 BRIGHTNESS DISP SET UP PLAY VCR CARD CAMERA CARD PLAY VCR TAPE CAMERA TAPE Make sure you open the LCD panel at 90 before attempting to rotate it Always rotate the LCD panel vertically into place before closing i...

Page 28: ... the viewfinder 144 You can choose the display style reversed mirror on or not mirror off The recording itself is unaffected regardless of which one you choose LCD MIRROR ON DISP SET UP 39 To turn the mirror mode off open the menu and select DISP SET UP Then select LCD MIRROR set it to OFF and close the menu The indicators that appear in the LCD display when LCD MIRROR is turned on CAMERA CARD CAM...

Page 29: ...e tab on the cassette so that it exposes the hole the switch position is usually labeled SAVE or ERASE OFF 1 Attach a power source and turn the POWER switch to PLAY VCR The power indicator lights up 2 Make sure the TAPE CARD switch is set to TAPE 3 Load the cassette 4 Press the e play button to start playback To end playback press the 3 stop button To wind the tape forwards stop playback and press...

Page 30: ...he 4a button and then the SLOW M button during normal playback Press the PLAY e button to return to normal playback Special playback REW PLAY FF STOP PAUSE SLOW 2 Playback pause Press the a pause button To resume normal playback press it again or press the e play button The camcorder automatically goes into stop mode after about 5 minutes playback pause Fast forward playback To play back the recor...

Page 31: ...playback Forward 2 Playback Press the 2 button during normal playback Press the PLAY e button to return to normal playback Reverse 2 Playback Press the 4a button and then the 2 button during normal playback Press the PLAY e button to return to normal playback Notes Mosaic like noise appears on the screen during some of the special playback modes There s no audio during special playback ...

Page 32: ...mpletely by turning the selector dial down until OFF appears Notes Sometimes audio may sound distorted when the volume is turned up high If this happens turn down the volume The speaker does not sound if PHONES is displayed Set AV headphones to AV 33 Using the headphones You can also use the headphones to monitor the sound track Change the setting of the AV headphones terminal through the menu 33 ...

Page 33: ...hone terminal can be switched to function as either the AV terminal or the headphone terminal Switching the AV headphone terminal Open the menu and select VCR SET UP Then select AV PHONES and set it to AV or PHONES and close the menu When the terminal is switched to PHONES PHONES appears in the display Using the headphones Make sure you switch the AV headphones terminal to PHONES before using head...

Page 34: ...et the TV VIDEO selector on the television to VIDEO If you are connecting the camcorder to a VCR set the input selector on the VCR to LINE VIDEO S S1 VIDEO INPUT AUDIO L R If your TV or VCR has an S S1 video input terminal For higher picture quality we recommend playing back recordings on a TV with an S S1 terminal If you connect the camcorder to a TV with an S1 terminal recordings made in the 16 ...

Page 35: ...re connecting the camcorder to a VCR set the input selector on the VCR to LINE Notes If you are going to use the TV as a monitor while you are shooting remember to keep the TV volume turned down as long as the camcorder s audio terminals are connected If the sound from the TV speakers is picked up by the microphone an unpleasant high pitched squeal called feedback may be produced For TVs having th...

Page 36: ...to operate the controls by touch without taking your eye off the action To prevent any unwanted movement you can mount the camcorder on a tripod or any flat surface at a suitable height and operate it with the wireless controller When you are using a tripod be careful not to leave the viewfinder exposed to bright sunlight as it may melt The light is concentrated by the viewfinder lens Make sure th...

Page 37: ...cture angle should have a definite purpose Avoid unnecessary or half hearted movements Use pans to record a landscape or follow a moving subject Decide the area you want to cover and stand facing the end of your panning angle Without moving your feet turn your waist to the starting position Start recording and after a few seconds begin to turn slowly from the waist Hold the final image for a few s...

Page 38: ...use mode Note Noise may appear on the screen when you play the tape backwards When the camcorder is in record pause mode you can use record search to play the tape forwards or backwards to find the point where you want to start or resume recording This is useful when you want to add a new scene to a previously used cassette By using record search you can ensure a smooth noise free join between the...

Page 39: ...y menu 45 2 CAM MENU CAMERA TAPE CAM MENU SEL SETSET MENUCLOSE CARD MIX CAM SET UP VCR SET UP DISP SET UP SYSTEM RETURN 2 VCR MENU PLAY VCR TAPE VCR MENU SEL SETSET MENUCLOSE VCR SET UP CARD SET UP CARD OPER DISP SET UP SYSTEM RETURN 2 C CAM MENU CAMERA CARD C CAM MENU SEL SETSET MENUCLOSE STITCH AST CAM SET UP CARD SET UP VCR SET UP DISP SET UP SYSTEM RETURN 2 C PLAY MENU PLAY VCR CARD C PLAY MEN...

Page 40: ...function will be set if you skip to step 11 8 Press the SET button to select The function is set and you return to the submenu 9 Turn the selector dial and move the arrow to b RETURN 10 Press the SET button to select You return to the main menu 11 Press the MENU button The main menu disappears Notes Pressing the MENU button at any time closes the menu Selecting b RETURN takes you back one menu or ...

Page 41: ...APE CARD switch to TAPE CAMERA CAM SET UP SEL SETSET MENUCLOSE SHUTTER AUTO D ZOOM 40 IMAGE S ON 16 9 OFF WHITE BAL AUTO SELF TIMER OFF RETURN e t u o r y i 2 Camera set up submenu e Shutter speed 74 r Digital zoom 24 t Image stabilizer 56 y 16 9 effect 22 u White balance 77 i Self timer 71 o Return List of Menus Turn to the appropriate page for a detailed explanation of each function Pressing the...

Page 42: ...159 8 Date time display 53 9 Card access display 103 0 Demo mode 23 1 Return 5 System submenu 2 Wireless controller 49 3 Tally lamp 50 4 Beep 23 5 Time zone Daylight saving time 51 6 Date time set 53 7 Return 1 To VCR set up submenu 2 To card set up submenu 3 To card operations submenu 4 To display set up submenu 5 To system submenu 6 Close main menu VCR MENU Set the POWER switch to and the TAPE C...

Page 43: ...igital converter 91 i Return 2 Card set up submenu o Still image quality 102 0 Movie size 102 1 File numbers 104 2 Return 3 Card operations submenu 3 Copy from tape to card 137 4 Return 4 Display set up submenu 5 Brightness 27 6 Displays 159 7 6 second auto date 82 8 Data code 81 9 Date time select 80 0 Card access display 103 1 Return CARD SET UP SEL SETSET MENUCLOSE SI QUALITY FINE MOVIE SIZE 32...

Page 44: ...P SET UP SYSTEM RETURN 1 3 5 2 4 7 6 5 System submenu 2 Wireless controller 49 3 Tally lamp 50 4 Beep 23 5 Time zone daylight saving time 51 6 Date time set 53 7 Return C CAM MENU Set the POWER switch to and the TAPE CARD switch to CARD CAMERA 1 To stitch assist mode 2 To camera set up submenu 3 To card set up submenu 4 To VCR set up submenu 5 To display set up submenu 6 To system submenu 7 Close ...

Page 45: ...ystem submenu 0 Wireless controller 49 1 Tally lamp 50 2 Beep 23 3 Time zone Daylight saving time 51 4 Date time set 53 5 Return SYSTEM SEL SETSET MENUCLOSE WL REMOTE 1 TALLY LAMP ON BEEP ON T ZONE DST D TIME SET RETURN 0 2 4 1 3 5 C PLAY MENU Set the POWER switch to and the TAPE CARD switch to CARD PLAY VCR 1 To card operations submenu 2 To VCR set up submenu 3 To display set up submenu 4 To syst...

Page 46: ...rn 2 VCR set up submenu o Recording mode 21 0 AV or headphones 33 1 Return 3 Display set up submenu 2 Brightness 27 3 Displays 159 4 Date time select 80 5 Card access display 103 6 Return DISP SET UP SEL SETSET MENUCLOSE BRIGHTNESS DISPLAYS ON D TIME SEL DATE TIME CARD ACCESS ON RETURN 2 4 6 3 5 VCR SET UP SEL SETSET MENUCLOSE REC MODE SP AV PHONES AV RETURN o 1 0 CARD OPER SEL SETSET MENUCLOSE PR...

Page 47: ...ght saving time 51 1 Date time set 53 2 Return 5 Direct Printing Mode Appears when connecting a printer with direct print function 127 SYSTEM SEL SETSET MENUCLOSE WL REMOTE 1 TALLY LAMP ON BEEP ON T ZONE DST D TIME SET RETURN 7 9 1 8 0 2 C PLAY MENU SEL SETSET MENUCLOSE CARD OPER VCR SET UP DISP SET UP SYSTEM PRINT RETURN 5 ...

Page 48: ...earch 83 Zero set memory 84 Audio mix 98 Dubbing from a digital video equipment 86 Analog Line in 88 AV insert 92 Audio dubbing 95 Insert two AA batteries following the and markings Be careful not to reverse the polarity of the batteries Inserting batteries Notes When using the wireless controller in brightly lit places or outdoors the effective range will be less The camcorder may have difficulty...

Page 49: ...TEM Then select WL REMOTE set it to A 1 or A 2 and close the menu The selected mode will appear on the display for 4 seconds on the wireless controller Press and hold the REMOTE SET button on the wireless controller Simultaneously press the ZOOM W button for mode 1 or the ZOOM T button for mode 2 Continue to press simultaneously for over 2 seconds Be sure to set the wireless controller to the same...

Page 50: ...r on When you replace the batteries the wireless controller returns to mode 1 Change the mode again if necessary Turning off the tally lamp To turn the tally lamp off open the menu and select SYSTEM Then select TALLY LAMP set it to OFF and close the menu The tally lamp no longer flashes during recording but it will still light up when the camera receives a signal from the wireless controller and d...

Page 51: ...n the menu and select SYSTEM and press the SET button 2 Select T ZONE DST The time zone display appears on the screen Your camcorder s time zone is factory preset to New York If you are at another time zone select your time zone first and daylight saving time DST setting if necessary 3 Move up or down the list of time zones with the selector dial Select the option that represents your time zone an...

Page 52: ...one No Notes After you have selected your time zone and set the date and time when you travel to another time zone there is no need to reset the date and time Just set the time zone to your destination and the camcorder s clock will automatically change to display the correct time for your destination The camcorder automatically accounts for the number of days in a month and leap year 1 24 1 2 3 4...

Page 53: ...ime you leave the menu and the clock starts If you press the SET button after setting the minutes you can set the date and time again from the start Setting the clock D TIME SET JAN 1 2003 12 00 AM SYSTEM 39 Date and time display You can choose to display or hide the date and time display during recording When the date and time display is set to ON date and time are shown in the lower left hand co...

Page 54: ... image Press the PHOTO button fully down and the still image will be taken immediately The camcorder takes the image immediately and then records the photo to the tape for approximately 6 seconds During this time the camcorder also records the sound and the display shows the still image A counter display appears and counts up as the camcorder records the image The camcorder returns to record pause...

Page 55: ...ately 6 seconds During this time the camcorder also records the sound and the display shows the still image A counter display appears and counts up as the camcorder records the still image F disappears from the display The camcorder returns to record pause mode Notes The camcorder automatically returns to record pause mode after recording a still image for approximately 6 seconds If you turn the P...

Page 56: ...open the menu and select CAM SET UP Then select IMAGE S i set it to OFF and close the menu The i mark disappears from the display when the stabilizer is off The image stabilizer cannot be turned off when the program selector is set to the Easy Recording position Notes Keep the image stabilizer turned off when the camcorder is mounted on a tripod The image stabilizer is designed to deal with a norm...

Page 57: ... camcorder has additional specialized AE auto exposure programs Availability of functions in each recording program h Available i Not available A Automatic function only 1 Can be used only when the TAPE CARD switch is set to b 2 Only Black and White can be used in CARD CAMERA mode You cannot use the multi image screen in the Night and Super Night recording program Position of program selector Reco...

Page 58: ...isappears after 4 seconds Avoid changing programs during recording as the brightness of the image may change suddenly If you switch the camcorder from the program to the Q program the camcorder returns to the Auto program When recording in dark places a bright light in the scene may cause a vertical light bar smear to appear This is a normal feature of camcorders CAMERA CARD CAMERA TAPE Easy Recor...

Page 59: ...is mainly intended for frame by frame or slow playback The picture may not appear smooth when played back in normal speed Use this mode to record spotlit scenes such as shows recitals or fireworks Use this mode to give accent to your subject by blurring the background or foreground The blur effect increases the more you zoom to telephoto This mode is set at a higher shutter speed The picture may n...

Page 60: ...ness and illuminates the subject in the center of the screen allowing you to record brightly in color In CARD CAMERA mode use this mode to record in dark places The shutter is fixed at a slow shutter speed The White LED lights up illuminating the subject in the center of the screen allowing you to record brightly in color Concerning Super Night and Low Light Plus modes The range of the White LED i...

Page 61: ...to use digital effects press the D EFFECTS SELECT button and select D EFFECT from the digital effects menu Press the D EFFECTS SELECT button to close the menu The camcorder remembers your chosen digital effect setting until you change it Digital effects can be selected but not operated on a blank blue screen appears in TAPE PLAY VCR mode The display continues to flash Digital effects operated duri...

Page 62: ...des of the screen The image gradually fades in The image gradually fades out Faders The image appears from the corners until it fills the whole screen The image is wiped off from the corners The image shrinks jumps from the center to the left and disappears The image flips out of the screen Jump JUMP A small image appears from the left jumps into the center and enlarges until it fills the whole sc...

Page 63: ...rs The image appears in zigzag from the top of the screen White stripes appear in zigzag from the bottom of the screen until they cover the whole image A yellow beam appears in the middle of the screen and expands until it covers the whole image The image disappears from both sides like tides Beam BEAM The screen turns yellow forms a beam and the full image appears Tide TIDE The image appears from...

Page 64: ... blurred through enlarging the size of some pixels Ball BALL The image becomes like a ball Cube CUBE The image becomes a cube and rotates Wave WAVE Both ends of the image sway in waves Color Masking COLOR M The image becomes a rhombus surrounded by a masking frame that changes the colors Mirror MIRROR Creates a symmetrical image as if there would be a mirror in the center of the screen Note Only B...

Page 65: ...fects menu 4 Press the D EFFECTS SELECT button to close the menu The name of your selected fader flashes in the display 5 Press the D EFFECTS ON OFF button The name of your selection stops flashing Each time you press the D EFFECTS ON OFF button the chosen fader is activated display lights continuously or deactivated display flashes 6 If you re in TAPE CAMERA mode Fade in Press the start stop butt...

Page 66: ...s the D EFFECTS SELECT button to close the menu The menu disappears and the name of your selected setting flashes in the display 5 If you re in TAPE PLAY VCR mode press the e play button 6 Press the D EFFECTS ON OFF button The name of your selection stops flashing and takes effect on the display Each time you press the D EFFECTS ON OFF button the chosen effect is activated or deactivated 1 Press t...

Page 67: ...S appear 2 Select MULTI S M S SPEED and M S SPLIT settings appear 3 Select M S SPEED MANUAL FAST MODERATE and SLOW settings appear 4 Select the desired setting You return to the digital effects menu 5 Select MULTI S again M S SPEED and M S SPLIT settings appear 6 Select M S SPLIT 4 9 16 settings appear Select multi image screen Divides your display image into 4 9 or 16 smaller images with the Imag...

Page 68: ...t image is captured Automatic The camcorder will capture the indicated number of images at the indicated speed 10 Press the start stop button to begin recording The multi image screen is recorded to the tape Notes You can operate the multi image screen from record or record pause mode After all the images have been captured press the D EFFECTS ON OFF button quickly to cancel the multi image screen...

Page 69: ...ice connected to the camcorder Selecting the audio mode The camcorder can record sound on a tape in two audio modes 16 bit and 12 bit The 16 bit mode produces the higher sound quality slightly superior to CD while the 12 bit mode records on two channels stereo 1 leaving 2 channels free stereo 2 for you to add new sound at a later time AUDIO MODE 12bit VCR SET UP 39 External microphone PLAY VCR TAP...

Page 70: ... wind screen can be used for audio dubbing with the built in microphone in TAPE PLAY VCR mode as well as recording when AUDIO DUB is set to MIC IN in VCR SET UP submenu The wind screen does not operate when an external microphone is connected to the MIC terminal Wind screen WIND SCREEN OFF VCR SET UP 39 PLAY VCR TAPE CAMERA TAPE The camcorder has an automatic wind screen to prevent wind noise from...

Page 71: ...onitor recording rotate the LCD panel 180 28 2 Press the start stop button The camcorder starts to record after a 10 second countdown period or after 2 seconds when you use the wireless controller The time remaining counts down in the display e g 5 SEC SELF T disappears from the display when recording begins The tally lamp starts flashing 3 Press the start stop button to end recording For movies S...

Page 72: ...the PHOTO button The camcorder takes the still image for approximately 6 seconds If you re in TAPE CAMERA mode the camcorder returns to record pause mode after recording to a tape If you re in CARD CAMERA mode the currently recording image appears after recording onto a memory card Notes To cancel the self timer setting set the SELF TIMER to OFF through the menu or press the SELF TIMER button on t...

Page 73: ...u 2 Press the EXP button eAE 0 appears light blue 3 Turn the selector dial to choose your desired level Levels are from 2 to 2 in 0 25 intervals excluding 1 75 and 1 75 The higher the setting the brighter the image Notes You cannot adjust the exposure without the e mark before AE in the display Press the EXP button so that e appears before AE Then you can adjust the exposure manually You cannot ad...

Page 74: ...er is set to Easy Recording or the Auto Night or Super Night recording program in TAPE CAMERA mode it automatically detects the flicker of fluorescent lighting and adjusts the shutter speed to compensate However if the brightness of the LCD or viewfinder display starts to flicker make sure the camcorder is set to the Auto recording program and select the 1 100 shutter speed SHUTTER AUTO CAM SET UP...

Page 75: ...ers People doing indoor sports such as basketball 1 2000 1 1000 1 500 or 1 250 1 100 Notes You are unable to set the shutter speed in any recording program other than AUTO The image may not appear smooth when a high shutter speed is set The camcorder returns to the auto shutter setting when you slide the program selector to Easy Recording or change the recording program If you set the shutter spee...

Page 76: ...ing off the autofocus it may not stay in focus It is generally best to adjust the zoom first and then the focus Notes If the e icon is shown before AE the focus cannot be adjusted manually Press the focus button again to bring the e icon before MF The camcorder will return to autofocus when selecting the Easy Recording program Autofocus can not be turned off in Easy Recording program See Troublesh...

Page 77: ...ve finished setting the white balance The W display flashes then remains lit Depending on the light source the flashing may at times continue The result will remain better than with the auto setting and you can continue recording 5 Close the menu The camcorder s auto white balance system compensates for a wide range of lighting conditions Although slight variations are unavoidable colors will appe...

Page 78: ...and lighting conditions change reset the white balance Try to record with light from a single source Correct white balance cannot be obtained for two types of lighting at once You cannot set the white balance or choose the indoor outdoor mode when the program selector is set to the Easy Recording program The white balance returns to the AUTO setting when you slide the program selector to Easy Reco...

Page 79: ...2 times 2 Move the image to the right and left Turn the selector dial up to move the image to the right and down to move the image to the left 3 Move the image up and down Press the SET button first Turn the selector dial up to move the image up and down to move the image down Pressing the SET button will switch the direction between right and left up and down 4 To cancel move the zoom lever towar...

Page 80: ... data code containing the date and time the recording was made and other camcorder data shutter speed and exposure settings is automatically recorded on a special data section of the tape Only the date and time appear in the data code when using a memory card Displaying Date Time and Camcorder Data Data Code To change the date and time combination open the menu and select DISP SET UP Then select D...

Page 81: ...ime in the camcorder s memory If the tape was recorded on a camcorder without a data code function If noise or tape damage prevents the data code from being read If a recording made on ELURA50 is played back on a different DV camcorder the data code may not be displayed correctly The data code will appear in the display even if DISPLAYS 159 has been set to OFF through the menu Possible data code c...

Page 82: ... you start playback and have the data code turned off The 6 second auto date will adjust for any time zone changes you have indicated To turn the 6 second auto date on open the menu and select DISP SET UP Then select 6SEC DATE set it to ON and close the menu Note When 6SEC DATE is turned on but DISPLAYS 159 is turned off the 6 second auto date will still appear for 6 seconds 6SEC DATE OFF DISP SET...

Page 83: ...o move forward 5 still images or days PHOTO SEARCH DATE SEARCH appears in the middle of the display alongside the or mark and number to search through You can change direction easily by pressing the button for the opposite direction Notes Press 3 stop to stop mid search If you begin a search very close to the start of a recorded still image during photo search the camcorder may skip straight past ...

Page 84: ...ars in the display The tape counter with  indication disappears from the display and the time code reappears Notes Time code and tape counter display may not match accurately The zero set memory may not function correctly where there is a break between recordings on the tape You can also use zero set memory to mark a position on a tape in TAPE CAMERA mode When you then play back the tape pressing...

Page 85: ...the VCR See Connections for Playback on a TV Screen on p 33 2 Prepare the TV and VCR Turn on the TV and set the TV VIDEO selector to VIDEO Turn on the VCR and set its input selector to LINE Load a blank cassette and put the VCR in record pause mode See your TV and VCR instruction manuals for details 3 Turn the camcorder s POWER switch to PLAY VCR and move the camcorder s TAPE CARD switch to TAPE M...

Page 86: ...o be anomalous although it may not appear so on the TV image or not recorded at all You are unable to dub tapes recorded with the copyright protective signal Dubbing to from a Tape with Digital Video Equipment Side with arrow 1 Connect the camcorder and the other digital device Connect the DV cable with the sides of the plugs marked with the arrows facing as shown above 2 Prepare the other device ...

Page 87: ...htly before the section you want to copy and set it to playback pause mode 2 Press the REC PAUSE button on the wireless controller The camcorder enters record pause mode 3 Start playback on the other digital device while you monitor the picture 4 Press the pause button Recording starts 5 When you get to the point where you want to stop recording press the stop button or the pause button Recording ...

Page 88: ... unable to dub tapes recorded with the copyright protective signal 1 Connect the camcorder to the VCR 2 Prepare the device Set the TV Video selector on the television to Video For further details see Connections for Playback on a TV Screen on p 33 Turn on the VCR Load your recorded cassette and put the VCR in playback pause mode See your TV and VCR instruction manuals for details 3 Turn the camcor...

Page 89: ... terminals The camcorder enters record pause mode 3 Start playback on the other device or turn on the TV to see the desired program while you monitor the picture 4 Press the pause button Recording starts 5 When you get to the point where you want to stop recording press the stop button or the pause button Recording stops 6 Stop playback on the other device Note You can monitor the picture in the v...

Page 90: ...eadphones during digital conversion Even if the AV headphone terminal is set to PHONES through the menu it will automatically be set to AV and PHONES will disappear from the display You are recommended to use power from a household power socket with an AC power adapter Do not operate with a cassette inserted to the camcorder Turn off the power of all equipment before performing connections Refer a...

Page 91: ... OUT set it to ON and close the menu Cautions For normal use set AV DV OUT to OFF through the menu If it is set to ON you cannot input digital signals through the camcorder s DV terminal When connecting to a PC equipped with a DV terminal you may not be able to transfer converted signals to your PC depending on the software you are using and the specifications of your PC and its settings ...

Page 92: ...V terminals Original video and audio will be replaced with the new video and audio REW PLAY FF REMOTESET SEARCH SELECT ZERO SET MEMORY AUDIO DUB STOP AV INSERT PAUSE SLOW 2 The playback tape Before inserting After inserting The tape in the camcorder The tape in the camcorder Side with arrow S 150 S video Cable STV 250N Stereo Video Cable Insert start point Insert end point Scene to be inserted Sig...

Page 93: ...correctly You cannot insert AV in the following cases The playback tape has been poorly recorded During special playback fast forward playback rewind playback or slow playback etc analog only 1 Connect the camcorder to the VCR 2 Prepare the VCR and TV Set the TV Video selector on the television to Video For further details see Connections for Playback on a TV Screen on p 33 Turn on the VCR and loa...

Page 94: ... INSERT and 2a appear in the display 4 Play back the tape in the VCR 5 To start inserting press the PAUSE button on the camcorder 2a changes to 2 6 To stop inserting press the STOP button on the camcorder Inserting stops and AV INSERT disappears from the display The camcorder returns to stop mode If instead of pressing STOP you press PAUSE the camcorder returns to the AV insert pause mode If you s...

Page 95: ...will stop If your tape hasn t been recorded in SP mode with 12 bit sound we recommend dubbing your original tape onto a blank tape using the ELURA50 s analog line in function then dubbing audio onto the new tape Make absolutely sure to set the audio mode of the new tape to 12 bit and the recording mode to SP To connect other audio equipment Notes Do not use the yellow video terminal The AV termina...

Page 96: ...PLAY VCR TAPE Preparations Dubbing Turn the camcorder s POWER switch to PLAY VCR and move the camcorder s TAPE CARD switch to TAPE Load a recorded cassette Make sure the REC SAVE tab on the cassette has been slid to REC closed position Notes When adding sound using the built in microphone make sure not to connect any cables to the MIC terminal To use your TV to monitor video connect the S video te...

Page 97: ...dubbing press the STOP button and then stop play on the other audio device if AUDIO IN Audio dubbing stops and AUDIO DUB disappears from the display The camcorder returns to stop mode You can also set zero set memory 84 at the place you want to stop audio dubbing then every time you return to that position audio dubbing will stop If instead of pressing STOP you press PAUSE the camcorder will retur...

Page 98: ...n the wireless controller Starting with the last selected setting 4 settings appear as you push the button STEREO1 for just stereo 1 STEREO2 for just stereo 2 MIX FIXED for an equal mix of stereo 1 and 2 MIX VARI mix variable for when you want to mix the balance between stereo 1 and 2 To simply choose STEREO1 STEREO2 or MIX FIXED make sure your choice appears on the display If you choose MIX VARI ...

Page 99: ... Open the menu and select VCR SET UP Then select OUTPUT CH set it to the desired setting and close the menu Refer to the following list PLAY VCR TAPE Selecting audio output channels OUTPUT CH L R VCR SET UP 39 OUTPUT CH setting Tape recorded with stereo sound Playback sound L R channels main sub L R L L L channel only main only R R R channel only sub only Tape recorded on multiple channels ...

Page 100: ... IN OUT terminal Commercially available DV cable Windows XP users can use the software on the supplied DV NETWORK SOLUTION DISK to perform videoconference and file transfer over the Internet or upload files from the computer to the memory card and use the camcorder as card reader writer The available functions depend upon the camcorder model and the networking environment For details refer to the ...

Page 101: ... to format them with the camcorder 139 For instructions on how to connect the camcorder to the computer see Connecting to a Computer using a USB Cable 140 Inserting and Removing the Memory Card Terminals Protect switch Inserting the Card Card access indicator 1 Turn off the camcorder 2 Open the cover 3 Insert the memory card all the way into the memory card slot 4 Close the cover Do not close the ...

Page 102: ...s in the display Movie Still Image 102 E Using a Memory Card Selecting the Image Size of Still Images and Movies CAMERA CARD Still image Quality Superfine Fine Normal To change the image quality open the menu and select CARD SET UP Then select SI QUALITY set it to FINE or NORMAL and close the menu The image quality may not differ between the settings depending on the still image Selecting the Stil...

Page 103: ... Card are to be included in the total number Maximum continuous recording time Notes Still images recorded in 1024 768 pixels may not be displayed correctly in a camcorder not supporting this size The remaining image capacity indicates the number of still images even when movies are recorded Still images are compressed and recorded in the JPEG Joint Photographic Experts Group format and movies in ...

Page 104: ...number avoiding duplication of numbers This is convenient when you want to manage your images on a PC We recommend keeping the file numbers set to CONTINUOUS FILE NOS CONTINUOUS CARD SET UP 39 Set the image file numbers so that they reset each time a new memory card is inserted or so that they count up continuously The still images movies you take are automatically assigned file numbers from 0101 ...

Page 105: ...l image is recorded to a memory card To turn the shutter sound off open the menu and select CARD SET UP Then select SHTR SOUND set it to OFF and close the menu 105 E Using a Memory Card SHTR SOUND ON CARD SET UP 39 Turning off the shutter sound CAMERA CARD ...

Page 106: ...te Make sure a memory card with enough memory available is inserted into the camcorder 1 Press and hold the small button on the POWER switch and turn the POWER switch to CAMERA 2 Move the TAPE CARD switch to CARD The number of images that can still be recorded on the memory card and other information appear in the display The camcorder will turn itself off if you are using a battery and do not ope...

Page 107: ...in the LCD display when LCD MIRROR is turned on on page 28 Notes To use the self timer 71 set the self timer before step 3 and then press the PHOTO button fully down The wireless controller s PHOTO button has no half way setting Press the button fully and the camcorder immediately takes the image 50 1024 320 FINE Image quality 102 Backup battery 147 Remaining battery power 146 Number of images tha...

Page 108: ...wn and hold it The tape is set to playback pause mode and the number of images that can still be recorded on the memory card appears in the display 3 Press the PHOTO button fully down to record the still image to the memory card The card access indicator flashes Notes You can also set the tape to playback pause mode in step 1 and record the image with only 1 full press of the PHOTO button If you r...

Page 109: ...mages onto a memory card If a cassette is inserted make sure the cassette is in stop mode You can record images from a VCR or TV connected through the S terminal or AV terminal analog line in as well as images from other digital camcorders connected through the DV terminal onto the memory card as still images The data code of the still image will reflect the date and time it has been recorded onto...

Page 110: ... appears in the display 3 Press the PHOTO button fully down to record the image to the memory card The card access indicator flashes Notes When dubbing to a tape via the DV terminal make sure that AVaDV is not displayed on the screen If so set AVaDV OUT to OFF in the menu 91 If you record an image onto a memory card that was originally recorded in the 16 9 mode for wide screen TV s the image will ...

Page 111: ...not load unload a tape during recording Sound will not be recording during this operation Notes Make sure a memory card with enough memory available is inserted into the camcorder The sound of a movie recorded on a memory card will be monaural 1 Turn the camcorder s POWER switch to CAMERA and move the TAPE CARD switch to CARD 2 Press the start stop button You can record up to 10 seconds in 320 240...

Page 112: ...play press the start stop button You can record up to 10 seconds in 320 240 and 30 seconds in 160 120 Press the start stop button to end recording The camcorder starts to write the movie to the memory card when recording is finished You can also start recording during record pause mode by pressing the start stop button Note If you record a movie to a memory card that was originally recorded in the...

Page 113: ... to load a cassette if you only record a movie onto the memory card If a cassette is inserted make sure the cassette is in stop mode Recording 1 Start playback on the other device 2 When the image you want to record appears in the display press the start stop button You can record up to 10 seconds in 320 240 and 30 seconds in 160 120 Press the start stop button to end recording The camcorder start...

Page 114: ... move counterclockwise 3 Set the recording program and zoom on the subject If necessary set the focus manually and AE shift After the first image recording program zoom and AE shift can not be changed 4 Press the PHOTO button to record the first image Direction and number of recorded images will be shown on the display 5 Orient the camcorder so that the second frame overlaps a small portion of the...

Page 115: ...are Instruction Manual for instructions on how to stitch them together Notes Compose each image so that it overlaps 30 to 50 of the adjoining image Try to keep the vertical misalignment within 10 Do not include moving subject in the overlapping portion Do not try to stitch images that include both distant and close subjects They may appear warped or doubled up ...

Page 116: ...th this camcorder but downloaded from a PC excluding the sample images on p 142 Still images movies that have been recorded with this camcorder but have subsequently been enhanced on a PC Still images movies whose image file names have been changed on a PC The camcorder may not be able to copy or play etc still images movies recorded on a non Canon camcorder While the card access indicator flashes...

Page 117: ... you to the last still image movie Movies Pressing e a plays back the movie and will show the last scene as a still image when playback ends Pressing e a during playback will stop the movie and the scene is shown as a still image Pressing e a again will restart the playback 2 Card Jump Function You can locate still images movies without displaying them one by one The number in the upper right of t...

Page 118: ...e frame 1 With a still image movie in the display press the INDEX SCREEN button Up to 6 still images movies appear in the display 2 Move the frame to the still image movie you want to view Turn the selector dial downwards to go to the previous still image movie and upwards to go to the next still image movie Turning the dial upwards at the last still image movie will take you to the next index scr...

Page 119: ...ased Movies can only be protected when the first or last scene is displayed as a still image They cannot be protected during playback pause The pre recorded sample images provided on the supplied SD Memory Card are already protected There are 2 ways to protect still images movies including the ways to cancel the setting 1 File Operation menu 121 2 Card Operations submenu 122 Marking a Still Image ...

Page 120: ...t once You cannot erase protected still images movies Cancel image protection first in order to erase an image Erase still images movies with caution Once a sill image movie has been erased it cannot be restored There are 2 ways to erase a single still image movie To erase still images movies one at a time 1 File Operation menu 121 To erase still images movies one at a time or erase all still imag...

Page 121: ...Select PRINT MARK set the number of prints with the selector dial and press the SET button The print mark appears on the still image If you select RETURN the menu disappears from the display To cancel a print mark select PRINT MARK set the number of prints to 0 Zero with the selector dial and press the SET button disappears 2 Select IMAGE ERASE and press the SET button ERASE THIS IMAGE NO YES appe...

Page 122: ...amcorder 1 With a still image movie in the display press the INDEX SCREEN button Up to 6 still images movies appear in the display Move the frame to the still image movie that you want to protect Index Screen 118 2 Open the menu and select CARD OPER 3 Select PROTECT 4 Press the SET button The protect mark appears on the still image movie Now you are unable to erase this still image movie Press the...

Page 123: ... selected for print mark You can also mark a still image for printing through the File Operation menu 121 Marking a still image for printing while viewing an index screen Make sure a memory card that has still images recorded on it has been inserted into the camcorder 1 With a still image in the display press the INDEX SCREEN button Up to 6 images appear in the display Move the frame to the still ...

Page 124: ...elect YES and press the SET button The print mark disappears from the still image 4 Close the menu PRINT MARKS ALL ERASE CARD OPER 39 PLAY VCR CARD Notes To cancel a print mark move the frame to the print marked still image set the number of prints to 0 zero with the selector dial and press the SET button The print mark disappears If there are a large number of images recorded on the memory card i...

Page 125: ...ill image movie you want to erase Use the index screen 118 or Card Jump Function 117 if necessary and make sure the still image movie you want to erase fills the display If you use the index screen press the INDEX SCREEN button after selecting the still image movie The still image movie you selected fills the whole display 2 Open the menu and select CARD OPER 3 Select IMAGE ERASE CANCEL SINGLE and...

Page 126: ...ie YES appears in purple and is unselectable If you select NO you return to step 4 6 Close the menu 1 Open the menu and select CARD OPER 2 Select IMAGE ERASE CANCEL SINGLE and ALL settings appear To cancel erasing select CANCEL and close the menu 3 Select ALL ERASE ALL IMAGES EXCEPT FOR IMAGES NO YES appears in the display 4 Select YES and press the SET button All still images movies except the pr...

Page 127: ...rs with the logo as of march 2003 Refer to the instruction manual of each printer for information on which interface cable to use with the camcorder The Card Photo Printer CP 10 is supplied with two direct interface cables Use the cable with the USB logo on the connector DIF 100 We recommend powering the camcorder from a household power source Refer also to the instruction manual of the respective...

Page 128: ...ing a Memory Card Printing PLAY VCR CARD 2 Connect a power source to the printer and turn on the printer 3 Set the camcorder to CARD PLAY VCR mode Wait until the card access indicator stops flashing 4 Connect the camcorder to the printer using the cable appears when the printer is properly connected to the camcorder Does not appear with movies or still images that cannot be played back with the ca...

Page 129: ...when Image is set to Standard Paper Size Card 1 Card 2 Card 3 LTR A4 For details on paper type refer to the Bubble Jet Printer User Guide Borders Borderless Prints right to the edges of the page Bordered Prints with a border Recommended paper size Card Photo Printer Selecting the Image Style 1 In the print setting menu turn the selector dial to select Style and press the SET button 2 Make sure tha...

Page 130: ...ect a setting option and press the SET button 4 Press the MENU button You return to the print setting menu Bubble Jet Printer Selecting the Paper Size 1 In the print setting menu turn the selector dial to select Style and press the SET button 2 Make sure that is selected and press the SET button 3 Turn the selector dial to select the paper size and press the SET button 4 Press the MENU button You ...

Page 131: ...s relatively unchanged from the recorded image when it is printed Borderless Multiple The center portion of the recorded image is printed at an enlarged size The image s top bottom and sides may be cropped slightly Card Photo Printer A still image set to Multiple will be printed without borders Set the print style before you start with the trimming settings 1 In the print setting menu turn the sel...

Page 132: ...rge the frame To cancel the trimming settings move the zoom lever toward W until the trimming frame disappears 3 Move the trimming frame Turn the selector dial to move the image to the right and left or up and down Pressing the SET button switches between the directions 4 Press the MENU button You return to the print setting menu Notes About the color of the trimming frame White No trimming settin...

Page 133: ...ing with print mark only Open the CARD PLAY VCR menu and select PRINT Select Restart in the print setting menu and press the SET button The remaining images will be printed Printing cannot be restarted in the following cases When you change the print mark settings When you delete a single image with print mark settings Printing Errors If an error occurs during the printing process an error message...

Page 134: ...on Manual Select from 3 types of Card Mix effects CARD CHROMA Chard Chroma Key Combine the image you are recording with a still image as a frame The image will be shown instead of the blue area of the still image When recording your own frame make sure that the area you wish the other image to appear is blue Adjustment of the MIX LEVEL blue area of the still image CARD LUMI Card Luminance Key Comb...

Page 135: ...e image you are recording MIX LEVEL CARD MIX MIX TYPE CARD CHROMA 39 Make sure a memory card that has images recorded on it and a cassette have been inserted into the camcorder 1 Make sure the camcorder is set to the Q program AE mode 2 Open the menu and select CARD MIX 3 Press the CARD buttons to select the still image to be combined Select Mix level The mix level bar appears Adjust the mix level...

Page 136: ...d MIX button your selection is activated display lights continuously or deactivated display flashes 1 Press the start stop button to start and stop recording The combined images are recorded onto the tape 1 Press the PHOTO button halfway down and hold it F flashes white in the display as the camcorder adjusts the focus and it is displayed continuously as a green mark when the camcorder is ready to...

Page 137: ...pe after that point will be copied onto the memory card If you want to copy all the images on a tape rewind the tape to the beginning 2 Open the menu and select CARD OPER 3 Select COPY CANCEL and EXECUTE settings appear 4 Select EXECUTE and press the SET button Select CANCEL to stop copying Tape and card information appear in the display and copying starts NOW COPYING appears in the display The ca...

Page 138: ... the memory card select the first image 3 Open the menu and select CARD OPER 4 Select COPY and press the SET button CANCEL and EXECUTE settings appear 5 Select EXECUTE and press the SET button Select CANCEL to stop copying Tape and card information appear in the display and copying starts NOW COPYING appears in the display Each image is copied for about 6 seconds on the tape Copying stops when all...

Page 139: ...ards All still images movies will be permanently erased If you use memory cards other than the supplied one make sure to format them with the camcorder not a PC or other device Make sure a memory card is inserted into the camcorder 1 Open the menu and select CARD OPER 2 Select FORMAT and press the SET button CANCEL and EXECUTE settings appear 3 Select EXECUTE and press the SET button Select CANCEL...

Page 140: ...ta files If you wish to use image files on your computer make copies of them first and use the copied file retaining the original Notes We recommend powering the camcorder from a household power source while it is connected to the computer For transferring recordings from to a computer using a DV cable see p 100 Still images movies recorded on a tape cannot be transferred to a computer via USB int...

Page 141: ...e downloaded from the following home page http www canondv com For details on how to add the downloaded images to the memory card refer to Adding Still Images from Your Computer to the Memory Card in the DIGITAL VIDEO SOLUTION DISK Software Instruction Manual If you are unable to connect the camcorder to a PC using a USB cable you will need a PC Card Adapter or USB Card Reader to be able to downlo...

Page 142: ...o temperature changes before removing it from the bag If condensation should occur maintain the memory card at a constant temperature and let the moisture evaporate naturally Do not touch the memory card s terminals or let dust or dirt come in contact with the terminals Store and carry memory cards in their case to protect the terminal area There is only one correct way to insert memory cards into...

Page 143: ...orded sample images on the supplied SD Memory Card are intended solely for the personal enjoyment gained from combining them with personal videos taken with this camcorder Do not use the pre recorded sample images for any other purpose PhotoEssentials Royalty Free Stock Photography The PhotoEssentials suite of royalty free images on CD ROM features premium quality assignment photography and is ide...

Page 144: ...that the subject can monitor viewing or totally closed with the screen facing inwards Adjusting the viewfinder Preparing the lens cap Attach the cord to the lens cap and pass the grip belt through the loop on the cord Hook the lens cap on to the grip belt while you are recording and place it over the lens when you have finished Fastening the grip belt Release the Velcro fastening and hold the camc...

Page 145: ...warmed in your pocket or someplace and then used If the battery pack starts to give you much less operating time than usual at normal temperatures it has reached the end of its life and must be replaced These figures show how long you can view playback with the LCD after attaching a fully charged battery pack Playback time will be shortened at low temperatures Time needed for full recharge Battery...

Page 146: ... pack will not work properly if the terminal are dirty Attach the terminal cover whenever the battery pack is not being used Storing the battery pack Storing a charged battery pack for long periods of time about 1 year can shorten its lifecycle or affect performance We recommend to discharge the battery pack in the camcorder fully and to store it in a dry place If you do not use the battery pack f...

Page 147: ... a clean dry cloth to ensure proper contact Keep the battery pack out of reach of children if it is swallowed contact a physician immediately as the battery case may break down and the battery fluids damage the stomach and intestines Do not disassemble heat or immerse the battery in water to avoid the risk of explosion Installing the backup battery Press the small hole with a pen and pull out the ...

Page 148: ...fields Do not use the camcorder close to TV transmitters portable communication devices or other sources of electric or magnetic radiation They may cause picture interference or permanently damage the camcorder Do not expose the camcorder to water Cover the camcorder when you are recording in rain or mist There is a risk of electric shock if water gets inside the camcorder contact qualified servic...

Page 149: ...sage HEADS DIRTY USE CLEANING CASSETTE appears or when the playback picture becomes distorted the video heads need to be cleaned To maintain the best picture quality we recommend cleaning the video heads frequently with the Canon DVM CL Digital Video Head Cleaning Cassette or a commercially available dry cleaning cassette Do not use wet type cleaning cassettes as this may damage the camcorder Main...

Page 150: ...ur recordings on the LCD screen your camcorder can only be connected to TVs which use its NTSC system This TV system is used in the following countries American Samoa Antigua Aruba Bahamas Barbados Bermuda Bolivia Canada Chile Columbia Costa Rica Cuba Ecuador El Salvador Guam Guatemala Greenland Haiti Honduras Jamaica Japan Korea Mexico Micronesia Myanmar Nicaragua Panama Peru Philippines Puerto R...

Page 151: ...played for approximately four seconds Then the power indicator flashes and the h mark flashes in the display If there is a cassette in the camcorder it stops automatically and REMOVE THE CASSETTE is displayed for approximately 4 seconds and then v flashes in the display If you have the beep turned on it will sound The camcorder may not detect the condensation immediately the condensation warning m...

Page 152: ...revention 17 18 The cassette has reached the end The camcorder is not set to the appropriate mode 19 29 You are attempting to play back or record copyright protected material 87 The video heads are badly contaminated 149 Refer to this checklist first if you have any problems with your camcorder Possible explanations are given for each problem on the list turn to the page numbers in parentheses for...

Page 153: ...Playback Cont Cause and or what to do about it There are a number of restrictions on using the digital effects 61 68 The camcorder is not set to TAPE PLAY VCR mode 29 The cassette is not loaded 17 The cassette has reached the end When recording in dark places a bright light in the scene may cause a vertical light bar smear to appear This is a normal feature of camcorders The video heads need clean...

Page 154: ...ht way and try inserting again Turn the camcorder s power off and back on again and remove and reinsert the card If the mark continues to flash format the memory card The camcorder is not set to CARD CAMERA or CARD PLAY VCR mode 106 116 The memory card is not inserted 101 You are using an SD Memory Card and it is set for erasure prevention Change the position of the protect switch The memory card ...

Page 155: ... Problem The wireless controller doesn t work The power indicator is flashing The camcorder malfunctions The DV cable is connected correctly but there s nothing in the display The camcorder becomes warm during use The memory card is not loaded 101 You are using an SD Memory Card and it is set for erasure prevention Change the position of the protect switch The memory card is full Erase images 120 ...

Page 156: ...roller MiniDV Video Cassette TV VCR ZR 1000 Zoom Remote Controller SC 1000 Soft Carrying Case S 150 S video Cable Digital Device Personal Computer SC A50 Soft Carrying Case Commercially available DV cable NB 2L BP 2L12 Battery Pack STV 250N Stereo Video Cable WD 28 Wide converter FS 28 U Filter Set TL 28 Tele converter BP 900 Series Battery Pack VL 10Li Battery Video Light SA 1 Adapter Bracket Pri...

Page 157: ...P 2L12 can also be used with the ELURA50 NB 2L BP 2L12 CBC NB2 Car Battery Charger Connect the car battery cable to recharge battery packs on the move The car battery cable plugs into your car s cigarette lighter socket and runs off a 12 24 V DC negative ground battery TL 28 Tele converter This tele converter lens increases the focal length of the camcorder lens by a factor of 1 7 The image stabil...

Page 158: ...A NON GENU I N E V I D E O A C C E S S O R Y SC 1000 Soft Carrying Case A handy camcorder bag with padded compartments and plenty of space for accessories Provided accessories WL D77 Wireless Controller D83 0582 000 CA PS700 Compact Power Adapter 7875A002AA CB 2LT Battery Charger 7303A001AA NB 2L Battery Pack 7302A001AA STV 250N Stereo Video Cable 3067A002AA D82 0590 201 Lens cap D52 0130 000 Opti...

Page 159: ... 33 TV SCREEN DATA CODE Turning off the LCD screen displays You can turn off the displays to give you a clear screen for playback To turn the displays off open the menu and select DISP SET UP Then select DISPLAYS set it to OFF PLAYBK and close the menu If you turn the displays off the LCD screen will be completely blank including connected TV screen but the camcorder will continue to show warning ...

Page 160: ...tery charge 146 Remote sensor mode 49 Audio mode 69 Fast forward playback rewind playback 30 2 playback forward and reverse 31 1 playback forward and reverse 31 Slow playback forward and reverse 30 Frame advance playback frame reverse playback 30 Playback pause forward and reverse 30 Date search photo search 83 Zero set memory forward and reverse 84 AV insert editing 92 Audio dubbing 95 END STEREO...

Page 161: ...mode 54 SELF T PHOTO SEARCH 1 1000 DV IN F1 8 MIX VARI 1 1 10 1 10 12bit 12 00 PM JAN 1 2003 SPEAKER ST 1 ST 2 12bit audio out 98 Photo search Date search 83 Volume level of built in speaker or headphones 32 Audio mode 69 DV input 86 Photo search Date search 83 AV insert 92 Audio dubbing 95 Data code 80 Mix balance 98 PLAY VCR Mode CARD CAMERA Mode 50 1024 320 1 100 1 2 MENUCLOSE 12 00 PM JAN 1 20...

Page 162: ...is loaded In TAPE CAMERA mode the frame number doesn t appear in the display Recording reminder When you start recording the camcorder counts from 0SEC to 10SEC Shots which are shorter than ten seconds may be difficult to edit later On the other hand if you are not planning to edit the recording remember that a shot which does not contain action should generally last no longer than 10 seconds AUTO...

Page 163: ...TE REC MODE CHECK THE CASSETTE AUDIO MODE CHECK THE CASSETTE BLANK COPYRIGHT PROTECTED DUBBING RESTRICTED Appears each time you turn the power on until you set the time zone date and time 51 Appears when the battery pack is exhausted 146 Appears when the tape has reached the end Refer to p 18 Appears when during DV dubbing the DV cable is disconnected or the power of the digital equipment connecte...

Page 164: ...emory card You are using an SD Memory Card and it is set for erasure pre vention Change the position of the protect switch Depending on the signal some analog images cannot be recorded on the memory card as still image Disconnect the USB cable erase still images movies until the memory card contains less than 900 images and reconnect the USB cable HEADS DIRTY USE CLEANING CASSETTE CARD ERROR CARD ...

Page 165: ...plete Printer is warming up The printer automatically starts printing when it is ready No print head is installed in the printer Printer cover is open Close the printer cover securely Wrong paper Cancel printing and set the paper you chose in the print settings menu Paper lever error occurred Adjust the paper selection lever to the proper position The ink tank needs to be replaced soon Prepare a n...

Page 166: ...ommended illumination More than 100 lx Filter diameter 28 mm Viewfinder 0 5 in TFT color LCD approx 113 000 pixels LCD screen 2 in measured diagonally TFT color approx 130 000 pixels Microphone Stereo electret condenser microphone Recording media SD Memory Card MultiMediaCard Number of recording pixels Still image 1024 768 640 480 pixels Movie 320 240 pixels approx 10 sec 160 120 pixels approx 30 ...

Page 167: ...with 600 ohm mic at least 5 kohms LANC u terminal ø 2 5 mm mini minijack Operating temperature range 32 104 F 0 40 C Dimensions 2 0 4 4 3 5 in 50 111 89 mm Weight 13 4 oz 380 g Battery type Rechargeable lithium ion battery Rated voltage 7 4 V DC Operating temperature 32 104 F 0 40 C Battery capacity 570 mAh Dimensions 1 3 1 8 0 64 in 33 3 45 2 16 2 mm Weight 1 4 oz 40 g Weight and dimensions are a...

Page 168: ...ion 151 Connecting to a PC 100 140 Connection to TV or VCR 33 Copying from Memory Card to Tape 138 Copying from Tape to Memory Card 137 Î Data Code 80 Date and Time 51 Date Search 83 Demo mode 23 Digital Effects 61 Digital Zoom 24 Direct Print Function 127 DV Dubbing 86 Easy Recording 58 Editing to a VCR 85 Effects 64 Erasing Still Images 120 125 External Microphone 69 95 Ï Faders 62 Fast Forward ...

Page 169: ...ting Accidental Erasure 119 122 Print Mark 119 123 Problems 152 Protect 119 122 Â Record Pause Mode 19 Record Review 38 Record Search 38 Recording Movies on a Memory Card 111 Recording Movies onto a Tape 19 Recording Programs 57 Recording Still Images on a Memory Card 106 Recording Still Images on a Tape 54 Remote Control 48 Remote Sensor 48 49 Rewind 29 Í S1 video terminal 34 Sample images 142 Sa...

Page 170: ... for Making Better Videos 36 Tripod 36 Troubleshooting 152 TV 33 159 Ë USB terminal 140 VCR 33 Video Heads 149 Video ID 1 system 35 Videocassettes 17 Viewfinder 144 White Balance 77 White LED 60 Wide screen TV 22 Wide angle 24 Wind Screen 70 Wireless Controller 48 Û Zero Set Memory 84 Zooming 24 ...

Page 171: ...anty covers all defects encountered in normal use of the DV Camcorder and does not apply in the following cases a Loss of or damage to the DV Camcorder due to abuse mishandling improper packaging by you alteration accident leaking batteries exterior nicks scratches or dents electrical current fluctuations failure to follow operating instructions maintenance and environmental instructions prescribe...

Page 172: ... c The digital video equipment is used for commercial professional or industrial purposes This limited warranty does not cover the cabinet exterior finish of the digital video equipment video cassette tapes head cleanings nor does it apply to digital video equipment purchased outside Canada TO OBTAIN WARRANTY SERVICE Ship your Canon digital video equipment in its original carton box or equivalent ...

Page 173: ... MONTREAL 5990 Côte de Liesse Quebec H4T 1V7 If you have any questions call the Canon Canada Information Center toll free at 1 800 828 4040 Canada only Si vous avez des questions veuillez téléphoner sans frais au Canada 1 800 828 4040 Canada seulement MEXICO CANON MEXICANA S DE R L DE C V Periferico Sur No 4124 Col Ex Rancho de Anzaldo C P 01900 México D F México CENTRO Y SURAMÉRICA CANON LATIN AM...

Page 174: ...E F Es DIGITAL VIDEO SOLUTION DISK Version 7 Mode d emploi du logiciel Manual de Instrucciones del software PUB DIM 553 Software Instruction Manual ...

Page 175: ...PDATES Neither Canon nor its subsidiaries dealers or distributors will be responsible for providing maintenance or support for use of the SOFTWARE No updates fixes or support will be made available for the SOFTWARE 4 LIMITED WARRANTY AND LIMITATION OF LIABILITY It is your responsibility to choose maintain and match the hardware and software components of your computer system Thus Canon does not gu...

Page 176: ...ll remain in full force and effect 9 CONTROLLING LAW The terms of this Agreement as it relates to purchases of the Software in the United States of America shall be governed and construed in all respects in accordance with the laws and regulations of the State of New York without reference to choice of law principles The terms of this Agreement as it relates to purchases of the Software in Canada ...

Page 177: ...Window 28 Playing Back Movies From a Memory Card 29 Running a Slide Show 30 Adding Sound to a Still Image 32 Adding Sound to a Still Image 32 Playing Back the Sound 32 Attaching Still Images to E mail Messages 33 Printing Still Images PhotoRecord 36 Selecting the Print Layout and Album Design 39 The PhotoRecord Window 40 Adjusting Image Quality and Printing Exif 2 2 Compliant 42 Selecting the Prin...

Page 178: ...78 Displaying Images in TimeTunnel 79 Playing Back Movies From a Memory Card 80 Running a Slide Show 81 Adding Sound to a Still Image 82 Adding Sound to a Still Image 82 Playing Back the Sound 83 Using the Sound Panel 83 Attaching Still Images to E mail Messages 84 Printing Still Images ImageBrowser 86 The Print Window 88 Adjusting Image Quality and Printing Exif 2 2 Compliant 89 Selecting the Pri...

Page 179: ... of the camcorder the software memory cards MultiMediaCards or SD Memory Cards personal computers or peripheral devices or due to use of a memory card not formatted by a Canon camcorder Trademark Acknowledgments Canon is a registered trademark of Canon Inc Macintosh is a trademark of Apple Computer Inc registered in the United States and other countries iPhoto and QuickTime are trademarks of Apple...

Page 180: ...essories to download recorded images from a memory card to your computer IFC 300PCU USB Cable DIGITAL VIDEO SOLUTION DISK Windows users Move on to p 8 Macintosh users Move on to p 60 The explanations in this manual use mainly Windows 98 and Mac OS 9 2 screen shots ...

Page 181: ...ections may not operate correctly Not all operations performed with a connection to a USB 2 0 compatible board can be guaranteed Please install the software on a computer meeting the following minimum requirements OS Windows 98 First or Second Edition Windows Me Windows 2000 Windows XP Home Edition Professional Proper operation is not guaranteed on an OS that has been upgraded from a previous vers...

Page 182: ...mory card to a computer ZoomBrowser EX 18 Downloading still images movies from a memory card to your computer Categorizing and organizing large volumes of images Creating mail attachments from images Your e mail program needs to be enabled as MAPI client PhotoRecord 36 Laying out and printing still images Printing indexes Creating still image albums PhotoStitch 44 Merging Panoramic Images This ins...

Page 183: ...ding images with this method To avoid these problems install ZoomBrowser EX to download images It may take a few minutes after connecting the camcorder until you can download images Only AVI movie files can be downloaded Thumbnails cannot be downloaded Two files are created in the camcorder for example MVI_0001 AVI and MVI_0001 THM MVI_0001 THM files cannot be downloaded but movies can still be pl...

Page 184: ...k the CD ROM icon and select Open from the displayed menu 3 Double click the Setup exe icon Depending on the setting of your computer the file extension exe may not appear 3 Select your language 4 Click Digital Video Software Installation 5 Click Next 6 Read the license agreement and click Yes ...

Page 185: ...t C Program Files Canon 8 Select the programs you wish to install and click Next Confirm that there is a check mark beside the name of the program you wish to install 9 Review the installation settings and click Next Installation starts If the Digital signature not found message appears click Yes ...

Page 186: ...omputer has restarted and the regular desktop screen is displayed remove the DIGITAL VIDEO SOLUTION DISK from the CD ROM drive When installation is complete remove the DIGITAL VIDEO SOLUTION DISK before you connect the camcorder to the computer At this point the files for the TWAIN Driver or WIA Driver have only been copied to your computer To download still images movies via USB connection finish...

Page 187: ...t the Power Adapter to the camcorder 3 Turn the POWER switch to PLAY VCR and move the TAPE CARD switch to CARD Wait until the card access indicator stops flashing 4 Connect the camcorder to the computer using the supplied USB cable 16 If the Digital signature not found message appears click Yes After a few moments a message such as New Hardware Found appears and the TWAIN driver will be installed ...

Page 188: ...N device 1 Insert a memory card containing still images movies into the camcorder 2 Connect the Power Adapter to the camcorder 3 Turn the POWER switch to PLAY VCR and move the TAPE CARD switch to CARD Wait until the card access indicator stops flashing 4 Connect the camcorder to the computer using the supplied USB cable 16 If the Digital signature not found message appears click Yes After a few mo...

Page 189: ...erface If it does happen never disconnect the USB cable Try to awaken the computer with the camcorder in the connected state Some computers will not awaken properly if you disconnect the camcorder while they are in standby mode Please refer to your computer manual for instructions regarding its standby mode 1 Insert a memory card into the camcorder 2 Connect the power adapter to the camcorder 3 Tu...

Page 190: ...river 14 15 Windows XP If a window appears prompting you to select an application program to start select ZoomBrowser EX or Scanners and Cameras Wizard to start If neither of these is selected operation may not work correctly You can also set the computer to start ZoomBrowser EX or Scanners and Cameras Wizard automatically 52 ...

Page 191: ...d onto the memory card or downloaded to the hard disk are important original data files Create a copy of the file first before working on it on your computer For Windows XP Users Do not rotate the image in the Windows Picture and Fax Viewer or in the explorer view The file format of the original image will be changed and the image can no longer be displayed in ZoomBrowser EX or on the camcorder If...

Page 192: ... not appear on the camcorder screen start ZoomBrowser EX and open the Camera Window following the steps 5 to 7 for Windows Me 5 Select Canon ZoomBrowser EX and click OK ZoomBrowser EX starts and opens the Camera Window displaying the camcorder images as thumbnails small images With Windows 2000 the name of the application program may not appear on the Canon Camera event window In such case double ...

Page 193: ...vies into the camcorder 2 Connect the Power Adapter to the camcorder 3 Turn the POWER switch to PLAY VCR and move the TAPE CARD switch to CARD Wait until the card access indicator stops flashing 4 Connect the camcorder to the computer using the supplied USB cable 16 The Scanners and Cameras Wizard automatically opens Click Cancel to close the Wizard 5 Double click the ZoomBrowser EX icon on the de...

Page 194: ...ill Images Movies to the Computer 1 In the Camera Window select the still image movie you wish to download and click Download image An orange frame appears around the selected still image movie You can select multiple images by continuously clicking on the images Click on the image again to deselect ...

Page 195: ...22 The Camera Window closes and the Main Window opens The downloaded images appear in the Main Window Downloading Still Images Movies ZoomBrowser EX ...

Page 196: ...Browser EX icon on the desktop Windows XP When a window appears allowing you to select an application program to start select ZoomBrowser EX and click OK ZoomBrowser EX starts 3 Click Camera Memory Card 4 Click Browse Download Images The Camera Window opens displaying the memory card images as thumbnails small images If multiple PC card readers loaded with memory cards are connected or if a camcor...

Page 197: ... Internet Attaches selected still images to an e mail message Toolbar Set Adjusts the connection settings and camcorder settings Menu options Reconnect Camera Settings Slide DPOF Add Image s and My Camera The SLIDE My Camera function cannot be used Select Selects still images movies Menu options Select All Select New Select Print mark Select Send mark Select Slide Show mark and Invert Selection De...

Page 198: ...a Window Select a folder in which you wish to download and save the still image movie If you wish to create a new folder select Create new folder and select the item you wish to use as folder name If you leave the box without check mark the folder will be named in the form of 100 0001 JPG If you put a check mark in the box you can designate a file prefix The folder will be named file prefix 0001 J...

Page 199: ...ex Print View Modify Use this to view or edit images Menu options View as a Slide Show Edit Image and Stitch Photos Internet Attaches selected still images to an e mail message This camcorder does not support the My Camera function The My Camera option in the Camera Memory Card task cannot be used Task Area Toolbar Folders Area Select image folders here As in Windows Explorer you can view the cont...

Page 200: ...r level You can also zoom up by double clicking an empty part of the Browser Area or the tab of a folder name Thumbnail Size Selects the size at which images are displayed in the Browser Area Menu options 80 80 160 160 and Column Number It can only be selected in Scroll Mode View Image Displays a still image in the Image Viewer window or opens a window for playing back a movie Properties Displays ...

Page 201: ...lor Brightness and Contrast You can adjust the color brightness and contrast by dragging the respective slide Zoom You can change the zoom ratio Crop You can extract a part of the image 1 Click on the image and drag to form a rectangular frame You can move or change the size of the frame 2 Click this button to extract the area within the frame The extracted part of the image appears ...

Page 202: ...e QuickTime 5 0 program from the DIGITAL VIDEO SOLUTION DISK Place the disk in the CD ROM drive and click QuickTime 5 0 Installation in the installer panel Do not double click a movie file AVI extension in Windows Explorer That will start Windows Media Player which may not support this file type To play back movies double click the thumbnail with a movie icon in the Main Window s Browser Area 1 In...

Page 203: ...de Show You can view selected still images in a slide show Movies cannot be selected for a slide show 1 Click View Modify in the Main Window 2 Click View as a Slide Show 3 Select the images and select Setup Slide Show ...

Page 204: ...lly When you select Every 3 seconds you can select the interval in the control below from 1 to 120 seconds Loop Select to stop the slide show after the last image or to continuously run it in a loop Effect Select the transition effect to be used when moving from one slide to another When you click an effect you can check the effect in the preview window 5 Click Start Slide Show Click in the lower ...

Page 205: ...d A window appears allowing you to select a file 3 Select the sound file and click Open 4 Click OK appears on the still image The sound file will be copied to the same folder as the still image To remove sound from a still image select Remove on the Sound Window in step 2 disappears and the copied sound file will be deleted Playing Back the Sound In the Main Window select the still image with the ...

Page 206: ...s You can attach selected still images to an E mail message To use this function the e mail program must be enabled as MAPI client For details refer to the instruction manual of the e mail software 1 Click Internet in the Main Window 2 Click Email Images ...

Page 207: ...ity and click Send or Save If you wish to send the image without changes select Send images unchanged Normally select Resize and compress images into JPEG format Resize Image Select the reduction ratio to the original image Image quality The lower the quality the coarser becomes the image and smaller the file size Pressing Apply displays the file size after the compression as Total size of changed...

Page 208: ...ar as an attachment in the message window Input address subject and your comments and send the message E mail programs not supporting MAPI do not start automatically In this case go back to step 5 and select Save the images in a folder If you select Save the images in a folder click Browse and select the destination folder Start your e mail program and attach the saved image to a message ...

Page 209: ...memory card data to become corrupted If you are using a network printer and the printer name including the network path exceeds 31 characters it may not be possible to print from PhotoRecord If this happens open Control Panel on the Start menu Click the Printers icon and change the name of the your printer limiting its length to within 31 characters Movies cannot be printed 1 Click Print in the Ma...

Page 210: ...lect the image information you wish to include in the print and click Open Layout Print Place a check mark beside the items you wish include in the print If you wish to add a comment right click the mouse button on the still image select Properties from the displayed menu and type in a comment PhotoRecord starts and the PhotoRecord Print Modes window appears 39 5 Select a print mode and click Next...

Page 211: ... The PhotoRecord window appears If you wish to change the layout select the layout in this window 8 Click PRINT in the PhotoRecord window The Print window appears If you wish to save it as an album select Save As from the File menu select the destination folder and input the file name 9 Click Print in the Print window Printing starts ...

Page 212: ...appears Artwork Layout album You can create a colorful and fun design Fixed photo size printing You can squeeze pictures into the paper size for printing Tiled photo printing The program lays out and prints the specified number of images with no gaps between images on the page Canon perforated paper printing 2 Select the paper size When you click Next a window for selecting the layout appears 3 Se...

Page 213: ...this to display the Print Dialog Page title To change the page title click on the left side of the window and on the menu that appears click Title and Edit Image caption To change the image caption right click the image and on the shortcut menu click Caption and Edit Then type a description about the image Text box To add text to the page click on the left side of the window and on the menu that a...

Page 214: ...hat you want to change then use the following operations to change its size or angle You cannot alter the size or rotation angle if you selected Fixed photo size or Canon perforated paper as the print mode Changing the number of images on a page You can change the number of images on one page On the Edit menu click Preferences and specify the number of images you want to have on one page of the al...

Page 215: ...uce better prints Still images recorded with camcorders complying with the Exif 2 2 standard incorporate recording settings information such as the recording conditions and scene mode along with the image data The Exif Print adjustment protocol uses this information to correct the image quality more accurately to reflect the recording settings 1 Right click an image you wish to print and select Cl...

Page 216: ...nt settings are limited to a maximum of 200 still images In that case all DPOF print settings on the 201st still image and onward will be erased 1 Click Set in the Camera Window and select Slide DPOF in the displayed menu The Edit Slide DPOF window appears 2 Select the still image you wish to print and the number of copies Standard Print Prints selected images in the specified number of copies Use...

Page 217: ...Instruction Manual to learn how to record in Stitch Assist mode The following instruction explains how to merge still images recorded in Stitch Assist mode with the camcorder Still images recorded in Stitch Assist mode with Wide converter or Tele converter attached cannot be merged correctly 1 Click the arrow in the Camera Window 2 In the confirmation window click OK PhotoStitch starts 3 Arrange t...

Page 218: ...o have QuickTime installed on your computer If it is not already installed install it from the DIGITAL VIDEO SOLUTION DISK Place the disk in the CD ROM drive and click QuickTime 5 0 Installation in the installer panel Please refer to the ZoomBrowser EX and PhotoStitch Help menu for more details 4 Click Start 5 Select 3 Save and then click Save Select the destination folder input the file name and ...

Page 219: ...from the computer to a memory card You can also add sample images for card mix from the DIGITAL VIDEO SOLUTION DISK Only still images in JPEG format can be added to the memory card Adding Still Images to the Memory Card 1 Click Camera Memory Card in the Main Window 2 Click Upload Images ...

Page 220: ...d images will be recorded to the memory card When recording is complete the images will appear in the Camera Window 3 Select the images you wish to add and click Open Camera Window You can select multiple images by continuously clicking on the images Click on the image again to deselect ...

Page 221: ...D LUMINANCE and 2 images for CAMERA CHROMA are provided on the DIGITAL VIDEO SOLUTION DISK 1 Insert the DIGITAL VIDEO SOLUTION DISK to the computer s CD ROM drive 2 Click Camera Memory Card 3 Click Upload Images 4 In the Folders Area of the Main Window select the CD ROM icon followed by DVC CARD IMAGE Sample images or folders for CARD CHROMA CARD LUMINANCE or CAMERA CHROMA appear in the Browser Ar...

Page 222: ...ndow You can select multiple images by continuously clicking on the images Click on the image again to deselect 6 In the Add Image window click Add The selected images will be recorded to the memory card When recording is complete the sample images will appear in the Camera Window ...

Page 223: ...rder to the computer using the supplied USB cable 16 When a window appears allowing you to select an application program to start click Cancel 5 Click the Windows Start menu and select Settings and Control Panel 6 Double click the Scanners and Cameras icon If you cannot find the Scanners and Cameras icon see Troubleshooting the TWAIN Driver WIA Driver Uninstall 55 7 Make sure that Canon Camera is ...

Page 224: ...ers and Cameras Wizard opens click Cancel 5 Click the Windows Start menu and select Settings and Control Panel 6 Double click the Scanners and Cameras icon If you cannot find the Scanners and Cameras icon see Troubleshooting the TWAIN Driver WIA Driver Uninstall 55 7 Double click the Canon Camera icon 8 Click the Events tab 9 In the Actions section select Start this program set it to Canon ZoomBro...

Page 225: ...nnect the Power Adapter to the camcorder 3 Turn the POWER switch to PLAY VCR and move the TAPE CARD switch to CARD Wait until the card access indicator stops flashing 4 Connect the camcorder to the computer using the supplied USB cable 16 A window appears allowing you to select an application program to start 5 Select Canon ZoomBrowser EX place a check mark next to Always use this program for this...

Page 226: ... of Windows 2000 and Windows XP must first log in as an Administrator to uninstall the driver and other programs Uninstalling ZoomBrowser EX 1 Click the Windows Start menu and select Programs Canon Utilities ZoomBrowser EX and ZoomBrowser EX Uninstall The uninstall utility starts and removes ZoomBrowser EX Uninstall the Camera Window with the same procedure Uninstalling the TWAIN Driver WIA Driver...

Page 227: ...hooting the TWAIN Driver WIA Driver Uninstall 55 8 Windows 98 Windows 2000 1 Delete Canon Camera from the Scanners and Cameras Properties list 2 Click OK to close the window 3 Click the Windows Start menu and select Programs Canon Utilities Camera TWAIN Driver x x and TWAIN Driver Uninstall A version number appears in place of x x Windows Me 1 Delete the camcorder icon from the Scanners and Camera...

Page 228: ...ouble click the System icon The System Properties dialog appears 3 Click the Device Manager tab 4 If Canon Camera appears under the Other Devices and or Imaging Devices categories use the following procedures to delete it 1 Select Canon Camera and click Remove 2 In the confirmation dialog click OK 3 Click OK to close the System Properties dialog 5 Double click the My Computer icon on the desktop f...

Page 229: ...ted to the computer 1 Click the Windows Start menu and select Settings and Control Panel 2 Double click the System icon 3 Click the Hardware tab 4 Click the Device Manager button 5 If Canon Camera or your camcorder model name appears under the Other Devices and or Imaging Devices categories use the following procedures to delete it 1 Select Canon Camera or the name of the camcorder model right cli...

Page 230: ... OEM A number such as 0 or 1 will appear in place of the asterisk above You will also find another file called Oem pnf which will have the same number as the Oem file The two constitute one set There may be many file sets starting with Oem If you double click the Oem file the Windows Notepad program will start and show the file contents Click each Oem file until you find one that contains Canon Ca...

Page 231: ...erational problems detach the USB cable from the camcorder and computer and terminate the connection Restart the computer and then reconnect the camcorder TWAIN Driver or WIA Driver is not installed properly First uninstall the TWAIN Driver WIA Driver then reinstall the driver from the DIGITAL VIDEO SOLUTION DISK remove the check marks from the other programs when prompted to select the programs t...

Page 232: ...gram Files Canon ZoomBrowser EX Program 2 Double click dbconverter exe 3 Select the database you were using until now C Program Files Canon ZoomBrowser EX Program and click the Start button Please note that with ZoomBrowser EX 4 0 both titles and comments appear in the comment list Cannot find the image folders saved on the prior version of ZoomBrowser EX 4 0 Image folders saved under the Program ...

Page 233: ...m even if it meets the requirements outlined above ImageBrowser and PhotoStitch do not operate on disks formatted with the Unix File System UFS A CD ROM drive is required to install the software Connect the USB cable directly to one of the computer s main USB ports The interface may not function correctly if the camcorder is connected via a USB hub The connection may not operate correctly if you a...

Page 234: ...6 Downloading still images movies recorded onto a memory card to your computer Categorizing and organizing large volumes of still images movies Searching and organizing images chronologically Creating mail attachments from still images Laying out and printing still images Printing indexes PhotoStitch 92 Merging panoramic images This camcorder does not support the My Camera function ...

Page 235: ...ated in the camcorder for example MVI_0001 AVI and MVI_0001 THM MVI_0001 THM files cannot be downloaded but movies can still be played back on the computer Mac OS X 10 2 You may not be able to download images with iPhoto if the memory card contains an enormous volume of images approx 900 or more The Exif version may change to 2 1 and image information may be modified when downloading images with I...

Page 236: ...lick the CD ROM icon followed by the Mac OS X and Canon Digital Video Installer icons The installer panel appears 4 Select your language 5 Click Digital Video Software Installation 6 Select the programs you wish to install and click Install Confirm that there is a check mark beside the name of the program you wish to install 7 Read the license agreement and click Agree ...

Page 237: ...ssage Installation has finished appears click OK 10 After the installation is complete restart the computer as prompted Installing the Software 8 Select the installation destination and click Choose Installation starts ...

Page 238: ...by sleep mode while a camcorder is connected via the USB interface If it does happen never disconnect the USB cable Try to awaken the computer with the camcorder in the connected state Some computers will not awaken properly if you disconnect the camcorder while they are in standby mode Please refer to your computer manual for instructions regarding its standby mode 1 Insert a memory card containi...

Page 239: ...the USB cable Do not turn off the camcorder or the computer Do not change the position of the POWER switch or the TAPE CARD switch Format the memory card with the camcorder or from the Camera Window 74 Still images movies recorded onto the memory card or downloaded to the hard disk are important original data files Create a copy of the file first before working on it on your computer Starting Imag...

Page 240: ...ted settings will appear the next time you start ImageBrowser 1 To use these settings unchanged click the Start button 2 To do nothing click Cancel 3 To change the settings click Settings Change select the action and click OK 5 Select Display Images and click OK The Communications Settings window appears This window only appears the first time the camcorder is connected 6 Confirm that USB port and...

Page 241: ... thereafter Click here to close the dialog Mac OS X 10 1 10 2 Do not connect the camcorder while the Classic environment is started Likewise do not start the Classic environment while the camcorder is connected 1 Insert a memory card containing still images movies into the camcorder 2 Connect the Power Adapter to the camcorder 3 Turn the POWER switch to PLAY VCR and move the TAPE CARD switch to CA...

Page 242: ...eBrowser icon on the desktop If the Canon ImageBrowser icon does not appear on the desktop double click the Canon Utilities folder on the drive on which the program was installed followed by the ImageBrowser folder and ImageBrowser icon 6 Click Canon Camera in the Explorer View section The Communications Settings window appears This window only appears the first time the camcorder is connected ...

Page 243: ...instructions below 1 Mac OS 9 0 9 2 Select Macintosh HD in the explorer view section Mac OS X 10 1 10 2 Select the user name subfolder of the Users folder in Macintosh HD 2 Create a new folder for saving images from the memory card in the camcorder Click the File menu and select New Folder A folder with the name Untitled will be created Click it to change the folder name as you wish In this exampl...

Page 244: ...ed still image movie Downloaded still images movies are saved to the computer and appear in the Browser area To disconnect the camcorder click the close box Mac OS 9 0 9 2 or the red close box Mac OS X 10 1 10 2 at the upper left of the Camera Window The Camera Window will close Thumbnail Explorer View Section Browser area ...

Page 245: ... folder in which you installed the program followed by the Canon Utilities and ImageBrowser folders and the ImageBrowser file 3 Double click the CANON_DV and DCIM folders in the Explorer View Section The Camera Window opens displaying the memory card images as thumbnails small images Double clicking a still image movie on the camera window imports it to the computer You can also download still ima...

Page 246: ... camcorder to the computer SELECT Selects still images movies Menu options Select All and Deselect All DELETE Deletes selected still images movies DOWNLOAD Downloads selected image to the computer PRINT Prints selected still images Menu options Layout printing and Index printing ROTATE Rotates still images Menu options 90 degrees right 90 degrees left and 180 degrees UPLOAD Adds selected still ima...

Page 247: ...Camera Window click the Setup Options button and select Camera Settings from the displayed menu 2 Check or change the settings Click OK to close the window Input a camcorder owner name here up to 31 characters Set the date and time here Click this button to synchronize the camcorder to the computer s date and time settings Check the battery status here Click this to format the memory card in the c...

Page 248: ...ntains buttons that allow you to perform a variety of functions Browser Area This is the area where thumbnails of still images movies in the selected folder are displayed Movies are displayed with an movie icon Browser Window This section describes the various parts of the Browser Window display CANON CAMERA Displays the Camera Window SELECT ALL Selects all still images movies in a folder SEND TO ...

Page 249: ...part of the image 1 Click on the image and drag to form a rectangular frame You can move or change the size of the frame 2 Click this button to extract the area within the frame The extracted part of the image appears ADJUST COLOR Click here to display the Adjust Color window to adjust hue saturation and lightness of the image by dragging the respective slide Enlarge or reduce the image Current zo...

Page 250: ...o display the information 2 From the File menu select Get Info The File Information window appears If you wish to add a comment input it in the Comment area Click OK to close the window It depends on your camcorder model which image information will be displayed When you modify and save an image using another program shooting information or comments may be lost ...

Page 251: ...he Browser Area To stop displaying the preview image select View Mode followed by List in the View menu Allows you to enlarge and reduce the size of the thumbnails Allows you to enlarge or reduce the size of the thumbnails Allows you to select the information displayed under the thumbnails Allows you to select the operating panel displayed below the Browser Area Using Other ImageBrowser Functions ...

Page 252: ...lay A window similar to the one below appears Specify the new date time Click to display the control panel Display Tool Panel Select to display or hide the tool panel Auto Cruise Enables or disables Auto Cruise When Auto Cruise is active the time movement continues even after you have moved and released the bar Switch to Browser View Exit TimeTunnel and returns to the previous screen Tool Panel Al...

Page 253: ...rst scene as a still image with a movie icon When you double click the thumbnail in the Browser Area QuickTime Player starts and plays back the movie 1 In the Browser Area double click a thumbnail with a movie icon QuickTime Player starts 2 Click the e play button in QuickTime Player The movie will be played back ...

Page 254: ... with Mouse or Keypad Advances the slide show manually with the mouse or keyboard Repeat Continuously Runs the slide show in a loop Hide buttons Hides the buttons during the slide show Transition Effect Select the transition effect to be used when moving from one slide to another When you select an effect you can check the effect in the preview window 3 Select the images and select Slide Show from...

Page 255: ...t a still image and select Record from the Sound menu The recording window appears 2 Click and start recording when the Save button is enabled 3 Click Save to stop recording appears on the still image The sound file will be copied in AIFF format extension AIF to the same folder as the still image To remove sound from a still image repeat step 1 and when a confirmation message appears click OK On t...

Page 256: ...Back the Sound In the Browser Area select the still image with the sound attachment and select Play from the Sound menu The sound will be played back You can control playback by selecting Pause or Stop from the Sound menu Using the Sound Panel You can use the sound panel to record playback and adjust the volume 1 From the View menu select View Settings and select Sound Panel from the displayed men...

Page 257: ... ratio and image quality and click Next Resize Select the reduction ratio relative to the original size of the image Quality Select the image quality The lower the quality the rougher the image becomes but the size of the file also becomes smaller Compress Use it to check the file size when you actually compress the image The file size appears next to Total Size After Compression Select this if yo...

Page 258: ...e mail program to start automatically in step 5 Note that some e mail programs may not start automatically Mac OS 9 0 9 2 From the Apple menu select Control Panel followed by Internet and click the Email tab Change the setting in the displayed window Mac OS X 10 1 10 2 From the Apple menu select System Preferences followed by Internet and click the Email tab Change the setting in the displayed win...

Page 259: ...ome corrupted 1 Select the still image s you wish to print in the Browser Window Movies cannot be printed 2 Click PRINT and select Layout printing from the displayed menu The Layout Options window and Print window appears If the Layout Options window does not appear display it by clicking LAYOUT OPTIONS in the Print window Printing Still Images ImageBrowser You can select the layout when printing ...

Page 260: ...print an index or print onto Canon perforated paper Canon perforated paper cannot be selected with Mac OS X 10 1 10 2 Layout Options Window 4 Select a paper size and click OK The Print window opens allowing you to change the layout and printing settings The settings available will vary according to the type of layout selected in Step 3 5 Click PRINT in the Print window The Print dialog appears 6 C...

Page 261: ...ayout Edit the Page Title Open the Edit menu and select Edit Header Change the Layout Drag the still image to change the layout Click this to select a layout type Click this to display the Print dialog Add Text Open the Edit menu and select Add Text Add Captions to Still Images Click the still image and then the Edit menu and select Edit Caption The Print Window Printing Still Images ImageBrowser ...

Page 262: ... supports the Exif 2 2 standard or Exif Print Still images shot with camcorders complying with the Exif 2 2 standard incorporate shooting settings information such as the shooting conditions and scene mode along with the image data The Exif Print adjustment protocol uses this information to correct the image quality more accurately to reflect the shooting settings When printing from ImageBrowser t...

Page 263: ...y settings and click OK See Printing Still Images for the next steps 86 Select this option to automatically correct only images shot with Exif 2 2 compliant camcorders Select this option to automatically correct images shot with Exif 2 2 compliant camcorders and other images A check mark must be placed here to automatically correct the image quality Mac OS X 10 1 10 2 ...

Page 264: ... camcorders DPOF print settings are limited to a maximum of 200 still images In that case all DPOF print settings on the 201st still image and onward will be erased 1 Click SLIDE DPOF in the Camera Window The Edit Slide DPOF window appears 2 Select the still image you wish to print and the number of copies Standard Print Prints selected images in the specified number of copies Use the arrows next ...

Page 265: ...tion Manual to learn how to record in Stitch Assist mode The following instruction explains how to merge still images recorded in Stitch Assist mode with the camcorder Still images recorded in Stitch Assist mode with Wide converter or Tele converter attached cannot be merged correctly 1 Click the green stitch mark in the Camera Window 2 In the confirmation window click Yes PhotoStitch starts 3 Arr...

Page 266: ...displays the merged image You can record the surroundings in 360 degrees and stitch them together later to form a 360 degrees cylinder In 1 Selection and Arrangement select Arrange and 360 degrees By saving this stitched image in QuickTime VR format you can then get a virtual view of the surroundings For more details please refer to the ImageBrowser and PhotoStitch Help menu 4 Click Start ...

Page 267: ...t can be added to a memory card However the still images will be saved in JPEG format on the memory card You can also add still images to a memory card by using drag and drop to move it from the browser area to the Camera window Adding Still Images to the Memory Card 1 In the camera window click UPLOAD 2 Select the still image you wish to add and click Open You can check the selected still image b...

Page 268: ...ION DISK 1 In the camera window click UPLOAD 2 Insert the DIGITAL VIDEO SOLUTION DISK to the computer s CD ROM drive 3 Double click the CD ROM icon followed by the DVC CARD IMAGE folder The folders CARD CHROMA CARD LUMINANCE or CAMERA CHROMA appear 3 In the Add Image window select the image size and click Add The selected images will be recorded to the memory card When recording is complete the im...

Page 269: ... image you wish to copy to the camcorder and click Open 5 In the Add Image window click Add The selected images will be recorded to the memory card When recording is complete the images will appear in the Camera Window Adding Still Images from Your Computer to the Memory Card ...

Page 270: ...lation is required to fix corrupted files Uninstalling ImageBrowser and PhotoStitch Move the program s folder into the Trash to uninstall programs such as ImageBrowser and PhotoStitch If the program folders contain subfolders into which still images movies have been saved be careful not to accidentally delete those subfolders ...

Page 271: ...y card in the camcorder Insert a memory card into the camcorder The camcorder is not set to the correct mode Slide the POWER switch to PLAY VCR and the TAPE CARD switch to CARD Camcorder is not correctly connected to the computer Read Connecting the Camcorder to a Computer 65 and check the connection Ensure that you are using the correct cable and that its connectors are in good shape If you are e...

Page 272: ... Tel US 1 800 828 4040 Mon Fri 9 AM to 8 PM Eastern Time CANADA Canon Canada Inc Tel Canada 1 800 OK CANON 1 800 652 2666 ASIA Canon Hong Kong Co Ltd 9 F The Hong Kong Club Building 3A Chater Road Central Hong Kong Phone 852 2739 0802 Fax 852 2369 7701 Printed on 100 reused paper Document réalisé avec du papier recyclé à 100 El papel aqui utilizado es 100 reciclado ...

Page 273: ...truction Manual PUB DIM 555 This software is for use with Windows XP only Ce logiciel ne peut être employé que sous Windows XP Este software solamente es compatible con Windows XP E F Es Mode d emploi du logiciel Manual de Instrucciones del software ...

Page 274: ... SOFTWARE or on a medium if any on which the SOFTWARE delivered 3 OWNERSHIP All rights including but not limited to copyrights and trade secret rights to the SOFTWARE belong to Canon its affiliated corporations and third party licensors Your use of the SOFTWARE is subject to the laws of the United States and Canada and other applicable copyright and trademark laws and nothing in this Agreement con...

Page 275: ...e hereof by clicking YES below and remains in effect until expiration of all copyright interests in the SOFTWARE unless earlier terminated You may terminate this Agreement by destroying the SOFTWARE including any and all copies thereof This Agreement shall also terminate without notice to you if you fail to comply with any of the terms of this Agreement In the event that this Agreement terminates ...

Page 276: ... WIA Driver Downloading Still Images Movies to a Computer 23 Downloading with the Scanner and Camera Wizard 24 Downloading with Windows Explorer 26 Uploading Files from the Computer to the Memory Card 28 DV Messenger Preparations for the DV Messenger 29 Checking the Camcorder Connection 29 Disabling the Firewall 30 Videoconferencing 33 Starting the DV Messenger 33 Preparing the Camcorder for Commu...

Page 277: ...ries Other names and products not mentioned above may be registered trademarks or trademarks of their respective companies AV C Camera Storage Subunit is a standard for downloading and uploading files using an AV device equipped with the IEEE1394 The driver complies with the AV C Camera Storage Subunit Version 1 0 by the IEEE1394 Trade Association WIA stands for Windows Image Acquisition WIA is a ...

Page 278: ...3 If you are using a router for Internet connection your router is UPnP Universal Plug and Play compatible Some modems are equipped with a router function For details refer to the manual of the modem This software is compatible with Windows XP only It cannot be used with other Operating Systems Furthermore Windows Messenger 4 5 or higher is required Establish an environment that allows the use of ...

Page 279: ...roadband connection to the Internet Cautions Proper operation is not guaranteed on a dual CPU PC or on a user built PC Proper operation is not guaranteed for all computers that meet the above requirements A CD ROM drive is required to install the software Connect the camcorder directly to the computer using a DV IEEE1394 cable The connection may not operate correctly if the camcorder is connected ...

Page 280: ...erations with your digital camcorder via the Internet Real Time Video Communication Videoconference 33 You can use your camcorder and computer for real time video and voice communication Sending Movies 33 You can send video and sound recorded with the camcorder via the Internet Camcorder Operation 43 Canon camcorders only refer to the table on the next page You can operate the camcorder connected ...

Page 281: ...t camcorder models Free Download If the person you wish to communicate with does not have DV Messenger it can be downloaded from the Canon Homepage http www canondv com If you leave the camcorder turned on for a long time heat generation may cause damage to the camcorder Turn off the camcorder after use Tapes may be damaged if left in the camcorder for a long time Do not leave tapes in the camcord...

Page 282: ...nstalling from the DV NETWORK SOLUTION DISK Close all programs that are running before copying the driver files Users of Windows XP Professional must first log in as an Administrator to install programs 1 Set the DV NETWORK SOLUTION DISK in the computer s CD ROM drive If the version of your Windows Messenger is older than 4 5 a dialog appears indicating that DV Messenger cannot be installed If you...

Page 283: ...xt 5 Read the license agreements and click Yes 6 Enter your information and click Next 7 Confirm the target folder and click Next If a dialog appears asking you whether you wish to create a shortcut of the DV Messenger on the desktop click Yes ...

Page 284: ... must first log in as an Administrator to install programs 1 Start the computer 2 Connect the power adapter to the camcorder 3 Set the camcorder to CARD PLAY VCR mode 4 Connect the camcorder to the computer using the DV cable 22 The driver installation starts automatically Depending on the setting of your computer a video editing program may start In such case close this program If the installatio...

Page 285: ... card is inserted into the camcorder the Scanner and Camera Wizard opens automatically Proceed to step 5 Downloading Still images Movies to a Computer 23 If no memory card inserted in the camcorder following dialog appears Click OK to close the dialog If a WIA compliant application software is already installed a dialog for selecting an application appears We recommend selecting the Scanner and Ca...

Page 286: ...res to change the setting 1 Connect the power adapter to the camcorder 2 Set the camcorder to CARD PLAY VCR mode 3 Connect the camcorder to the computer using the DV cable 22 4 From the start menu select My Computer 5 Right click the mouse button on the camera icon and select Properties 6 Click the Events tab 7 Select Take no action and click OK Now the application will not start automatically whe...

Page 287: ...application automatically select Start this program and click OK If the started application displays a message such as TWAIN data source not found Reinstall the scanner software select WIA Canon Camera Storage and use the WIA TWAIN Driver ...

Page 288: ...DV Messenger and DV Messenger Uninstall in succession 2 If a confirmation dialog appears click Yes The uninstall utility starts and removes DV Messenger 1 Connect the power adapter to the camcorder 2 Set the camcorder to CARD PLAY VCR mode 3 Connect the camcorder to the computer using the DV cable 22 If Scanner and Camera Wizard or Explorer are open close them Uninstalling the AV C Camera Storage ...

Page 289: ...17 E 4 From the start menu select Control panel 5 Click Printers and Other Hardware 6 Click Scanners and Cameras ...

Page 290: ...not affect the uninstall process The uninstall process is complete Troubleshooting the Driver Uninstall If you had problems uninstalling the driver use the following procedures to remove it Notes Use the procedures below for the following circumstances too If you do not find the Scanners and Cameras icon in the Printers and Other Hardware If the Camera icon does not appear in the Scanners and Came...

Page 291: ...operties 5 Click the Device Manager button 6 If Canon Camera Storage Device appears under Imaging devices and or Other devices categories use the following procedures to delete it 1 Right click the mouse button on Canon Camera Storage Device and select Uninstall ...

Page 292: ... 7 From the start menu select My Computer and double click the C WINDOWS and INF folders in succession If the INF Folder Is Not Visible in the WINDOWS Folder Use the following procedures to show all files and folders 1 Click the Tools menu and select Folder Options 2 Click the View tab 3 In the Advanced setting section set the Hidden files and folders category to the Show hidden files and folders ...

Page 293: ...nts Click each Oem file until you find the one that contains AV C Camera Storage WIA driver in its first line When you have found the correct file delete the file set 1 Close the Notepad window 2 Right click the mouse button and select Delete 9 Close all windows and restart the computer The uninstall process is complete Caution The Inf folder contains numerous files that are critical to the comput...

Page 294: ...non DV Camcorder camcorder icon appears in the explorer view If the driver is not installed only the camcorder icon appears Camera icon You can download still images movies from a memory card to the computer Camcorder icon You can playback still images movies recorded on a tape on the computer 1 Attach the DV cable to the computer s IEEE1394 terminal and the camcorder s DV terminal You do not need...

Page 295: ...older and select Refresh Still images cannot be uploaded to the memory card using the Scanner and Camera Wizard Do not rotate the still images recorded on a memory card in Windows Picture and Fax Viewer or Scanner and Camera Wizard or in Windows Explorer The file format of the original image will be changed and the recording information of the still image may be lost The still image can no longer ...

Page 296: ...rd starts automatically If the program does not start automatically select My computer on the start menu right click the mouse button in the camera icon and click Get pictures 5 Click Next Thumbnail versions of the camcorder file appear 6 Confirm that a check mark is on the still image movie you wish to download and click the Next button ...

Page 297: ...of the selected still images starts When download is complete a dialog confirming to finish appears 8 If you wish to end the program select Nothing I m finished working with these pictures and click Next 9 Click Finish You can also check the still images you have copied by clicking on the link to the destination folder ...

Page 298: ... place of the asterisk The still images movies recorded on the memory card will be displayed If you select Thumbnails on the View menu thumbnail versions of the still images movies appear With images not recorded with Canon digital camcorders their thumbnails may not be displayed correctly Double clicking a still image on Windows Explorer displays it in bigger size Double clicking a file other tha...

Page 299: ...WIA Driver 27 E 5 Keep the mouse clicked on the thumbnail and move it to the desired folder drag and drop OR 5 Right click the mouse on the image and select Copy 6 Open a folder right click the mouse in the folder and select Paste ...

Page 300: ...rd may not be played back on the camcorder depending on file type and size If you download a still image movie from the camcorder to the computer and upload it again to the camcorder The still image movies may not be played back on the camcorder The DPOF setting before downloading is cancelled 1 Right click the mouse button on the file you wish to add and select Copy 2 On the explorer view open a ...

Page 301: ...omputer using the DV cable do not connect any other devices to the camcorder s USB terminal Do not connect two or more camcorders to the same computer The DV Messenger may not operate correctly 1 Connect the power adapter to the camcorder 2 Set the camcorder to TAPE CAMERA mode 3 Connect the camcorder to the computer using the DV cable 22 4 From the start menu select All Programs and Windows Messe...

Page 302: ... Firewall The firewall is an important security system that protects your computer by limiting or preventing access by other computers on the Internet If you disable the function other computers may be able to access the files on your computer or write files onto your hard disk Disable the firewall before using the DV Messenger and enable the firewall after use Caution If an anti virus software is...

Page 303: ...DV Messenger 31 E 1 From the start menu select Control Panel 2 Click Network and Internet Connections 3 Click Network Connections ...

Page 304: ...nnection is listed select a connection other than 1394 Connection If Status is not shown select Details from the View menu 5 Click the Advanced tab remove the checkmark from the Internet Connection Firewall section and click OK Note To enable the firewall after using DV Messenger repeat steps 1 to 4 and place the checkmark back to the checkbox Preparations for the DV Messenger ...

Page 305: ...ders to the computer 1 Set the camcorder to TAPE CAMERA mode 2 Connect to the Internet 3 Double click the DV Messenger icon on the desktop or select DV Messenger from the start menu If a dialog appears prompting you to sign out of Windows Messenger click OK The computer signs out of Windows Messenger and starts DV Messenger DV Messenger starts The DVM panel DV Messenger panel and Windows Messenger...

Page 306: ... A message appears automatically notifying you that your contact has signed in When you have signed in set the camcorder and adjust the volume of the speaker and microphone 1 Set the camcorder to TAPE CAMERA mode or TAPE PLAY VCR mode When you have set the camcorder to TAPE PLAY VCR mode play back the tape 2 Open the Tools menu and select Audio Tuning Wizard Message on the Computer Screen of Your ...

Page 307: ... camcorder and click Next If you are using a Canon camcorder select Canon DV Device 5 When the video picture appears click Next The live video recording of the camcorder appears in TAPE CAMERA mode In TAPE PLAY VCR mode the playback video appears ...

Page 308: ... Next If you are using a Canon camcorder select Canon DV Device The installed sound device appears for Speaker Proceed with the setting unchanged 8 Connect speakers or headphones to the computer Click Click to Test Speakers adjust the volume and click Next Move the volume lever with the mouse to adjust the speaker volume ...

Page 309: ...cannot be adjusted with the volume lever The volume indicator will not operate when the camcorder is in CARD CAMERA mode 10 Click Finish The settings for speaker and microphone are complete There are two methods to start a videoconference You can invite your contact or you can accept an invitation from your contact Caution An error message may appear and the communication may not work correctly In...

Page 310: ...r is waiting for response If you click Cancel the request will be cancelled If your contact accepts the request the above dialog disappears The communication between your and your contact s DV Messenger starts and you can now operate the camcorder of your contact from the DVM panel An invitation message will be sent to your contact If your contact clicks on the message the Conversation window appe...

Page 311: ...k Yes The communication between your and your contact s DV Messenger starts and you can now operate the camcorder of your contact from the DVM panel 2 When the invitation message appears click on the message The Conversation window appears on your computer screen If it does not appear click the task flashing on the taskbar 3 Click Accept The videoconference starts Video picture of your contact s c...

Page 312: ... The mode of your camcorder is highlighted only if a Canon camcorder is connected 4 Remote Section The mode of the camcorder of your contact is highlighted only if your contact is using DV Messenger or Canon camcorder 5 Allow Remote Control This selects whether you allow your contact to operate your camcorder Appears when the operating panel of your camcorder is displayed by clicking Local The def...

Page 313: ... end the DV Messenger 50 Taskbar When DV Messenger is started the DV Messenger task and DV Messenger icon appear on the taskbar 1 2 1 DV Messenger task Appears when the DV Messenger panel is displayed or minimized If it is minimized it appears when you click this task 2 DV Messenger icon A list of menus appears when you click this icon If the DVM panel is not displayed on the screen it appears whe...

Page 314: ...Messenger Displays the version of the DV Messenger 2 Help Topics Displays the DV Messenger s help topics 3 Control Panel Open Displays the DV Messenger panel on the screen 4 Disconnect Disconnects the communication between you and your contact The Conversation window disappears 5 Exit Exits the DV Messenger Screen Displays ...

Page 315: ...anon Digital Camcorder Non Canon Digital Camcorder You can operate your and your contact s camcorder You can only operate your camcorder You can only operate the camcorder of your contact You cannot operate either camcorder Caution Depending on the condition of the communication line during videoconference video picture and sound may appear interrupted or sound may be delayed Note If the camcorder...

Page 316: ...ate your contact s camcorder when set to TAPE CAMERA mode Click the Remote button on the DVM panel The CAMERA Operating Buttons 1 2 4 3 5 1 Zoom W wide angle The subject becomes smaller 2 Zoom T telephoto The subject becomes bigger 3 Focus Mode Selects autofocus or manual focus Click the checkbox to change to manual focus Manual focus cannot be selected if the camcorder is set to Easy Recording pr...

Page 317: ...tended recording modes the picture in the Conversation window may be distorted The buttons on the DVM panel cannot be operated if no tape is inserted into the camcorder If your contact fast forwards rewinds or stops the tape during playback Windows Messenger will continue to show the last picture If the tape is played back again the playback picture appears Depending on the camcorder Windows Messe...

Page 318: ...n only be used during playback pause 8 Reversed Frame Advance Plays back the tape frame by frame in reverse Can only be used during playback pause 9 Playback Speed Control Controls the playback speed of the tape Move the lever with the mouse to set the speed no sound will be played back The positions are as follows a Fast Reverse Playback b Reverse x2 Playback c Reverse Playback d Slow Reverse Pla...

Page 319: ...VM panel File transfer may not work depending on the Internet connection file type or file size When files are being transferred from your camcorder to the computer of your contact the DVM panel shows that file transfer is in progress with moving graphics Make sure that the graphics are not moving when changing the camcorder from CARD PLAY VCR mode to another mode If your contact has started an ap...

Page 320: ...ontact 5 When you have selected the files you wish to transfer click Fetch 6 Select the destination folder enter the file name and click Save The selected file s will be trans ferred to your computer The transferred file will be saved to the selected folder Numbers will be assigned to the entered file name e g image01 jpg The transfer status will be displayed on the DVM panel If you wish to cancel...

Page 321: ...de of your camcorder In such case reset with the Audio Tuning Wizard before clicking Start Camera 1 On the Conversation window click Stop Camera 2 Change the mode of the camcorder 3 Wait until the video picture and camcorder information such as the tape counter appear in the display and click Start Camera A message with the options Accept and Decline appears in the Conver sation window of your con...

Page 322: ...he displayed menu The communication with your contact ends and the Conversation win dow closes If you wish to communicate with another contact select the contact after clicking the Remote button 1 Click the DV Messenger icon on the taskbar and select Exit from the displayed menu DV Messenger closes Ending the Communication with Your Contact Ending the DV Messenger ...

Page 323: ...he computer cannot read the images on the memory card Check if the memory card is correctly inserted into the camcorder When downloading still images movies from the memory card to the computer Canon Camera Storage Device is not recognized The memory card cover is open Disconnect the DV cable from the camcorder close the memory card cover and reconnect the camcorder to the computer When uploading ...

Page 324: ...ows Messenger may not be able to receive video and sound if you have changed the operating mode of the camcorder during videoconference Click Stop Camera and then Start Camera to restart the videoconference Some Canon camcorders are equipped with a extended recording function SP LP The extended recording modes are not supported by Windows Messenger If you are using the camcorder in TAPE CAMERA mod...

Page 325: ...ation window Move the lever to the right until the volume indicator on the right operates Check if the sound device is set to Mute in the Control Panel 1 From the Start menu select Control Panel 2 Select Sounds Speech and Audio Devices 3 Click Adjust the System Volume ...

Page 326: ...t operates If you are using a Canon camcorder click Stop Camera and check whether Canon DV Device is selected in the Audio Tuning Wizard Click Start Camera to restart the videoconference Ask your contact to check the settings of the speakers See I receive the video picture of my contact in the Conversation window but not the sound for what your contact should do There is an echo on the sound If yo...

Page 327: ...et to Easy Recording program focus cannot be adjusted manually Set the program selector to Q program AE The camcorder turns off during use in TAPE CAMERA mode If the Canon camcorder set to TAPE CAMERA mode and a recordable tape is inserted the camcorder automatically turns off after a certain time to protect the tape and video heads When using the camcorder in TAPE CAMERA mode unload or write prot...

Page 328: ...ot operate the camcorder of your contact your contact may not have placed a checkmark to the before Allow Remote Control Check if the camcorder is correctly connected to the computer The firewall is not disabled on your and or your contact s computer 30 If an anti virus software is installed on the computer the firewall function of the software may be active In such case deactivate the firewall fu...

Page 329: ...c du papier recyclé à 100 El papel aqui utilizado es 100 reciclado U S A Canon U S A Inc Canon Customer Care Center Tel US 1 800 828 4040 Mon Fri 9 AM to 8 PM Eastern Time CANADA Canon Canada Inc Tel Canada 1 800 OK CANON 1 800 652 2666 ASIA Canon Hong Kong Co Ltd 9 F The Hong Kong Club Building 3A Chater Road Central Hong Kong Phone 852 2739 0802 Fax 852 2369 7701 ...

Page 330: ...rden CD Avvertenza Per utenti Windows XP Evitate di ruotare Ie immagini in Visualizzatore immagini e fax per Windows 0 in Esplora risorse di Windows II formate originale del relativo file verrebbe modificato e Ie immagini stesse non potrebbero piu essere visualizzate ne ZoomBrowser EX ne sulla videocamera Precauci6n Para los usuarios de Windows XP No gire la imagen utilizando Visor de imagenes y f...

Page 331: ...afdekking aangebracht op het aansluitpunt voor de batterij Alvorens de camcorder te gebruiken drukt u op de BATT RELEASE toets en verwijdert u de afdekking iii Adenda A tampa do terminal esta acoplada a esta camara de video Antes de usar esta camara de video pressione 0 botao BATT RELEASE e remova a tampa do terminal mTillagg Ett kontaktlock ar fastsatt pa kameran Tryck pa knappen BATT RELEASE och...

Page 332: ...te or a commercially available dry cleaning cassette If the symptoms reappear shortly after the cleaning the videocassette may be defective Stop using the cassette Availability differs from area to area Video heads may become dirty under the following conditions When using the camcorder in humid or hot places When using cassettes with damaged or dirty tape When using the camcorder in dusty places ...

Page 333: ...If you have comments or questions about our product please call 1 800 828 4040 USA FRN01 01 DWE 034 IIIII Canon VIDEO Product Registration Department POBOX 174022 DENVER CO 80217 4022 ...

Page 334: ...Purchase Should your camera get lost stolen or damagedl we have your information recorded on a database Just call us to verify purchase for insurance purposes Product Innovation We like to hear from our customers Who you are and what you like about our products See details inside ...

Page 335: ...ildren and other adults living in your household Which of the following publications do you read regularly check allihat apply 01 0 American Photo 17 D Consumer Reports 02 0 PC Photo 18 0 Outside 03 0 Outdoor Photographer 19 j Travel Leisure 04 J Videography 20 D Conde Nast Traveler 05 D New Media 21 0 Sports Illustrated 06 D Digital Video 22 D Time 07 D Wired 23 C U S News W R 08 0 PC Computing 2...

Page 336: ...2 C 175 000 199 999 06 0 50 000 59 999 13 0 200 000 249 999 07 J 60 000 74 999 14 0 250 000 over 27 level of education check highest level completed 1 0 Completed High School 2 0 Completed College 3 0 Completed Graduate School Which credit cards do you use regularly 1 0 American Express Diners Club 4 0 Do not use credit cards 2 MasterCard Visa Discover 28 00 11 D Samsung 12 Sears 13 J Sharp 14 0 S...

Page 337: ...Macintosh Computer 06 0 Own aCompact 14 0 Own aCD ROM Disc Player 15 0 Speak Spanish at Home 07 Own aCamcorder Digital Effects Size Styling Ergonomics Lithium Ion Battery Other _ 3 0 PC Connectivity 4 00ther _ 2 Still Image Capture Do you own a personal computer 1 0 Yes 2 0 No B If yes do you intend to use this camcorder with your personal computer 1 0 Yes 2 0 No C If yes how will you use it 1 0 V...

Page 338: ...e Video Games 16 0 Flower Gardening 36 0 Travel in USA 56 0 Motorcycles 17 1 Vegetable Gardening 37 0 Gourmet Cooking Fine Foods 57 0 Watch Cable TV 18 0 Sewing 38 C Wines 58 0 Home Video Recording 19 0 Crafts 39 0 Coin Stamp Collecting 59 0 Moneymaking Opportunities 20 0 Buy Pre Recorded Videos 40 Collectibles Collections 60 C Current Affairs Politics 33 Using the numbers in the above list please...

Page 339: ...l DIGITAL VIDEO CAMCORDER Modele CAMESCOPE ET LECTEUR VIDEO DIGITAL Warranty coverage is subject to the country where the unit was purchased Please read all warranty information carefully Pub No DWI 011 La garantie en vigueur dans Ie pays au I achat a ete effectue s appllque Veuillez lire les details de votre garantie avec soin ...

Page 340: ... enclosed CD ROM before connecting the video camcorder to your computer with this cable STOP Veillez ainstaller Ie logiciel apartir du CD fourni avant de brancher Ie cable de connexion du camescope aI ordinateur iATENCION Asegurese de haber instalado el software que contiene el CD ROM antes de conectar la videocamera al ordenador con este cable ...

Page 341: ...XP et de la version 4 5 ou plus recente de Windows Messenger Avant d installer DV Messenger procedez comme il est dit dans la section II Avant d installer DV Messenger de la documentation fournie Le pilote AV C Camera Storage Subunit W1A et DV Messenger ne sont compatibles qu avec Windows XP 115 ne peuvent pas fonctionner sous d autres systemes d exploitation Usez les termes de I accord de licence...

Page 342: ...ual of the router No ows Messenger can its nee function be igit video This software requires that Windows Messenger operates correctly Please establish an environment where Windows Messenger operates Please consult Microsoft for details s XP and Messenger 4 5 nstalled This software is compatible with Windows XP only It cannot be used with other Operating Systems Furthermore Windows Messenger 4 5 o...

Reviews: