background image

86

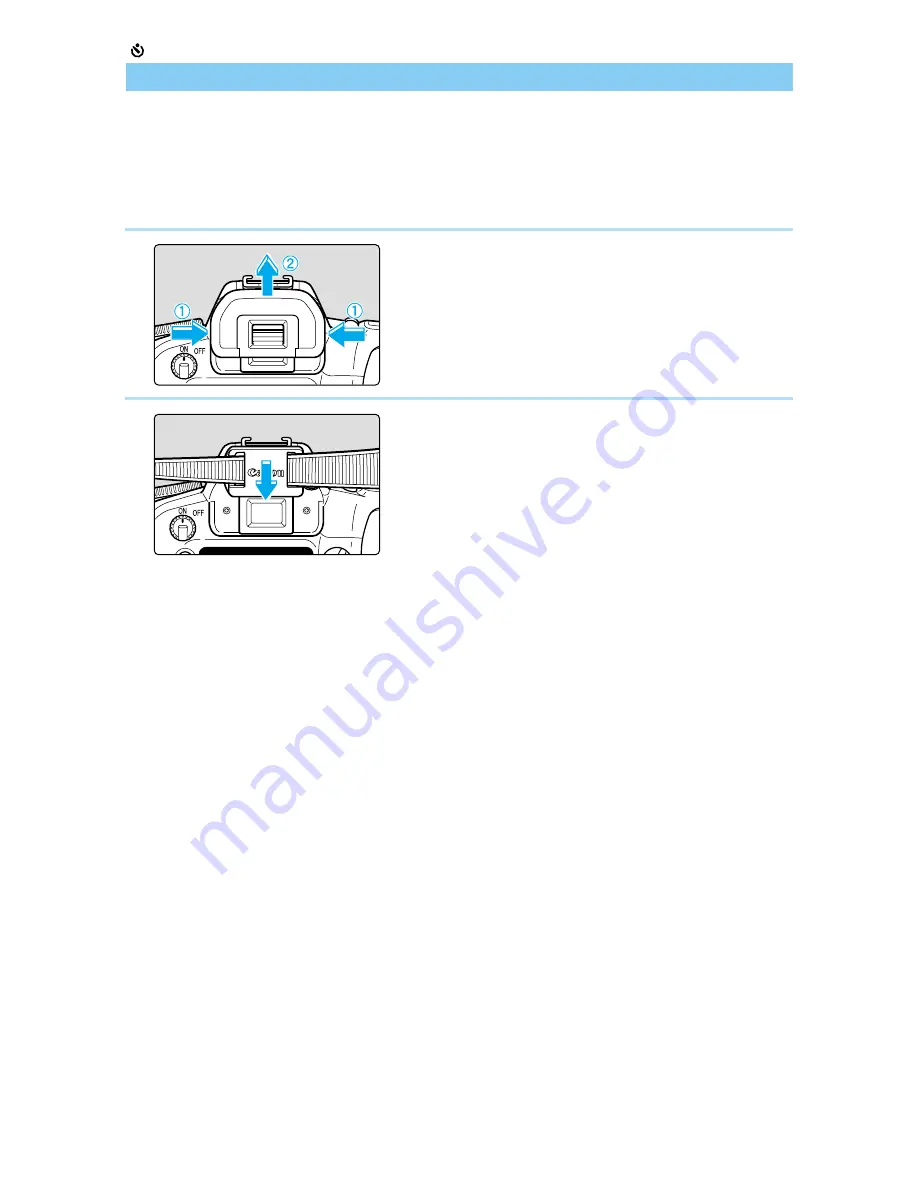
Self-timer Operation

Using the Eyepiece Cover

If you take a picture using the self-timer or remote switch (sold separately) without looking
through the viewfinder, stray light can enter the eyepiece and affect the exposure. To prevent
this, attach the eyepiece cover to the viewfinder eyepiece before taking the picture.

1

Remove the eyecup.

Grasp both sides of the eyecup and lift it
up and away from the camera.

2

Slip the eyepiece cover over the
eyepiece.

The eyepiece cover is attached to the
camera strap.

Summary of Contents for DIGITAL IXUS vEOS D30

Page 1: ......

Page 2: ...tarter Guide EOS D30 Camera User s Guide This Document 1 Prepare your camera for use 2 Start taking pictures 3 Check your pictures Software Starter Guide Help 1 Install the software from the Canon Dig...

Page 3: ...es arising from any malfunction of the EOS D30 camera or recording media CF card that results in the failure of an image to be recorded or transferred to a computer Warning Against Copyright Infringem...

Page 4: ...on this and the following page If any are missing contact the store where you purchased your camera Check Your Accessories q EOS D30 Camera w Strap with eyepiece cover e Battery Pack BP 511 r Compact...

Page 5: ...roduction 5 Check Your Accessories u Interface Cable IFC 200 PCU i Video Cable VC 100 English Edition INSTRUCTIONS Camera User s Guide o Canon Digital Camera Solution Disk Adobe Photoshop LE Disk 0 EO...

Page 6: ...ng 46 Erasing a Recorded Image Single Image Erase 47 Portrait Mode 48 Landscape Mode 49 Close Up Mode 50 6 Contents Sports Mode 51 Night Scene Mode 52 3 Advanced Operations 53 Quality Selection 54 Abo...

Page 7: ...ack 105 Rotating an Image 106 Protecting an Image 107 Erasing Images All Image Erase 108 Formatting the CF Card 109 Print Order 110 Selecting Images for Printing 111 Print Type 113 Specifying Date Pri...

Page 8: ...dential installation This equipment generates uses and can radiate radio frequency energy and if not installed and used in accordance with the instructions may cause harmful interference to radio comm...

Page 9: ...on Customer Support Help Desk To avoid the risk of high voltage electrical shock do not touch the flash portion of the camera if it has been damaged Similarly never touch internal portions of the equi...

Page 10: ...y flush with water any area of the body including the eyes and mouth or clothing that comes into contact with the inner contents of a battery If the eyes or mouth contact these substances immediately...

Page 11: ...use malfunctions or corrupt image data Avoid Condensation Related Problems Moving the equipment rapidly between hot and cold temperatures may cause condensation water droplets to form on its external...

Page 12: ...e condensation can form on the outside and inside of the camera To prevent this place the camera in an airtight resealable plastic bag until it warms up to the ambient temperature 9 Do not use the cam...

Page 13: ...store or use CF cards near objects that generate magnetic fields such as TVs speakers or magnets or in locations affected by static electricity Doing so could lose the images recorded on the CF card...

Page 14: ...on until it locks into place Press the cover closed until it clicks shut 27 5 Mount the lens Align the red dots on the lens and camera and turn the lens in the direction shown by the arrow in the diag...

Page 15: ...then close the cover 31 8 Set the Mode Dial to Full Auto 42 7 Set the Main Switch to ON 33 11 Check the image The image is displayed for approximately 2 seconds after the shot 44 To check other image...

Page 16: ...nt Electrical contacts 13 Reflex mirror 88 117 Red eye reduction lamp 93 AF assist light emitter 43 Self timer operating display 85 Grip Battery chamber Shutter button 33 Main dial 34 Metering mode bu...

Page 17: ...er cover release lever 27 Battery chamber cover 27 Quick control dial 35 Set button 36 Backup battery chamber cover 24 Tripod socket Erase button 47 108 LCD monitor 36 Index Enlarge button 102 103 JUM...

Page 18: ...l metering Center weighted averaging metering AEB Manual focus icon Flash exposure compensation icon Red eye reduction icon Battery check icon Beep icon Custom function icon White balance mode Auto Da...

Page 19: ...tor Focusing point indicator Aperture value Shutter speed Data processing CF full warning CF error warning High speed sync indicator FP flash Flash ready indicator FE lock underexposure warning AE loc...

Page 20: ...take fully automatic pictures the camera makes all the settings Image zone Lets you take fully automatic pictures in specific situations Portrait 48 Landscape 49 Close up 50 Sports 51 Night Scene 52 w...

Page 21: ...25 Attach battery packs for charging Charge lamp 25 DC coupler socket 29 Plug in cord for DC coupler here Power cord 25 29 Power cord socket 25 29 Plug in power cord here Back DC coupler plug 29 Plug...

Page 22: ...See Nomenclature on page 16 Reference page numbers are shown in parentheses The procedures in this user s guide use a Canon EF 24 85mm F3 5 4 5 USM lens for reference The descriptions also assume tha...

Page 23: ...oting as well as how the shutter button operates Attaching the Strap Pass the end of the strap through the strap eyelet from beneath then back in and out of the strap clasp as shown Pull the strap to...

Page 24: ...he Main Switch to OFF 2Open the backup battery chamber cover by turning it 45 degrees counterclockwise as shown by the arrow in the diagram Be careful not to rotate the cover more than 45 degrees 3 Re...

Page 25: ...t side of the adapter 4Charge the battery pack As soon as you place the battery pack in the compact power adapter the charge lamp starts blinking and charging begins When charging is complete the lamp...

Page 26: ...Replace it with a new battery pack The adapter can hold and charge two battery packs Charging starts with the first battery pack attached After that battery pack is charged the charge lamp goes on and...

Page 27: ...attery pack until it locks into place 3 Close the cover Press the cover closed until it clicks shut Battery Charge Remaining Icons The level of charge remaining is shown in three stages when the Main...

Page 28: ...n operating conditions The number of available shots is reduced by frequent use of the LCD monitor Holding the shutter button halfway down for long periods to use the AF function without taking a shot...

Page 29: ...he camera Open the cover 27 and lower the covering on the cord channel Insert the DC coupler and fit the cord into the cord channel Check that the cord is placed tightly in the cord channel and slide...

Page 30: ...emove the front lens cap Detaching a Lens Press and hold the lens release button and turn the lens as shown by the arrow in the diagram Turn the lens until the index mark is at the top then remove it...

Page 31: ...n the cover 2 Remove the CF card Press the Eject button The CF card is ejected Close the cover Never do any of the following while the access lamp is blinking the and messages are shown on the LCD pan...

Page 32: ...dial to select File Numbering then press the button 2Select the setting you want Turn the dial to select Continuous or Auto reset then press the button The selection is entered and the display return...

Page 33: ...turns off if you do not operate it for approximately one minute Auto power off function To use the camera again press the shutter button down halfway or set the Main Switch to OFF and then set it to O...

Page 34: ...ing this time you can turn the dial and view the settings on the LCD panel When the timer runs out or you press the shutter button down halfway the camera is ready to take a picture 2 Just turn the di...

Page 35: ...turn the dial while watching the viewfinder display or LCD panel When you are making selections and settings from the LCD monitor turn the dial while watching the LCD monitor About the LCD Monitor Yo...

Page 36: ...ns lists You can select the display language from three other languages besides English 122 If you press the JUMP button while the menu screen is displayed you can move to the top item in the recordin...

Page 37: ...Red eye on off 3 AEB 2 ISO speed Beep Custom WB 2 Parameters 1 2 Protect Rotate Print order Auto playback Auto power off Review Review time LCD Brightness Date Time File numbering Language Video syst...

Page 38: ...dial to select Date Time 2Press the button The Date Time setting screen appears 3 Set the date and time Turn the dial to adjust the date and time values then press the button After entering the settin...

Page 39: ...taken If the date and time are not set they cannot be recorded correctly Make sure you set the date and time correctly The date and time are stored using the backup battery 5 Press the button The date...

Page 40: ...wfinder The diagram shows the knob set at the standard diopter 1 dpt If the viewfinder image still does not look sharp after adjusting the diopter adjustment knob try one of the E series dioptric adju...

Page 41: ...cture taking In this zone anyone can take pictures easily by simply pressing the shutter button In addition to help prevent mistakes caused by operating the camera improperly the dial and the and butt...

Page 42: ...t The camera determines the subject position and uses the most appropriate focusing point To focus on a subject that is not at any of the three focusing points see Focusing On an Off Center Subject 62...

Page 43: ...vailable When the in focus indicator is blinking the camera will not take pictures 63 139 To take pictures in an area where flash photography is prohibited or using indoor lighting the Program 72 mode...

Page 44: ...ayed you can press the button to delete that image 47 This will erase the image shown on the LCD monitor before it is written to the CF card Check the Image in PLAY Mode 1 View the image Press the but...

Page 45: ...MENU button Turn the dial to select Review then press the button 2Select the Review setting Turn the dial to select the desired option then press the button The setting is entered and the display retu...

Page 46: ...then press the button 2Set the review time Turn the dial to select the review time you want then press the button The setting is entered and the display returns to the menu Press the MENU button to c...

Page 47: ...Erase menu Press the button The Erase menu appears at the bottom of the LCD monitor 4Erase the image Turn the dial to select Erase then press the button The access lamp blinks and the image is erased...

Page 48: ...ode to and the metering mode to The Quality setting is automatically set to Large Fine 2160 1440 Head and shoulder shots give the best background blur effect Also the farther the subject is from the b...

Page 49: ...ed indicator blinks the shutter speed may be too slow to keep the picture from being blurred by camera shake We recommend you use a tripod when taking landscape pictures The shutter speed indicator st...

Page 50: ...t to ONE SHOT the drive mode to Single shot and the metering mode to The Quality setting is automatically set to Large Fine 2160 1440 Close up mode is most effective when the subject is at the minimum...

Page 51: ...cator still blinks if you use a tripod but camera shake will not be a problem For best results in Sports mode use a film speed setting of ISO 400 or faster 55 120 For sports photography we recommend u...

Page 52: ...uses flash to illuminate the subject and a slow shutter speed to expose the background resulting in a natural looking exposure Set the Mode Dial to The way you take pictures is the same as in Full Au...

Page 53: ...of each of these functions The icon represents the Main Dial and the icon represents the Quick Control Dial Press the shutter button down halfway and release and a timer will show the exposure setting...

Page 54: ...een and exit the menu You can set the Quality by pressing the button and turning the or dial as you look at the LCD panel C Fn 12 1 128 Size of one image 1 3 Mbyte 0 7 Mbyte 0 7 Mbyte 0 4 Mbyte 3 4 Mb...

Page 55: ...er speeds are less suited to moving subjects or dim conditions but produce sharper more detailed images The Canon EOS D30 provides ISO equivalent speed settings from ISO 100 to ISO 1600 in one step in...

Page 56: ...mputer see the Software Starter Guide Note that if no custom parameters are set or stored using this function this item will not appear on the menu You can set the parameters by pressing the button an...

Page 57: ...ration Level Low Normal High Low Normal High Low Normal High Effect Takes pictures with lower contrast Takes pictures with normal contrast Takes pictures with higher contrast Takes pictures with lower...

Page 58: ...e Mode Dial to a Creative zone setting other than 3 Press the button 4Select the AF mode Turn the dial to make the selection Press the shutter button down halfway to return to ready to shoot status 6...

Page 59: ...ure setting is determined when focus is achieved The exposure setting and focus remain locked as long as the shutter button is pressed down halfway You can then recompose the shot while retaining the...

Page 60: ...or retreating from the camera at a constant rate the focusing function can track the subject and predict the focusing distance immediately before the picture is taken so that the shot will be in focus...

Page 61: ...F The camera selects the focusing point automatically according to conditions Manual selection AF You can select any of the three focusing points manually This is best when you want to be sure to focu...

Page 62: ...g point 61 2Focus on the subject Place the focusing point over the subject and press the shutter button down halfway 3 Hold the shutter button down halfway and recompose the picture 4Take the picture...

Page 63: ...as cage bars and the animal inside the cage In such cases use one of the following procedures 1 Focus on an object that is at the same distance as the desired subject apply Focus Lock then recompose t...

Page 64: ...ation during playback see Turning the Information Display On and Off 104 Auto power off time 33 121 ISO speed 55 AEB 82 Possible images that can still be taken C Fn custom function number s 124 Parame...

Page 65: ...Select a metering mode Look at the LCD panel as you turn the dial Press the shutter button down halfway to return to ready to shoot mode 6 Turn the dial to set the flash exposure compensation for the...

Page 66: ...determines the main subject s size position brightness background front and back lighting etc so that it can select the proper exposure for the subject at all times When using manual focusing evaluati...

Page 67: ...ake a picture after 10 seconds 85 Based on Canon testing standards shutter speed of 1 250 second or faster at ISO 100 The number of frames that can be recorded depends on the subject and modes used 1...

Page 68: ...t stored in the camera s internal memory then on the CF card When the internal memory is full the message appears on the LCD panel and in the viewfinder and no more images can be taken Once this happe...

Page 69: ...sing color correcting filters or switching to different film types Digital cameras rely on software to correct the color temperature by determining white as the basis for the colors in the subject the...

Page 70: ...so that the white subject fills the entire partial metering zone in the viewfinder This picture can be taken using any mode 20 2From the menu select Custom WB Press the MENU button Turn the dial to se...

Page 71: ...white paper for white balance basis White balance data is loaded from the partial metering zone 19 You can store white subjects photographed under various conditions on the CF card then select these...

Page 72: ...he shutter button down halfway When the camera has focused the focusing point indicator and the in focus indicator in the viewfinder light at the same time 3 Check the display The shutter speed and ap...

Page 73: ...tton selected EX series Speedlites Exposure compensation FE lock Autoexposure bracketing AEB Fill flash control Custom functions FEB 2nd curtain sync Modeling flash E TTL wireless autoflash Shifting t...

Page 74: ...nd a slow shutter speed can blur the subject to give the impression of motion stands for time value 1 Set the Mode Dial to 2Set the shutter speed Turn the dial 3 Focus on the subject Press the shutter...

Page 75: ...lue stops blinking If the largest aperture value the minimum aperture for the lens you are using blinks the scene is too bright Turn the dial to a faster shutter speed until the aperture value stops b...

Page 76: ...larger aperture value smaller aperture you can increase the depth of field to make both the foreground and background look sharp stands for aperture value 1 Set the Mode Dial to 2Select the aperture v...

Page 77: ...e the aperture to the current aperture setting and then verify the range of focus in the viewfinder This feature can be used in the Creative zone In mode this feature operates when the shutter button...

Page 78: ...xposure level displayed in the camera stands for manual 1 Set the Mode Dial to 2 Set the shutter speed Turn the dial 3 Set the aperture value Set the Quick Control Dial switch to ON then turn the dial...

Page 79: ...6Take the picture Compose the picture then press the shutter button down fully You can set the camera so that you can set the shutter speed or aperture value in 1 3 stop increments C Fn 4 124 Standard...

Page 80: ...subject and press the shutter button down halfway The active focusing points are displayed The range between the nearest subject covered by a focusing point and the farthest subject covered by another...

Page 81: ...ter button down halfway Positions on the side indicate overexposure and positions on the side indicate underexposure Once set the exposure compensation remains in memory after the Main Switch is set t...

Page 82: ...e AEB setting is entered and the display returns to the Menu Press the MENU button to clear the screen and exit the menu 3 Take the picture When using continuous shooting press and hold the shutter bu...

Page 83: ...o the settings In and modes AEB set to 1 stop With exposure compensation of 1 stop With exposure compensation of 1 5 stops With exposure compensation of 2 stops In mode Center exposure 2 stops from co...

Page 84: ...oint and metering method selected 135 1 Focus on the point on which you want to lock the exposure reading The exposure value is displayed in the viewfinder 2 Press the button The icon lights in the vi...

Page 85: ...ast 2 seconds Faster beeps and the lamp stays on While the self timer is operating the LCD panel shows the number of seconds remaining until the picture is taken To cancel the self timer press the DRI...

Page 86: ...e viewfinder stray light can enter the eyepiece and affect the exposure To prevent this attach the eyepiece cover to the viewfinder eyepiece before taking the picture 1 Remove the eyecup Grasp both si...

Page 87: ...999 seconds Exposure continues as long as you hold down the shutter button 3 Advanced Operations 87 Bulb Exposures The Remote Switch RS 80N3 sold separately or Timer Remote Controller TC 80N3 sold se...

Page 88: ...2Press the shutter button down fully again The picture is taken and the mirror goes back down To take the picture again repeat the procedure from step 1 During mirror lockup the drive mode 67 is singl...

Page 89: ...evaluative metering in memory and either the camera s built in flash or any EOS dedicated EX series Speedlite The procedure is as easy as a normal AE shot This chapter describes how to take flash pic...

Page 90: ...ne you can take flash pictures by simply pressing the button to pop up the built in flash at any time regardless of lighting conditions Select mode for full autoflash The shutter speed and aperture va...

Page 91: ...3 44 9 ft Approx 1 10 6 m 3 3 34 8 ft Flash Photography 4 91 Using the Built in Flash Flash Sync Shutter Speed and Aperture Settings Mode Sync shutter speed Automatically set from 1 200 to 1 60 second...

Page 92: ...an EX series Speedlite 96 press the built in flash back into the camera before mounting the external flash When using the built in flash keep at least 1 m 3 3 ft away from the subject Otherwise the l...

Page 93: ...eye reduction function is turned On and the display returns to the Menu Press the MENU button to clear the screen and exit the menu When you press the shutter button down halfway the red eye reduction...

Page 94: ...and records the required flash output for this subject in memory In the viewfinder the display appears as shown in 1 for 0 5 seconds then changes to 2 Each time you press the button the preflash fires...

Page 95: ...indicates negative compensation Once set the exposure compensation amount remains in memory after the Main Switch is set to OFF To cancel set the compensation amount to the position 6 Negative compens...

Page 96: ...9 As with normal exposure compensation you can use flash exposure compensation to adjust the flash output within a range of 2 stops in 1 2 stop increments FEB Flash Exposure Bracketing 98 The FEB func...

Page 97: ...have the camera automatically set the shutter speed or aperture value just as in normal picture taking without flash 2 Press the shutter button down fully for E TTL autoflash using preflash evaluativ...

Page 98: ...rements C Fn 4 124 Flash Photography with the EOS Dedicated 550EX Speedlite High Speed Sync FP Flash When the 550EX Speedlite is set to high speed sync mode it can automatically synchronize at any shu...

Page 99: ...h 95 Modeling Flash Modeling flash allows you to see shadows light balance and other effects produced by multi light settings 1 Check that the camera and Speedlite are properly set for flash photograp...

Page 100: ...at 1 200 second or slower You can use a flash unit attached to the camera s hot shoe and another flash unit connected to the PC terminal at the same time We recommend Canon EX series Speedlites for u...

Page 101: ...EOS D30 may in some cases be unable to accurately display images taken with other cameras or taken with the EOS D30 but subsequently had image data or file names modified by computer or other means A...

Page 102: ...st Turn the dial clockwise to view images in order from oldest to newest Viewing the Index This mode displays 9 images simultaneously on a single screen 1 Press the button The most recent single image...

Page 103: ...er to center right to lower left Turn the dial counterclockwise to change the displayed area of the picture from center to center left to top right When you finish viewing press the button JUMP Jumpin...

Page 104: ...am is a graph showing brightness levels on the horizontal axis and the number of pixels at each level of brightness on the vertical axis Darker pixels are towards the left side of the graph and bright...

Page 105: ...after the Loading image screen has been displayed for approximately 2 seconds the auto playback starts To pause auto playback press the button During the pause the indicator appears in the upper left...

Page 106: ...clockwise 90 counterclockwise 0 If you have other images to be rotated repeat the above steps Press the MENU button to exit Rotate mode Rotate pictures taken with the camera grip on the bottom 90 clo...

Page 107: ...display 3 Protect the image Turn the dial to select the image you want to protect then press the button Protected images are identified with a icon Press the button again to cancel protection and del...

Page 108: ...ars 3 Turn the dial to select All then press the button The Erase Confirmation message appears 4Turn the dial to select OK then press the button The camera erases all unprotected images Once an image...

Page 109: ...ssage will appear asking you to confirm that you want to format the CF card 3 Turn the dial to select OK then press the button The CF card will be formatted If a CF card from another manufacturer does...

Page 110: ...ng lab 1 Order the prints from the camera 2Insert the CF card into a digital printer for easy printing Digital printer 2Take the CF card to a photo printing service for easy ordering Precautions for P...

Page 111: ...d 3 Press the button The Select Image screen appears If you press the button 3 images are displayed on the Select Image screen Press the button again to enlarge the Select Image screen 4Select the ima...

Page 112: ...ng a Single Image procedure 111 to display the Print Order screen 2Turn the dial to select All then press the button The Select All Images menu appears 3 Select Mark all Turn the dial to select Mark A...

Page 113: ...vidual images and an index sheet 1 Follow steps 1 and 2 of the Selecting a Single Image procedure 111 to display the Print Order screen 2Turn the dial to select Set up then press the button The Print...

Page 114: ...hen press the button The Print Order Setting screen appears 3 Turn the dial to select Date then press the button 4Specify date printing Turn the dial to select On or Off then press the button Press th...

Page 115: ...o display the Print Order screen 2Turn the dial to select Set up then press the button The Print Order Setting screen appears 3 Turn the dial to select File No then press the button 4Specify file numb...

Page 116: ...d set the input switch to Video In 4Set the Main Switch to ON 5 Press the button The image appears on the TV screen You can use the TV to view images or make menu settings just as you would with the L...

Page 117: ...ging element always connect the EOS D30 camera to a household power outlet using the DC coupler If you try to clean the imaging element while the battery pack is installed in the camera the cleaning w...

Page 118: ...Main Switch to OFF The camera power turns off the shutter closes and the mirror is lowered Set the Main Switch to ON again and the camera will be ready to shoot pictures normally Never disconnect the...

Page 119: ...are related to camera operation This booklet indicates these settings with the mark and provides basic descriptions This chapter lists the EOS D30 s menu functions and describes the use of the Custom...

Page 120: ...ion for reducing the red eye look caused by using a flash to photograph people at night or in dark settings Sets the increment steps for underexposure and overexposure in AEB shots Sets the ISO speed...

Page 121: ...atically stored in the camera Allows the user to protect image files against accidental erasure Rotates the image display 90 clockwise or counterclockwise Lets you order prints of your photos for prin...

Page 122: ...ow When the Review function has been set to On or On Info this determines the time that images are displayed Select 2 4 or 8 seconds or Hold Sets the LCD brightness Select normal or bright Sets the da...

Page 123: ...ystem Format CF card Custom functions Screen Description Determines the video system format Select NTSC or PAL Formats the CF card in the camera Sets custom functions that can adjust many of the camer...

Page 124: ...utton AE AF Press the shutter button down halfway AE lock Press the shutter button down halfway AE AF button AF lock no AE lock button AE AF no AE lock Press the shutter button down halfway AE Disable...

Page 125: ...ess the button to pause AF operation and keep the camera from focusing on the obstruction Exposure is determined when you take the picture This is useful when photographing subjects that move and stop...

Page 126: ...fill flash Func No 06 07 08 09 10 Setting or change Automatic setting Fixed at 1 200 second 0 Enabled 0 Disabled 0 Enabled 0 Disabled 1st curtain sync Flash fires immediately after the shutter reache...

Page 127: ...hots from the lowest exposure first Effective when you continue to take AEB shots from the lowest exposure first Effective at filling in shadows at slow shutter speeds Camera AF does not operate while...

Page 128: ...No 11 12 13 Setting or change Always show first menu item Show the most recently set menu item Set the Main Switch to Off to cancel or On to show the first menu item Show the most recently set menu it...

Page 129: ...ient when you want to retain function settings regardless of whether the power is On or Off Lets you change quality quickly when you are taking photographs Lets you change ISO speed quickly when you a...

Page 130: ...nt of and behind the subject is also in focus This is called the depth of field The greater the aperture value that is the smaller the aperture the broader the depth of the field This is called a deep...

Page 131: ...d and aperture value File Numbering and Folders The pictures you take are automatically assigned file numbers from 0001 9900 and stored in folders of 100 images each Each folder is numbered from 100 t...

Page 132: ...en the file is expanded restored Red eye Phenomenon In a relatively dark room where subjects pupils are dilated the light from a camera flash passes through the pupil is reflected by the retina and ca...

Page 133: ...aken is also locked The above conditions apply during continuous shooting in Large format approximately 3 images per second to a maximum of 8 images AI Servo AF Autofocus tracks the moving subject and...

Page 134: ...focal length Use a flash the result will be the same as using Program AE Use a neutral density filter Exposure Warnings The warnings shown are examples using a lens with a minimum aperture value of f...

Page 135: ...ents the shutter speed and the right hand vertical axis represents the aperture value The combinations of shutter speed and aperture value automatically determined by Program AE are shown as colored l...

Page 136: ...om 4000 to 4 denote the denominator of the shutter speed fraction for example 125 is 1 125 seconds In addition 0 3 is 0 3 seconds and 15 is 15 seconds Aperture value readout The aperture value is norm...

Page 137: ...file already exists with the file name that the camera is attempting to create Or the file numbers have already reached the maximum value and no new file numbers can be created Transfer the necessary...

Page 138: ...r is not closed Close the battery chamber cover tightly 27 CF card slot cover is not closed Insert the CF card firmly until the CF card eject button pops out then close the CF card slot cover tightly...

Page 139: ...s cloth LCD monitor is worn out Consult the store where you bought your camera or a Canon Service Center 12 back cover Lens focusing mode switch set to MF or M Set the focusing mode switch to AF 30 Ha...

Page 140: ...he camera s eyepiece to further expand the dioptric correction range EOS Dedicated EX Series Speedlites 550EX 380EX 220EX Three EOS dedicated E TTL autoflash Speedlites are available the high output z...

Page 141: ...ouch locking plug for connecting to the EOS D30 Remote Switch RS 80N3 This is a remote switch with an 80 cm cord to prevent camera shake for super telephoto shots macrophotography and bulb exposures Y...

Page 142: ...RS 80N3 Wireless Controller LC 4 Strap CF Card FC 16M Eyecup Eb Rubber Frame Eb Eyepiece Extender EP EX15 Angle Finder C Battery Grip BG ED3 Battery Pack BP 511 Compact Power Adapter CA PS400 DC Coupl...

Page 143: ...TV Video Macintosh Computer PC AT Compatible Computer PC Card Adapter Canon Digital Camera Solution Disk Adobe Photoshop LE Disk Interface Cable IFC 200 PCU Video Cable VC 100 Printer or Modem Port DI...

Page 144: ...atio 2 3 Color filter method Primary color filter Low pass filter Positioned on front surface of imaging element non removable LCD Monitor Type TFT type color LCD monitor Picture size 1 8 inch Pixel c...

Page 145: ...iopter adjustment range 3 to 1 dpt Picture coverage 95 vertically and horizontally Magnification 0 88 at 1 dpt 50mm lens at infinity Viewfinder information Shutter speed aperture value FEL indicator A...

Page 146: ...time Approx 3 sec Flash ready indicator Flash ready icon lights in viewfinder Flash coverage Covers field equivalent to a focal length of 18mm Flash adjustment E TTL autoflash preflash for metering an...

Page 147: ...t be charged when the DC coupler is connected Power cord length Approx 1 8 m 5 9 ft Charging time Approx 90 minutes per battery pack Rated input frequency 100 240 V AC 50 60 Hz Rated output Charging 8...

Page 148: ...compensation 95 99 Flash range 91 Flash sync shutter speed aperture value 91 Red eye reduction 93 Bulb exposures 87 C Canon Service Centers Back cover CF CompactFlash card 3 4 13 31 130 141 Formatting...

Page 149: ...nd LCD monitor 12 Lens electrical contacts 13 Lithium backup battery 13 High speed sync 98 Holding the camera 40 Household power supply 29 I Image information 45 104 Image zone 20 Imaging element 3 11...

Page 150: ...enters Back cover Settings checking 64 Shooting modes 20 Shutter button 33 Shutter speed 131 Shutter Speed Priority AE 74 Shutter speed readout 137 Specifications 142 Software Starter Guide 5 Sports M...

Page 151: ...7 REFERENCE 151 Memo...

Page 152: ......

Reviews: