


Chapter 2
2-8
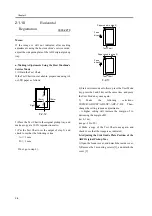
5) Make the following selections:
FEEDER>ADJUST>DOCST. Then, change the
setting to make adjustments.
- if A >/= 1 mm, increase the setting (so that the
margin will be increased).
- if B >/= 1 mm, decrease the setting (so that the
margin will be decrease).
(unit: 0.5 mm)
(range: -30- to 10; -5 to +5 mm)
6) Make a copy of the Test Chart once again, and see
the image is as indicated.
2.1.12
White Level
0003-2377
1) Place A4 or LTRR paper on the copyboard glass,
and close the machine.
Make sure that the paper is not too small.
Otherwise, white level may not be adjusted.
2) Make the following selections on the Service Mode
screen to bring up the Adjustment screen:
COPIER>FUNCTION>CCD.
3) Touch [DF-WLVL1] to highlight.
4) Press the OK key.
In response, the machine runs an auto adjustment
session, and will indicate 'OK!' if it ends normally.
5) Remove the paper from the copyboard glass, and
place it in the original pickup tray of the machine.
6) Press [DF-WLVL2] on the touch panel to highlight.
7) Press the OK key.
In response, the machine will run an auto adjustment
session (duplexing stream reading).
8) Press the Reset key twice to end service mode.
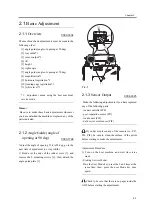
2.1.13
Adjusting the Hinge
Pressure
0003-1932
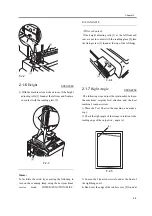
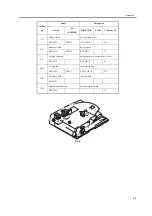
1) Open the ADF, and measure the height of the point
at which it stops closing when let go.
2) Check to see if the height is 10 to 20 cm in range.
<If Not As Indicated>
1. if 10 cm or less, turn it counterclockwise using a
hex wrench to make adjustments.
2. if 20 cm or more, turn it clockwise using a hex
wrench to make adjustments.
Memo
Service Tool
hex wrench (8 mm); CK - 0540
F-2-18
10
20cm
Summary of Contents for DADF-M1
Page 1: ...Feb 21 2005 Portable Manual Feeder DADF M1 ...
Page 2: ......
Page 6: ......
Page 9: ...Chapter 1 Maintenance and Inspection ...
Page 10: ......
Page 12: ......
Page 26: ...Chapter 1 1 14 F 1 20 F 1 21 4 Clean the top face plastic film 1 of the prism 1 2 1 ...
Page 31: ...Chapter 2 Standards and Adjustments ...
Page 32: ......
Page 34: ......
Page 44: ......
Page 45: ...Chapter 3 Error Code ...
Page 46: ......
Page 47: ...Contents Contents 3 1 User Error Code 3 1 3 1 1 Alarm Code 3 1 ...
Page 48: ......
Page 50: ......
Page 51: ...Chapter 4 Outline of Components ...
Page 52: ......
Page 54: ......
Page 59: ...Chapter 5 System Construction ...
Page 60: ......
Page 62: ......
Page 69: ...Feb 21 2005 ...
Page 70: ......


