Canon CREATIVE PARK Sea lion Assembly Instructions Download Page 5

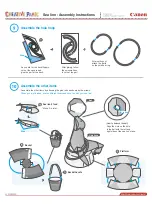
Assemble the hula hoop

Assemble the other items

[How to balance the ball]

Glue

As you did for the back flippers, 

cut out the square and 

glue the part at the back.

After gluing, follow 

the scissors lines 

to cut out the part.

*Make 3 in total.

Align the slots on the hole 

in the ball with the left and 

right sides of the sea lion's face.

After cutting out, 

attach the parts 

so they make a ring.

Assemble the other items by attaching the glue tabs as shown by the arrows.

When you are finished, use the different items and have fun with your sea lion!

Ball

Hula hoop

Sea lion's food

Bucket

Bucket handle

Platform

Glue

Cut in line

Sea lion : Assembly Instructions

Summary of Contents for CREATIVE PARK Sea lion

Page 1: ... Scissors Glue We recommend quick drying paper glue How to assemble your model neatly Scoring along the fold lines in advance with a dried up pen or a ruler with slightly sharp corners will result in a neater model Be careful not to press too hard as the paper may tear Notation Key Scissors line Mountain fold Cut in line Valley fold Glue spot Caution Keep scissors and glue away from small children...

Page 2: ...glue tabs to give the head its shape Cut out part C and glue it to the inside of the assembled part Assemble the front flippers Glue Assemble the chest Cut out parts F and G and join them together by gluing When they are joined next attach the glue tabs indicated by arrows Do the same for the opposite side Lastly tuck the joint inside After you ve tucked it inside if you open the folded parts back...

Page 3: ... the part Close the part up into a cylinder shape and glue together Glue After cutting out attach part L and insert it into the assembled tail Assemble and insert part M N back flipper right for the other side in the same way After you ve tucked it inside if you open the folded parts back up inside it will prevent it from slipping out Sea lion Assembly Instructions Assemble the belly Cut out part ...

Page 4: ...nd attach to the top and bottom of the assembled part Close the part up and glue together Align the patterns and attach Cut in line Sea lion Assembly Instructions Assemble the sea lion Assemble the ball Attach the joints of the assembled parts in the following order tail belly chest front flippers head Your sea lion is complete Fold the sides of the joint and insert into the hole After you ve inse...

Page 5: ...e 3 in total Align the slots on the hole in the ball with the left and right sides of the sea lion s face After cutting out attach the parts so they make a ring Assemble the other items by attaching the glue tabs as shown by the arrows When you are finished use the different items and have fun with your sea lion Ball Hula hoop Sea lion s food Bucket Bucket handle Platform Glue Cut in line Sea lion...

Reviews: