


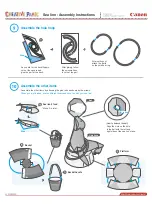

Close the part up into a cylinder shape,
and glue together.
Cut out parts I and J, and
join them together by gluing.
For part K, first cut out the square around the part
marked by the red lines. Fold along the center line
and glue together at the back.
After gluing,
follow the scissors line
to cut out the part.
Close the part up into
a cylinder shape,
and glue together.
Glue
After cutting out, attach part L and
insert it into the assembled tail.
Assemble and insert part M,N
(back flipper (right)) for the other side,
in the same way.
After you've tucked
it inside, if you open
the folded parts
back up inside it will
prevent it from
slipping out.
Sea lion : Assembly Instructions
Assemble the belly
Cut out part H, and attach the glue tabs
to their adjacent areas.
Assemble the tail
Assemble the back flippers


