background image

5. Basic Photography

-19-

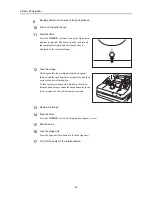
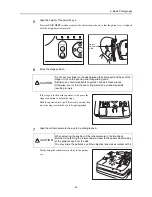
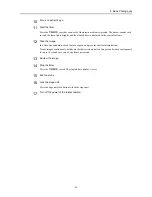
12

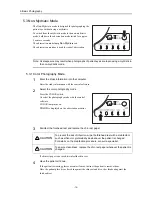
Review the image.

The fundus images and study information are displayed in the control software. Check the images.
To take images of the other eye, repeat steps 7 and the following.

13

End the study.

End the study with the control software.

14

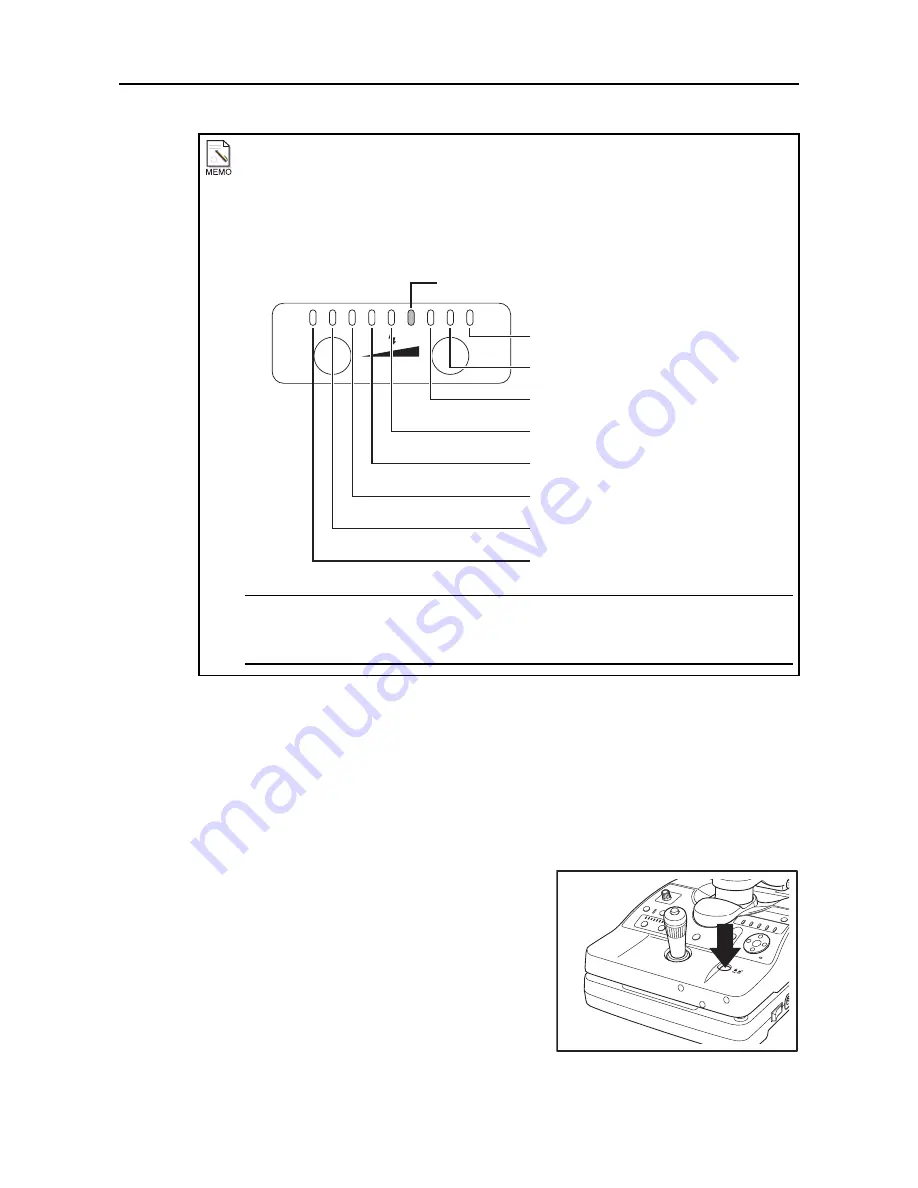
Lock the stage unit.

Press the stage unit lock button to lock the stage unit.

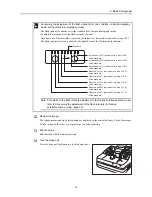
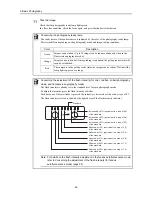
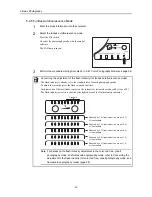
Concerning the adjustment of the flash intensity (for color, red free, cobalt photography 
mode, and fluorescein angiography mode)

The flash intensity is already set to the standard level for each photography mode.
To adjust the intensity, press the flash intensity switches.
Each time one of these switches is pressed, the intensity is increased or reduced by steps of 0.3.
The flash intensity selected is shown by the lighted area of the flash intensity indicator.

Note: For details on the flash intensity adjustment in the fundus autofluorescence mode, 

refer to Concerning the adjustment of the flash intensity (for fundus 
autofluorescence mode) (page 23).

Increased by 87% (equivalent to a step of 0.9)
of the standard

Standard

Increased by 52% (equivalent to a step of 0.6)
of the standard

Increased by 23% (equivalent to a step of 0.3)
of the standard

Reduced by 19% (equivalent to a step of 0.3)
of the standard

Reduced by 34% (equivalent to a step of 0.6)
of the standard

Reduced by 47% (equivalent to a step of 0.9)
of the standard

Reduced by 56% (equivalent to a step of 1.2)
of the standard

Reduced by 65% (equivalent to a step of 1.5)
of the standard

Summary of Contents for Classic 5350SE

Page 1: ...Before using the instrument be sure to read this manual thoroughly Keep the manual where it is easily accessible Digital Retinal Camera CX 1 Operation Manual ...

Page 2: ...e for loss of image data due to any reason 8 Reading of image and storage of data must be performed in accordance with the law of the country where the product is being used Also the user is responsible for maintaining the privacy of image data 9 The power cable supplied is designed to be used solely with this camera Do not use it for any other products 10 Canon reserves the right to change the sp...

Page 3: ...ammable anaesthetic mixture with air or with oxygen or nitrous oxide The mode of operation is Continuous Operation For EU Countries The following mark shows compliance of the instrument with Directive 93 42 EEC This instrument is a CLASS I EQUIPMENT according to EN 60601 1 The following mark indicates that the instrument is a Type B Applied Parts according to EN 60601 1 The degree of protection ag...

Page 4: ...ers and to prevent accidents this operation manual uses the symbols and text shown below in warnings and cautions Read the meanings of these caution signs and the Safety Precautions see page 3 and follow the safety instructions WARNING This indicates a potentially hazardous situation which if not heeded could result in death or serious injury to you or others CAUTION This indicates hazardous situa...

Page 5: ...over Otherwise the temperature in the instrument may rise and cause fire CAUTION Place the instrument on a firm table Do not place it extremely near the edge of the table in order to avoid damage or injury due to falling Installation Operation WARNING Do not connect the instrument with anything other than specified Otherwise it may result in fire or electric shock Also when other equipment is goin...

Page 6: ...ath or serious injury WARNING Do not place anything on top of the instrument Otherwise the object may fall and cause injury Also if metal objects such as needle or clip falls into the instrument or if liquid is spilled it may result in fire or electric shock WARNING When the instrument is going to be moved be sure to turn OFF the power unplug the power cable from the AC outlet and disconnect other...

Page 7: ...led into the instrument or a metal object has entered through an opening When the instrument has been dropped and it is damaged Maintenance and Inspection WARNING For safety reasons be sure to turn OFF the power when the inspections indicated in this manual are going to be performed Otherwise it may result in electric shock WARNING When the instrument is going to be cleaned be sure to turn OFF the...

Page 8: ...t of the system Otherwise it may result in fire or electric shock WARNING Do not connect non medical electrical equipment which has been supplied as a part of the system to any power socket other than the multiple socket outlets for the system Otherwise it may result in electric shock WARNING Do not connect any electrical equipment which has not been supplied as a part of the system to the multipl...

Page 9: ...Safety Information 7 Label on the Instrument The CX 1 has a label on it The label contents and its position are indicated below ...

Page 10: ...1 1 Digital camera 1 Camera cover 1 Power cable 3 m Non shielded 1 Plug shapes differ by power specifications External eye fixation lamp 1 Chin rest paper 100 Video cable 1 Camera mount cap 1 Objective lens cap 1 Dust cover 1 Body cap 1 CD ROM Retinal imaging control software 1 Operation Manual CX 1 control software 1 each ...

Page 11: ...iatic Mode 14 5 3 1 Color Photography Mode 14 5 3 2 Red free Photography Mode 20 5 3 3 Cobalt Photography Mode 21 5 3 4 Fluorescein Angiography Mode 21 5 3 5 Fundus Autofluorescence Mode 23 5 4 Mydriatic Mode 24 5 4 1 Color Photography Mode 24 5 4 2 Red free Photography Mode 30 5 4 3 Cobalt Photography Mode 30 5 4 4 Fluorescein Angiography Mode 30 5 4 5 Fundus Autofluorescence Mode 32 6 Photograph...

Page 12: ... Rest 45 7 3 4 Retinal Camera and Digital Camera Outer Covers 46 7 4 Refilling the Chin Rest Paper 47 7 5 Removing and Installing the Digital Camera 48 7 5 1 Removing the Digital Camera 48 7 5 2 Installing the Digital Camera 50 7 5 3 Cleaning the Digital Camera imaging sensor 52 8 Main Specifications and Performance 53 8 1 Main Specifications 53 8 2 Functions in the Observation and Photography Mod...

Page 13: ...asier to assist patients and provides significantly improved ease of operation Vertical movement of the main body by a motorized chin rest and an operation lever significantly improves alignment operability Small pupil photography function The CX 1 can photograph dilated pupils with a diameter of at least 5 1 mm in the mydriatic mode with 50 of their field angle It can photograph non dilated pupil...

Page 14: ...ngerprints dust and other foreign objects attaches to the lens or mirror part you cannot take a good image Be sure to adjust the diopter of the viewfinder so it matches the diopter of photographer s eye Otherwise focusing will not be able to be performed correctly After use Turn OFF the power of the instrument Place the cap over the objective lens and place the dust cover over the instrument You c...

Page 15: ...ronment of Use see page 3 when selecting the installation location Dust in the air will not only attach to the objective lens but will also attach onto the optical parts inside the instrument You cannot take a good image when dust is on them Please keep the room clean Installation Please ask a Canon representative or distributor to perform installation of this product Please handle this product ca...

Page 16: ...ce rest 3 Forehead rest see page 45 4 Objective lens see page 44 5 Objective lens cap 6 Chin rest see page 15 7 Diopter compensation lever see page 34 8 Focus knob see page 17 27 9 Pan Tilt grip see page 35 10 Finger guard 11 Carrying indentations see page 10 1 2 3 4 6 7 8 10 11 5 9 ...

Page 17: ...ton see page 18 21 22 28 18 Operation lever see page 12 15 16 19 Stage unit see page 12 15 19 29 20 Height adjustment mark see page 15 21 Tilting lock lever see page 35 22 Panning lock knob see page 35 23 Operation panel see page 6 24 Stage unit lock button see page 19 25 USB connector see page 9 26 AC power connector see page 8 27 Retinal camera power switch 14 12 15 13 18 17 19 20 21 16 22 23 24...

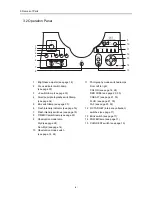
Page 18: ...s see page 19 8 TIMER C switch lamp see page 22 9 Observation mode lamp Myd see page 24 Non Myd see page 14 10 Observation mode switch see page 14 24 11 Photography mode switches lamps From left to right COLOR see page 14 24 RED FREE see page 20 30 COBALT see page 21 30 FLUO see page 21 30 FAF see page 23 32 12 FIX TARGET internal eye fixation switches see page 17 13 Blink switch see page 17 14 PO...

Page 19: ...tor see page 17 3 2 photography indicator see page 33 4 Small pupil photography indicator see page 34 5 Right Left eye indicator R Right eye L Left eye 6 Small pupil photography effective area see page 34 7 Internal eye fixation lamp position see page 17 8 2 photography range see page 33 9 Photography ready lamp see page 18 Viewfinder 1 2 photography range see page 33 2 Focus indicator see page 27...

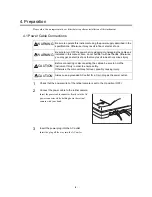
Page 20: ... into the AC outlet WARNING Be sure to operate this instrument using the power supply described in the specifications Otherwise it may result in fire or electric shock WARNING Be sure to turn OFF the power before plugging or unplugging the cables as indicated in this manual Also do not handle it with wet hands Otherwise you may get an electric shock that may result in death or serious injury CAUTI...

Page 21: ...nd to the computer Connect the connectors at the other end of the USB cables firmly into USB connectors of the computer Note Use the following type of USB cables Communication may not be possible if any other kind of cable is used Cable with type AB connector plug supporting USB 2 0 Hi Speed maximum length of 3 meters For further details contact a Canon representative or the distributor from which...

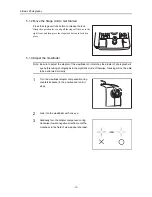
Page 22: ...ntative or distributor for more information WARNING When the instrument is going to be moved be sure to turn OFF the power unplug the power cable from the AC outlet and disconnect other cables Otherwise the cable may be damaged which may result in fire or electric shock Also when the instrument is going to be carried be sure to tighten the stage unit lock the panning lock knob and the tilting lock...

Page 23: ...ation manual of the control software Concerning the power saving function The power saving function is activated under the following circumstances When none of the switches on the operation panel has been operated for 10 or more minutes while power is supplied to the camera When none of the switches on the operation panel has been operated for 1 or more minutes after the operation to stop the time...

Page 24: ...e sure to adjust the diopter of the viewfinder so it matches the diopter of photographer s eye before taking photographs in the mydriatic mode Otherwise focusing will not be able to be performed correctly 1 Turn the viewfinder diopter compensation ring counterclockwise to the positive end until it stops 2 Look into the viewfinder with one eye 3 Gradually turn the diopter compensation ring clockwis...

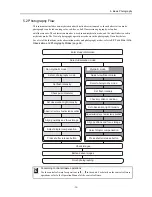
Page 25: ...re operations Use the control software for operations in in the chart For details on the control software operations refer to the Operation Manual of the control software Non mydriatic mode Select photography mode Set flash intensity Check pupil diameter Set observation light intensity Adjust int ext eye fixation lamp position Align positions and focus image Select diopter compensation Press shutt...

Page 26: ...ct the color photography mode Press the COLOR switch Or select the photography mode with the control software COLOR lamp turns on COLOR is displayed on the observation monitor 3 Disinfect the forehead rest and replace the chin rest paper If chin rest paper is not used disinfect the chin rest 4 Have the patient sit down If the patient is wearing glasses or contact lenses instruct the patient to rem...

Page 27: ...ing the stage closer to the patient s eye so that a retinal image becomes visible on the observation monitor CAUTION Do not put your fingers or hands between the sliding part and base of the stage unit or on the panning and tilting sliding parts Similarly do not allow patients to put their hands in these places Otherwise your or their hands or fingers may be pinched possibly resulting in injury CA...

Page 28: ...r and pull it forward and backward to perform rough adjustment and tilt it forward and backward to perform fine adjustment When the split lines are not visible Part of the split lines may not be visible if the pupil diameter is small In this case press the small pupil photography switch to turn on the small pupil photography function see page 34 Concerning the linkup function of the working distan...

Page 29: ...ng the external eye fixation lamp function In the non mydriatic mode you can use either the internal eye fixation lamp or external eye fixation lamp The lamp to be used can be selected in the control software For details refer to the Operation Manual of the control software Resetting the internal eye fixation lamp position If you hold down the blink switch for approx 2 or more seconds the internal...

Page 30: ...dicated by the color of the photography ready lamp This status differs depending on the photography mode and image taking conditions Photography ready lamp COLOR R Color Description Green Images can be taken Up to 10 images can be taken continuously when in the fluorescein angiography mode Orange Images can be taken but if image taking is continued the getting ready status will soon be established...

Page 31: ... switches is pressed the intensity is increased or reduced by steps of 0 3 The flash intensity selected is shown by the lighted area of the flash intensity indicator Note For details on the flash intensity adjustment in the fundus autofluorescence mode refer to Concerning the adjustment of the flash intensity for fundus autofluorescence mode page 23 Increased by 87 equivalent to a step of 0 9 of t...

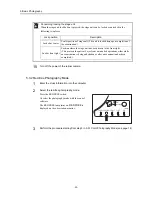
Page 32: ...rting from step 3 in 5 3 1 Color Photography Mode see page 14 Concerning locking the stage unit When the stage unit lock button is pressed the stage unit can be locked or unlocked in the following two places Lock position Description Locked at center Center position of stage unit The unit is locked here upon completion of the examination Lock at front right Position where the stage unit has been d...

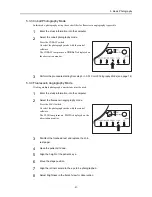
Page 33: ...1 Color Photography Mode see page 14 5 3 4 Fluorescein Angiography Mode If taking multiple photographs a mydriatic must be used 1 Enter the study information into the computer 2 Select the fluorescein angiography mode Press the FLUO switch Or select the photography mode with the control software The FLUO lamp turns on FLUO is displayed on the observation monitor 3 Disinfect the forehead rest and r...

Page 34: ...ck again that the working distance dots appear sharpest and the split lines form a single line and then press the shutter release button To take images continuously hold down the shutter release button Images can be taken continuously for up to 10 seconds at a rate of one frame per second 13 Review the image 14 Stop the timer Press the TIMER C switch The elapsed time display is reset 15 End the st...

Page 35: ...lash intensity switches Each time one of these switches is pressed the intensity is increased or reduced by steps of 0 3 The flash intensity selected is shown by the lighted area of the flash intensity indicator Note For details on the flash intensity adjustment in the color red free cobalt photography mode and fluorescein angiography mode refer to Concerning the adjustment of the flash intensity ...

Page 36: ...th the control software 2 Select the color photography mode Press the COLOR switch Or select the photography mode with the control software The COLOR lamp turns on 3 Disinfect the forehead rest and replace the chin rest paper If chin rest paper is not used disinfect the chin rest 4 Have the patient sit down Have the patient place his or her chin against the chin rest and his or her forehead agains...

Page 37: ...e to be photographed Slowly bring the retinal camera closer to the patient eye CAUTION Do not put your fingers or hands between the sliding part and base of the stage unit or on the panning and tilting sliding parts Similarly do not allow patients to put their hands in these places Otherwise your or their hands or fingers may be pinched possibly resulting in injury CAUTION When adjusting the posit...

Page 38: ... lever and pull it forward and backward to perform rough adjustment and tilt it forward and backward to perform fine adjustment When the split lines are not visible Part of the split lines may not be visible if the pupil diameter is small In this case press the small pupil photography switch to turn on the small pupil photography function see page 34 Concerning the linkup function of the working d...

Page 39: ...r details contact a Canon representative or distributor When the split lines cannot be aligned If the patient diopter is not in the range of 10 to 15 D focusing cannot be performed using the focus indicator In this case use the diopter compensation function see page 34 to focus with the cross hair line in the viewfinder When bringing the target into exact focus When bringing the target into focus ...

Page 40: ...nsity indicator Note For details on the flash intensity adjustment in the fundus autofluorescence mode refer to Concerning the adjustment of the flash intensity for fundus autofluorescence mode page 32 Color Description Green Images can be taken Up to 10 images can be taken continuously when in the fluorescein angiography mode Orange Images can be taken but if image taking is continued the getting...

Page 41: ...off the power of the retinal camera Concerning locking the stage unit When the stage unit lock button is pressed the stage unit can be locked or unlocked in the following two places Lock position Description Locked at center Center position of stage unit The unit is locked here upon completion of the examination Lock at front right Position where the stage unit has been drawn to the front right Th...

Page 42: ... 4 4 Fluorescein Angiography Mode 1 Enter the study information into the computer 2 Select the fluorescein angiography mode Press the FLUO switch Or select the photography mode with the control software The FLUO lamp turns on 3 Disinfect the forehead rest and replace the chin rest papar 4 Have the patient sit down 5 Align the height of the patient s eye 6 Move the stage position 7 Align the camera...

Page 43: ...n a flare free condition check the focus again and press the shutter release button To take images continuously hold down the shutter release button Images can be taken continuously for up to 10 seconds at a rate of one frame per second 13 Review the image 14 Stop the timer Press the TIMER C switch The elapsed time display is reset 15 End the study 16 Lock the stage unit Press the stage unit lock ...

Page 44: ...s Each time one of these switches is pressed the intensity is increased or reduced by steps of 0 3 The flash intensity selected is shown by the lighted area of the flash intensity indicator Note For details on the flash intensity adjustment in the color red free cobalt photography mode and fluorescein angiography mode refer to Concerning the adjustment of the flash intensity for color red free cob...

Page 45: ...raphy function Press the 2 switch If the 2 photography function is enabled the 2 lamp is turned on and the 2 photography indication is displayed in the viewfinder or on the observation monitor If a photograph is taken in this state the image in the 2 photography range is saved The enlarged image is displayed on the window in the control software Viewfinder Observation monitor Focus indicator lamp ...

Page 46: ...the target cannot be brought into focus by turning the focus knob use the diopter compensation lever to insert the diopter compensation lens and take the photographs Given below is the diopter range in which images can be photographed 0 position 10 to 15 D position 7 to 31 D position 11 to 33 D Note that the focus indicator see page 33 cannot be used when the diopter compensation lever is set to t...

Page 47: ...tographs of peripheral areas in the up down direction First turn the tilting lock lever to the position and then adjust the angle of the retinal camera in the vertical direction The lever clicks in at the horizontal position so you can easily find the position Before carrying the retinal camera around turn the tilting lock lever to the position Note Hold the pan tilt grip when adjusting the camera...

Page 48: ...gital camera Connect the video cable to the VIDEO OUT terminal on the digital camera Firmly insert the cable up to the plug base 3 Put the cable into the grooves in the camera cover Fit the core of the video cable into the space in the cover Be careful not to damage the cable while putting it into the groove 4 Attach the camera cover Place the camera cover hook onto the strap mount of the digital ...

Page 49: ...era and digital camera The image is displayed on the connected external monitor No image is displayed on the digital camera observation monitor Note Do not use any video cable other than the one provided Images might not be displayed if a different video cable is used Note Dress the video cable for smooth operation of the retinal camera It can be bundled with the retinal camera cables The cables m...

Page 50: ...sentative or distributor It is recommended that you either copy the tables of 7 1 1 Before Turning ON the Power see page 39 and 7 1 2 Turning ON the Power see page 40 or create a separate checklist for recording the inspection results WARNING Repairs must be performed by a technician qualified for the specific repair work If it is not repaired properly it may cause fire electric shock or accident ...

Page 51: ...with the power turned OFF Also be sure to plug in cables between equipments as far as they will go Main unit Check that the cover and parts are not damaged and are not loose Pass Fail Pass Fail Pass Fail Contact a Canon representative or distributor if the cover and parts are damaged or are loose Grasp the operation lever and tilt it back and forth and from left to right checking that the stage un...

Page 52: ...t is dirty see page 44 Contact a Canon representative or distributor if it is scratched Place a sheet of paper in front of the objective lens turn the brightness adjuster and check that the brightness for observation changes on the retinal observation screen Pass Fail Pass Fail Pass Fail Contact a Canon representative or distributor if there are no changes Place a sheet of paper in front of the ob...

Page 53: ...ontact a Canon representative or distributor When the power is turned on the buzzer sounds beep beep beep the display lamps on the operation panel blink A system error has occurred Turn off the main unit s power and contact a Canon representative or distributor The external eye fixation lamp does not light up or flicker The external eye fixation lamp is not attached properly Insert the external ey...

Page 54: ...not dilated enough Make the patient s pupil dilate If the pupil is still too small press the small pupil photography switch to activate the small pupil function Eyebrows or eyelashes are blocking the pupil Instruct the patient to open his or her eye wider The patient s vitreous body is unclear Focusing cannot be performed with the split lines The diopter compensation lever is set to the side or si...

Page 55: ...ation ring have not been adjusted Adjust the settings The objective lens is dirty Clean the lens see page 44 The patient is wearing contact lenses Instruct the patient to remove his or her contact lenses Black points appear on photographed images in the same area Dust or other substance is adhering to the surface of the objective lens Clean the lens see page 44 Dust or other substance is adhering ...

Page 56: ... of a blower touch the objective lens Use the procedure below to clean the objective lens when it is dirty Please order the lens cleaning paper lens cleaner and blower from a Canon representative or distributor 1 Turn ON the power of the retinal camera Press the power switch of the retinal camera to the I side ON 2 Adjust the brightness Set the brightness adjuster in the 8 to MAX range 3 Check for...

Page 57: ...t let the tip of a blower touch the viewfinder lens If the viewfinder is dirty blow off any dirt or dust on the lens surface with a blower 7 3 3 Forehead Rest Disinfect the forehead rest whenever changing patients CAUTION To prevent the risk of infection wipe the forehead rest with disinfecting ethanol glutaraldehyde solution or other disinfectant whenever changing patients For more details on the...

Page 58: ... the power switch of the retinal camera to the O side OFF 2 Unplug the power cable 3 Wipe the instrument with cleanser Soak a soft cloth with diluted neutral cleanser and wring it out 4 Wipe off with a rinsed cloth Wipe with a cloth that has been dipped in water and wringed out WARNING Before cleaning the instrument be sure to turn OFF the power and unplug the power cable from the AC outlet Never ...

Page 59: ...onsumable product sold separately To purchase the chin rest paper please contact a Canon representative or distributor 1 Pull out the chin rest right and left holding pins 2 Insert the holding pins in the chin rest paper Insert the holding pins in the right and left holes of the chin rest paper About 100 sheets of paper can be mounted 3 Attach the chin rest paper to the chin rest Attach the chin r...

Page 60: ...foreign objects attaches to the lens or mirror part you cannot take a good image 7 5 1 Removing the Digital Camera Note If the digital camera is removed and left unattached dust and other foreign objects can enter the main unit and digital camera After removing the digital camera be sure to also attach the caps to each mount 1 Turn off the power for the retinal camera and digital camera Set the po...

Page 61: ...unt index I on the top of the digital camera is aligned with the seam of the cover of the retinal camera body Release the lens unlock button While holding the digital camera pull the knob of the mount lock lever and pull up the lever to the UNLOCK position Note Hold the digital camera securely so that it does not drop Remove the digital camera Seam of cover Digital camera mount index ...

Page 62: ...ng points if the digital camera must be removed or installed Perform the work quickly in a clean room If the digital camera will be removed and stored be sure to attach the supplied mount cap to the retinal camera body and the body cap to the digital camera Wipe off any dust or other substances on the caps before attaching them 7 5 2 Installing the Digital Camera 1 Turn off the power of the retina...

Page 63: ...camera body When fitting them together be sure that the digital camera mount index mark is aligned with the cover seam on the retinal camera body Hold the knob of the mount lock lever and push down the lever to the LOCK position Turn the digital camera clockwise until it clicks into place Check that the digital camera is firmly secured in place Seam of cover Digital camera mount index Clicks Click...

Page 64: ...omatically removing dust and other substances that are adhering to the imaging sensor front surface The user does not need to pay particular attention to this function in normal operation The self cleaning sensor unit is capable of removing most dust and substances that can appear in images Use the operation below to perform automatic cleaning 1 Turn on the power of the retinal camera body 2 Set t...

Page 65: ...nsation lens 31 to 7D when using negative compensation lens 11 to 33D when using positive compensation lens Split line aligning type focusing Viewfinder diopter compensation range 5 D Flash intensity Linked to the photography mode Can be set manually Camera Digital camera Eye fixation lamp External eye fixation lamp Internal eye fixation lamp LED Internal Eye Fixation Target sold separately Moving...

Page 66: ...ode 2 RF RED FREE mode 3 COB COBALT mode Function Non Mydriatic Mode Mydriatic Mode COL 1 RF 2 COB 3 FLUO FAF COL 1 RF 2 COB 3 FLUO FAF Viewfinder N A 9 Observation Monitor 9 N A Observation Illumination Near infrared Visible light Field Angle 45 50 Used Eye Fixation Lamp Internal or external eye fixation lamp External eye fixation lamp Focus Indicator 9 9 Working Distance Dot 9 9 Minimally requir...

Page 67: ...ance RF emissions CISPR 11 GROUP 1 The CX 1 uses RF energy only for its internal function Therefore its RF emissions are very low and are not likely to cause any interference in nearby electromagnetic equipment RF emissions CISPR 11 Class B The CX 1 is suitable for use in all establishments including domestic establishments and those directly connected to the public low voltage power supply networ...

Page 68: ... differential mode 2 kV common mode 1 kV differential mode 2 kV common mode Mains power quality should be that of a typical commercial or hospital environment Voltage dips short interruptions and voltage variations on power supply input lines IEC 61000 4 11 5 UT 95 dip in UT for 0 5 cycle 40 UT 60 dip in UT for 5 cycles 70 UT 30 dip in UT for 25 cycles 5 UT 95 dip in UT for 5 sec 5 UT 95 dip in UT...

Page 69: ...iated RF IEC 61000 4 3 3 V m 80 MHz to 2 5 GHz 3 V m NOTE 1 At 80 MHz and 800 MHz the higher frequency range applies NOTE 2 These guidelines may not apply in all situations Electromagnetic propagation is affected by absorption and reflections from structures object and people a Field strengths from fixed transmitters such as base stations for radio cellular cordless telephones and land mobile radi...

Page 70: ...lity which could lead erratic diagnose No change in operation status or stored data Rated maximum output power of transmitter W Separation distance according to frequency of transmitter m Conducted RF Radiated RF 150 kHz 80 MHz 80 MHz 800 MHz 800 MHz 2 5 GHz 0 01 0 12 0 12 0 23 0 1 0 38 0 38 0 73 1 1 2 1 2 2 3 10 3 8 3 8 7 3 100 12 12 23 For transmitters rated at a maximum output power not listed ...

Page 71: ...mance Parts for Repair Performance parts parts required to maintain the functioning of the product of this product will be stocked for eight years after discontinuance of production to allow for repair Expendable Parts Replaced by Service Person Following parts are apt to become worn out or to deteriorate due to the characteristics of the material or structure These parts cannot be replaced by the...

Page 72: ......

Page 73: ......

Page 74: ...XB Amstelveen The Netherlands Telephone 31 20 545 8926 CANON CHINA CO LTD Medical Equipment Division 15F Jinbao Building No 89 Jinbao Street Dongcheng District Beijing 100005 China Telephone 86 10 8513 9999 CANON SINGAPORE PTE LTD Medical Equipment Department 1 Harbour Front Avenue 04 01 Keppel Bay Tower Singapore 098632 Telephone 65 6799 8888 CANON AUSTRALIA PTY LTD Optical Products Division 1 Th...

Reviews: