background image

Chapter 2  Functions

Summary of Contents for Cassette Feeding Module-J1

Page 1: ...Sep 20 2005 Service Manual Cassette Cassette Feeding Module K1 ...

Page 2: ......

Page 3: ... need arises In the event of major changes in the contents of this manual over a long or short period Canon will issue a new edition of this manual The following paragraph does not apply to any countries where such provisions are inconsistent with local law Trademarks The product names and company names used in this manual are the registered trademarks of the individual companies Copyright This ma...

Page 4: ...quiring care to avoid combustion fire Indicates an item prohibiting disassembly to avoid electric shocks or problems Indicates an item requiring disconnection of the power plug from the electric outlet Indicates an item intended to provide notes assisting the understanding of the topic in question Indicates an item of reference assisting the understanding of the topic in question Provides a descri...

Page 5: ...sed to indicate Low The voltage value how ever differs from circuit to circuit In addition the asterisk as in DRMD indicates that the DRMD signal goes on when 0 In practically all cases the internal mechanisms of a microprocessor cannot be checked in the field Therefore the operations of the microprocessors used in the machines are not discussed they are explained in terms of from sensors to the i...

Page 6: ......

Page 7: ...nary Jam at Delivery Sensor Stationary Jam at Delivery Sensor 2 5 Chapter 3 Parts Replacement Procedure 3 1 Document Feeding System 3 1 3 1 1 Pickup Roller Unit 3 1 3 1 1 1 Removing the Cassette Paper Pickup Roller 3 1 3 2 Electrical System 3 1 3 2 1 Cassette Size Detection Unit 3 1 3 2 1 1 Removing the Paper Size Detection Switches 3 1 3 2 2 Cassette Retry Paper Sensor 3 1 3 2 2 1 Removing the Ca...

Page 8: ...Contents 4 1 1 1 Periodically Replaced Parts 4 1 4 1 2 Durables 4 1 4 1 2 1 Durables 4 1 4 1 3 Periodical Servicing 4 1 4 1 3 1 Periodical Servicing 4 1 ...

Page 9: ...Chapter 1 Specifications ...

Page 10: ......

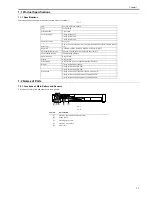
Page 11: ...Contents Contents 1 1 Product Specifications 1 1 1 1 1 Specifications 1 1 1 2 Names of Parts 1 1 1 2 1 Locations of Main Rollers and Sensors 1 1 ...

Page 12: ......

Page 13: ...mestic Label sheet 60 g m2 to 90 g m2 Paper size A3 B4 A4 A4R B5 B5R A5 LDR LGL LTR LTR R STMT Environmental measures Taken A cassette heater is available as an accessory Paper loading capacity 250Sheets 80g m2Paper Operation panel Not provided Display Not provided Power supply Not provided Power is supplied from host machine Weight 1 stage cassette model 6 0kg 2 stage cassette model 12 0kg 3 stag...

Page 14: ......

Page 15: ...Chapter 2 Functions ...

Page 16: ......

Page 17: ... System 2 3 2 2 Detecting Jams 2 4 2 2 1 Delay Jam in Pickup Assembly 2 4 2 2 2 Delay Jam in Pickup Assembly Paper Leading Edge Jam at Delivery Sensor Wound Paper Jam at Fixing Assembly 2 4 2 2 3 Stationary Jam in Pickup Assembly 2 4 2 2 4 Stationary Jam in Delivery Assembly Paper Trailing Edge Stationary Jam at Delivery Sensor Stationary Jam at Delivery Sensor 2 5 ...

Page 18: ......

Page 19: ...on of the pickup roller is controlled by the pickup roller drive gear which transfers the drive power of the main motor M204 to the pickup roller drive shaft and the cassette pickup solenoid SL202 When the main motor starts rotating the interlocked relay gear also starts rotating At this time the pickup roller drive gear is not driven because its toothless portion is positioned at the relay gear a...

Page 20: ...paper is fed to the registration roller through the vertical path roller F 2 4 2 1 3 Cassette Paper Size Detection 0011 1555 The size of the paper in the cassette is detected by the DC controller PCB when the user changes the position of the cassette paper size lever When the cassette is inserted in the iR host machine the paper size lever pushes the paper size switches provided in the iR host mac...

Page 21: ... 1 stage cassette 2 stage cassette A3 A4 A4R A5 B4 B5 B5R LGL 11x17 LTR LTRR STM T U1 U2 U3 PSIZ E1 ON OFF ON OFF OFF ON ON OFF ON ON ON ON OFF OFF OFF PSIZ E2 OFF ON OFF ON OFF OFF ON ON OFF ON ON ON ON OFF OFF PSIZ E3 OFF OFF ON OFF ON OFF OFF ON ON OFF ON ON ON ON OFF PSIZ E4 OFF OFF OFF ON OFF ON OFF OFF ON ON OFF ON ON ON ON Symbol Name 1 Connecting gear 2 Main motor drive signal MTRON 3 Cass...

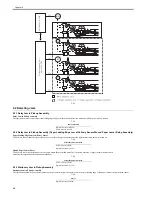
Page 22: ... turned on T 2 4 Wound Paper Jam at Fuser The delivery sensor has detected absence of paper within the prescribed time after it detected presence of paper within the prescribed time after the registration clutch had been turned on T 2 5 2 2 3 Stationary Jam in Pickup Assembly 0011 1559 Stationary Jam in Pickup Assembly The registration sensor does not detect absence of paper within the prescribed ...

Page 23: ...ivery Sensor The delivery sensor cannot detect absence of paper within the prescribed time after the registration sensor has been turned off T 2 7 Stationary Jam at Delivery Sensor The delivery sensor cannot detect absence of paper within the prescribed time after it has detected the leading edge of paper T 2 8 Sensor Registration sensor SR209 Delivery sensor SR203 Sensor Delivery sensor SR203 ...

Page 24: ......

Page 25: ...Chapter 3 Parts Replacement Procedure ...

Page 26: ......

Page 27: ... Detection Switches 3 1 3 2 2 Cassette Retry Paper Sensor 3 1 3 2 2 1 Removing the Cassette Pickup Assembly 3 1 3 2 2 2 Removing the Retry Sensor 3 1 3 2 3 Cassette Paper Sensor 3 1 3 2 3 1 Removing the Cassette Pickup Assembly 3 1 3 2 3 2 Removing the Cassette Paper Presence Absence Sensor 3 2 3 2 4 Cassette Pickup Solenoid 3 2 3 2 4 1 Removing the Cassette Pickup Assembly 3 2 3 2 4 2 Removing th...

Page 28: ......

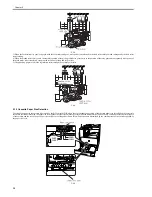
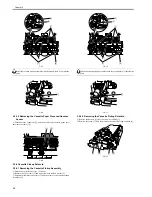
Page 29: ...e Retry Paper Sensor 3 2 2 1 Removing the Cassette Pickup Assembly 0011 1692 1 Detach the cassette rear cover 2 screws 2 Remove the five screws 1 and one screw with toothed washer 2 3 Disconnect the three connectors 3 and then remove the cassette pickup assembly 4 F 3 4 Install the cassette pickup assembly with the ground plate 1 outside the side plate F 3 5 3 2 2 2 Removing the Retry Sensor 0011 ...

Page 30: ...te Pickup Assembly 0011 3241 1 Detach the cassette rear cover 2 screws 2 Remove the five screws 1 and one screw with toothed washer 2 3 Disconnect the three connectors 3 and then remove the cassette pickup assembly 4 F 3 10 Install the cassette pickup assembly with the ground plate 1 outside the side plate F 3 11 3 2 4 2 Removing the Cassette Pickup Solenoid 0011 1689 1 Remove the harness 1 from t...

Page 31: ...Chapter 4 Maintenance ...

Page 32: ......

Page 33: ...s 4 1 Maintenance and Inspection 4 1 4 1 1 Periodically Replaced Parts 4 1 4 1 1 1 Periodically Replaced Parts 4 1 4 1 2 Durables 4 1 4 1 2 1 Durables 4 1 4 1 3 Periodical Servicing 4 1 4 1 3 1 Periodical Servicing 4 1 ...

Page 34: ......

Page 35: ...e machine does not have parts that need to be replaced on a periodical basis 4 1 2 Durables 4 1 2 1 Durables 0010 4731 This machine does not have items that may be classified as durables 4 1 3 Periodical Servicing 4 1 3 1 Periodical Servicing 0011 1564 The machine does not have items that must be serviced on a periodical basis ...

Page 36: ......

Page 37: ...Sep 20 2005 ...

Page 38: ......

Reviews: