background image

Be sure to read these Instructions before using
your camera for the first time. Keep this booklet
handy for easy reference.
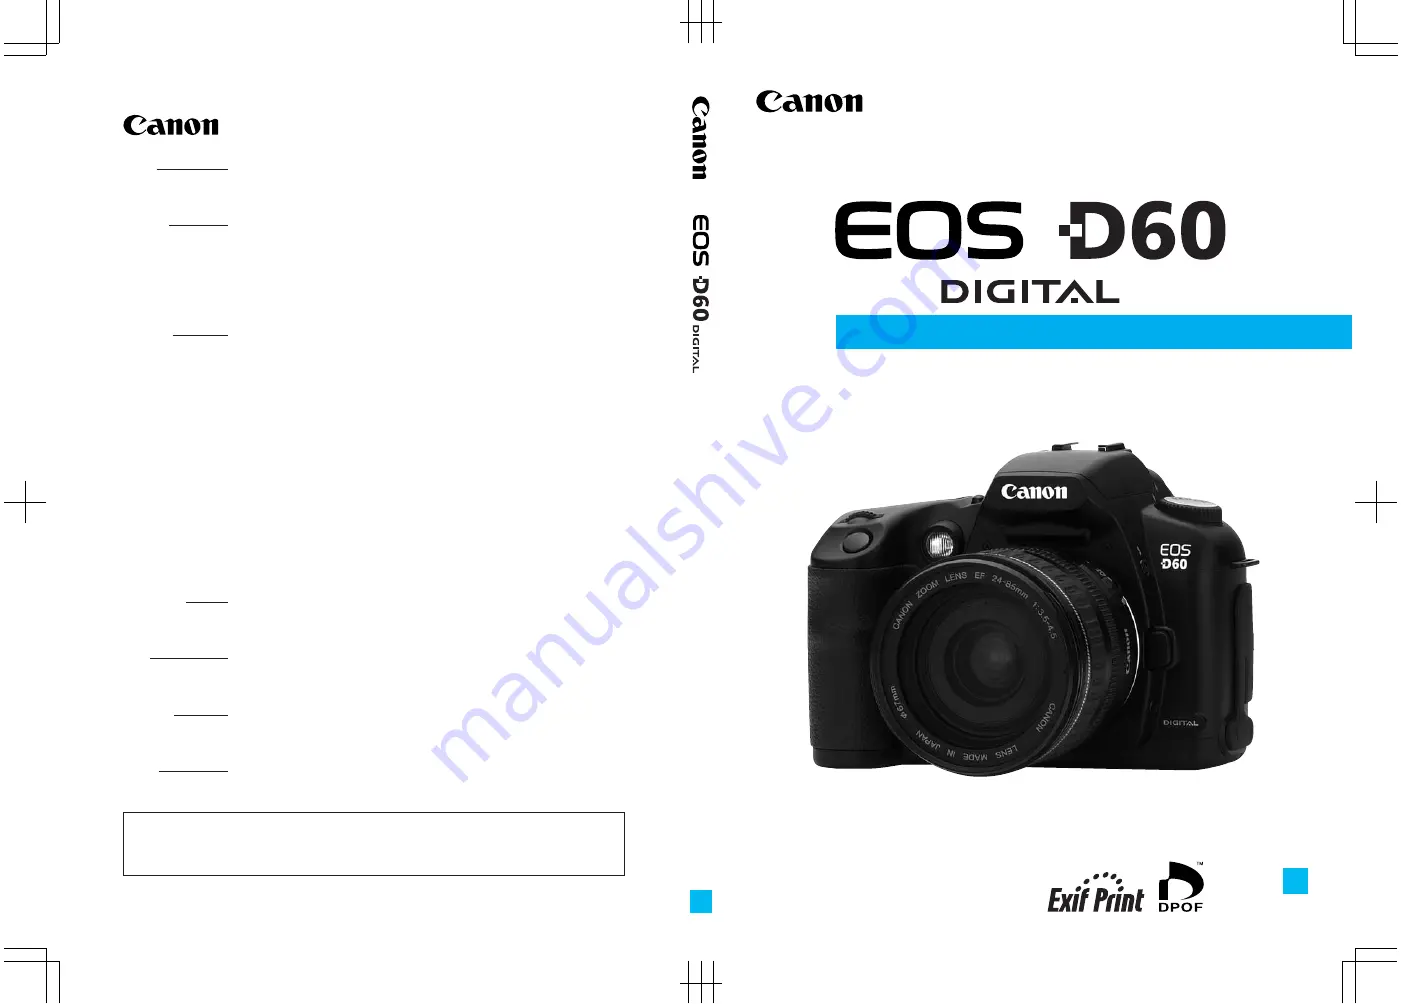
English Edition

INSTRUCTIONS

E

E

CT1-1232-001

©

 CANON INC. 2002

PRINTED IN JAPAN

This Instructions booklet is current as of January 2002. For information on using the
camera with system accessories introduced after this date, contact your nearest Canon
Service Center.

CANON INC. 30-2, Shimomaruko 3-chome, Ohta-ku, Tokyo 146-8501, Japan

U.S.A.

CANON U.S.A. INC.
For all inquiries concerning this camera, call toll free in the U.S.
1-800-OK-CANON or write to: Customer Relations, Canon U.S.A., Inc.
One Canon Plaza, Lake Success, N.Y. 11042-1198

CANADA

CANON CANADA INC. HEADQUARTERS
6390 Dixie Road, Mississauga, Ontario L5T 1P7, Canada
CANON CANADA INC. MONTREAL BRANCH
5990, Côte-de-Liesse, Montréal Québec H4T 1V7, Canada
CANON CANADA INC. CALGARY OFFICE
2828, 16th Street, N.E. Calgary, Alberta T2E 7K7, Canada
For all inquiries concerning this camera, call toll free in Canada
1-800-OK-CANON

EUROPE,

CANON EUROPA N.V.

AFRICA &

Bovenkerkerweg 59-61, P.O. Box 2262, 1180 EG Amstelveen, The Netherlands

MIDDLE EAST

CANON COMMUNICATION & IMAGE FRANCE S.A.
102, Avenue du Général de Gaulle 92257 La Garenne-Colombes Cedex, France
CANON UK LTD.
Woodhatch Reigate Surrey RH2 8BF, United Kingdom
CANON DEUTSCHLAND GmbH
Europark Fichtenhain A10, 47807 Krefeld, Germany
CANON ITALIA S.p.A.
Palazzo L, Strada 6, 20089 Rozzano, Milanofiori, Milano, Italy
CANON Benelux N.V./S.A.
Bessenveldstraat 7, 1831 Diegem (Machelen), Belgium
CANON Schweiz AG
Geschäftsbereich Wiederverkauf, Industriestrasse 12, CH-8305 Dietlikon, Switzerland
CANON G. m. b. H.
Oberlaaerstrasse 233, 4th floor, 1100 Wien, Austria
CANON España, S. A.
C/Joaquín Costa, 41, 28002 Madrid, Spain
SEQUE Soc. Nac. de Equip., Lda.,
Praça da Alegria, 58, 2

°

, 1269-149 Lisboa, Portugal

CENTRAL &

CANON LATIN AMERICA, INC. DEPTO DE VENTAS

SOUTH AMERICA

703 Waterford Way Suite 400 Miami, FL 33126 U.S.A.
CANON LATIN AMERICA, INC. CENTRO DE SERVICIO Y REPARACION
Apartado 2019, Zona Libre de Colón, República de Panamá

ASIA

CANON HONGKONG CO., LTD.
9/F, The Hong Kong Club Building, 3A Chater Road, Central, Hong Kong
CANON SINGAPORE PTE. LTD.
79 Anson Road #09-01/06 Singapore 079906

OCEANIA

CANON AUSTRALIA PTY. LTD.
1 Thomas Holt Drive, North Ryde, N.S.W. 2113, Australia
CANON NEW ZEALAND LTD.
Fred Thomas Drive, P.O. Box 33-336, Takapuna, Auckland, New Zealand

JAPAN

CANON SALES CO., INC.
12-15 Mita, 3-Chome, Minato-ku, Tokyo 108-8011, Japan

INSTRUCTIONS

Summary of Contents for BP-511

Page 1: ...MMUNICATION IMAGE FRANCE S A 102 Avenue du Général de Gaulle 92257 La Garenne Colombes Cedex France CANON UK LTD Woodhatch Reigate Surrey RH2 8BF United Kingdom CANON DEUTSCHLAND GmbH Europark Fichtenhain A10 47807 Krefeld Germany CANON ITALIA S p A Palazzo L Strada 6 20089 Rozzano Milanofiori Milano Italy CANON Benelux N V S A Bessenveldstraat 7 1831 Diegem Machelen Belgium CANON Schweiz AG Gesch...

Page 2: ...actFlash is a trademark of SanDisk Corporation IBM PC AT and Microdrive are trademarks or registered trademarks of International Business Machines Macintosh is a registered trademark of Apple Corporation in the United States and other countries All other trademarks are the property of their respective owners This digital camera supports Exif 2 2 also called Exif Print Exif Print is a standard for ...

Page 3: ...ns Explains how to install the software for transferring images from the camera to a personal computer editing RAW images and setting processing parameters Battery Pack BP 511 Instructions Warranty card Quick Operation Guide EOS D60 Accessories Introduces major accessories for the EOS D60 No CF card is included Please purchase it separately CF cards made by Canon are recommended A microdrive is a ...

Page 4: ...ait Mode 44 Landscape Mode 45 Contents 1 Before You Start 21 Introduction 2 Simple Picture Taking 37 Close Up Mode 46 Sports Mode 47 Night Portrait Mode 48 Quality Selection 50 ISO Speed 51 Setting Processing Parameters 52 AF Mode Selection 54 One Shot AF for Still Subjects 55 AI Servo AF for Moving Subjects 56 AI Focus AF 56 AF Point Selection 57 Focusing On an Off Center Subject 58 Problem Subje...

Page 5: ...s Auto playback 101 Rotating an Image 102 Protecting an Image 103 Erasing Images All Image Erase 104 Formatting the CF Card 105 Print Order 106 Selecting Images for Printing 107 Print Type 109 Specifying Date Printing 110 Specifying File Number Printing 111 Connecting to a TV 112 Replacing the Date Time Battery 113 File Numbering System 114 Cleaning the CMOS Imaging Element 115 List of Menu Functi...

Page 6: ...radio or television reception which can be determined by turning the equipment off and on the user is encouraged to try to correct the interference by one or more of the following measures Reorient or relocate the receiving antenna Increase the separation between the equipment and receiver Connect the equipment into an outlet on a circuit different from that to which the receiver is connected Cons...

Page 7: ...age Please take the first opportunity to consult your camera distributor or Canon Customer Support immediately Stop operating the equipment immediately if it should emit smoke or noxious fumes Failure to do so may result in fire or electrical shock Set the camera s main switch to the OFF position and remove the camera battery or unplug the power cord from the electrical outlet immediately Please c...

Page 8: ...ly flush with water any area of the body including the eyes and mouth or clothing that comes into contact with the inner contents of a battery If the eyes or mouth contact these substances immediately flush with water and seek medical assistance Avoid dropping or subjecting the batteries to severe impacts that could damage the casings This could lead to leakage and injury Do not short circuit the ...

Page 9: ...ause malfunctions or corrupt image data Avoid Condensation Related Problems Moving the equipment rapidly between hot and cold temperatures may cause condensation water droplets to form on its external and internal surfaces You can avoid this by placing the equipment in an airtight resealable plastic bag and letting it adjust to temperature changes slowly before removing it from the bag If Condensa...

Page 10: ...d interfere with the camera s normal operation 8 If you take the camera quickly from a cold location into a warm one condensation can form on the outside and inside of the camera To prevent this place the camera in an airtight resealable plastic bag until it warms up to the ambient temperature 9 Do not use the camera if condensation forms on it or you could damage it If this occurs remove the CF c...

Page 11: ...ice Do not drop CF cards or expose them to vibrations Doing so could lose the images recorded on them 2 Do not store or use CF cards near objects that generate magnetic fields such as TVs speakers or magnets or in locations affected by static electricity Doing so could lose the images recorded on the CF card 3 Do not place CF cards in direct sunlight or close to heating appliances Doing so can dis...

Page 12: ... the cover closed until it clicks shut 24 2 Focus on the subject Look through the viewfinder and place the AF point over the subject Then press the shutter button down halfway to focus 29 The AF point which achieves focus will flash in red In low light conditions or backlit daylight conditions the built in flash fires automatically 86 9 Take the shot Press the shutter button down fully 29 10 Open ...

Page 13: ... 40 11 To check other images you have taken see Check the Image Immediately 40 and Viewing Recorded Images 98 To erase images you have taken see Erasing a Recorded Image Single Image Erase 43 Mount the lens Align the red dots on the lens and camera and turn the lens in the direction shown by the arrow in the diagram until it clicks into place 27 3 Set the focus mode switch on the lens to AF 27 4 ...

Page 14: ...uction Self timer lamp 89 81 AF assist lamp 39 Mirror 84 115 Electrical contacts 11 Lens mount Depth of field preview button 73 95 Lens release button 27 Strap mount 21 Mode dial 18 Flash button 86 AF mode selection White balance selection button 54 66 AF WB Lens mount index 27 Built in flash 86 Hot shoe 92 Main dial 30 Lens lock pin Cover VIDEO OUT terminal 112 DIGITAL terminal See software instr...

Page 15: ...on 43 104 Tripod socket Date time battery compartment cover 113 Set button 32 Quick control dial 31 Battery chamber cover 24 Battery chamber cover release lever 24 CF card slot cover 28 Strap mount 21 Access lamp 28 AF point selection button 57 AE lock FE lock button 80 90 Quick control dial switch 31 Dioptric adjustment knob 36 CF Card Slot Cover CF card slot accepts card type1and 2 28 CF card ej...

Page 16: ...osure compensation Manual focus AEB Metering mode Evaluative metering Partial metering Center weighted average metering Exposure level Exposure compensation amount AEB level Flash exposure compensation amount CF card writing status Exposure level scale AF mode ONE SHOT AF AI FOCUS AF AI SERVO AF Shots remaining Self timer countdown Bulb exposure time ISO speed Drive mode Single frame Continuous Se...

Page 17: ...dicator FE lock underexposure warning High speed sync FP flash Exposure level Exposure compensation amount AEB level Flash exposure compensation amount Red eye reduction lamp on indicator Focus confirmation light Partial metering circle AF points Superimposed display Aperture value CF full warning CF error warning No CF card warning Flash exposure compensation Maximum burst count during continuous...

Page 18: ...res in specific situations Portrait 44 Landscape 45 Close up 46 Sports 47 Night Portrait 48 Reference page numbers are indicated by Mode Dial The Mode Dial is divided into two functional zones 2 2 2 2 2 Creative zone Lets you make a variety of settings Program AE 68 Shutter priority AE 70 Aperture priority AE 72 Manual exposure 74 Automatic Depth of field AE 76 Image zone Basic zon e Creative zone...

Page 19: ... into DC coupler socket of compact power adapter DC Coupler DR 400 Back Charge lamp 22 Power cord 22 26 Battery pack connectors 22 Attach battery packs for charging DC coupler socket 26 Plug in cord for DC coupler here DC coupler cord 26 Power cord socket 22 26 Plug in power cord here ...

Page 20: ...m f 3 5 4 5 USM lens for reference The descriptions also assume that the menu functions and custom functions are set to the default settings The icons 4 6 and 16 indicate that the function operates on a timer and remains in effect after the button is released The icons represent 4 6 or 16 seconds respectively In general the pictures used for explaining procedures are taken with a single lens refle...

Page 21: ... as well as how the shutter button operates Attaching the Strap Pass the end of the strap through the strap mount from beneath then back in and out of the strap clasp as shown Pull the strap to make sure it does not slip out of the clasp The eyepiece cover is attached to the strap 82 Before You Start Eyepiece cover ...

Page 22: ...ttery pack As soon as you place the battery pack in the compact power adapter the charge lamp starts blinking and charging begins When charging is complete the lamp stops blinking and stays on It can take up to 90 minutes to fully charge a battery pack You can check whether a battery is charged by seeing whether the charge lamp blinks or stays on When charging is complete the charge lamp stops bli...

Page 23: ...d even after charging normally the battery pack may have exceeded its useful life Replace it with a new battery pack The adapter can hold and charge two battery packs Charging starts with the first battery pack attached After that battery pack is charged the charge lamp goes on and the adapter starts charging the second battery pack After charging of both battery packs is completed both charge lam...

Page 24: ... Slide the lever in the direction shown by the arrow in the diagram and open the cover as shown 2Insert the battery into the camera Make sure the battery pack is facing the right way and insert it into the battery chamber Insert the battery pack until it locks into place 3 Close the cover Press the cover closed until it clicks shut Battery Level Icons The level of charge remaining is shown in thre...

Page 25: ...ith Battery Grip BG ED3 optional refer to the BG ED3 s instructions Removing the Battery Pack 1 Open the battery cover Slide the lever in the direction shown by the arrow in the diagram and open the cover as shown 2Remove the battery pack Slide the battery lock lever in the direction shown by the arrow and remove the battery 3 Close the battery cover Press the cover closed until it clicks shut The...

Page 26: ...ra Open the cover 24 and lower the covering on the cord hole Insert the DC coupler and fit the cord into the cord hole Check that the cord is placed tightly in the cord hole and slide the DC coupler into the chamber until it locks into place Close the cover so that it clicks into place 4Connect the power cord Connect the power cord to the compact power adapter Plug the cord into a power outlet Whe...

Page 27: ...panel 4Remove the front lens cap Detaching a Lens Press and hold the lens release button and turn the lens as shown by the arrow Turn the lens until the index mark is at the top then remove it Mounting and Detaching a Lens Lens mount index Since the EOS D60 s picture coverage is smaller than the normal 35mm film format see illustration the EF lens attached to the camera will have a telephoto effec...

Page 28: ... Set the Main Switch to OFF Check that the message is not shown on the LCD panel Make sure the access lamp is off 15 and open the cover 2Remove the CF card Press the Eject button The CF card is ejected Close the cover While the access lamp is blinking never do the following Shake or hit the camera Open the CF card slot cover Open the battery compartment cover Doing so may destroy the image data or...

Page 29: ...y turns off if you do not operate it for approximately one minute Auto power off function To use the camera again press the shutter button down halfway or set the Main Switch to OFF and then set it to ON again You can use the Menu functions to set the Auto power off function to 1 2 4 8 15 or 30 minutes or Off 120 If you set the Main Switch to OFF immediately after you take a picture the access lam...

Page 30: ...ile a timer 6 runs During this time you can turn the dial and view the settings on the LCD panel When the timer runs out or you press the shutter button down halfway the camera is ready to take a picture 2 Just turn the dial Turn the dial while watching the LCD panel Use the dial this way to set the AF mode AF point metering mode or drive mode Use the dial this way to set the shutter speed and ape...

Page 31: ...res turn the dial while watching the viewfinder display or LCD panel When you are making selections and settings from the LCD monitor turn the dial while watching the LCD monitor LCD Monitor You can use the LCD monitor on the back of the camera to review and select images as well as select and set menu functions Use the dial this way to select and set the white balance drive mode and flash exposur...

Page 32: ...play the options list then turn the dial to select the desired option 4 Make the setting Press the button 5 Exit the menu Press the MENU button to exit the menu When the menu is displayed you can take pictures immediately by pressing the shutter button down You can finish making a setting by pressing the shutter button down halfway You can cycle through menu items and options lists You can select ...

Page 33: ... Auto playback Plays the images automatically 101 Auto power off 1 min 2 min 4 min 120 8 min 15 min 30 min Off Review Off On On Info 41 Review time 2 sec 4 sec 42 8 sec Hold LCD Brightness Normal Bright 120 Date Time mm dd yy dd mm yy yy mm dd 34 File numbering Continuous Auto reset 114 Language English Deutsch 121 Français Japanese Video system NTSC PAL 121 Format Format CF card 105 C Fn 1 Custom...

Page 34: ... the dial to select Date Time 2Press the button The Date Time setting screen appears 3 Set the date and time Turn the dial to adjust the date or time values then press the button After entering the setting go to the next item 4Select the order for the display Use the dial to select the order then press the button Turn the dial to cycle through the selections in the order shown yy mm dd mm dd yy dd...

Page 35: ...o the menu Press the MENU button to clear the screen and exit the menu Each photographed image is recorded with the date and time it was taken If the date and time are not set they cannot be recorded correctly Make sure you set the date and time correctly The date and time setting is maintained by the date time battery ...

Page 36: ...rply defined in the viewfinder The diagram shows the knob set at the standard diopter 1 dpt To get sharp pictures hold the camera as still as possible Horizontal shooting Vertical shooting Grasp the camera grip firmly with your right hand and hold your elbows lightly against your body Hold the lens at the bottom with your left hand Hold the camera to your face and look through the viewfinder To ma...

Page 37: ...quick and easy shooting In these modes all you do is point and shoot In addition to help prevent mistakes caused by operating the camera improperly the dial and the AF WB and buttons do not operate so there is no need to worry about acciden tal errors Simple Picture Taking Basic zone Shutter button ...

Page 38: ...focus Press the shutter button down halfway to set the focus The AF point achieving focus will flash in red and the beeper will sound The focus confirmation light at the lower right will also light 4Check the display The camera determines the shutter speed and aperture value automatically and displays them in the viewfinder and on the LCD panel A number to displayed on the left of the focus confir...

Page 39: ...g to On or Off 33 118 If the number of remaining shots to in the CF card is displayed changing the image quality will also change this remaining number of shots The LCD panel can be illuminated 67 118 If anything blocks the flash so that it cannot pop up automatically the error code 135 appears on the LCD panel When this occurs set the Main Switch to OFF and then set it to ON again To take picture...

Page 40: ...ldest Turn the dial clockwise to move through the images from oldest to newest Check the Image Immediately You can turn the Review function on or off as well as display the image information display 41 You can change the length of time the image is displayed 42 You can change the brightness of the LCD monitor 120 While a picture is being displayed you can press the button to delete that image 43 T...

Page 41: ... MENU button Turn the dial to select Review then press the button 2Select the Review setting Turn the dial to select the desired option then press the button The setting is entered and the display returns to the menu Press the MENU button to clear the screen and exit the menu 3 Take the picture After the picture is taken the image as it was shot appears on the LCD monitor The time that image is di...

Page 42: ...ess the button 2Set the review time Turn the dial to select the review time you want then press the button The setting is entered and the display returns to the menu Press the MENU button to clear the screen and exit the menu When this function is set to Hold the image is displayed until you press the shutter button down halfway Note however that the camera power will turn off automatically when t...

Page 43: ...rase menu Press the button The Erase menu appears at the bottom of the LCD monitor 4Erase the image Turn the dial to select Erase then press the button The access lamp blinks and the image is erased You cannot recover an image once you have erased it Make sure you no longer want an image before erasing it You can protect images 103 to prevent them from being erased accidentally To erase all images...

Page 44: ...T the drive mode to and the metering mode to Head and shoulder shots give the best background blur effect Also the farther the subject is from the background the more blurred the background will appear Use a telephoto lens to blur the background even more If you use a zoom lens its longest focal length is the most effective for example a 24 85mm lens set to 85 mm The image quality can also be set ...

Page 45: ...ow to keep the picture from being blurred by camera shake We recommend you use a tripod when taking landscape pictures The shutter speed indicator still blinks if you use a tripod but camera shake will not be a problem The built in flash does not fire in Landscape mode even if it is raised The image quality can also be set 50 118 A wide angle lens provides the greatest depth from foreground to bac...

Page 46: ... ONE SHOT the drive mode to Single frame and the metering mode to Close up mode is most effective when the subject is at the minimum focusing distance of the lens If you use a zoom lens use its longest focal length to get a higher magnifica tion For serious macro photography using EOS dedicated macro lenses and Macro Ring Lite MR 14EX or Macro Twin Lite MT 24EX is recommended The image quality can...

Page 47: ... speed may be too slow to keep the picture from being blurred by camera shake Be careful to hold the camera steady and press the shutter button smoothly or use a tripod The shutter speed indicator still blinks if you use a tripod but camera shake will not be a problem The built in flash does not fire in Sports mode even if it is raised The image quality can also be set 50 118 For best results in S...

Page 48: ...y set to ONE SHOT the drive mode to Single frame and the metering mode to To prevent camera shake always use a tripod If you are taking images of scenery only and not people use Landscape mode Tell your subjects not to move for a few seconds after the flash fires You can also use Night Portrait mode with an EX series Speedlite In daylight Night Portrait mode operates the same as Full Auto mode The...

Page 49: ...he Quick Control Dial Press the shutter button down halfway and release and a timer will show the exposure setting for approximately 4 seconds on the LCD panel and viewfinder You can set the AF mode AF point metering mode drive mode and white balance only in the Creative Zone modes You can use AE lock exposure compensation AEB bulb exposures and depth of field preview only in the Creative Zone mod...

Page 50: ... menu Press the MENU button to clear the screen and exit the menu Quality Large Fine Large Normal Medium Fine Medium Normal Small Fine Small Normal RAW Icon Recording size 3072 2048 2048 1360 1536 1024 3072 2048 Recording method JPEG RAW Compression ratio Low High Low High Low High Size of one image 2 5 Mbyte 1 3 Mbyte 1 4 Mbyte 0 7 Mbyte 0 9 Mbyte 0 5 Mbyte 7 4 Mbyte Recording capacity Approx 48 ...

Page 51: ...ments The default setting is ISO 100 1 Select ISO speed Press the MENU button Turn the dial to select ISO Speed then press the button 2Set the ISO speed Turn the dial to select the desired ISO speed then press the button The selected ISO speed is entered and the screen returns to the Menu Press the MENU button to clear the screen and exit the Menu You can set the ISO speed by pressing the button a...

Page 52: ...Low 0 Standard High Low 0 Standard High Red 0 Standard Yellow Effect Takes pictures with lower contrast Takes pictures with normal contrast Takes pictures with higher contrast Takes pictures with lower sharpness Takes pictures with normal sharpness Takes pictures with higher sharpness Takes pictures with muted colors Takes pictures with normal color saturation Takes pictures with intense colors Ma...

Page 53: ... be set Turn the dial to select the parameter then press The parameter selection will change in the following loop 5 Set the desired parameter setting Turn the dial and select 0 or Then press 6Go back to step 1 Press the MENU button twice to return to step 1 then press 7 Select the desired set number Turn the dial and select Set 1 Set 2 or Set 3 Then press Contrast Sharpness Saturation Color tone ...

Page 54: ...he Mode Dial to a Creative zone setting other than 3 Press the AF WB button 6 4Select the AF mode Turn the dial to make the selection Press the shutter button down halfway to return to ready to shoot status In addition to the above two AF modes the EOS D60 provides AI Focus AF which automatically switches between One shot and AI Servo AF modes according to the state of the subject AI Focus AF is a...

Page 55: ...is achieved The exposure setting and focus remain locked as long as the shutter button is pressed down halfway You can then recompose the shot while retaining the exposure setting and focus 58 If the camera cannot focus the focus confirmation light in the viewfinder blinks If this happens you will not be able to take a picture even if you press the shutter button down fully Instead reframe the sho...

Page 56: ...three AF points to focus on the subject Tracking and predictive focusing is carried out using the camera selected AF point When the AF point is selected manually 57 the selected AF point tracks the subject AI Focus AF AI Focus AF is set automatically in Full Auto mode At the time of the shot the camera automatically selects One shot AF or AI Servo AF according to the state of the subject If the su...

Page 57: ...s manually This is best when you want to be sure to focus on a particular subject or to use the speed of the AF focusing function to help you compose a particular shot quickly 1 Press the button 6 2Select the AF point Look at the LCD panel or the viewfinder display as you turn the or dial Press the shutter button halfway to ready the camera for shooting Automatic selection All the AF points will l...

Page 58: ...t an AF point 57 2Focus on the subject Place the AF point over the subject and press the shutter button down halfway 3 Hold the shutter button down halfway and recompose the picture 4Take the picture You can also use the Focus lock function in the Basic Zone except for mode starting from step 2 For best results use the combination of One shot AF with AE lock applied on the AF point where focus is ...

Page 59: ...al inside the cage In such cases use one of the following procedures 1 Focus on an object that is at the same distance as the desired subject apply Focus Lock then recompose the picture 2 Set the lens focus mode switch to MF or M and focus manually Manual Focus 1 Set the lens focus mode switch to MF or M on older lenses The icon appears on the LCD panel 2Focus on the subject Turn the manual focusi...

Page 60: ... settings appear on the LCD monitor Press the INFO button again to clear the LCD monitor INFO Checking Camera Settings Auto power off time 29 120 Review 41 Review time 42 Parameters 52 C Fn Custom Function number s 122 Flash exposure compensation 91 Shots remaining CF card capacity remaining 50 ISO speed 51 AEB 78 For viewing image information during playback see Turning the Information Display On...

Page 61: ...uative metering In the Creative zone any of the three modes can be selected 1 Press the button 6 2Select a metering mode Look at the LCD panel as you turn the dial Evaluative Partial Center weighted average Press the shutter button down halfway to return to ready to shoot mode Turn the dial to set the flash exposure compensation for the built in optional flash 91 ...

Page 62: ...hat it can select the proper exposure for the subject at all times When using manual focusing evaluative metering is based on the center AF point Partial Metering This is particularly effective when the background is much brighter than the subject due to backlighting etc This method uses a center area of approxi mately 9 5 of the screen The area covered by partial metering is shown on the left Cen...

Page 63: ... are based on Canon s testing standards at 1 250 sec or faster and ISO 100 1 Press the DRIVE button 6 2Select the drive mode Look at the LCD panel as you turn the or dial Single frame shooting Continuous shooting Self Timer Operation Press the shutter button down halfway to return to ready to shoot mode Size Quality Large Fine Large Normal Medium Fine Medium Normal Small Fine Small Normal RAW ONE ...

Page 64: ... the CF card When the internal memory becomes full during continuous shooting will be displayed on the LCD panel and in the viewfinder and the camera cannot take any more pictures As the captured images are transferred to the CF card you will be able to take more pictures Press the shutter button halfway to check in the viewfinder the current remaining number of maximum shots to for continuous sho...

Page 65: ...lor correcting filters or switching to different film types Digital cameras rely on software to correct the color temperature by determining white as the basis for the colors in the subject then correcting the other colors to achieve a natural color range mode automatically selects the white balance according to the light source where you are shooting If this does not produce pictures with satisfa...

Page 66: ... can be taken using any mode 16 Photograph a white subject so that a standard exposure is obtained If the picture is underex posed or overexposed the correct white balance might not be obtained 2From the menu select Custom WB Press the MENU button Turn the dial to select Custom WB then press the button 3 Select the image Turn the dial to select the picture you took in step 1 then press the button ...

Page 67: ...panel illumination turns off automatically after 2 sec On the menu select LCD illumi and set the LCD panel illumina tion Press the MENU button Turn the dial to select LCD illumi then press Turn the dial to select On then press The LCD panel illumination will be enabled and the menu will reappear Press the MENU to quit the menu and turn off the display Illuminating the LCD panel Press To turn off t...

Page 68: ...utter button down halfway The AF point achieving focus will flash in red and the beeper will sound The focus confirmation light at the lower right will also light 3 Check the display The shutter speed and aperture value are determined automatically and displayed in the viewfinder and on the LCD panel If the shutter speed and aperture values are not blinking the exposure is correct If either is bli...

Page 69: ... FE lock AE lock with button Flash output ratio control Exposure compensation FEB Autoexposure bracketing AEB 2nd curtain sync Depth of field preview Modeling flash Custom Functions Shifting the Program In Program AE mode you can freely change the shutter speed and aperture value combina tion program set by the camera while maintaining the same exposure value This is called shifting the program To...

Page 70: ...low shutter speed can blur the subject to give the impression of motion stands for time value Fast shutter speed Slow shutter speed 1 Set the Mode Dial to 2Set the shutter speed Turn the dial 3 Focus on the subject Press the shutter button down halfway The aperture value is determined automati cally 4Check the display then take the picture If the aperture value is not blinking the exposure is corr...

Page 71: ...s blinking Shutter Speed Display You can set the shutter speed in half stop increments as shown below The shutter speeds from 4000 to 4 indicate the denominator of the fractional shutter speed so that for example 125 is 1 125 second For slow speeds 0 7 is 0 7 seconds and 15 is 15 seconds 4000 3000 2000 1500 1000 750 500 350 250 180 125 90 60 45 30 20 15 10 8 6 4 0 3 0 5 0 7 1 1 5 2 3 4 6 8 10 15 2...

Page 72: ...arger aperture value smaller aperture you can increase the depth of field to make both the foreground and background look sharp Av stands for aperture value Small aperture value Large aperture value 1 Set the Mode Dial to 2Select the aperture value Turn the dial 3 Focus on the subject Press the shutter button down halfway The shutter speed is determined automati cally 4Check the display then take ...

Page 73: ...n half stops as shown below The higher the aperture value the smaller the aperture opening The range of aperture settings displayed depends on the lens mounted on the camera 1 0 1 2 1 4 1 8 2 0 2 5 2 8 3 5 4 0 4 5 5 6 6 7 8 0 9 5 11 13 16 19 22 27 32 38 45 54 64 76 91 If no lens is mounted on the camera the aperture setting is displayed as 00 You can also set the camera so that you can set the ape...

Page 74: ...exposure level displayed in the camera stands for manual 1 Set the Mode Dial to 2Set the shutter speed Turn the dial 3 Set the aperture value Set the Quick Control Dial switch to ON then turn the dial 4Focus on the subject Press the shutter button down halfway 4 The exposure level indicator appears in the viewfinder and on the LCD panel The exposure level icon lets you see how far you are from the...

Page 75: ...ake the picture Compose the picture then press the shutter button down fully Standard exposure This is the standard reference point for a correct exposure Underexposure Decrease the shutter speed or reduce the aperture value Overexposure Increase the shutter speed or increase the aperture value Manual Exposure You can set the camera so that you can set the shutter speed or aperture value in 1 3 st...

Page 76: ...s the picture Place an AF point over the subject and press the shutter button down halfway 4 The focus will be sharp between the subjects where the AF points flashes in red You can check the depth of field beforehand while the exposure is displayed 73 In the example shown on the left sharp focus will be attained between the left most person and right most person 3 Check the display then take the p...

Page 77: ...ing the shutter button down halfway Positions on the side indicate increased exposure and positions on the side indicate decreased exposure Decreased Increased exposure exposure Once set the exposure compensation remains in memory after the Main Switch is set to OFF To cancel exposure compensation return the compensation setting to the standard exposure position 4Take the picture To prevent the di...

Page 78: ...on The AEB setting is entered and the display returns to the Menu Press the MENU button to clear the screen and exit the menu 3 Take the picture The bracketing sequence will be standard exposure decreased exposure and increased exposure The pictures will be taken in the drive mode currently set 63 When using continuous shooting press and hold the shutter button down fully to take all three bracket...

Page 79: ...ou can use AEB in combination with exposure compensation In this case if exposure compensation causes the exposure to fall outside the indicated exposure level the viewfinder display looks as follows In all cases the exposures are taken according to both the AEB and exposure compensation settings In and modes AEB set to 1 stop With exposure compensation of 1 stop With exposure compensation of 1 5 ...

Page 80: ...t and metering method selected 133 1 Focus on the point on which you want to lock the exposure read ing The exposure value is displayed in the viewfinder 2 Press the button The icon lights in the viewfinder to indicate that the exposure setting is locked 4 Each time you press the button the current exposure setting is locked 3 Compose the shot and take the picture You can apply AE lock by pressing...

Page 81: ...ow beeps and the lamp blinks slowly Last 2 seconds Faster beeps and the lamp stays on While the self timer is operating the LCD panel shows count down To cancel the self timer press the DRIVE button Do not stand in front of the camera when you press the shutter button to start the self timer Doing so prevents the camera from focusing on the subject You can set the beep that indicates the subject i...

Page 82: ...he viewfinder stray light can enter the eyepiece and affect the exposure To prevent this attach the eyepiece cover to the viewfinder eyepiece before taking the picture 1 Remove the eyecup Grasp both sides of the eyecup and lift it up and away from the camera 2Slip the eyepiece cover over the eyepiece The eyepiece cover is attached to the strap ...

Page 83: ... Set the aperture value Turn the dial 4Take the picture Press and hold the shutter button down fully During the bulb exposure the elapsed exposure time is displayed on the LCD panel 1 to 999 seconds Exposure continues as long as you hold down the shutter button The elapsed exposure time displayed on the LCD panel is only counted up to 999 seconds For accurate exposure time check the information di...

Page 84: ...ess the shutter button down fully again The picture is taken and the mirror goes back down To take the picture again repeat the procedure from step 1 During mirror lockup do not point the camera at the sun The sun s heat can scorch and damage the shutter curtains If you use mirror lockup with the self timer for a bulb exposure there will be a shutter release sound when you release the shutter butt...

Page 85: ...flash preflash evalua tive metering in memory and either the camera s built in flash or any EOS dedicated EX series Speedlite The procedure is as easy as a normal AE shot This chapter describes how to take flash pictures with the built in flash with the EOS dedicated 550EX Speedlite or other types of external flash Flash Photography ...

Page 86: ... take flash pictures by simply pressing the button to pop up the built in flash at any time regardless of lighting conditions Select mode for full autoflash The shutter speed and aperture value are determined automatically just as in Full Auto mode Select mode to manually set a shutter speed slower than 1 200 second The camera then automatically sets the flash aperture value to provide the proper ...

Page 87: ...3 m 3 3 17 4 ft 800 Approx 1 9 6 m 3 3 31 5 ft Approx 1 7 5 m 3 3 24 6 ft 1000 Approx 1 10 8 m 3 3 35 4 ft Approx 1 8 4 m 3 3 27 6 ft Aperture Value Automatically set by the E TTL program Automatically set for the metered brightness according to the shutter speed setting Manually set as desired Sync shutter speed Automatically set from 1 200 to 1 60 second Manually set to speeds slower than 1 200 ...

Page 88: ...e a lens shorter than 18 mm the photo will be dark around the edges The E in E TTL stands for Evaluative To retract the built in flash press it back down into the camera You cannot use the built in flash to set high speed sync FP flash In or mode if you set the shutter speed faster than 1 200 second the camera will automatically reset it to 1 200 unless the EX series Speedlite has been set for hig...

Page 89: ...the button The red eye reduction function is turned On and the display returns to the Menu Press the MENU button to clear the screen and exit the menu When you press the shutter button down halfway the red eye reduction lamp indicator appears in the viewfinder Red eye reduction is effective only when the subject is looking at the red eye reduction lamp Be sure to tell your subjects to look at the ...

Page 90: ...over the subject and press the button 16 The Speedlite fires a preflash and records the required flash output for this subject in memory The icon lights in the viewfinder The center AF point will flash in red In the viewfinder the display appears as shown in 1 for 0 5 seconds then changes to 2 Each time you press the button the preflash fires and the FE lock is applied at the required exposure lev...

Page 91: ... dial The side indicates increased compensa tion and the side indicates decreased compensation Decreased Increased exposure exposure Once set the exposure compensation amount remains in memory after the Main Switch is set to OFF To cancel set the compensation amount to the position You can set the camera to adjust exposure compensation in 1 3 stop incre ments C Fn 4 1 122 You can also disable the ...

Page 92: ... As with normal exposure compensation you can use flash exposure compensation to adjust the flash output within a range of 2 stops in 1 2 stop increments FEB Flash Exposure Bracketing 94 The FEB function is like AEB autoexposure bracketing with flash You can bracket flash exposures by up to 3 stops in 1 2 stop increments Modeling Flash 95 Modeling flash allows you to check shadows and the light ba...

Page 93: ...king without flash Mode Shutter speed setting Aperture flash aperture setting Shutter priority AE Manual 30 to 1 200 sec Auto Aperture priority AE Auto 30 to 1 200 sec Manual Manual exposure Manual 30 to 1 200 sec Manual If is set in low light conditions a slow shutter speed will be set Therefore use a tripod to prevent camera shake 2 When you press the shutter button completely a preflash will be...

Page 94: ... the background 2 When you want to produce a catchlight in the subject s eyes 3 When you want to use fill flash to eliminate shadows Normal flash FP flash FEB Flash Exposure Bracketing By setting FEB flash exposure bracketing with the 550EX you can bracket the flash exposure up to 3 stops in 1 2 stop increments The flash output is changed automatically for each bracketed shot so that the backgroun...

Page 95: ...eck that the camera and Speedlite are properly set for flash photography 2Press the camera s depth of field preview button The Speedlite fires at 70Hz for approxi mately one second Wireless Multi Flash E TTL Autoflash Shooting The 550EX Speedlite can be operated as a slave light from a master 550EX or ST E2 for easy wireless multi flash E TTL autoflash photography The slave 550EX is placed to supp...

Page 96: ...ries Speedlites for use with this camera If you use the EOS D60 with a flash unit or flash accessory built for another brand of camera the EOS D60 may not operate properly Some large studio flash units have a sync cord polarity that is the opposite of the EOS D60 s PC terminal Such flash units will not work with the EOS D60 unless you change the polarity of the sync cord Consult the manufacturer o...

Page 97: ...OS D60 may in some cases be unable to accurately display images taken with other cameras or taken with the EOS D60 but subsequently had image data or file names modified by computer or other means About DPOF DPOF Digital Print Order Format is a standard used to record on the CF card or other recording media the image number number of prints etc of images taken by digital camera You can simply inse...

Page 98: ...est Turn the dial clockwise to view images in order from oldest to newest Viewing the Index This mode displays 9 images simultaneously on a single screen 1 Press the button The most recent single image taken by the camera appears 2Display the index Press the button The images are displayed in index format 3 Change the image selection The selected image is surrounded by a green frame Turn the dial ...

Page 99: ...ter to center right to lower left Turn the dial counterclockwise to change the displayed area of the picture from center to center left to top right When you finish viewing press the button JUMP Jumping to Another Image The display can jump directly to another image 1 Display a single image or index 98 2Change to jump display Press the JUMP button The Jump bar appears 3 Jump to another image Turn ...

Page 100: ...posure compensation 77 towards the plus end If the histogram is higher towards the light end set the exposure compensation towards the minus end then take the picture again Highlight Alert When exposure information is displayed for a picture that will be overexposed the related settings will blink For better results check the histogram and adjust the exposure compensa tion towards the decreased ex...

Page 101: ...d after the Loading image screen has been displayed for approximately 2 seconds the auto playback starts To pause auto playback press the button During the pause the indicator appears in the upper left part of the image To resume press the button again To quit auto playback press the MENU button While auto playback is paused you can turn the dial to change the picture in the same way as for single...

Page 102: ...0 clockwise 90 counterclockwise 0 If you have other images to be rotated repeat the above steps Press the MENU button to exit Rotate mode Rotating images in the display has no effect on the recorded image data Some software for loading images may not display a rotated image with the correct orientation on a computer screen Pictures taken with the camera grip on the bottom should be rotated 90 cloc...

Page 103: ...gain to show the Protect Settings screen on a single image display 3 Protect the image Turn the dial to select the image you want to protect then press the button Protected images are identified with a icon Press the button again to cancel protection and delete the icon If you have other images to be protected repeat the above steps Press the MENU button to exit Protect mode The icon Once an image...

Page 104: ...ars 3 Turn the dial to select All then press the button The Erase Confirmation message appears 4Turn the dial to select OK then press the button The camera erases all unprotected images Once an image is erased it cannot be recovered Make sure you no longer need the image before erasing it Once an image is protected it cannot be removed by the camera s Erase function To erase a protected image you ...

Page 105: ... the button The CF card will be formatted Formatting a CF card will erase all information on the card including protected images Be sure to carefully review the contents of a CF card before formatting A non Canon CF card or a CF card formatted with another camera or personal computer might not work with the EOS D60 camera In such a case format the CF card with the camera first Then it might work w...

Page 106: ... following when printing from a DPOF compatible device The EOS D60 cannot change print order information set by another DPOF compatible device Any such changes should be made by the device on which the print order was entered If the CF card contains image data with print order information from another device entering new print order information from the EOS D60 may erase the previous print order i...

Page 107: ...ress the button The Select Image screen appears If you press the button 3 images are displayed on the Select Image screen Press the button again to enlarge the image on the Select Image screen 4Select the images Turn the dial to select an image then press the button If the Print Type 109 selection is Standard or Both the Print Quantity screen appears If the Print Type 109 selection is Index a chec...

Page 108: ...g a Single Image procedure 107 to display the Print Order screen 2Turn the dial to select All then press the button The Select All Images menu appears 3 Select Mark all Turn the dial to select Mark All then press the button This orders all the images and the display then returns to the Print Order screen At this point you can select Clear all to cancel print order for all images Select Cancel to r...

Page 109: ...dividual images and an index sheet 1 Follow steps 1 and 2 of the Select ing a Single Image procedure 107 to display the Print Order screen 2Turn the dial to select Set up then press the button The Print Order Setting screen appears 3 Turn the dial to select Print Type then press the button 4Select the print type Turn the dial to select the print type then press the button Press the MENU button to ...

Page 110: ... then press the button The Print Order Setting screen appears 3 Turn the dial to select Date then press the button 4Specify date printing Turn the dial to select On or Off then press the button Press the MENU button to return to the Print Order screen If the print type is Index you cannot specify both date and file number Specify one or the other The date will be printed in the date style set from...

Page 111: ...mber information on each image 1 Follow steps 1 and 2 of the Select ing a Single Image procedure 107 to display the Print Order screen 2Turn the dial to select Set up then press the button The Print Order Setting screen appears 3 Turn the dial to select File No then press the button 4Specify date printing Turn the dial to select On or Off then press the button Press the MENU button to return to th...

Page 112: ...D60 to a television using the video cable provided with your camera to display your recorded images Always turn off the camera and the television before connecting or disconnecting them 1 Open the cover 2Connect the cable Connect the cable to the VIDEO OUT terminal on the camera and to the video input terminal on the TV Insert the cable plug all the way until it clicks into place 3 Turn the TV on ...

Page 113: ...ime battery cham ber cover by turning it 45 degrees counterclockwise as shown by the arrow in the diagram Be careful not to rotate the cover more than 45 degrees 3 Take out the old battery With the camera bottom facing downward push in the edge of the battery to take it out 4Install a new battery The plus side of the battery must face upward 5 Close the cover by turning it clockwise as shown by th...

Page 114: ... is assigned 1 From the menu select File num bering Press the MENU button Turn the dial to select File Number ing then press the button 2Select the setting you want Turn the dial to select Continuous or Auto reset then press the button The selection is entered and the display returns to the menu Press the MENU button to clear the screen and exit the menu File numbers are used the same way as frame...

Page 115: ...lement always connect the EOS D60 camera to a household power outlet using the DC coupler If you try to clean the imaging element while the battery pack is installed in the camera the cleaning warning message will blink on the LCD panel and you will not be able to clean the imaging element Before you start cleaning remove the lens 27 1 Insert the DC coupler 26 and set the Main Switch to ON 28 2Fro...

Page 116: ... the spray gas may damage the surface of the imaging element 5 Select 1 Enable Turn the dial to select 1 Enable then press the button The message appears on the LCD panel If is blinking on the LCD panel set the Main Switch to OFF and remove the battery pack Then repeat the procedure from Step1 6Press the shutter button down fully The reflex mirror of the camera then flips up and the shutter opens ...

Page 117: ...om Functions that are related to camera operation This booklet indicates these settings with the mark and provides basic descriptions This chapter lists the EOS D60 s menu functions and describes the use of the Custom Function settings For Menu operations and default settings see Menu Functions and Settings 32 33 Menu Function Settings ...

Page 118: ...Turns off on a function for reducing the red eye look caused by using a flash to shoot people at night or in dark settings Sets the increment steps for dereased exposure and increased exposure in AEB shots Sets the ISO speed Select ISO 100 200 400 800 or 1000 Enables LCD panel illumination with the button LCD panel illumination is effective in the dark Turns on off the electronic beep that sounds ...

Page 119: ...andard processing parameters applied automatically by the camera up to three sets of processing parameters can be set and saved Allows the user to protect image files against accidental erasure Rotates the image display 90 clockwise or counterclockwise Lets you order prints of your captured images for printing on DPOF compatible devices Captured images can be displayed automatically in sequence on...

Page 120: ...s whether images appear on the LCD monitor after they are taken Select On On Info or Off The display time is set by the Review time setting below When the Review function has been set to On or On Info this determines the time that images are displayed Select 2 4 or 8 seconds or Hold Sets the LCD brightness Select normal or bright Sets the date and time and the order of display for year month and d...

Page 121: ...anguage used for the Menu screen Select English Deutsch Français or Japanese Determines the video system format Select NTSC or PAL Formats the CF card in the camera Sets Custom Functions that can adjust many of the camera functions to meet individual requirements Resets all Custom Functions to the default settings Displays the camera s firmware version No For firmware updates see Canon s Web site ...

Page 122: ...ck button 0 1 2 3 Press the shutter button down halfway AE AF button AE lock button AE AF Press the shutter button down halfway AE lock Press the shutter button down halfway AE AF button AF lock no AE lock button AE AF no AE lock Press the shutter button down halfway AE 03 Mirror lockup 0 1 Disable normal shooting Enable 04 Tv Av and exposure level 0 1 1 2 stop increments 1 3 stop increments 05 AF...

Page 123: ... Servo AF mode you can press the button to start or stop AI Servo AF operation Exposure is determined when you take the picture The optimum focus and exposure are thus always ready for the decisive moment 80 56 84 Effective for preventing the effects of camera shake caused by mirror action in close up and ultra telephoto shots 134 Effective in conditions that require more precise exposure settings...

Page 124: ... shutter reaches full open position 2nd curtain sync Flash fires immediately before 2nd curtain closes 09 Lens AF stop button Fn Switch 0 1 2 Stop AF while button is pressed Operate AF while button is pressed Press button to start AE lock 10 Auto reduction of fill flash 0 1 Enable Disable The AF stop button is provided only on certain super telephoto lenses C Fn 8 1 This works with the built in fl...

Page 125: ...en starting with the decreased exposure The AEB shots will be taken starting with the decreased exposure The AEB setting will be saved even when you turn off the main switch change lenses or replace the battery or CF card 79 79 79 88 Effective to capture movement of light sorce at slow shutter speeds Camera AF does not operate while this button is pressed Effective for determining focus and exposu...

Page 126: ...first menu item Show the most recently set menu item Retain in memory when the main switch is set to Off 12 SET button func when shooting 0 1 2 3 Default no function Change quality Change ISO speed Select parameters 13 Sensor cleaning 0 1 Disable Enable 14 Superim posed display 0 1 On Off 15 Shutter release w o CF card 0 1 Possible without CF card Not possible Settings you set with C Fn 11 will be...

Page 127: ...o retain function settings regardless of whether the power is On or Off Lets you change quality quickly when you are shooting Lets you change ISO speed quickly when you are shooting Lets you change parameters quickly when you are shooting 50 51 52 113 Used when cleaning the imaging element Effective when dust or small black spots appear on pictures 55 Disables the red flashing of the AF point Prev...

Page 128: ...bject is also in focus This is called the depth of field The greater the aperture value that is the smaller the aperture the broader the depth of the field This is called a deeper depth of field Conversely the smaller the aperture value larger aperture the narrower the depth of field called a shallower depth of field The depth of field is affected as described below 1 A smaller aperture larger ape...

Page 129: ... correct exposure is adjusted by changing the combination of the shutter speed and aperture value File Numbering and Folders The pictures you take are automatically assigned file numbers from 0001 9900 and stored in folders of 100 images each Each folder is numbered from 100 to 998 and recorded on the CF card However during continuous shooting a folder may store more than 101 images Also note that...

Page 130: ...estored RAW This is an image file format that saves the image as is when captured by the camera s imaging element It is intended for image editing with a personal computer Image compression saving and decompression feature lossless image quality By using the bundled software s image processing features you can create the desired image characteristics Red eye Phenomenon In a relatively dark room wh...

Page 131: ... taken unless focus is achieved When focus is achieved it is locked With evaluative metering the exposure setting is also locked The exposure setting is stored in memory before the picture is taken The above conditions apply during continuous shooting approximately 3 images per second to a maximum of 8 images Autofocus tracks the moving subject and the exposure is set when the picture is taken The...

Page 132: ...d cannot be obtained Subject is too dark Subject is too bright 1 Increase the ISO speed 2 Use flash 1 Decrease the ISO speed 2 Use a neutral density filter 1 Turn the dial to a slower shutter speed 2 Increase the ISO speed 1 Turn the dial to a faster shutter speed 2 Decrease the ISO speed 1 Turn the dial to a smaller aperture value 2 Increase the ISO speed 1 Turn the dial to a larger aperture valu...

Page 133: ... EV12 on the top edge intersects the Program AE line represents the corresponding shutter speed 1 350 second and aperture value f 3 5 that the program sets automatically The diagonal arrowed lines at the upper left indicate the metering range for the indicated ISO speed AF point selection Metering method Evaluative metering Partial metering Center weighted average Auto selection AF AE lock applied...

Page 134: ...In addition is 0 3 seconds and is 15 seconds Aperture value readout The aperture value is normally displayed in 1 2 stop increments The larger the number the smaller the aperture opening The range of aperture values f numbers displayed depends on the lens used The shutter speed and aperture value can be set in 1 3 stop increments C Fn 4 122 1 2 stop increments 1 3 stop increments Shutter speed Ape...

Page 135: ...mat or processed by a computer Unidentified Image Attempted to play an image taken in a special format such as a format unique to a camera from another manufacturer Protected Attempted to erase a protected image Too many marks Attempted to enter a print order quantity that is too high Enter a lower quantity Cannot complete Print order setting could not be stored CCDRAW Playback of a CCDRAW image c...

Page 136: ...d on the CF card After the image has been stored on the CF card the access lamp will go out and the camera will turn off automatically Battery pack is not sufficiently charged Charge the battery pack fully 22 Battery pack is beyond its useful life Obtain a new battery pack 138 Auto power off function is operating Switch the camera on again with the main switch or turn off the Auto power off functi...

Page 137: ... button is pressed Press the shutter button carefully so that the camera does not shake 29 36 CF card data is corrupted Format the CF card 105 Use the specified type of CF card 2 139 The date time battery is exhausted Replace the battery with a new one 113 Unable to shoot or record images LCD monitor displays and images are hard to see Images are blurred Unable to use the CF card The message appea...

Page 138: ... Lenses One of ten E series dioptric adjustment lenses 4 to 3 diopters with eyecup can be attached to the camera s eyepiece to further expand the dioptric correction range Shoe mount Speedlites Flash photography with an EX series Speedlite is as easy as normal auto exposure shooting without flash All EX series Speedlites enable E TTL autoflash high speed sync FP flash and FE lock With the 550EX an...

Page 139: ...ecting to the EOS D60 s remote control terminal Remote Switch RS 80N3 This is a remote switch with an 80 cm cord to prevent camera shake for super telephoto shots macroshooting and bulb exposures You can use the remote switch to press the shutter button down halfway or completely Also includes shutter release lock and a one touch locking plug for connecting to the EOS D60 s remote control terminal...

Page 140: ...3 Remote Switch RS 80N3 Wireless Controller LC 4 Strap Eyecup Eb Rubber Frame Eb Eyepiece Extender EP EX15 Angle Finder C Battery Grip BG ED3 Battery Pack BP 511 Compact Power Adapter CA PS400 DC Coupler DR 400 E series Dioptric Adjustment Lenses 220EX ST E2 420EX 550EX MR 14EX MT 24EX Items included with the Camera ...

Page 141: ...ot CF Cards CF Card Reader TV Video Macintosh Computer PC AT Compatible Computer PC Card Adapter EOS Digital Solution Disk Adobe Photoshop LE Disk Interface Cable IFC 200 PCU Video Cable VC 100 USB Port USB Port PC Card Slot Parallel Port ...

Page 142: ... Approx 1 4 MB 2048 1360 pixels 4 Medium Normal Approx 0 7 MB 2048 1360 pixels 5 Small Fine Approx 0 9 MB 1536 1024 pixels 6 Small Normal Approx 0 5 MB 1536 1024 pixels 7 RAW Approx 7 4 MB 3072 2048 pixels Exact file sizes depend on the shooting conditions and ISO speed File numbering 1 Continuous numbering 2 Auto reset Processing parameters Standard parameters plus up to three sets of custom proc...

Page 143: ... LCD panel AF assist beam Emitted automatically by a lamp Effective range Approx 3 8 m 12 5 ft at center Exposure Control Metering system 35 zone SPC TTL full aperture metering 1 Evaluative metering linked to all AF points 2 Partial metering approx 9 5 of viewfinder at center 3 Centerweighted average metering Metering range EV 2 20 at 20 C with 50mm f 1 4 lens ISO 100 Exposure control systems 1 Pr...

Page 144: ...peeds Max burst during continuous shooting 8 shots LCD Panel LCD panel illumination Provided LCD Monitor Type TFT color liquid crystal monitor Screen size 1 8 inches Pixels Approx 114 000 Picture coverage Approx 100 with respect to the effective pixels Brightness control Two levels Standard or Bright Image Playback Image display format 1 Single image 2 Single image with information 3 9 image index...

Page 145: ...coupler DC Coupler DR 400 Battery connector 2 recharging disabled when the DC Coupler is installed Power cord length Approx 1 8 m 5 9 ft Recharging time Approx 90 min per battery Rated input 100 240 VAC 50 60 Hz Rated output During battery charging 8 4 VDC With coupler connected 8 1 VDC Working temperature range 0 C 40 C Working humidity range 85 or lower Dimensions 100 W 51 H 133 D mm 3 94 2 0 5 ...

Page 146: ...18 86 Custom Functions 121 122 Custom White Balance 66 D Date printing specification 110 DC coupler 19 26 Depth of field 73 128 Dioptric adjustment 36 Dioptric adjustment Lens 138 DPOF Digital Print Order Format 97 106 129 Drive Mode 63 E Erasing 43 104 Evaluative metering 63 Exposure 129 Exposure compensation setting 77 Exposure warnings 132 Eyepiece cover 21 82 F FEB Flash Exposure Bracketing 94...

Page 147: ...nDisk Corporation IBM PC AT and Microdrive are trademarks or registered trademarks of International Business Machines Macintosh is a registered trademark of Apple Corporation in the United States and other countries All other trademarks are the property of their respective owners This digital camera supports Exif 2 2 also called Exif Print Exif Print is a standard for enhancing the communication b...

Page 148: ...MMUNICATION IMAGE FRANCE S A 102 Avenue du Général de Gaulle 92257 La Garenne Colombes Cedex France CANON UK LTD Woodhatch Reigate Surrey RH2 8BF United Kingdom CANON DEUTSCHLAND GmbH Europark Fichtenhain A10 47807 Krefeld Germany CANON ITALIA S p A Palazzo L Strada 6 20089 Rozzano Milanofiori Milano Italy CANON Benelux N V S A Bessenveldstraat 7 1831 Diegem Machelen Belgium CANON Schweiz AG Gesch...

Reviews: