


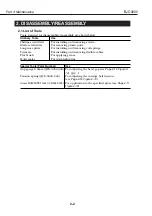


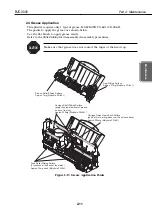


2.3.3 Reattaching and removing the upper cover unit
Procedures to reattach the upper cover unit are shown below:
1) Assemble the back part of the upper cover unit.
2) Assemble the claw on the front side.
To remove the cover, follow the procedures in reverse order.
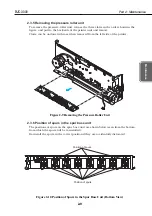
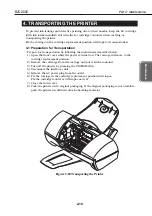
2.3.4 Removing the printer unit
Procedures to remove the printer unit are shown below:
1) Remove the screws which fasten the printer unit to the bottom case.
2) Release the 2 claws on the bottom case on the back side of the printer unit (Arrows
1 and 2).
3) Holding the handles on both sides of the printer, shift and raise the printer unit as
by Arrow 3.
Part 2: Maintenance
BJC-3000
2-8
2
1
Figure 2-7 Reattaching and Removing the Upper Cover Unit
Figure 2-8 Removing the Printer Unit
1
2
3
3
Screw
Summary of Contents for BJC-3000 Series
Page 2: ...0899 SC 0 30 0 ...
Page 3: ......
Page 12: ...VIII This page intentionally left blank ...
Page 14: ......
Page 28: ......
Page 48: ...Part 2 Maintenance BJC 3000 2 20 This page intentionally left blank ...
Page 50: ......
Page 62: ...Part 3 Operation BJC 3000 3 12 This page intentionally left blank ...
Page 64: ......
Page 88: ......
Page 95: ......
Page 112: ...Part 5 Appendix BJC 3000 5 24 This page intentionally left blank ...
Page 118: ......
Page 119: ...PRINTED IN JAPAN IMPRIME AU JAPON CANON INC The printing paper contains 70 waste paper ...


