E2
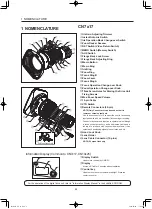
①
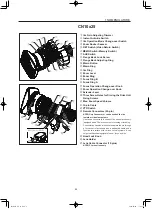
Iris Gain Adjusting Trimmer
②
Instant Auto-Iris Switch
③
Iris Operation Mode Change-over Switch
④
Zoom Rocker Seesaw
⑤
RET Switch (Video Return Switch)
⑥
MEMO Switch (Memory Switch)
⑦
AUX
Switch
⑧
Flange Back Lock Screw
⑨
Flange Back Adjusting Ring
⑩
Macro Button
⑪
Macro Ring
⑫
Iris Ring
⑬
Zoom Ring
⑭
Focus Ring B
⑮
Zoom Lever
⑯
Focus Ring A
⑰
Focus Operation Change-over Knob
⑱
Zoom Operation Change-over Knob
⑲ Three
Screw Holes for Storing the Drive Unit
Fixing Screws
⑳
Max. Zoom Speed Volume
㉑
12-pin Cable
㉒
VTR Switch
㉓
Remote Connectors (20-pin)
NOTE) Only Connector
★
can be used as the iris
remote or virtual output port.
Use these connectors to connect the control accessory
(equipped with a 20 pin connector) for zooming or focusing.
Connector
★
has also a function to operate the iris through
a focus control accessory and a dedicated cable and a
function to interface with various virtual systems. It can
output each positioning signal of zoom, focus, and iris.
㉔
Hood Lock Knob
㉕
Lens Holder
㉖
Lens Cable Connector (12-pins)
NOTE) PL mount lens only
①
Display Switch
Used to turn the display ON/OFF.
②
Display
It turns off if left for 2 minutes without operation.
③
Control key
Used to move the cursor up/down/left/right. Press the
center to confirm.
1 NOMENCLATURE
Information Display (Common to CN7x17, CN10x25)
1 NOMENCLATURE
DISPLAY
①
②
③
RE
T
IRIS
MEMO
I
AUX
㹋
AM
⑨
① ②
③
④
⑤
⑥
⑦
⑧
⑩
⑪
⑫
⑬
⑭
⑮
⑯
⑰
⑱
⑲
⑳
㉑
㉒
REM
OTE
1
REM
OTE
2/
VIR
TUA
L
REM
OTE
3
ZO
OM
MA
NU
.
SE
RVO
FO
CU
S
MA
NU
. S
ERV
O
㉓
㉔
㉕
㉓
㉖
PL Mount lens Only
For the operation of the digital drive unit, refer to "Information Display Manual" in the
supplied
CD-ROM.
CN7x17
BT1-B051-E_E_CC.indd 2
2020/02/04 11:02:07


