


Check 3: If a network key is set to the access point, set the machine to match it.
How to Set a WEP/WPA/WPA2 Key
Check 4: Make sure that the valid wireless channel is used.
The wireless channel to be used may be limited depending on wireless network devices
installed in the computer. Refer to the manual provided with your computer or your wireless
network device to specify the valid wireless channel.
Check 5: Make sure that the channel set to the access point is valid to
communicate with the computer, confirmed in Check 4.
If not, change the channel set to the access point.
For placement:
Make sure that there is no barrier or obstacle between the access point and the machine.
When using the printer in a multiple access point setup, make sure that the
access point to be used can communicate with the machine and the computer.
Make sure that the wireless channel of the access point is far enough away with those of
other access points.
Windows XP may automatically connect to an unintended access point. Follow the steps
below to make your access point the highest priority.
1.
Select Start and Connect To.
2.
Right click Wireless Network Connection and select Properties.
3.
Click the Wireless Networks tab and confirm that Use Windows to configure my
wireless network settings is checked.
4.
Confirm that the target access point is displayed in the Preferred networks list.
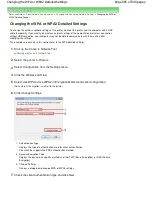
When Encryption Is Enabled, Cannot Communicate With the Machine After the Encryption
Type Was Switched on the Access Point
If the printer cannot communicate with the computer after the encryption type of the printer was
switched, make sure that encryption types for the computer and the access point matches that set
to the printer.
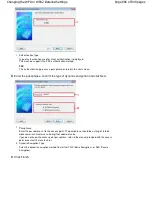
Cannot Communicate with the Machine after Applying MAC/IP Address Filtering or Entering a
WEP/WPA/WPA2 Key to the Access Point
Cannot Communicate with the Machine with USB Connection
Check 1: Make sure that the machine is turned on.
Check 2: Make sure that the USB cable is connected properly.
Refer to the setup manual of the machine to connect the USB cable properly.
Check 3: Do not start up the Canon IJ Network Tool while printing.
Check 4: Do not print while the Canon IJ Network Tool is running.
Check 5: Make sure that Enable bidirectional support is selected in the Ports
sheet of the properties dialog box of the printer driver.
Opening the Printer Properties Dialog Box (Windows)
Cannot Communicate with the Machine over the Network
Page 919 of 949 pages
Cannot Communicate With the Machine/Cannot Print from the Machine
Summary of Contents for 3747B003
Page 19: ...Page top Page 19 of 949 pages Printing Photos Saved on the Memory Card USB Flash Drive ...
Page 22: ...Page top Page 22 of 949 pages Using Various Functions ...
Page 28: ...Page top Page 28 of 949 pages Inserting the USB Flash Drive ...
Page 73: ...Page top Page 73 of 949 pages Loading Paper ...
Page 81: ...Page top Page 81 of 949 pages Loading Paper in the Rear Tray ...
Page 87: ...2 Close the Document Cover gently Page top Page 87 of 949 pages Loading Originals ...
Page 101: ...Page top Page 101 of 949 pages Printing the Nozzle Check Pattern ...
Page 105: ...See Cleaning the Print Head Deeply Page top Page 105 of 949 pages Cleaning the Print Head ...
Page 148: ...Page top Page 148 of 949 pages Printing Photos ...
Page 173: ...See Help for details on the Edit screen Page top Page 173 of 949 pages Editing ...
Page 182: ...Page top Page 182 of 949 pages Printing ...
Page 191: ...Adjusting Images Page top Page 191 of 949 pages Correcting and Enhancing Photos ...
Page 228: ...Page top Page 228 of 949 pages Printing an Index ...
Page 230: ...Page top Page 230 of 949 pages Printing ID Photos ID Photo Print ...
Page 249: ...Page top Page 249 of 949 pages Printing Dates on Photos ...
Page 270: ...Page top Page 270 of 949 pages Borderless Printing ...
Page 329: ...Page top Page 329 of 949 pages Smoothing Jagged Outlines ...
Page 525: ...Page top Page 525 of 949 pages Memory Card Screen Scan Import Window ...
Page 606: ...Page top Page 606 of 949 pages Scanning in Advanced Mode ...
Page 608: ...Page top Page 608 of 949 pages Scanning in Auto Scan Mode ...
Page 637: ...Scanning in Basic Mode Page top Page 637 of 949 pages Basic Mode Tab ...
Page 660: ...Page top Page 660 of 949 pages Scanner Tab ...
Page 747: ...Page top Page 747 of 949 pages Printer Cannot be Registered ...
Page 761: ...Page top Page 761 of 949 pages Advanced settings ...
Page 780: ...Page top Page 780 of 949 pages If an Error Occurs ...
Page 823: ...Page top Page 823 of 949 pages Jammed Paper Is Not Removed out When Automatic Duplex Printing ...
Page 889: ...Page top Page 889 of 949 pages Using Easy PhotoPrint EX ...
Page 898: ...Page top Page 898 of 949 pages Canon IJ Network Tool Dialog Box ...
Page 917: ...Page top Page 917 of 949 pages How to Set a Network Key Network Password ...


