background image

3-13

3

Operating Pr

ocedures

7.

Scanning Procedures

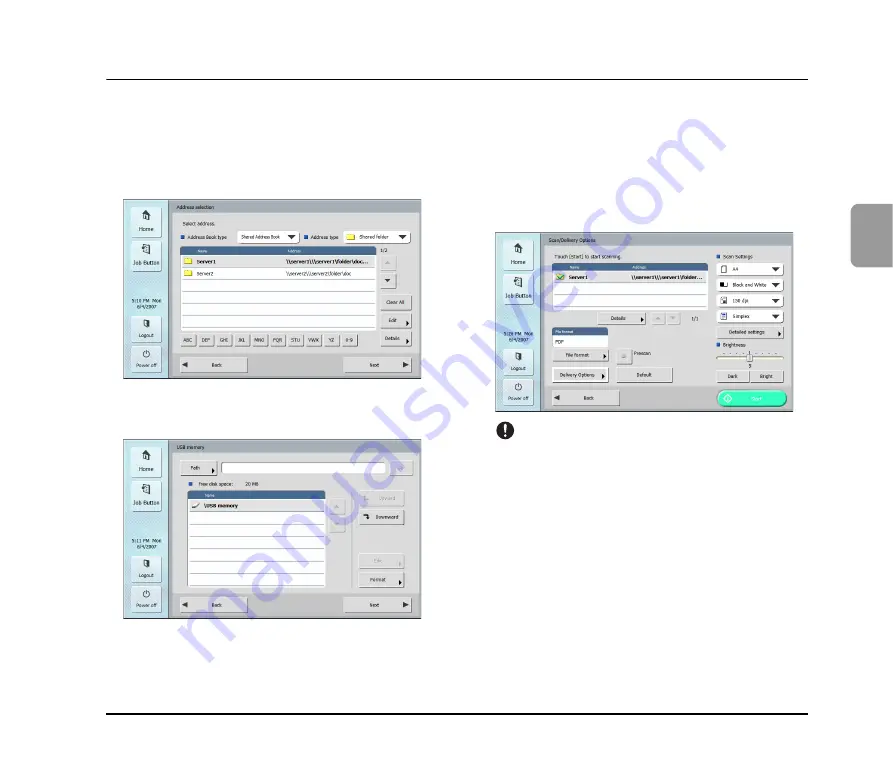
You can perform scanning from the Home screen or the Job Button screen. 

Scanning From the Home Screen

Press a destination selection (E-mail, FTP, Shared folder, 
or USB memory) button to open an address selection 
screen and then select an address to send an image file. 

If you press the USB memory destination selection button, 
press [Downward] and specify the folder in the USB 
memory to which you want to save the image file. 

If you select an address and then press [Next], the Scan/
Delivery Options screen appears. Set the scanning 
conditions and then start scanning.

Scanning From the Job Button Screen

If you press a job button, the Scan/Delivery Options screen 
appears. Confirm the address and scanning settings 
registered to the job button and then start scanning. 
For details on the scanning procedure, read from the 
setting of scanning conditions in Step 5. 

IMPORTANT

• The settings screen display and the screen displayed after 

scanning differ depending on the job button settings. For 
details on the overall flow from configuring settings to sending 
an image file, see “Flow of Scanner Operations” on p. 3-2

• It is not possible to save to USB memory from a job button. 

Summary of Contents for 220P - imageFORMULA ScanFront

Page 1: ...Please read this manual before using the scanner After you finish reading this manual keep it in a safe place for future reference Operation Guide...

Page 2: ...gistered trademarks in other countries imageFORMULA is a trademark of Canon Electronics Inc Microsoft Windows Internet Explorer andActive Directory are registered trademarks or trademarks of Microsoft...

Page 3: ...rmission THIS SOFTWARE IS PROVIDED BY THE COPYRIGHT HOLDERS AND CONTRIBUTORS AS IS AND ANY EXPRESS OR IMPLIED WARRANTIES INCLUDING BUT NOT LIMITED TO THE IMPLIED WARRANTIES OF MERCHANTABILITY AND FITN...

Page 4: ......

Page 5: ...ecting to a computer You can transfer the data of an image scanned with the ScanFront 220 220P to a shared folder on a server PC or client PC on the network or to an FTP server or deliver it to a remo...

Page 6: ...anner settings as well as handling maintenance and troubleshooting information This manual is stored as a PDF file on the supplied INSTRUCTIONS CD ROM and requires Adobe Reader to open You can downloa...

Page 7: ...s of documents that can be scanned and the basic operations of the scanner Chapter 3 Operating Procedures This chapter describes the basic operating procedures for the scanner Chapter 4 Web Menu User...

Page 8: ...print Authentication 2 12 Chapter 3 Operating Procedures 1 Flow of Scanner Operations 3 2 2 Turning the Power ON and OFF 3 3 Turning the Power ON 3 3 Turning the Power OFF 3 3 3 Login Screen 3 4 Login...

Page 9: ...s Book Settings 4 6 Registering New Addresses 4 8 Copying Addresses 4 10 Exporting and Importing Address Books 4 11 5 Job Button Settings 4 12 Registering New Job Buttons 4 14 Scan Settings Overview 4...

Page 10: ...vi...

Page 11: ...ctions 1 2 Installation Location 1 2 Power 1 2 Moving the Scanner 1 3 Handling 1 3 About the Fingerprint Sensor ScanFront 220P only 1 5 Disposal 1 5 2 Names and Functions of Parts 1 6 Front and Docume...

Page 12: ...the scanner is installed is cold but rapidly heated water droplets condensation may form inside the scanner This may result in a noticeable degradation in scanning quality The following conditions ar...

Page 13: ...scanner Failure to do so may result in a fire or electric shock Never use alcohol benzene paint thinner aerosol sprays or any other highly flammable substance near the scanner Do not cut damage or mod...

Page 14: ...ve to have the unit serviced Do not install the scanner in a humid or dusty location Doing so may result in a fire or electric shock Do not place objects on top of the scanner as they may tip over and...

Page 15: ...ently the fingerprint sensor may be dirty Clean the surface of the fingerprint sensor regulary When cleaning the fingerprint sensor use a soft dry cloth to wipe dirt off the surface Do not use a point...

Page 16: ...cument Guides Adjust these to match the width of the document See p 2 7 f Panel Unit Open this when there is a paper jam or to perform maintenance See p 2 10 g Touch Panel Touch this screen to operate...

Page 17: ...Connector Purple Connect a PS 2 keyboard See p 2 6 n LAN Port RJ 45 Connect an RJ 45 10Base T 100Base TX compatible network cable o USB Ports Connect a USB1 1 Hi Speed USB2 0 compatible USB memory de...

Page 18: ...1 8...

Page 19: ...y and Eject Tray 2 4 Feed Selection Lever 2 5 USB Port 2 5 Using a PS 2 Keyboard and PS 2 Mouse 2 6 3 Placing Documents 2 7 Placing a Document 2 7 Placing a Card 2 8 4 Clearing a Paper Jam or Double F...

Page 20: ...after scanning a document written in pencil Scanning documents with pencil written on them may soil the rollers or scanning glass cause stripes to appear in images or dirty other documents When scanni...

Page 21: ...tion orientation Landscape CAUTION A card placed into the document feed tray in the portrait orientation may not be output properly because a load is placed on it during feeding Furthermore removing a...

Page 22: ...tray a 2 Pull out the document feed tray b c to match the length of the document to be placed in the tray Hint Open the center tray extension when output documents are likely to fall out of the tray H...

Page 23: ...eeding and then scanning a stack of documents will cause multiple pages to be fed at the same time USB Port You can insert a USB memory device to store image files or connect a USB keyboard or USB mou...

Page 24: ...Mouse You can connect a PS 2 keyboard and mouse to the PS 2 port and use them to operate the scanner IMPORTANT Turn OFF the scanner before connecting or disconnecting the PS 2 mouse and keyboard Gree...

Page 25: ...Placing a Document Follow the procedure below to place a document 1 Adjust the document guides to be wider than the width of the document 2 Fan the document to offset the pages so that the top edge of...

Page 26: ...he cards one at a time 2 Adjust the document guides to match the width of the card 3 Place the card face down in the landscape orientation with the top edge at the bottom of the tray CAUTION A card pl...

Page 27: ...tinue to resume scanning If you press Complete the display returns to the previous screen If a paper jam or double feed error is detected in the middle of a document the following messages appear Hint...

Page 28: ...open the panel unit 4 Pull out the jammed document in the direction that seems the easiest to remove it 5 Close the panel unit and then place the document again 6 Press Continue to resume scanning IMP...

Page 29: ...g the fingerprint sensor with dirty hands which might scratch or dirty the surface of the fingerprint sensor Placing a sticker on the surface of the fingerprint sensor or covering the surface with ink...

Page 30: ...onditions may cause an error in fingerprint authentication The finger is wet or sweaty The finger is dirty The grooves of the fingerprint are filled with sweat or oil The finger is dry dry skin Part o...

Page 31: ...Settings Screen 3 9 Change Password 3 9 Fingerprint Registration 3 9 6 Fingerprint Registration Only Available with the ScanFront 220P 3 10 Fingerprint Authentication 3 10 Registering a Fingerprint 3...

Page 32: ...ee p 3 9 The User Settings screen enables setting a password for the user that logged in and registration for the ScanFront 220P Scan Delivery Options screen See p 3 23 Scan The process after scanning...

Page 33: ...panel to restore the display When the power indicator is flashing but nothing appears on the touch panel the Low Power mode has activated to temporarily stop scanner operations You can press the power...

Page 34: ...to p 3 10 on the ScanFront 220 220P INSTRUCTIONS Fingerprint authentication is enabled when you are using the ScanFront 220P See Fingerprint Authentication Only Available with the ScanFront 220P on p...

Page 35: ...log in as from the list and then press Next The password input screen appears 2 Press Password The keyboard screen appears 3 Enter a password and then press OK IMPORTANT Passwords are case sensitive...

Page 36: ...ssword and then press OK IMPORTANT User names and passwords are case sensitive Make sure to enter the user and password registered during device authentication correctly If you do not know the user na...

Page 37: ...1 Press Fingerprint Authentication The authentication mode screen appears 2 Perform fingerprint authentication using the finger with the registered fingerprint IMPORTANT Perform finger authentication...

Page 38: ...Opens the Administrator Settings screen IMPORTANT If a user whose use of the Home screen is restricted logs in the Home screen is not available For details contact the administrator Job Button Screen...

Page 39: ...ew user password or change a user password registered via the Web menu Hint The old password does not need to be entered in order to change a password The new password that you entered is registered F...

Page 40: ...ication function may not work properly for a finger with a fingerprint that is worn down or has few distinguishable features The same finger needs to be scanned three times to register the fingerprint...

Page 41: ...canning until the same fingerprint has been successfully scanned three times IMPORTANT If any of the messages below appears there was an error scanning the fingerprint Try scanning your fingerprint ag...

Page 42: ...ntication test for the registered fingerprint by scanning your fingerprint 6 Press Close to end fingerprint registration IMPORTANT If you want to change the registered fingerprint start registration a...

Page 43: ...press Next the Scan Delivery Options screen appears Set the scanning conditions and then start scanning Scanning From the Job Button Screen If you press a job button the Scan Delivery Options screen...

Page 44: ...address E mail Shared folder FTP Group Pressing an address adds a checkmark to the icon and selects the address Pressing a selected address again clears the selection An address is not selected as an...

Page 45: ...nized as USB memory and the one that was inserted after that is recognized as USB memory2 If you want to remove a USB memory stick and insert a different one press the Back button to return to the Hom...

Page 46: ...play the address to send the image file 3 Press a displayed address to select it A checkmark is added to the icon for the selected address Pressing a selected address again clears the selection IMPORT...

Page 47: ...onfirm addresses before sending is set to OFF the image is sent without displaying the address confirmation screen of Step 10 and the operation ends 6 Press Start to start scanning Scanning stops afte...

Page 48: ...address confirmation message appears IMPORTANT If Confirm addresses before sending is set to OFF in Delivery Options of the Scan Delivery Options screen the image is sent without displaying the addre...

Page 49: ...pe E mail Registration Screen Name Enter the name to appear in the address book E mail address Enter the sender s address for when image files are sent by e mail Shared Folder Registration Screen Name...

Page 50: ...he procedure below to specify the sub folder 1 Enter the server address user name and password and click Browse to log in to the FTP server 2 Specify any sub folder at the level of the displayed folde...

Page 51: ...hared folders with different access privileges may result in a send error Modifying an Address Modify an address when there is a send error because the information of the transfer destination register...

Page 52: ...ied to memory 3 Select the address book type press Edit and then press Paste A confirmation message appears 4 Press New and paste the address Hint If the address book already has an address with the s...

Page 53: ...9 g Default button Resets any modified settings to the default values of the scanner IMPORTANT If you press Default in the Scan Delivery Options screen opened from a job button the settings are reset...

Page 54: ...g Scanning Side Select the method for scanning the document Simplex Duplex Skip Blank Page Hint The Skip Blank Page option scans both sides of a document and skips saving any image it determines to be...

Page 55: ...ments are fed together and stops feeding when a double feed is detected IMPORTANT Using the length of the first page of the document as a reference the scanner determines a double feed when it detects...

Page 56: ...ed as result of deskewing Prefer Speed The image deteriorates slightly as a result of deskewing IMPORTANT If you select Prefer Quality the scanning speed is reduced If you are scanning a large number...

Page 57: ...ct that emphasizes a specified color You can set each of these effects for the front side and back side IMPORTANT The color drop out settings are disabled when the scanning mode is set to Color File F...

Page 58: ...s you to select the language for character recognition Encryption Security If you set encryption to On and then press the Security settings button the Security settings screen appears and you can conf...

Page 59: ...password protection for a password protected PDF file in an application capable of editing PDF files such as Adobe Acrobat Delivery Options E mail settings subject message Set the subject and message...

Page 60: ...s when scanning completes Screen after sending Select the screen to display after sending images Home screen Job Button screen Redisplay the Home screen Job Button screen after sending images IMPORTAN...

Page 61: ...4 4 User Settings 4 5 4 Address Book Settings 4 6 Registering New Addresses 4 8 Copying Addresses 4 10 Exporting and Importing Address Books 4 11 5 Job Button Settings 4 12 Registering New Job Button...

Page 62: ...e device name or IP address assigned to the scanner as the URL for logging in to the Web Menu See p 4 3 Web Menu User Mode a User Settings See User Settings on p 4 5 Use to change the user settings b...

Page 63: ...as the URL to open the Web Menu Ex http scanfront220 when the device name is ScanFront220 and http 172 19 xxx xxx for the IP address Hint If the Web Menu is set to Administrator Mode click To User Mo...

Page 64: ...g See User Settings on p 4 4 Allows you to edit a user s settings IMPORTANT For a user logged in by Server Authentication you can only select a setting for Screen after Login E mail address may not be...

Page 65: ...sult the ScanFront administrator IMPORTANT When entering a Password select the Change Password check box before entry Change Password updates the password information saved on the scanner but does not...

Page 66: ...on p 4 11 c Import to ScanFront 220 Imports a previously exported address book data file See Exporting and Importing Address Books on p 4 11 d Address type Selects the type of addresses E mail FTP Se...

Page 67: ...e ScanFront administrator If editing is restricted for only one address book either the My Address Book or the Shared Address Book users can only copy addresses from the restricted address book and pa...

Page 68: ...r E mail Address Enter the destination e mail address OK button Registers a new e mail address with the specified parameters Address type FTP Server This option registers a network FTP server IMPORTAN...

Page 69: ...click OK IMPORTANT If you click Browse without entering the user account information only computers and workgroups within the same network address will display When displaying workgroups that are not...

Page 70: ...display it in the list OK button Registers a new group with the specified parameters Copying Addresses You can copy an address and register it as a new address You can also copy an address from one a...

Page 71: ...of the file You can match the structure of a CSV file created in another mailer to that of a CSV file saved on the ScanFront and then import the address book of the other mailer and use it on the Scan...

Page 72: ...orted job button data file See Exporting and Importing Job Buttons on p 4 19 d New Job Button button Registers a new job button See Registering New Job Buttons on p 4 14 e Select All button Selects al...

Page 73: ...he ScanFront administrator If editing is restricted for only one set of job buttons either the My Job Button or the Shared Job Button users can copy job buttons from the restricted set of job buttons...

Page 74: ...splays the Scan Setting screen when the job button is pressed Skip Scan Setting Screen Starts scanning without displaying the Scan Setting screen when the job button is pressed IMPORTANT If you select...

Page 75: ...g completes Confirm addresses before sending ON Displays the Address Confirmation screen and then starts sending after you confirm the address OFF Sends the image without confirming the address Screen...

Page 76: ...he entire document Hint Scanning pauses after the first page of the document is scanned and the image of the first page is displayed Use the displayed image to confirm and adjust the brightness and co...

Page 77: ...on level is recommended The Low 40 bit RC4 encryption level provides less security Protect Document The ability to view the document is protected by a password IMPORTANT Take care not to forget the pa...

Page 78: ...her and stops feeding when a double feed is detected IMPORTANT Using the length of the first document page as a reference the scanner detects a double feed when a subsequent page is longer or shorter...

Page 79: ...om the Shared Job Button to the My Job Button Hint Use this function when you want to copy a job button between the Shared Job Button and My Job Button or register it as a different job button after c...

Page 80: ...fy a previously exported job button settings file 3 Select a processing method for importing the job button settings file Replaces the whole data Deletes all currently registered job buttons and overw...

Page 81: ...Chapter 5 Troubleshooting 1 Troubleshooting 5 2...

Page 82: ...and then starting scanning results in an error Cause The mail server settings have not been registered or have been deleted Solution Contact the administrator of the ScanFront Cannot edit the address...

Page 83: ...lace the document and then press a job button Cannot turn on the power Cause The AC adapter is not connected properly or the power plug is not inserted Solution Check the connections of the AC adapter...

Page 84: ...tion Contact the administrator of the shared folder Cannot delete a folder Cause Permission to change the shared folder has not been granted for the user name and password that were entered Solution C...

Page 85: ...Chapter 6 Index...

Page 86: ...Fingerprint Authentication 2 12 3 7 Fingerprint Registration 3 10 Fingerprint Sensor 1 6 2 11 Flow Up Until Sending an Image File 3 2 H Handling 1 3 Home Screen 3 8 I Installation Location 1 2 Introdu...

Page 87: ...3 23 Scanning 3 16 Security Settings 3 28 Server Authentication 3 4 4 3 T Troubleshooting 5 2 Turning Off the Power 3 3 Turning On the Power 3 3 U USB Memory 3 15 USB Memory Screen 3 15 USB Port 2 5 U...

Page 88: ...HERLANDS CANON LATIN AMERICA INC 703 WATERFORD WAY SUITE 400 MIAMI FLORIDA 33126 U S A CANON AUSTRALIA PTY LTD 1 THOMAS HOLT DRIVE NORTH RYDE SYDNEY N S W 2113 AUSTRALIA CANON SINGAPORE PTE LTD 1 HARB...

Reviews: