Canon 1447B002 User Manual Download Page 40

38

Chapter 3

Printing From A Memory Card (MP180)

2

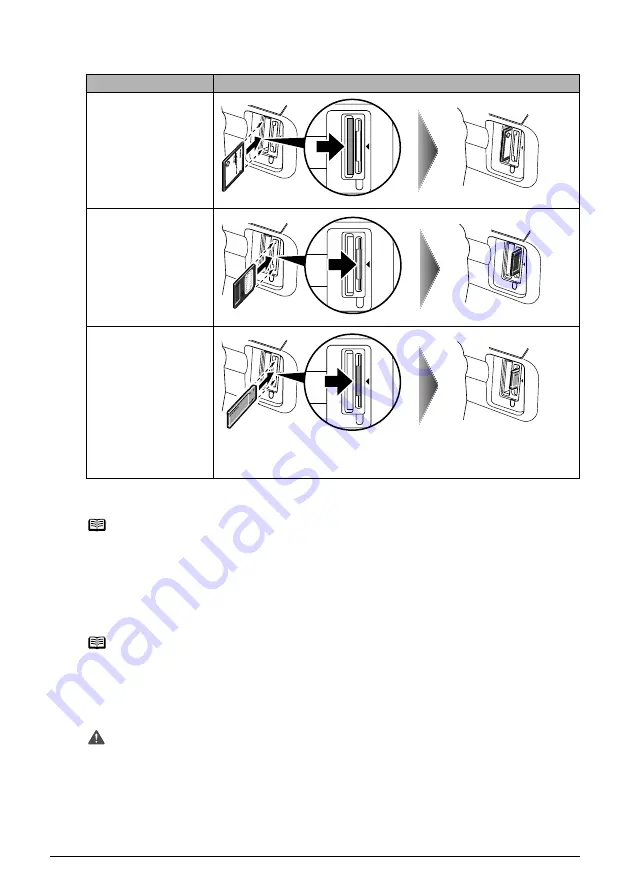
Install the memory card in the appropriate Card Slot.

* Install the memory card with the appropriate adapter attached.

3

Check that the Access Lamp lights after blinking.

„

Removing A Memory Card

1

Ensure that the Access Lamp is not flashing, then hold the exposed portion of the 
memory card with your fingers and remove the memory cards.

Type of card

How to install

z

CompactFlash (CF) 
Card

z

Microdrive

z

xD-Picture Card*

Install these cards into 
the left card slot.

z

SmartMedia Card

Install this card into the 
right card slot.

z

MEMORY STICK

z

MEMORY STICK PRO

z

MEMORY STICK DUO*

z

MEMORY STICK PRO 
DUO*

z

SD Card

z

miniSD Card*

z

MultiMedia Card 
(ver3.31)

Install these cards into 
the right card slot.

Note

Do not try to insert the memory card into the Card Slot furthermore than 
as it stops, otherwise the machine and/or the memory card will be 
damaged.

Note

If you use the machine connected to your computer, follow the 
instructions for removal of the memory card from the computer.

Important

Removing the memory card or turning OFF the machine while the Access 
Lamp is flashing can damage the data stored in the memory card.

Summary of Contents for 1447B002

Page 1: ...wing FINE Cartridges are compatible with this machine The following FINE Cartridges High Yield are also compatible with this machine For details on FINE Cartridge replacement refer to Replacing A FINE Cartridge in this guide QT5 0546 V05 ENG User s Guide User s Guide ...

Page 2: ...om Support program specifics are subject to change without notice Ordering Information For additional supplies use the following descriptions and order numbers Description Order FINE Cartridges PG 40 Black 0615B002 CL 41 Color 0617B002 PG 50 Black High Yield 0616B002 CL 51 Color High Yield 0618B002 Canon Specialty Papers Photo Paper Plus Glossy 4 x 6 20 sheets 7980A007 Photo Paper Plus Glossy 4 x ...

Page 3: ...ant digital camera the camera s image data at the time of shooting is used and optimized yielding extremely high quality prints About Consumables Consumables ink tanks FINE Cartridges are available for 5 years after production has stopped Trademark Notices Windows is a registered trademark of Microsoft Corporation in the United States and other countries Macintosh and Mac are trademarks of Apple C...

Page 4: ...ATION 66 LOAD CONFGURATION 66 9 Routine Maintenance 67 Replacing A FINE Cartridge 67 When Printing Becomes Faint Or Color Is Incorrect 75 Printing The Nozzle Check Pattern 76 FINE Cartridge Cleaning 78 FINE Cartridge Deep Cleaning 78 Aligning The FINE Cartridge 79 Cleaning Your Machine 81 10 Troubleshooting 85 An Error Message Is Displayed On The LCD LED 86 Cannot See The Display On The LCD LED 88...

Page 5: ...t your local power company The shape of the plug and outlet may vary depending on the country of purchase Do not allow the power cord to be near objects that emit heat The outer cover of the power cord may melt resulting in fire or electrical shock Never use the machine if the power cord is bundled or knotted Knots in the cord may result in fire or electrical shock If you detect smoke unusual smel...

Page 6: ... If you place it near to them the machine may malfunction as a result of the noise emitted by the fluorescent lighting When turning OFF the power be sure to press ON OFF and confirm that the Alarm Lamp has shut off If you pull the power plug out of the wall outlet while the Alarm Lamp is on the FINE Cartridge is not protected and you may not be able to print later Caution You may cause injury or d...

Page 7: ... depending on local electrical requirements Do not plug the machine into the same circuit as appliances such as an air conditioner television or copier These devices generate electrical noise which may interfere with your machine s operation Whenever you turn OFF the power and unplug the machine wait at least five seconds before you plug it in again Use only the power cord that came with the machi...

Page 8: ...e be careful not to get ink on your hands or clothing If ink gets on your hands or clothing wash them soon in running water If you use hot water the ink may adhere and become difficult to remove After printing do not touch the electrical contacts of the FINE Cartridge They will be hot and may result in burns or electrical shock Do not subject the machine to strong physical shock or vibration This ...

Page 9: ...Cartridges Ink Cartridges out of the reach of small children If a child ingests any ink consult a doctor immediately Do not shake FINE Cartridges Ink Cartridges Ink may leak out and stain clothing or the surrounding area Never touch the nozzle and the gold terminal ...

Page 10: ...on concerning operations that may lead to injury to persons or damage to property if not performed correctly In order to use the machine safely always pay attention to these cautions Important Indicates operational warnings and restrictions Be certain to read these items to operate the machine correctly and to avoid damage to the machine Note Indicates notes for operation or additional explanation...

Page 11: ... z Certificates of deposit z Postage stamps canceled or uncanceled z Identifying badges or insignias z Selective service or draft papers z Checks or drafts issued by governmental agencies z Motor vehicle licenses and certificates of title z Traveler s checks z Food stamps z Passports z Immigration papers z Internal revenue stamps canceled or uncanceled z Bonds or other certificates of indebtedness...

Page 12: ...t before loading paper 4 Paper Guide When loading paper ensure the left edge of the paper just touches this guide 5 Auto Sheet Feeder Load paper here Paper feeds automatically one sheet at a time 6 Paper Output Tray Printouts are output to this tray Open the tray before you start copying or printing When not being used keep it closed in the machine 7 Direct Print Port Used to connect a PictBridge ...

Page 13: ...ghts when a memory card is inserted into the Card Slots This lamp flashes while the machine is reading data from the memory card 15 Scanning Unit Support Used to hold the Scanning Unit being opened 16 Paper Thickness Lever Used to adjust the gap between the FINE Cartridge and surface of the printing paper Move the lever to the correct position for the media being used 17 Power Connector Used to co...

Page 14: ...onal status 6 Black Button Starts black white copying 7 Color Button Starts color copying 8 Stop Reset Button Cancels operations and returns the machine to standby mode 9 ON OFF Button Turns the machine ON and OFF Before turning ON the machine make sure the Document Cover is closed 10 Alarm Lamp Lights if an error occurs or when the paper or ink runs out 11 Menu Button Accesses the settings to cus...

Page 15: ...Black Button Starts black white copying Also press this button to confirm settings or operations 8 Color Button Starts color copying Also press this button to confirm settings or operations 9 Stop Reset Button Cancels operations and returns the machine to standby mode 10 ON OFF Button Turns the machine ON and OFF Before turning ON the machine make sure the Document Cover is closed 11 Black Color I...

Page 16: ...ation of the FINE Cartridge See page 78 z The FINE Cartridge has many nozzles in order to produce high definition prints In the same way that the tip of a felt tip or marker pen will naturally dry out over time and become unusable even with the cap in place the nozzles might become clogged Periodically printing or performing FINE Cartridge cleaning can help to prevent this kind of clogging Note z ...

Page 17: ... upper left corner of your document with the alignment mark on the lower right corner of the Platen Glass Document Type z All types of paper documents z Photographs z Books catalogs or magazines Size W x L z Max 8 1 2 in x 11 3 4 in 216 mm x 297 mm Thickness z Max 3 4 in 20 mm Important z Do not place any objects weighing more than 4 4 lb 2 kg on the Platen Glass z Do not press or put weight on th...

Page 18: ...not to touch the print surface The print quality will deteriorate if the print surface is damaged or becomes dirty z Do not touch the print surface until the ink has dried z Some paper may curl and the print surface may smudge if you have used a large amount of ink for printing Paper that tends to curl is not recommended for printing photographs or graphics Use it for printing mainly text z If the...

Page 19: ...Thickness Lever Position Printer Driver Setting For Media Type Super White Paper SW 201 Approx 100 sheets Letter A4 Left Plain Paper High Resolution Paper HR 101N Approx 80 sheets Letter A4 Left High Resolution Paper Glossy Photo Paper GP 401 GP 501 10 sheets Letter A4 20 sheets 4 x 6 Credit Card Left Glossy Photo Paper Matte Photo Paper MP 101 10 sheets Letter A4 20 sheets 4 x6 Left Matte Photo P...

Page 20: ... portrait orientation You can use regular copier paper cotton bond paper or typical letterhead Your machine does not require special inkjet paper Legal size paper can only be used when printing from your computer We do not recommend using plain paper for photo printing Envelopes US Commercial No 10 9 1 2 in x 4 1 8 in 241 mm x 105 mm European DL 8 5 8 in x 4 3 8 in 220 mm x 110 mm Printing from yo...

Page 21: ...r than High Resolution Paper and has a glossy surface to produce near photographic quality printouts By using borderless printing you can print without any white borders Do not touch the printing surface until the ink has dried Load the paper with the whiter side facing up Do not use the loading support sheet included with this paper If the ink takes a long time to dry remove each sheet as soon as...

Page 22: ... from your computer photo printing This is a thick paper with a glossy water resistant coating and provides superior color reproduction It is ideal for printing high quality photographs By using borderless printing you can print without any white borders Load the paper with the glossy side facing up Remove each sheet from the Paper Output Tray as soon as it is printed Photo Paper Plus Semi gloss L...

Page 23: ...fore the count reaches 20 For other than 4 x 6 cards remove the paper from the Paper Output Tray before the count reaches 10 For additional information on Photo Paper Pro see page 22 Photo Stickers 4 x 6 4 in x 6 in 101 6 mm x 152 4 mm Printing from your computer copying This is a peel and stick sheet that allows you to make original photo stickers using your own photographs On each sheet you can ...

Page 24: ...m from direct exposure to air or sunlight z Do not mount printouts in an adhesive type album as you may not be able to remove them z Be aware that some types of clear plastic folders and albums may cause the edges of the paper to turn yellow T Shirt Transfers A4 8 1 4 in x 11 3 4 in 210 mm x 297 mm Printing from your computer This paper is used to produce iron on transfers Use mirror printing to p...

Page 25: ... Sheet Feeder 1 pinch the Paper Guide A and adjust it to the left side of the stack 2 z Set the Paper Thickness Lever to the correct position for the paper See page 17 Note Set the Lever to the left for most paper When the Lever is set to the right the confirmation message appears before the machine starts printing MP180 Important Make sure the stack does not exceed the Load Limit Mark B 1 2 2 A B...

Page 26: ...the envelopes to make the folds crisp Also press firmly on the area that corresponds to the edges of the back flap z Remove any curling by holding the edges diagonally and bending them gently z If the edges of the envelope are inflated or curled place the envelope on a flat surface With a pen press down while moving it from the center toward the edges of the envelope z Ensure that no curl or puff ...

Page 27: ... Auto Sheet Feeder 1 pinch the Paper Guide A and adjust it to the left side of the stack 2 z Load the envelopes in the Auto Sheet Feeder with the short side down z Set the Paper Thickness Lever to the right Important Make sure the stack does not exceed the Load Limit Mark B A 2 B 1 ...

Page 28: ...ess Color for color copying or Black for black white copying The machine starts copying Note For details on paper see page 17 Note For the maximum load limit for the paper you are using in the Auto Sheet Feeder see page 17 Note z To select the paper size and type see page 28 z To select the image quality see page 29 z To select the scanning exposure see page 29 z To select the copy ratio see page ...

Page 29: ...n Color or Black for longer than 2 seconds The LED flashes once 2 Release the button The machine starts high speed copying Note By pressing repeatedly F will be displayed The number of copies will be set as 20 Note For details on how to load documents see page 15 Note z High speed copying is only available when A4 or Letter plain paper is selected as the paper size and type z High speed copying is...

Page 30: ... 4 x6 5 x7 CREDIT CARD SIZE 4 Press Menu repeatedly until MEDIA TYPE appears 5 Use or to select the paper type PLAIN PAPER PHOTO PAPER PRO PHOTO PAPER PLUS MATTE PHOTO PAPR GLOSSY 6 Press OK Note The asterisk on the LCD indicates the current setting Note Some of these are not available depending on the country of purchase Note In order to obtain optimal quality print results when copying photograp...

Page 31: ...xposure between nine gradations Follow this procedure 1 Press COPY 2 Press Menu repeatedly until INTENSITY appears 3 Use or to select the MANUAL ADJUST or AUTO ADJUST A If you select MANUAL ADJUST press OK and then use to decrease the density or press to increase the density 4 Press OK If you select AUTO ADJUST A the message A appears on the LCD STANDARD Suitable for text only documents HIGH Suita...

Page 32: ...to letter size Follow this procedure 1 Press COPY 2 Press Menu repeatedly until ENLARGE REDUCE appears 3 Press OK 4 Use or to select the preset ratio 25 70 86 100 115 141 400 5 Press OK Preset copy ratios You can select one of the preset ratios to reduce or enlarge copies Custom copy ratios Zoom You can specify the copy ratio as a percentage to reduce or enlarge copies Automatic ratios Fit to Page...

Page 33: ...tio z Press and hold down or to quickly advance through the ratios 6 Press OK z Using Automatic Copy Ratios Fit To Page You can set the machine to automatically reduce or enlarge the document to fit the paper size you selected in PAGE SIZE Follow this procedure 1 Press COPY 2 Press Menu repeatedly until ENLARGE REDUCE appears 3 Use or to select FIT TO PAGE 4 Press OK The message AUTO appears on th...

Page 34: ...s Menu repeatedly until SPECIAL COPY appears 4 Use or to select STICKER COPY then press OK 5 Press OK 6 Use or to select the number of copies 7 Load the document on the Platen Glass 8 Press Color for color copying or press Black for black white copying Sticker copying MP180 Copies photos or graphics onto stickers Borderless copying MP180 Copies the images so that they fill the entire page without ...

Page 35: ...message z Use or to select the paper size then press OK 8 5x11 A4 4x6 5x7 C CARD z Use or to select the paper type then press OK Note z You cannot specify the paper size paper type or reduction enlargement when using this function z The Quality is fixed to High You cannot select other than High Note z The copied image may need to be enlarged to fit onto the selected paper size when making borderle...

Page 36: ...uto Sheet Feeder 2 Press COPY 3 Press Menu repeatedly until SPECIAL COPY appears 4 Use or to select IMAGE REPEAT 5 Press OK 6 Use or to select AUTO or MANUAL then press OK z If you selected AUTO proceed to step 11 z If you selected MANUAL proceed to step 7 7 Use or to set the vertical repeats then press OK 8 Use or to set the horizontal repeats then press OK 9 Load the document on the Platen Glass...

Page 37: ... 5 Load the document on the Platen Glass 6 Press Color for color copying or Black for black white copying The machine starts Fit to Page copying Important z The area read from the documents depends on the enlargement reduction ratio z The size of the documents to copy should be no larger than one division of the paper For example if you copy four documents at the same size their sizes must be one ...

Page 38: ...Card Adapter for xD Picture Card separately 2 Use the special adapter supplied with the card Memory Cards which can be inserted directly z CompactFlash CF Card Supports TYPE I TYPE II 3 3V z Microdrive z Memory Stick z Memory Stick PRO z SD Secure Digital Memory Card z MultiMedia Card ver3 31 z SmartMedia Card Supports 3 3V card only 1MB and 2MB cards not supported Memory Cards which can be used t...

Page 39: ... card Memory card data formats may not be compatible with computer specific formats z Images edited on a computer may result in improper printing z Please use only one type of memory card at a time Note z When the write protection is disabled on the machine neither printing nor maintenance can be done After using the card slot as the memory card drive for your computer be sure to enable the write ...

Page 40: ...ds into the left card slot z SmartMedia Card Install this card into the right card slot z MEMORY STICK z MEMORY STICK PRO z MEMORY STICK DUO z MEMORY STICK PRO DUO z SD Card z miniSD Card z MultiMedia Card ver3 31 Install these cards into the right card slot Note Do not try to insert the memory card into the Card Slot furthermore than as it stops otherwise the machine and or the memory card will b...

Page 41: ...ndex Sheet prints the selected photographs according to the selections you have made 1 Turn ON the machine and load A4 or Letter sized paper in the Auto Sheet Feeder Use completely white plain paper when printing a Photo Index Sheet 2 Insert the memory card into the Card Slot See page 37 3 Press Photo Index Sheet 4 Use or to select PRINT 5 Press OK Note z For details on paper see page 17 z For det...

Page 42: ...LL PHOTOS Prints all image data stored on the memory card LAST PHOTO Prints image data stored on the memory card in chronological order beginning with the most recently recorded date SELECT RANGE Prints image data stored on the memory card according to a specified range of recorded dates LAST 36 PHOTOS Prints the 36 most recently recorded photographs LAST 72 PHOTOS Prints the 72 most recently reco...

Page 43: ...ach photograph those marks will be disregarded and one copy each of all photographs will be printed 4 Select the number of copies fill in the respective circle under the photograph you want to print 5 Follow the procedure as described 6 Mark this to print the same Photo Index Sheet again If you mark this all other marked settings will be disregarded Note If more than 37 photographs are to be print...

Page 44: ... corner of the sheet with the alignment mark on the lower right corner of the Platen Glass 11 Press Photo Index Sheet 12 Use or to select SCAN Important z Be sure to fill in a circle for every setting item except options z If there is more than one Photo Index Sheet fill in all the sheets z If the filled circles on the Photo Index Sheet are not dark enough the machine may not read the settings Not...

Page 45: ...then press OK 5 Adjust the print settings as necessary then press OK See page 48 6 Press Color An index of all photos saved on the memory card will be printed Important z If the LCD displays SCAN ERROR press OK and ensure that a circle is filled in for each setting item z If the filled circles on the Photo Index Sheet are not dark enough the machine may not read the settings z Do not remove the me...

Page 46: ...fying The Printing Data You can specify how many copies to print for each photo 1 Turn ON the machine and load the paper in the Auto Sheet Feeder 2 Insert the memory card into the Card Slot See Inserting A Memory Card on page 37 3 Press MEMORY CARD and then press Menu 4 Use or to select SELECT PHOTO then press OK 5 Use or to select the photo number to print then press OK You can select the multipl...

Page 47: ...e machine and load the paper in the Auto Sheet Feeder 2 Insert the memory card into the Card Slot See Inserting A Memory Card on page 37 3 Press MEMORY CARD and then press Menu 4 Use or to select SELECT RANGE then press OK 5 Use or to select PHOTO NO or DATE then press OK 6 Use or to select the earliest photo number or shooting date to print then press OK 7 Use or to select the latest photo number...

Page 48: ...d then press Menu 4 Use or to select STICKR then press OK 5 Use or to select the photo number to print then press OK 6 Use or to specify the number of copies to print then press OK 7 Use or to select STICKR x16 then press OK 8 Press Color The specified number of copies are printed Note You can load only one sheet of stickers at a time Note You can only print in 4 x 4 layout though other layouts ap...

Page 49: ...ge format CIFF JFIF and Exif Print type Standard The photos for which you specified Standard using the DPOF function are printed Print type Index The photos for which you specified Index using the DPOF function are printed according to the index print layout Photos to Print Only the photos specified using the DPOF function are printed photos cannot be specified on the Operation Panel Copies Photos...

Page 50: ...IGH BORDERLESS PRINT Selects bordered or borderless print ON OFF PRINT DATE Selects whether to print the shooting date or not ON OFF FILE NO PRINT Selects whether to print the file number or not ON OFF IMAGE ENHANCEMENT Selects whether to optimize photos with the functions below or not SKIP SET z VIVID Makes green and blue more lively ON OFF z POP Photo Optimizer PRO Automatically optimizes bright...

Page 51: ...es from your hard disk onto a memory card Enabling Writing Of Data To Memory Cards 1 Press MEMORY CARD 2 Press Menu repeatedly until SYSTEM SETTINGS appears 3 Use or to select OTHERS then press OK 4 Use or to select READ ONLY MODE then press OK 5 Use or to select ON or OFF then press OK Important z When the write protection is disabled on the machine neither printing nor maintenance can be done Af...

Page 52: ...te protection is enabled on the machine If the computer does not detect that the write protection is enabled a delayed write error might occur and data could be corrupted when attempting to copy data to a memory card z You cannot write to memory cards when the machine is in Memory Card mode Note To change the write protect setting while a card is inserted in the Card Slot unplug the USB cable befo...

Page 53: ...elect Print from the application software s File menu The Print dialog box opens 2 Ensure that your machine is selected 1 3 Click Preferences or Properties 2 The Main tab of the Preferences screen is displayed Note z Menu and command names may differ between software applications and more steps may be required For details refer to the documentation for each software application you use z The steps...

Page 54: ... the On screen Manual Note z From the Page Setup tab select the correct document size to be printed z For details about other printer driver functions click Instructions or Help to view the Printer Driver Guide Instructions is only displayed when the On screen Manual is installed z Selecting the Preview before printing check box displays a preview screen that allows you to confirm the selected pri...

Page 55: ...ing Note z You can cancel a print job in progress by simply pressing Stop Reset on the machine z Click Cancel Printing on Canon IJ Status Monitor to stop printing To show Canon IJ Status Monitor click Canon MP180 Printer on the taskbar Canon IJ Status Monitor opens automatically when a machine error occurs 1 ...

Page 56: ... from the application software s File menu The Page Setup dialog box opens 2 Confirm that your machine is selected in Format for 1 3 Select the desired paper size from Paper Size 2 4 Click OK 3 Note z Menu and command names may differ between software applications and more steps may be required For details refer to the documentation for each software application you use z The steps described in th...

Page 57: ...ocuments consisting mainly of photographs and graphics featuring fine color gradation Printing tables and charts Select when printing documents consisting mainly of graphs and graphics illustrations with strong color definition Printing a composite document Select when printing documents consisting mainly of text Detailed Setting Select to fine tune the Print Quality and Halftoning setting z For d...

Page 58: ...ter Setup Utility When using Mac OS X v 10 2 8 double clicking the name of your machine in the Printer List of the Print Center displays a dialog that prompts you to confirm the status of the print job To cancel a job in progress select the desired document then click Delete To temporarily stop a job in progress click Hold To stop all the jobs in the list click Stop Jobs when using Mac OS X v 10 3...

Page 59: ...ning Using The MP Navigator Using the MP Navigator you can scan process and save documents to your computer For details on using the MP Navigator see the Scanning Guide On the Windows desktop double click the MP Navigator 3 0 icon to open the MP Navigator On the Go menu select Applications Canon Utilities then double click the MP Navigator 3 0 icon to open the MP Navigator You can launch the follo...

Page 60: ...er window select MP Navigator 3 0 from Application to launch when scanner button is pressed then click OK If you are using Macintosh OS X v 10 2 8 Select Applications from the Go menu then double click Image Capture Select Preferences from the Image Capture menu Select Others from When a scanner button is pressed open select MP Navigator 3 0 from Applications then click Open 1 Load the document on...

Page 61: ... scan an image from TWAIN or WIA Windows XP only compliant application software and use the image in that application software This procedure varies depending on the application software For the detailed procedure refer to the manual of the application software you are using ...

Page 62: ...s without the need to use a computer Hereafter digital still cameras digital video camcorders and mobile phones are collectively called the PictBridge compliant device Caution Do not connect any equipment other than PictBridge compliant devices to the Direct Print Port of the machine Doing so may result in an electric shock fire or damage to the device Note z When printing photos with the digital ...

Page 63: ... machine is correctly connected Confirming Or Changing The Device Settings To change the paper size or paper type operate the device to select the PictBridge print setup mode and confirm or change the settings The settings below can be changed by pressing Menu MP180 or Paper Fit to Page MP160 when the PictBridge compliant device is connected However changes can only be made on the properties scree...

Page 64: ...e Media type settings made using the controls of the machine The following sizes and types of paper can be loaded in the machine by selecting options in Page size and Media type 1 This paper is exclusively used to print photo stickers When printing on sticker paper select 10x15 cm 4 x 6 in Page size 2 This size can be selected only for Canon PictBridge compatible devices note that it cannot be sel...

Page 65: ... z When printing onto Photo Stickers PS 101 16 up use the following settings 1 Load Photo Stickers PS 101 in the Auto Sheet Feeder 2 Select 10 x 15 cm 4 x 6 for the Page size and Photo for the Media type 3 Select N up for layout then select 16 z Some PictBridge compliant devices display the Layout option 2 up 4 up 9 up and 16 up In this case always select 16 up If there are no options on the PictB...

Page 66: ...ess OK 5 Use or to select SMALL or LARGE then press OK PRINT SETTINGS QUIET MODE Use this function if you want to reduce the operation noise such as when printing at night ON OFF EXTENDED AMOUNT Selects the amount of image that extends off the paper when printing in borderless SMALL LARGE Note Depending on the functions you use some setting items cannot be specified in combination Important z The ...

Page 67: ...rless print ON OFF IMAGE ENHANCEMENT Selects whether to optimize photos or not SKIP SET VIVID POP REMOVE NOISE FACE BRIGHT See page 48 OTHERS DATE TIME SETUP Selects the shooting date format to be printed on photos YYYY MM DD MM DD YYYY DD MM YYYY READ ONLY MODE Selects whether to allow data to be written onto memory cards from a computer ON OFF LANGUAGE SETTING Changes the language for LCD messag...

Page 68: ...ack to the default except for the language for LCD messages and the position of the FINE Cartridge YES NO SAVE CONFGURATION Saves the current media settings for the size type quality magnification intensity and image optimize YES NO LOAD CONFGURATION Loads the saved media settings YES NO ...

Page 69: ...he model number very carefully The machine will not print properly if the wrong FINE Cartridge is used or installed incorrectly The FINE Cartridge PG 50 Black High Yield and CL 51 Color High Yield are also compatible with this machine Replacing A FINE Cartridge When a FINE Cartridge runs out of ink replace it using the following steps 1 Ensure that the machine is turned ON and then open the Scanni...

Page 70: ...FINE Cartridge Important z Handle FINE Cartridges carefully to avoid staining your clothes or the surrounding work area z Discard empty FINE Cartridges according to local laws and disposal regulations Caution Do not touch the transparent film A film cable B ink absorber sponge part C or any metal parts 1 2 A B C ...

Page 71: ...t a new FINE Cartridge on a slight tilt 2 Push the FINE Cartridge up until it clicks into place Important z Do not reattach the Protective Tape once you have removed it z Handle the removed Protective Tape carefully to avoid getting your hands dirty or staining the surrounding work area once you have removed it z Once the Protective Tape is removed do not touch the gold terminals of the FINE Cartr...

Page 72: ... with the FINE Cartridge removed z When a FINE Cartridge runs out of ink replace the FINE Cartridge with a new one immediately If you replace it with the FINE Cartridge that has previously been removed the machine may not print properly due to clogged FINE Cartridge nozzles Furthermore the Low Ink Warning dialog box which advises when to exchange the FINE Cartridge will be inaccurate z To maintain...

Page 73: ...Cartridge immediately If you continue printing with an empty FINE Cartridge it will be a cause of trouble Be sure to press OK MP180 Black or Color MP160 with all the FINE Cartridges installed Printing does not resume if any of the FINE Cartridges are left uninstalled If you continue to print with an empty FINE Cartridge the ink level will not be detected correctly z Checking the Ink Level MP180 Yo...

Page 74: ...d FINE Cartridge is installed a message that the remaining level of ink cannot be detected appears z When the mark appears on the Low Ink Warning The ink level of the FINE Cartridge showing the mark is low You should ensure you have a new FINE Cartridge Note How to Check the Ink Level Open the Printer Properties dialog box Click the Maintenance tab and then click View Printer Status Canon IJ Statu...

Page 75: ...Open Printer Setup Utility or Print Center 2 Double click the model name from Name in the Printer List and then click Utility 3 Choose the name of your machine from Product and click the Maintenance button 4 Choose Ink Cartridge Settings from the pull down menu 5 Select Color only when the cartridge runs out of Black ink or select Black only when the cartridge runs out of Color ink and then click ...

Page 76: ...t you replace the FINE Cartridge with a new one If you try printing when mark appears the following message appears and printing stops In either case clicking OK cancels the error indication and enables continuation of printing However the error detection function is disabled after the error indication is canceled therefore Low Ink Warning message does not appear later on When you install a new FI...

Page 77: ...or a Macintosh may improve the print quality See the Printer Driver Guide Step 1 See Printing The Nozzle Check Pattern on page 76 After FINE Cartridge Cleaning print the nozzle check pattern If missing lines or white stripes appear Step 2 See FINE Cartridge Cleaning on page 78 If the problem persists after performing FINE Cartridge Cleaning twice Step 3 See FINE Cartridge Deep Cleaning on page 78 ...

Page 78: ...o Sheet Feeder 2 Press Menu repeatedly until MAINTENANCE appears 3 Use or to select NOZZLE CHECK 4 Press OK The machine prints a nozzle check pattern 5 Confirm the nozzle check pattern For details on confirming the nozzle check pattern see page 77 1 Load A4 or Letter sized plain paper in the Auto Sheet Feeder 2 Press Maintenance repeatedly until A appears 3 Press Black or Color The machine prints ...

Page 79: ...heck pattern and the FINE Cartridge position pattern z If the lines are broken 1 or white lines 2 are present in the pattern A clean the FINE Cartridge See page 78 Note If the ink level is low the nozzle check pattern is not printed correctly If the ink level is low replace the relevant FINE Cartridge See page 67 A 1 2 ...

Page 80: ...t quality does not improve after a standard FINE Cartridge Cleaning try FINE Cartridge Deep Cleaning which is a more powerful cleaning process FINE Cartridge Deep Cleaning consumes more ink than standard FINE Cartridge Cleaning so perform this procedure only when necessary 1 Press Menu repeatedly until MAINTENANCE appears 2 Use or to select DEEP CLEANING 3 Press OK 1 Press Maintenance repeatedly u...

Page 81: ...ning The FINE Cartridge 1 Press Menu repeatedly until MAINTENANCE appears 2 Use or to select ALIGN PRINT HEAD 3 Press OK The machine prints the head alignment sheet 4 Beginning from column A on the printout fill in the appropriate circles with a dark pencil to select the most solid image 1 Column A 2 Good example Most solid box 3 Bad example Least solid box 1 2 3 ...

Page 82: ...g from column A on the printout enter checkmarks in the patterns that have the most solid image 4 Load the checked sheet on the Platen Glass When loading the checked sheet place the front side down and align the upper left corner of the sheet with the alignment mark on the lower right corner of the Platen Glass 5 Press Maintenance repeatedly until U appears 6 Press Black or Color The machine scans...

Page 83: ...ou have trouble getting the scanning area clean wipe with diluted mild detergent for dish washing Cleaning The Exterior Wipe the machine s exterior with a clean soft lint free damp cloth Caution z Be sure to turn OFF the power and disconnect the power cord before cleaning the machine z Do not use tissue paper paper towels or similar materials for cleaning they can stick to the components or genera...

Page 84: ...e of A4 or Letter sized paper in the Auto Sheet Feeder 8 Repeat steps 2 to 4 three times The sheet of paper is automatically fed in and then out of the machine 1 Press ON OFF to turn ON the machine then remove any paper from the Auto Sheet Feeder 2 Press Maintenance repeatedly until b appears 3 Press Black or Color 4 Repeat steps 2 to 3 twice 5 Open the Paper Output Tray 6 Load three or more of A4...

Page 85: ...83 See Cleaning The Protrusions Inside The Machine on page 84 1 Ensure that the machine is turned ON and there is no paper loaded in the Auto Sheet Feeder 2 Take a sheet of A4 or Letter sized plain paper and fold it in half widthwise Then open the paper 3 Load it into the Auto Sheet Feeder with the opened side facing up Insert the paper open side up 4 Press Menu repeatedly until MAINTENANCE appear...

Page 86: ...re stained wipe ink off the protrusions using a swab or something similar Note z If the discharged paper still appears dirty after you have run this cleaning process the inside of your machine is probably extremely dirty z Clean the inside of the machine in accordance with the following directions z See Cleaning The Protrusions Inside The Machine on page 84 Important Before cleaning be sure to tur...

Page 87: ...The Digital Camera See page 96 Cannot Install The MP Driver See page 98 Cannot Connect To PC Properly See page 99 Problems With Scanning See page 100 An Error Message Appears On The Screen See page 103 For Windows Users See page 106 If You Cannot Solve The Problem See page 107 z If an error occurs when the machine is connected to a computer When an error occurs in printing such as the machine is o...

Page 88: ...age 67 REQ SERVICE SOON The ink absorber is almost full Printing will no longer be possible once the ink absorber is full Contact the service center immediately Press OK to continue printing INCOMPATIBLE CAMERA Depending on the model or brand of your device you may have to select a print mode compliant with PictBridge before connecting the device You may also have to turn on the device or select P...

Page 89: ...INE Cartridge installed Replace the empty FINE Cartridge immediately after the printing The resulting print quality is not satisfactory if printing is continued under the ink out condition E 5 The FINE Cartridge may not be installed properly or the Cartridge may not be the compatible with this machine Install the appropriate FINE Cartridge If lines are misaligned or the resulting output is not sat...

Page 90: ...ities E 1 9 The size of the document cannot be correctly detected or the document is too small when the Fit to Page copying is selected Make sure the document meets the requirements and correctly loaded on the Platen Glass Then reload the document and press Black or Color See Setting Documents on page 15 E 2 x E 3 x E 4 x An error requiring servicing might have occurred Turn OFF the machine and un...

Page 91: ...x of the printer driver select Quality Media from the pop up menu and then ensure that the Media Type selected matches the paper loaded FINE Cartridge nozzles clogged or shifted Print the nozzle check pattern to check for uneven ink output See Printing The Nozzle Check Pattern on page 76 z ink supply is uneven See FINE Cartridge Cleaning on page 78 See FINE Cartridge Deep Cleaning on page 78 z If ...

Page 92: ...ent Increase available memory by closing any other applications currently running If you still cannot print restart Windows and try printing again The machine has been printing continuously over a long period If so the FINE Cartridge will overheat To protect the FINE Cartridge printing will stop temporarily and resume after a period of time Interrupt printing when appropriate turn OFF the machine ...

Page 93: ...rectly Check that the document is loaded correctly on the Platen Glass See Loading Documents on page 15 The quality image quality displayed on the LCD is not suitable for the document MP180 Set the image quality suitable for the document See Adjusting Image Quality on page 29 The document is not loaded with the side to be copied face down When loading the document on the Platen Glass the side to b...

Page 94: ...n the Auto Sheet Feeder 2 Place A4 Letter size plain paper in landscape horizontally fold it in half 3 Unfold the paper and load the paper in the Auto Sheet Feeder with the inverted V edge down 4 Follow the steps described in Cleaning The Bottom Plate on page 83 Paper will be ejected If protrusions inside the machine are stained wipe ink off the protrusions using a swab or the like Important Befor...

Page 95: ...lar paper to avoid damaging the surface 2 Roll up the paper in the direction opposite to the paper curl as per the figure below 3 Check the printing paper to confirm if the paper curl is eliminated to within approximately 2 to 5mm 0 08 to 0 2 in B It is recommended to print the curl corrected paper one sheet at a time The media type is not selected correctly in the printer driver On the Main tab o...

Page 96: ...nit and remove it Be careful not to touch the components inside the machine at this time After removing the paper close the Scanning Unit turn the machine OFF and turn it back ON z If you cannot pull the paper out turn the machine OFF and turn it back ON The paper will be ejected automatically 2 Reload the paper into the machine and press OK MP180 Black or Color MP160 z If you have turned OFF the ...

Page 97: ...isplayed is not selected Select the language according to the following procedure 1 Press ON OFF to turn off the machine 2 Press ON OFF to turn on the machine 3 Press Menu seven times 4 Press twice then press OK 5 Press twice then press OK 6 Press repeatedly to select the leftmost language 7 Press the number of times in the following table according to your desired language 8 Press OK The desired ...

Page 98: ...e switched to printing mode before it is connected to the machine depending on the model of the device Also it may need to be turned on manually or switched to replay mode after connected to the machine Refer to the instruction manuals supplied with your camera and take the necessary steps before connection z The FINE Cartridge nozzles may be clogged if printing becomes faint or colors are incorre...

Page 99: ...lace the FINE Cartridge and close the Scanning Unit If printing is in progress and you want to continue printing press OK MP180 Black or Color MP160 with the FINE Cartridge installed Then printing can continue under the ink out condition by selecting Continue 1 on the display on your camera Replace the empty FINE Cartridge immediately after the printing The machine may be damaged if printing is co...

Page 100: ...d reinstall the driver Other applications including anti virus software running in the background Other applications opened on your computer can interfere with the installation routine Close all open software applications before reinstalling the MP Driver Installation does not start automatically when the Setup CD ROM is inserted into the drive Click Start select My Computer and then double click ...

Page 101: ...art your computer Reinstall the MP Driver Cause Action Your environment is not fully compatible with USB 2 0 If your environment is not fully compatible with USB 2 0 the machine will operate at a lower speed provided under USB 1 1 In this case the machine operates properly but printing speed may slow down due to communication speed Check the following to ensure that your Computer environment suppo...

Page 102: ...t the Setup CD ROM in your computer and install ScanGear Machine may not be selected Select your machine following the directions in Scanning with ScanGear in Initiating a Scan The Feature of the application program does not support calling up ScanGear Start ScanGear from within a TWAIN compatible program An error message appears and the ScanGear window fails to appear z Reattaching the USB cable ...

Page 103: ...Simple Mode or turn on the Descreen option in the Advanced Mode of ScanGear Turn off the Unsharp Mask function if the moiré effect is still too strong even when the Descreen option is on See the Scanning Guide Inappropriate display settings Set your display settings on your computer to Medium 16 bit or higher In the System Preferences dialog click the Displays icon and select the Display tab Set t...

Page 104: ...he following when using the Multi Scan or Multi crop function z Up to 10 originals can be set at once z There should be a gap of at least 0 4 10 mm between the edge of the Platen Glass and originals z Leave at least 0 4 10 mm between the originals z If an original is slightly crooked on the Platen Glass within 10 degrees of true the image will be automatically straightened z Originals that are irr...

Page 105: ...he machine instead See the on screen manuals for each application program for the detailed procedures z Change the resolution setting in the scanner driver and rescan The higher the resolution the larger the resulting image will be z Some application programs do not display clear images at small image display settings Set the scale to 100 Scanned image won t open The file name extension is not sup...

Page 106: ... 3 Open the File menu and select Properties 4 Click the Ports tab or the Details tab to confirm the port settings A USB port is selected if either USBnnn Canon MP180 MP160 or MPUSBPRNnn Canon MP180 MP160 where n is a number is indicated If the port setting is not correct change the port setting according to the interface you are using on the Ports tab or the Details tab or reinstall the MP Driver ...

Page 107: ...lowing the procedures described in the Easy Setup Instructions Cause Action The ink absorber is almost full Ink used for cleaning is absorbed in a ink absorber placed in the machine Press OK to cancel the error so that you can continue printing Once the ink absorber becomes completely full printing cannot be done until the ink absorber is replaced Canon recommends to contact a Canon service repres...

Page 108: ...Manual is not installed Set the Setup CD ROM in your computer and install the On screen Manual The Instructions button is displayed only on Main and Maintenance tabs The Scanning Guide cannot be displayed The button for displaying the scanner driver operating instruction is grayed out when the on screen manuals instruction manuals are not installed Set the Setup CD ROM in your computer and install...

Page 109: ...irm the following z Product name PIXMA MP180 MP160 z Serial number written on label at rear of machine z Details of the problem z What you tried to solve the problem and what happened Caution Attempts by customers to repair or take apart the machine will invalidate any warranty regardless of whether the warranty has expired Note If the machine emits any unusual sound smoke or odor turn it OFF imme...

Page 110: ...with no margins is possible This is available in A4 Letter 4 x 6 101 6 x 152 4 mm 4 x 8 101 6 x 203 2 mm 5 x 7 127 0 x 177 8 mm and Credit Card paper sizes MP180 See A4 B5 A5 4 x 6 4 x 8 5 x 7 Credit Card on page 109 See Letter Legal on page 110 See Envelopes on page 110 Recommended printing area Canon recommends that you print within this area Printable area The area where it is possible to print...

Page 111: ...x 169 8 mm 4 7 x 6 7 in Credit Card 47 2 x 78 0 mm 1 86 x 3 07 in Recommended printing area Printable area Note When Printing on Glossy Photo Paper GP 401 GP 501 Matte Photo Paper MP 101 Photo Paper Plus Double Sided PP 101D Photo Paper Plus Glossy PP 101 Photo Paper Plus Semi gloss SG 101 SG 201 and Photo Paper Pro PR 101 selection of Borderless Printing enables you to make prints with no margins...

Page 112: ...oto Paper Plus Double Sided PP 101D Photo Paper Plus Glossy PP 101 Photo Paper Plus Semi gloss SG 101 SG 201 and Photo Paper Pro PR 101 selection of Borderless Printing enables you to make prints with no margins However Borderless Printing may reduce the print quality on the top and bottom edges of the paper or cause the paper to become smudged Size Printable Area width x height European DL 180 8 ...

Page 113: ...When the message prompting you to restart your computer is displayed click OK to restart your computer z Uninstall the Printer Driver Guide and Scanning Guide Delete the MP Driver and scanner driver to uninstall the Printer Driver Guide and Scanning Guide z Uninstall the User s Guide and Photo Application Guide 1 Select Applications from the Go menu 2 Double click the Canon Utilities folder then I...

Page 114: ...lug the machine 2 Close the Paper Support and Paper Support Extension 3 Disconnect the USB cable from the computer and from the machine and then disconnect the power cord from the machine 4 To prevent the Scanning Unit or the Paper Support from opening secure them with tape 5 Cover the machine with protection materials attached on both sides and put it in a box Important To protect the machine fro...

Page 115: ...oustic noise level Approx 45 dB A when printing in the highest print quality mode on Photo Paper Pro Operating environment Temperature 5 to 35 C 41 to 95 F Humidity 10 to 90 RH no condensation Storage environment Temperature 0 to 40 C 32 to 104 F Humidity 5 to 95 RH no condensation Power supply AC 100 240 V 50 60 Hz Power consumption Standby minimum Approx 2 W Printing Copy Approx 13 W OFF Approx ...

Page 116: ... Pro A4 Letter Photo Paper Plus Semi gloss A4 Letter Glossy Photo Paper A4 Letter Plain Paper A4 Letter 5 4 x 8 6 cm Credit Card Glossy Photo Paper Card Size 1 Canon brand sticker Printing on this paper is available only when the Layout function on your camera has a 16 up option See Recommended Paper on page 17 2 If using a Canon PictBridge compatible camera you can select it Media type Default Ph...

Page 117: ...ce z USB interface USB operation can only be guaranteed on a PC with preinstalled Windows XP Windows 2000 Windows Me or Windows 98 or a PC preinstalled with Windows 98 or later and upgraded to Windows XP Windows 2000 or Windows Me z The CD ROM drive or the CD ROM drive that is shared online z Available hard disk space for printer driver installation Windows XP Windows 2000 Windows Me Windows 98 Ap...

Page 118: ...st be installed The on screen manual may not be displayed properly depending on your operating system or Internet Explorer version We recommend that you keep your system up to date with Windows Update z Browser Help Viewer The on screen manual may not be displayed properly depending on your operating system We recommend that you keep your system up to date ...

Page 119: ...in accordance with the instructions may cause harmful interference to radio communications However there is no guarantee that interference will not occur in a particular installation If this equipment does cause harmful interference to radio or television reception which can be determined by turning the equipment off and on the user is encouraged to try to correct the interference by one or more o...

Page 120: ...A shall have no responsibility for such items except for compatible Canon brand peripheral equipment covered by a separate warranty Separate Warranty Repairs of such Canon brand peripheral equipment shall be governed by the terms of the Separate Warranty Non Canon brand equipment and software that may be distributed with the Product are sold as is and without warranty of any kind by Canon USA incl...

Page 121: ... OF THE PRODUCT CAUSING THE ALLEGED DAMAGE WITHOUT LIMITING THE FOREGOING YOU ASSUME ALL RISK AND LIABILITY FOR LOSS DAMAGE OR INJURY TO YOU AND YOUR PROPERTY AND TO OTHERS AND THEIR PROPERTY ARISING OUT OF THE POSSESSION USE MISUSE OR INABILITY TO USE THE PRODUCT SOLD BY CANON USA NOT CAUSED SOLELY AND DIRECTLY BY THE NEGLIGENCE OF CANON USA OR ITS ASF SOME STATES DO NOT ALLOW THE EXCLUSION OR LI...

Page 122: ...Exchange Service expedites usually by the second business day the exchange of a defective Product with a replacement Product which will normally be shipped the same day if your request for this service is by 3 p m E T Monday through Friday except holidays three 3 business day InstantExchange Service for Alaska and Hawaii Canon USA does not guarantee expedited shipping service in the event of the o...

Page 123: ...ON z The location of the authorized service facility nearest you 1 800 OK CANON If the problem cannot be corrected by using one of the above technical support options repair options are available at the time of your call to the Free live technical support number above or via the website at www canon ca Support program specifics are subject to change without notice CANON CANADA INC 1 800 OK CANON 1...

Page 124: ...ridge 67 When To Replace A FINE Cartridge 71 Fit to Page Button 13 Fit to Page Lamp 13 G General Paper Guidelines 16 L LCD Liquid Crystal Display 12 LED Light Emitting Diode 13 Loading Paper 23 Loading Envelopes 24 M Machine Parts 10 Maintenance Button 13 Memory Card 36 Inserting 37 Reading From Writing To 49 Removing 38 Write Protection 49 MEMORY CARD Button 12 Menu Button 12 N Nozzle Check Patte...

Page 125: ...MP160 13 SCAN Button MP180 12 Scanning Images 57 From An Application Software 59 Using The MP Navigator 57 Using The SCAN Button 58 Scanning Unit 11 Scanning Unit Support 11 Setting Documents 15 Document Requirements 15 Loading Documents 15 Specifications 113 Stop Reset Button MP160 13 Stop Reset Button MP180 12 System Settings MP180 64 LOAD CONFGURATION 66 OTHERS 65 PICTBRIDGE SET 65 PRINT SETTIN...

Page 126: ...terials related to such distribution and use acknowledge that the software was developed at Cygnus Support Inc Cygnus Support Inc may not be used to endorse or promote products derived from this software without specific prior written permission THIS SOFTWARE IS PROVIDED AS IS AND WITHOUT ANY EXPRESS OR IMPLIED WARRANTIES INCLUDING WITHOUT LIMITATION THE IMPLIED WARRANTIES OF MERCHANTABILITY AND F...

Page 127: ...om Support program specifics are subject to change without notice Ordering Information For additional supplies use the following descriptions and order numbers Description Order FINE Cartridges PG 40 Black 0615B002 CL 41 Color 0617B002 PG 50 Black High Yield 0616B002 CL 51 Color High Yield 0618B002 Canon Specialty Papers Photo Paper Plus Glossy 4 x 6 20 sheets 7980A007 Photo Paper Plus Glossy 4 x ...

Page 128: ...wing FINE Cartridges are compatible with this machine The following FINE Cartridges High Yield are also compatible with this machine For details on FINE Cartridge replacement refer to Replacing A FINE Cartridge in this guide QT5 0546 V04 ENG User s Guide User s Guide ...

Reviews: