background image

7

134459 (10/16)

SAG

30%,

Owner’s Manual suppleMent

WARNING

SELECT ONLY COMPATIBLE SHOCKS AND FORKS FOR YOUR BIKE. DO 
NOT MODIFY YOUR BIKE IN ANY WAY TO MOUNT ONE. HAVE YOUR 
SHOCK OR FORK INSTALLED BY A PROFESSIONAL BIKE MECHANIC

•   Riding with the wrong rear shock can damage 

the frame. You could have a serious accident. 

Make sure the total travel, eye-to-eye length, 

and stroke length of the rear shock you select 

meet the SPECIFICATIONS listed in this manual. 

•   When selecting different shocks or forks for your 

bike, make sure that the shock or fork you select 

is compatible with your bike’s design and how 

you will use your bike. 

YoU Can Be YoU serIoUsLY InJUreD, ParaLYZeD 

or KILLeD If YoU IGnore tHese WarnInGs.
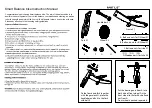
NOTICE

Mount the shock as shown. 

set Up

1.   Set the air pressure according to for you body 

weight. Follow the shock manufacturer’s instruction 

for pressurizing the shock.

2.   Slide the O-ring against the shock wiper seal. 

3.   Sit on the bike in a normal riding position with your 

hands on the handlebar and feet on the pedals so 

that your weight compresses the rear shock. 

4.  Measure the SAG. Adjust the air pressure in the 

shock to achieve the correct SAG measurement.


Add air to decrease sag. 


Release air to increase sag. 


Recommended Sag 30%


rear shock

Summary of Contents for MOTERRA

Page 1: ...MOTERRA OWNER S MANUAL SUPPLEMENT...

Page 2: ......

Page 3: ...ountry region location information See Contacting Cannondale in this supplement You can download Adobe Acrobat PDF versions of any manual supplement from our website www cannondale com This supplement...

Page 4: ...engage WARNING UNDERSTAND YOUR BIKE DRIVE SYSTEM ANDTHE INTENDED USE OF BOTH USING YOUR BIKETHE WRONG WAY IS DANGEROUS Please read your Cannondale Bicycle Owner s Manual for more information about Int...

Page 5: ...IKES This bike has wide bars and with wide tires without a integrated kickstand to hold it parked upright Always park the bike in a suitable safe area away from children cars or animals that may come...

Page 6: ...dentally in the lock Keep your spare key in a safe place Please Note After lots of rides and washing the battery lock can become dry and difficult to use To maintain whenever you lubricate your bike c...

Page 7: ...g To calculate maximum load of your e bike please deduct bike weight from total Maximum Bike Weight Limit 330 lbs 150kg To find the bike weight please see CE Sticker on you bike or contact your local...

Page 8: ...78 79 G HEADTUBE LENGTH 109 7 122 4 134 4 134 4 109 7 122 4 134 4 134 4 H WHEELBASE 117 2 118 3 121 4 124 1 115 7 118 9 122 1 124 8 I FRONT CENTER 71 5 72 7 75 8 78 5 71 4 74 6 77 8 80 5 J CHAIN STAY...

Page 9: ...the shock or fork you select is compatible with your bike s design and how you will use your bike YOU CAN BE YOU SERIOUSLY INJURED PARALYZED OR KILLED IF YOU IGNORE THESE WARNINGS NOTICE Mount the sh...

Page 10: ...and install the axle 8 and shim 9 The kit also includes bearing driver needed to replace the link and swingarm bearings It is available from a Cannondale Dealer Shock Link Remove 1 Place the bike in...

Page 11: ...10 16 8 Nm Loctite 242 blue 5 Nm Loctite 435 5 Nm 1 2 3 4 5 6 6 8 7 7 9 10 8 a b 8 KP169 9 9 b a http tds henkel com tds5 search asp t 435 Owner s Manual Supplement Carbon Link Install bearings w Loc...

Page 12: ...parts are good condition Service of worn or damaged parts in this assembly should be performed by a Cannondale Dealer As shown a significant degree of disassembly is required The main pivot bearings 5...

Page 13: ...stay dropout connection The bearings see inset can be inspected without removing them With the pivots removed rotate the installed bearings The bearings should be free of corrosion fixed firmly in th...

Page 14: ...cable It spans the housing section between the chain stay opening the connection to the rear derailleur The guide is necessary to best shifting performance Be sure to replace it if it is removed when...

Page 15: ...is performed by your Cannondale Dealer To release the strap Pull the strap loop a back and down to disengage the hook c from the slot e in the plate 3 To secure the strap Insert the charged battery 1...

Page 16: ...mm CRANK BOLTS 40Nm CODE DESCRIPTION KP173 KIT DER HANGER SI12 KP312 KIT GROMMET 10X KP169 KIT TOOL JEKYLL PIVOT KP175 X KIT ADAPTER SI12 PM 160 KP176 X KIT ADAPTER SI12 PM 180 KP177 X KIT ADAPTER SI1...

Page 17: ...Nm C C E F G A KP169 H I KP388 34 9 mm CRANK BOLTS 40Nm CODE DESCRIPTION ITEM CK2017U10OS CHAIN GUIDE MOTERRA BLK CK3017U10OS SKID PLATE MOTERRA BLK CK3027U00OS PLUG GROMMET KIT MOTERRA CK3277U00OS MO...

Page 18: ...ith pedal only bikes This requires frequent inspection and replacement Check the bicycle brakes make sure they are working well Brake system pad and disc wear is greater compared with pedal only bikes...

Page 19: ......

Page 20: ...om 2016 Cycling Sports Group 134459 11 16 CANNONDALE EUROPE Cycling Sports Group Europe B V Han zepoort 27 7570 GC Oldenzaal Netherlands Voice 41 61 4879380 Fax 31 5415 14240 servicedeskeurope cycling...

Reviews: