

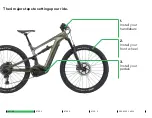


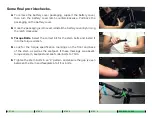


Some final pre-ride checks.
Twist Check.
Secure the front wheel between your legs and turn the
handlebar. If the handlebar and wheel move independently, the stem
bolts are not tight enough. Use the torque wrench and correct bit to
properly torque the bolts.
Attempt to rotate the handlebar forward and backward in the stem. If
it moves, the stem faceplate bolts are not tight enough. Use the torque
wrench and correct bit to torque the faceplate bolts to specification,
using the same “X” pattern as before.
Grab the front and rear of the seat and attempt to tilt it on the seat
post head. It should not move.
Brake Check.
Confirm the front and rear brakes engage when the
levers are squeezed. The brake lever and handlebar should not come
into contact with the brakes fully engaged.
Tire Inflation.
Inflate the tires to the manufacturer’s recommended
tire pressure, marked on the tire sidewall.
Wheel Engagement.
Using the 6mm hex wrench, verify the front
wheel is securely attached. The wrench should leave a mark on your
hand.
Suspension.
Read the suspension manuals for tips to set up your
bike’s suspension to optimize the ride.
M.
N.
O.
P.
Q.
R.
S.
M
N
P
R
SET-UP
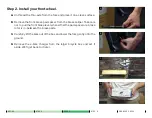
STEP 2
STEP 1
STEP 3
PRE-RIDE CHECK
Summary of Contents for Full-Suspension EBike
Page 1: ...Full Suspension EBike Quick Start Guide Applies to Habit Neo Moterra Neo Cujo Neo 130...
Page 14: ...Welcome to the family ridecannondale...
Page 15: ......
Page 16: ......


