background image

Some final pre-ride checks. 

Seat Height.

 Raise the dropper post using the lever on the left side 

of the handlebar.

Adjust seat height by loosening the seatpost collar with a hex wrench. 

Standing next to the bike, position the saddle so it’s the same height 

as your hip. 

Align the saddle with the frame and tighten the seatpost clamp. 

When riding, you should have a slight bend in your knee when the 

pedal is at the bottom of its rotation.

Once you have established a comfortable seat height, use the torque 

wrench to tighten the seat collar to the proper torque specification. 

Do not exceed the recommended torque values.

Reflectors. 

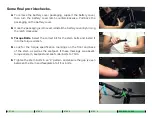
Ensure  the  front  reflector  points  straight  ahead, 

perpendicular to the ground. The rear reflector must point straight 

back. Tighten both reflectors with a screwdriver.

Gently  pull the wheel  reflectors toward the  rim to  ensure they  are 

braced by the spokes.


F.

G.

H.

I.

J.

K.

L.

F

I

SET-UP

STEP 2

STEP 1

STEP 3

PRE-RIDE CHECK 

J

G

Summary of Contents for Full-Suspension EBike

Page 1: ...Full Suspension EBike Quick Start Guide Applies to Habit Neo Moterra Neo Cujo Neo 130...

Page 2: ...Y INFORMATION First up thank you for buying a new Cannondale bike we re excited to have you on board and to get you out riding as soon as possible Our new assembly process is easy to follow using meth...

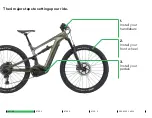
Page 3: ...SET UP STEP 2 STEP 1 STEP 3 PRE RIDE CHECK The 4 major steps to setting up our ride 1 Install your handlebars 2 Install your front wheel 3 Install your pedals...

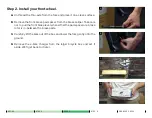
Page 4: ...the attached wheel is facing upwards Use a flat head screwdriver to carefully open the upper flap of the box Prior to assembling your bike review the pre ride checklist and Assembly Instruction Guide...

Page 5: ...of the box Let the handlebar gently hang from the frame Insidethesmallbox you llfindtoolsnecessaryforassembly including a 15mm pedal wrench torque wrench and hex wrenches specific to the bolts on your...

Page 6: ...nly without visible kinks in the lines Loosely reattach the faceplate to the stem Take care to not tighten one bolt more than another Your goal is a consistent gap between the stem and faceplate Cente...

Page 7: ...r Take care not to pull the front brake lever when either the pad spacer or a brake rotor is in between the brake pads Carefully lift the bike out of the box and lower the fork gently onto the ground...

Page 8: ...nd roll the front wheel backward into the fork dropouts making sure the rotor goes in between the brake pads Insert the thru axle from the right drivetrain side of the bike and tighten with a 6mm hex...

Page 9: ...ert the right pedal marked with R into the right drive side crank arm and tighten with your fingers Repeat with the left pedal with an L on it Please note Both pedals tighten in the direction of the f...

Page 10: ...atch clockwise Torque Bolts Select the correct bit for the stem bolts and install it into the torque wrench Look for the torque specification markings on the front and back of the stem as well as the...

Page 11: ...in your knee when the pedal is at the bottom of its rotation Once you have established a comfortable seat height use the torque wrench to tighten the seat collar to the proper torque specification Do...

Page 12: ...ore Grab the front and rear of the seat and attempt to tilt it on the seat post head It should not move Brake Check Confirm the front and rear brakes engage when the levers are squeezed The brake leve...

Page 13: ...with the charger then assemble the charger Locate the charging port and carefully open the port cover Insertthechargerintothechargeport keepinginmindtheorientation of the charging contacts A charging...

Page 14: ...Welcome to the family ridecannondale...

Page 15: ......

Page 16: ......

Reviews: