Cannondale 2014 MAVARO Supplemental Owner'S Manual Download Page 11

 Esp

añol

ITal

Ia

No

NEDER

la

ND

s

FR

aNÇ

aI

s

DEUT

sCH

ENGLISH

10

Setting the Assistance Level

The level of assistance of the eBike drive when pedaling can be 
adjusted via the HMI. The assistance level can be changed anytime, 
even during riding.

Note:

 For individual versions, it is possible that the the assistance 

level is preset and cannot be changed. It is also possible that less 
assistance levels are available for selection than listed here.

The following assistance levels (max.) are available:

– 

“Off”

: The drive is switched off, the eBike can be operated as 

a normal bicycle through pedaling.

– 

“ECO”:

 Effective assistance at maximum efficiency for 

maximum cruising range

– 

“TOuR”

: Uniform assistance, for touring with long cruising 

range

– 

“SPORT”

: Powerful assistance for sportive riding off road as 

well as for urban traffic

– 

“TuRBO”

: Maximum assistance, supporting highest cadence 

for sportive riding

To increase the assistance level, press the 

“+”

 button 

13

 on the 

operating unit until the desired assistance level is displayed in 
indicator 

b

; to 

decrease

 the assistance level, press the 

“–”

 button 

12

.

The requested motor output is displayed in indicator 

a.

 The 

maximum motor output depends on the selected assistance level.

Assistance Level

Assistance factor*

“ECO”

40%

“TOuR”

100%

“SPORT”

150%

“TuRBO”

225%

* The motor output can vary for individual versions.

When the HMI is removed from holder 

4

, the last indicated 

assistance level is stored; the motor output indicator a remains 
empty.

Switching the Push/Start Aid On/Off

With the speed version, the push aid can also be used as a start aid. 
The start aid is switched off at 18 km/h.

The push/start aid can make it easier for you to push or start the 
eBike. The speed of this function depends on the selected gear and 
can reach a maximum of 6 km/h or 18 km/h. The lower the selected 
gear, the lower the speed of this function (at full capacity).

■ 

The push/start aid function may only be used when pushing 

or starting the eBike. 

WARNING

If the wheels of the eBike have no contact with the 
ground when using the push aid, then there is risk of 
injury.  The wheels MUST be in contact with the ground 
before using the push/start aid function.

To 

switch on

 the push/start aid, press and hold the 

“WALk” 14


button on the HMI. The eBike drive is switched on.

The push/start aid is switched off if one of the following occurs:

–  you release the 

“WALk” 14

 button,

–  the wheels of the eBike are blocked (e.g. by actuating the 

brakes or impacting against an obstacle),

–  the speed exceeds 6 km/h.

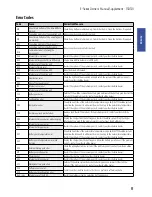
Error Code Indication

The components of the eBike system are continuously and 
automatically monitored. When an error is detected, the respective 
error code is indicated in text indication 

d.

To return to the standard indication, press any button on the HMI 

3

 or on the operating unit 

10

. Depending on the type of error, the 

drive is automatically shut off if required. Continued travel without 
assistance from the drive is possible at any time. However, have the 
eBike checked before attempting new trips.


have all inspections and repairs carried out only by an 

Authorized Cannondale Dealer.


When an error is still displayed despite corrective measures, 
please also refer to an authorised bicycle dealer. 

Summary of Contents for 2014 MAVARO

Page 1: ...E SERIES OWNER S MANUAL SUPPLEMENT 130374 E SERIES OWNER S MANUAL SUPPLEMENT...

Page 2: ...can download Adobe Acrobat PDF versions of any Cannondale Owner s Manuals or Supplements from our website http www cannondale com Please note that the specifications and information in this manual are...

Page 3: ...would void applicable warranties EXCEPTION This model must not be used as a commuter bike until the proper required accessories reflectors lighting and locally required safety devices have been insta...

Page 4: ...g container to prevent damage CHARGING Remove battery from bike before charging Bring indoors and allow to reach room temperature before charging Make sure charger and A C outlet are the same voltage...

Page 5: ...DEUTSCH ENGLISH 4 Parts of the E Series Bike 3 Drive HMI 9 Drive unit 10 Operating unit 17 Speed sensor 18 Spoke magnet of the speed sensor A2 Rack type battery pack A8 Standard battery pack L1 Headl...

Page 6: ...rge Level A fully charged battery will provided the greatest range Before every ride make sure the battery is fully charged 2 Assitance Mode Support Level The assistance mode and support level you sel...

Page 7: ...hweite K M H 4 3 15 16 A Checking the Speed Sensor seefigureB The speed sensor 17 and its spoke magnet 18 must be mounted in such a manner that the spoke magnet after a turn of the wheel moves past th...

Page 8: ...The drive is activated as soon as you step into the pedals except when in push assistance mode see Switching the Push Start Aid On Off The motor output depends on the settings of the HMI As soon as yo...

Page 9: ...USB cable connect the USB port 7 of the HMI to a commercially available USB charger or to the USB port of a computer 5V charging voltage max 500mA charging current USB connected is displayed in text i...

Page 10: ...s removed from the holder 4 all function values remain stored and can be viewed Displaying Adapting Basic Settings The basic settings can be displayed and changed no matter if the HMI is in the holder...

Page 11: ...the speed version the push aid can also be used as a start aid The start aid is switched off at 18 km h The push start aid can make it easier for you to push or start the eBike The speed of this func...

Page 12: ...ike is outside of the permissible temperature range Switch off the eBike system and allow the drive unit to either cool down or heat up to the permissible temperature Restart the system If the problem...

Page 13: ...ore Using for the FirstTime Check the battery pack before charging it or using it with your eBike for the first time For this press the On Off button A4 to switch on the battery pack When no LED of th...

Page 14: ...A8 A9 A5 A6 A7 7 C C6 A8 C5 F A5 A6 A1 A2 C6 A2 C5 D F E Series Owner s Manual Supplement 130374 Espa ol ITALIANO NEDERLANDS FRAN AIS DEUTSCH ENGLISH 13...

Page 15: ...The charge control of the switched on battery pack is also indicated on the display of the HMI Read and observe the operating instructions of the drive unit and the HMI When the capacity of the batter...

Page 16: ...ght temperatures With increasing age however the battery pack capacity will diminish even when properly maintained A significantly reduced operating period after charging indicates that the battery pa...

Page 17: ...socket C2 of the charger Connect the mains cable country specific to the mains supply Charging the removed battery see Figure B Switch the battery pack off and remove it from the holder of the eBike F...

Page 18: ...the charger can heat up considerably Once the battery is fully charged the LEDs extinguish immediately and the HMI is switched off The charging procedure is terminated The charging state can be displ...

Page 19: ...Make sure the fork works properly Things that can indicate a serious problem are 1 any unusual klunking or knocking noises 2 changes in travel 3 an over extended or compressed boot 4 any changes in th...

Page 20: ...teners yourself always use a good torque wrench Drive Unit NOTICE Drive unit is maintenance free and must only be serviced at an authorized service center This will ensure the quality and safety of th...

Page 21: ...te the lever completely to either position until it stops To change the lever position Remove the retaining screw with a 3 mm Allen key andcarefully lift off the lockout lever with your fingers Reposi...

Page 22: ...2 Lockout Lever 3 Handlebar Stem 4 Bearing Seal 5 Upper Bearing Cup 6 Upper Bearing 7 Lower Bearing Cup 8 Lower Bearing 9 Upper Boot Clamp 49mm 10 Fork Boot 11 Lower Boot Clamp 33mm 12 Accessories Mou...

Page 23: ...5 70 389 1 58 45 650 286 473 473 160 1117 637 MAVARO MEN S HEADSHOK RIGID 52 520 585 74 71 401 0 58 45 652 286 473 473 160 1119 642 57 570 599 73 5 71 5 408 3 58 45 654 286 473 473 160 1121 644 62 620...

Page 24: ...RIDER lbs kg LUGGAGE lbs kg TOTAL lbs kg 300 136 55 25 330 150 Drive Unit 9 Drive Unit Article number 0 275 007 020 0 275 007 022 Power output W 250 Output torque max Nm 48 Rated voltage V 36 Operati...

Page 25: ...replacement If your keys are ever lost or stolen or you would like additonal spares please contact Replacement information by key manufacturer http www axa stenman com www abus com http www trelock de...

Reviews: