background image

PRODUCT SPECIFICATIONS 


Unit Net Weight : 

120kg 

Heat Output


12kW

Heating Efficiency :


62%

Particulate Emissions : 

1.7g/kg

Heating Capacity :


Up to 22 squares (205 m2) 

Overall Dimensions :


(H) 760mm X (W) 680mm X (D) 609mm  

(does not include handle)

Plinth Dimensions : 


(H) 20mm X (W) 658mm X (D) 540mm

Fire Box Dimensions :


(H) 420mm X (W) 535mm X (D) 430mm 

Flue Diameter :

l


Inner flue stainless steel – 152mm diameter. 

Outer flue coated galvanized 180 degree perforated front  

  with solid back - 200mm diameter.

Flue Spigot : 

Distance from rear of appliance to center line of flue spigot – 190mm. 

Distance from rear of top plate to center line of flue spigot – 215mm. 

Distance from side of appliance to center line of flue spigot – 340mm.   

Inner Flue : 

Must terminate at least 4.6m above the base of heater.


Model No – CAWDFS12

Summary of Contents for CAWDFS12

Page 1: ...d these instructions WARNING Improper installation adjustment alteration service or maintenance can cause injury or property damage Refer to this manual For assistance or additional information consult an authorized installer or the Cannon distributor Installation and product maintenance must be performed by an authorized installer or service agent SUPPORTING LANDCARE AUSTRALIA SUPPORTING THE AUST...

Page 2: ...ions H 420mm X W 535mm X D 430mm Flue Diameter l Inner flue stainless steel 152mm diameter l Outer flue coated galvanized 180 degree perforated front with solid back 200mm diameter Flue Spigot l Distance from rear of appliance to center line of flue spigot 190mm l Distance from rear of top plate to center line of flue spigot 215mm l Distance from side of appliance to center line of flue spigot 340...

Page 3: ...ombustible material including curtains furniture wood paper and matches away from the heater Observe the clearances in the installation section Children and adults should be alerted to the hazard of high surface temperatures and should take care to avoid burns or clothing ignition Supervise young children to ensure they do not play with the appliance Keep children away from the heater when it is a...

Page 4: ...e air pressure eg due to installing the heater in an area without ade quate external ventilation Negative pressure will result in flue exhaust being sucked back into the room which if left uncorrected can result in suffocation USING YOUR HEATER SAFELY Ensure you are completely familiar with the usage section of these instructions before operating the heater WARNING Always open the air control full...

Page 5: ...DE OR CODES WARNING APPLIANCES INSTALLED IN ACCORDANCE WITH THIS STANDARD SHALL COMPLY WITH THE REQUIREMENTS OF AS NZS 4013 WHERE REQUIRED BY THE REGULATORY AUTHORITY I E THE APPLIANCE SHALL BE IDENTIFIABLE BY A COMPLIANCE PLATE WITH THE MARKING TESTED TO AS NZS 4013 ANY MODIFICATION OF THE APPLIANCE THAT HAS NOT BEEN APPROVED IN WRITNG BY THE TESTING AUTHORITY IS CONSIDERED TO BE IN BREACH OF THE...

Page 6: ...obstructions eg trees very close to the roof then an anti downdraft cowl is advised The flue should extend above any window of a neighbouring property If performance problems remain after the flue has been extended as required consult your Cannon distributor for further advice Requirement for a floor protector If your wood heater is to be installed on carpet floorboards or a combustible surface th...

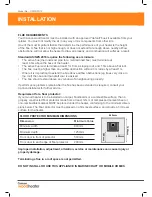
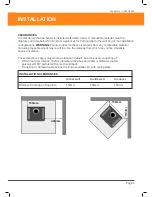
Page 7: ...al including loose firewood may result in a fire the damage from which may not be claimable against insurance These clearances apply only where a standard default flue kit is used consisting of Within the room interior 152mm diameter active flue and 200mm diameter coated galvanized 180 perforated front with solid back Transition to default double skinned ceiling penetration kit with ceiling plate ...

Page 8: ... factory SET UP THE FIRE BRICKS Place the bricks upright as shown in the illustration 3 across the back and 2 on each side POSITION THE BRICK RETAINER Now carefully place the steel brick retainer bracket on top of the fire bricks to keep them in place INSERT THE BAFFLE PLATE Position the baffle plate as shown Ensure it is pushed back as far as possible ...

Page 9: ...b moisture if exposed to rain Store the wood under cover allowing plenty of air flow between the logs A criss cross pattern works best SPLITTING THE FIREWOOD Use a log splitter rather than an axe Split the pieces so that you have a range of sizes Very thin pieces kindling are excellent as fire starters Moderate sized pieces 50 75mm 2 3 should be used to help encourage a fire that is starting to be...

Page 10: ...s ajar This process is for fire start up only as unit may overheat if door is left open for too long After a few minutes place a few more pieces of wood onto the flames For the next 10 minutes place progressively more and larger pieces of wood onto the flames until a strong fire and a bed of embers have formed After about 30 minutes from a cold start turn the air slide control to medium MAINTAININ...

Page 11: ...an on low or medium once the fire is fully established Do not use the fan when the air slide control is on low Use the fan on high when the air slide control is at maximum air flow REDUCING YOUR ENERGY BILL It s in everyone s interest to reduce our energy usage and energy costs These simple suggestions will pay for themselves quickly Ensure your home is well insulated including thick curtains a su...

Page 12: ...eater should never be operated without the door glass DO NOT use this heater if the glass is cracked Contact your Cannon distributor to obtain a replacement glass Sometimes especially after an overnight burn a black deposit may appear on the inside of the door glass This is creosote deposit from the fire burning at below its optimal temperature Most or all of this will burn away next time the heat...

Page 13: ...s Door sealant Fan You should also check that moving parts such as the door handle and air slide work correctly If there is any stiffness in these parts apply lubricant rated for high temperature applications as recommended by the manufacturer Any service requests resulting from incorrect installations are not covered by our warranty terms and conditions These calls will result in charges usually ...

Page 14: ...installation 3 Subject to Point 1 Sampford IXL will repair any defects in materials and workmanship during the warranty term and if the product is deemed irreparable provide a replacement of an equivalent current model where the balance of the warranty period from the original date of purchase will take effect 4 To the fullest extent permitted by law and subject always to Point 1 Sampford IXL will...

Page 15: ...on Warranty 6 To make a claim under this Warranty you will need to a contact Sampford IXL service department on 1300 727 421 or service ixl com au to provide details and register your claim enabling a Sampford IXL assessment b submit proof of purchase with your claim e g tax invoice or purchase receipt c where a property has been constructed by a builder developer and it is fitted with Cannon prod...

Page 16: ...1 391 Boundary Road Truganina VIC 3029 Model No CAWDFS12 T 1300 727 421 F 1300 727 425 E service ixl com au W cannonappliances com au ...

Reviews: