background image

21

EN 50242 place load
Capacity with pans and dishes
Water supply pressure 
Fuse
Power input
Supply voltage

12
8 persons
Min. 0,08 - Max 0,8 MPa
(see rating plate)
(see rating plate)
(see rating plate)

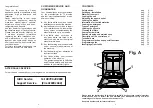
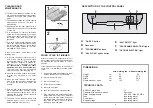
DESCRIPTION OF THE CONTROL PANEL

TECHNICAL DATA:

DIMENSIONS:

Height
Depth 
Width 
Depth with door open

cm
cm
cm
cm

with working top    

85
60
60

120

without working top

82

57,3
59,8

117

A

"ON/OFF" button 

B

Open door

"PROGRAMME" buttons

"HALF LOAD" option button

"SALT EMPTY" light

"PROGRAMME SELECTION" lights

"OPTION SELECTION" light

A

B                      C         D

F        G

E

20

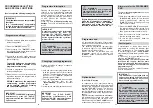
WHEN CYCLE IS FINISHED

After every wash it is essential to turn off
water supply and to switch off the machine
by pressing the On/Off button to the off
position. 

If the machine is not going to be used for
some time, it is advisable to follow these
rules:

1. do an empty wash with detergent in order

to clean the machine of any deposits;

2. pull out the electric plug;

3. turn off the water tap;

4. fill the rinse aid container; 

5. Ieave the door ajar;

6. keep the inside of the machine clean;

7. If the machine is left in places where the

temperature is below 0°C any water left
inside the pipes may freeze. Wait until
the temperature rises above zero and
then wait for about 24 hours before
starting up the dishwasher.

CLEANING AND 
MAINTENANCE

To clean the dishwasher outside, do not
use solvents (degreasing action) neither
abrasives, but only a cloth soaked with
water.

The dishwasher does not require special
maintenance, because the tank is
self-cleaning. 

Regularly wipe the door gasket with a
damp cloth to remove any food remains
or rinse aid. 

It is advisable to remove limestone
deposits or dirt periodically, by doing an
empty wash; pour a glass of vinegar on
the bottom of the tank and select the
light wash.

If, in spite of the routine cleaning of the
filters, you notice that the dishes or pans
are not properly washed or rinsed, check
that all the spray heads on the rotor
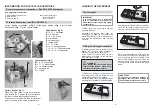
arms (fig. A “5”) are clear.

If they are blocked, clean them in the
following way:

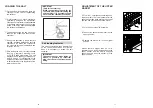
1. to remove the upper rotor arm, turn it

until it lines up with the stop marked
by the arrow (fig. 1). Push it upwards
(fig. 1b) and, keeping it pushed in,
unscrew it in a clockwise direction
(to reassemble it repeat the same
operation, but turn it anticlockwise).
The lower rotor arm can be removed
simply by pulling it upwards (fig. 2);

2. wash the rotor arms under a jet of water

to clear any blockage in the spray
heads;

3. when you have finished, refit the rotor

arms in the same position, remembering
to re-align the arrow and screw into
position.

Both the door lining and the tank lining
are in stainless steel; however, should
spots caused by oxidation occur, this is
probably due to a high level of iron salts
presents in the water. 

The spots can be removed with a mild
abrasive agent; never use chlorine
based materials, steel wool, etc.  

1

2

1b

Summary of Contents for CDF 322

Page 1: ...User instructions CDF 322 DISHWASHER EN ...

Page 2: ...anufacturers parts D Any faults arising from non domestic use or unusual or abnormal use of the machine E Any faults arising from operation at incorrect voltage F Any faults arising from incorrect operation of the machine The guarantee applies to Gt Britain and Northern Ireland only and is an addition to your statutory rights AFTER SALES SERVICE For service and repairs call your local engineer on ...

Page 3: ...oved service agent and only genuine spare parts should be fitted Any failure to follow the above advice may have serious consequences for the safety of the appliance Disposal The dishwasher has been made from materials which can be recycled so that it can be disposed of in an environmentally friendly way If you wish to dispose of an old dishwasher be careful to remove the door to eliminate the ris...

Page 4: ...inlet and drain hoses can be directed to left or right IMPORTANT The dishwasher can be connected to either cold or hot water as long as it is no hotter than 60 C Water pressure must be between 0 08 MPa and 0 8 MPa If the pressure is below the minimum consult our service department for advice The inlet hose must be connected to a tap so that the water supply can be cut off when the machine is not i...

Page 5: ... lights 1 2 3 4 5 0 1 2 3 4 5 HALF LOAD option button Levels Level ºfH French grading ºdH German grading NO YES YES YES YES YES Indicator light 1 Indicator light 1 Indicator lights 1 2 Indicator lights 1 2 3 Indicator lights 1 2 3 4 Indicator lights 1 2 3 4 5 Water hardness Water softener setting Use of regenerating salt 0 1 2 3 4 5 0 5 6 15 16 30 31 45 46 60 61 90 0 3 4 9 10 16 17 25 26 33 34 50 ...

Page 6: ...o time according to the regulation of the water softener unit 10 IMPORTANT Only for first start up When the appliance is used for the first time after completely filling the salt container it is necessary to add water until the container overflows Salt loading indicator This model is provided with an indicator light on the control panel which will light up when it is necessary to reload the salt c...

Page 7: ...ded with up to 24 plates on two rows up to 30 glasses on five rows or a mixed load Using the lower basket Saucepans oven dishes tureens salad bowls lids serving dishes dinner plates soup plates and ladles can be loaded on the lower basket Place the cutlery in the plastic cutlery holder with the handles pointing upwards Place the cutlery holder on the lower basket fig 3 making sure that the cutlery...

Page 8: ...ts are the same the instructions on the boxes of detergent can vary We should just like to remind users that too little detergent does not clean the dishes properly whilst too much detergent will not produce better results and is also a waste IMPORTANT Do not use an excessive amount of detergent and help limit damage to the environment at the same time A B 14 Lower basket fig 6 M 8 4 soup plates N...

Page 9: ...hwasher The 50 C wash programmes purposely exploit the dirt dissolving properties of the enzymes allowing therefore with the use of the concentrated detergents to achieve the same results of the 65 C programmes but at a lower temperature Combined detergents The detergents that also contain the rinse aid must be placed in the wash section of the detergent container The rinse aid container must be e...

Page 10: ...with wooden handles items in aluminium crystal leaded glass unless otherwise stated Certain decorations may fade It is therefore a good idea before loading the whole batch to wash just one of the items first so as to be sure that others like it will not fade It is a good idea not to put silver cutlery with non stainless steel handles into the dishwasher as there could be a chemical reaction betwee...

Page 11: ... do not use solvents degreasing action neither abrasives but only a cloth soaked with water The dishwasher does not require special maintenance because the tank is self cleaning Regularly wipe the door gasket with a damp cloth to remove any food remains or rinse aid It is advisable to remove limestone deposits or dirt periodically by doing an empty wash pour a glass of vinegar on the bottom of the...

Page 12: ...blem occur WARNING To ensure the correct operation of the anti overflow safety device we recommend that the dishwasher is not moved or tilted during operation If however it is necessary to tilt or move the dishwasher please ensure that the washing cycle is complete and that there is no remaining water inside the dishwasher 22 PROGRAMME SELECTION AND SPECIAL FUNCTIONS Use in conjunction with progra...

Page 13: ...wash programme a second dose of about 20 g of detergent 1 table spoon must be added directly in the machine RECOMMENDED PROGRAMME Once a day for normal soiled pans and any other items that have been left all day for washing Once a day for heavily soiled pans and any other items that have been left all day for washing Energy Saving Programme suitable for normal soiled items Using detergents with en...

Page 14: ... with the outflow water Increase the measure according to how dirty the dishes are and change detergent Choose a more vigorous programme Depress half load button Position dishes not to obstruct the dispenser Check salt and rinse aid level and regulate amount Should the fault persist Contact Service Centre Re check loading of dishes in the basket Again re check loading Leave the dishwasher door aja...

Page 15: ......

Page 16: ...declines all responsibility in the event of any printing mistakes in this booklet The manufacturer also reserves the right to make appropriate modifications to its products without changing the essential characteristics ...

Page 17: ...d by inappropriate waste handling of this product The symbol on the product indicates that this product may not be treated as household waste Instead it shall be handed over to the applicable collection point for the recycling of electrical and electronic equipment Disposal must be carried out in accordance with local environmental regulations for waste disposal For more detailed information about...

Reviews: