background image

BCO-1000  l User’s Manual  

17

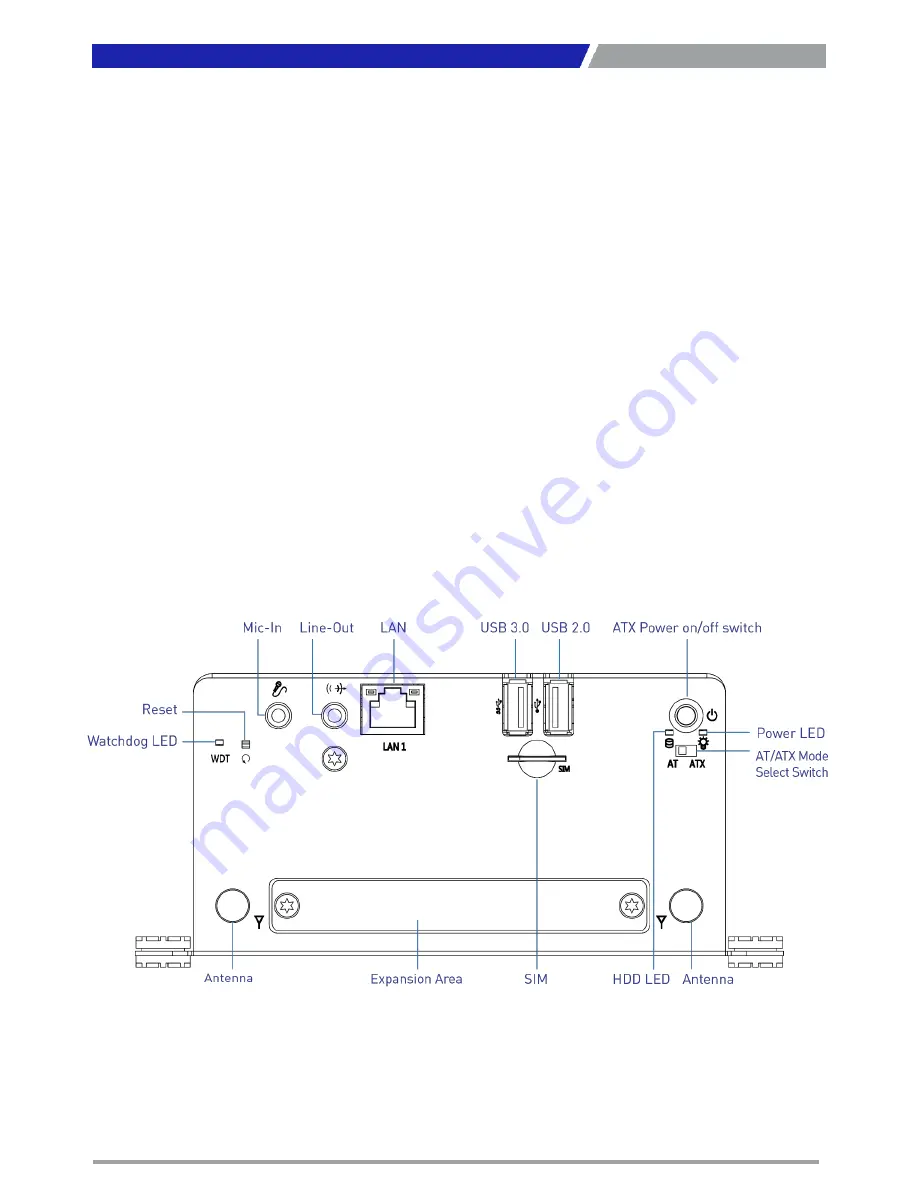
1.3.2  BCO-1030

Chapter 1: Product Introductions

Front Panel

ATX power on/off switch

Press to power-on or power-off the system

AT/ATX mode select switch

Used to select AT or ATX power mode

Power LED

Indicates the power status of the system

HDD LED

Indicates the status of the hard drive

Wachdog LED

Indicates the watchdog status of the system

USB 3.0 port

Used to connect USB 3.0/2.0/1.1 device

USB 2.0 port

Used to connect USB 2.0/1.1 device

SIM card

Used to insert a SIM card

LAN port

Used to connect the system to a local area 
network

Line-out

Used to connect a speaker

Mic-in

Used to connect a microphone

Reset hole

Used to reset the system

Antenna hole

Used to connect an antenna for optional Mini-
PCIe WiFi module

Expandable I/O bracket

Used to customized I/O output

Summary of Contents for BCO-1000

Page 1: ...BCO 1000 Series Basic Fanless Embedded System...

Page 2: ...CO 1020D 15 1 3 4 BCO 1030 17 1 4 Mechanical Dimension 19 1 4 1 RCO 1000 19 1 4 2 RCO 1010 RCO 1010A RCO 1010B 20 1 4 3 RCO 1020C RCO 1020D 21 1 4 4 RCO 1030 22 Chapter 2 Switches and Connectors 23 2...

Page 3: ...iguration 58 4 3 8 SATA Configuration 59 4 3 9 OS Selection 59 4 3 10 CSM Configuration 60 4 3 11 USB Configuration 61 4 4 Chipset 62 4 4 1 North Bridge 62 4 4 2 South Bridge 64 4 5 Security 66 4 5 1...

Page 4: ...t of this manual may be reproduced or transmitted in any form or by any means electronic or mechanical including photocopying recording or information storage and retrieval systems without the prior w...

Page 5: ...e power outlet Disconnect this equipment from the power before cleaning Use a damp cloth Do not use liquid or spray detergents for cleaning Avoid the dusty humidity and temperature extremes Do not pla...

Page 6: ...number Description of your peripheral attachments Description of your software operating system version application software etc A complete description of the problem The exact wording of any error m...

Page 7: ...eleron J1900 Processor 1x DVI I 1x DP 2x COM 1x 2 5 SATA HDD Bay BCO 1010B J1900 Basic Fanless Embedded System with Intel Celeron J1900 Processor 1x DVI I 4x COM 1x 2 5 SATA HDD Bay BCO 1020C J1900 Ba...

Page 8: ...Chapter 1 Product Introductions...

Page 9: ...internal 2 5 SATA HDD bays and one mSATA shared by 1x Mini PCI Express to provide sufficient storage It also comes with one full size mini PCIe socket with USIM socket PCIe USB SATA that satisfy cust...

Page 10: ...422 485 with Auto Flow Control BCO 1010B BCO 1020C only 6 x DB9 for COM1 6 Support RS232 422 485 with Auto Flow Control BCO 1020D BCO 1030 only 1x Power Switch 1x Reset Hole 1x AT ATX Switch Digital I...

Page 11: ...the hard drive Wachdog LED Indicates the watchdog status of the system USB 3 0 port Used to connect USB 3 0 2 0 1 1 device USB 2 0 port Used to connect USB 2 0 1 1 device SIM card Used to insert a SI...

Page 12: ...ith terminal block DVI I port Used to connect a DVI monitor or connect optional split cable for dual display mode COM port COM1 COM2 support RS232 422 485 serial device Antenna hole Used to connect an...

Page 13: ...em HDD LED Indicates the status of the hard drive Wachdog LED Indicates the watchdog status of the system USB 3 0 port Used to connect USB 3 0 2 0 1 1 device USB 2 0 port Used to connect USB 2 0 1 1 d...

Page 14: ...1010A Only Digital I O Terminal Block The Digital I O terminal block supports 4 digital input and 4 digital output BCO 1010A Only COM port COM1 COM2 support RS232 422 485 serial device COM1 COM4 suppo...

Page 15: ...DD LED Indicates the status of the hard drive Wachdog LED Indicates the watchdog status of the system USB 3 0 port Used to connect USB 3 0 2 0 1 1 device USB 2 0 port Used to connect USB 2 0 1 1 devic...

Page 16: ...yPort port Used to connect a DisplayPort monitor Digital I O Terminal Block The Digital I O terminal block supports 4 digital input and 4 digital output COM port COM1 COM4 support RS232 422 485 serial...

Page 17: ...he hard drive Wachdog LED Indicates the watchdog status of the system USB 3 0 port Used to connect USB 3 0 2 0 1 1 device USB 2 0 port Used to connect USB 2 0 1 1 device SIM card Used to insert a SIM...

Page 18: ...split cable for dual display mode DisplayPort port Used to connect a DisplayPort monitor Digital I O Terminal Block The Digital I O terminal block supports 4 digital input and 4 digital output COM po...

Page 19: ...BCO 1000 l User s Manual 19 1 4 Mechanical Dimensions 1 4 1 BCO 1000 Unit mm Chapter 1 Product Introductions...

Page 20: ...BCO 1000 l User s Manual 20 1 4 2 BCO 1010 BCO 1010A BCO 1020B Unit mm Chapter 1 Product Introductions...

Page 21: ...BCO 1000 l User s Manual 21 1 4 3 BCO 1020C BCO 1020D Unit mm Chapter 1 Product Introductions...

Page 22: ...BCO 1000 l User s Manual 22 1 4 4 BCO 1030 Unit mm Chapter 1 Product Introductions...

Page 23: ...Chapter 2 Switches and Connectors...

Page 24: ...BCO 1000 l User s Manual 24 2 1 Switch and Connector Locations 2 1 1 Top View Chapter 2 Switches and Connectors...

Page 25: ...BCO 1000 l User s Manual 25 2 1 2 Bottom View 2 1 3 Daughter board view Chapter 2 Switches and Connectors...

Page 26: ...1 Watchdog LED Status USB2_1 USB 2 0 Port USB3_1 USB 3 0 Port LAN1 LAN Port SIM1 SIM Card Socket LINE_OUT1 Line out Jack MIC_IN1 Mic in Jack RESET1 Reset Switch DC_IN1 3 pin DC 9 48V Power Input Conne...

Page 27: ...r BIOS 2 4 Connectors Definitions PWR_SW1 Power Button Pin Definition Pin Definition 1 NC 4 GND 2 Power Button 5 NC 3 NC 6 GND PWR_LED1 Power LED Status Pin Definition 1 POWER LED 2 POWER LED Pin Defi...

Page 28: ...ATA1 7 GND 3 USB2_DATA1 8 USB3_TX 4 GND 9 USB3_TX 5 USB3_RX LAN1 RJ45 with LEDs Port Pin Definition Pin Definition 1 LAN1_MDI0P 5 LAN1_MDI2N 2 LAN1_MDI0N 6 LAN1_MDI1N 3 LAN1_MDI1P 7 LAN1_MDI3P 4 LAN1_...

Page 29: ...GND 5 OUT_L MIC_IN1 Microphone Jack Pink Connector Type 5 pin Phone Jack Pin Definition 1 GND 2 MIC_R 3 NC 4 GND 5 MIC_L RESET1 Reset Button Pin Definition 1 RESET 2 GND DC_IN1 DC Power Input Connect...

Page 30: ...VGA VSYNC 23 DVI_TXCLK 9 DVI_TX1 24 DVI_TXCLK 10 DVI_TX1 C1 VGA_RED 11 GND C2 VGA_GREEN 12 NC C3 VGA_BLUE 13 NC C4 VGA_HSYNC 14 5V C5 GND 15 GND COM1_1 RS232 RS422 RS485 Connector Connector Type 9 pin...

Page 31: ...TX2 DATA2 3 TxD2 RX2 4 DTR2 RX2 5 GND 6 DSR2 7 RTS2 8 CTS2 9 RI2 CN1 RS232 RS422 RS485 Connector Connector Type 9 pin D Sub Pin RS232 Definition RS422 485 Full Duplex Definition RS485 Half Duplex Defi...

Page 32: ...6 8 CTS4 CTS6 9 RI4 RI6 DIO1 Digital Input Output Connector Connector Type Terminal Block 1X10 10 pin 3 5mm pitch Pin Definition Pin Definition 1 DC INPUT 6 DO1 2 DI1 7 DO2 3 DI2 8 DO3 4 DI3 9 DO4 5 D...

Page 33: ...BCO 1000 l User s Manual 33 Chapter 2 Switches and Connectors...

Page 34: ...XP1 51 NC 16 NC 34 GND 52 3 3V 17 NC 35 GND 18 GND 36 USB_DN1 CN3 Mini PCI Express mSATA Socket Chapter 2 Switches and Connectors Pin Definition Pin Definition Pin Definition 1 WAKE 19 NC 37 GND 2 3 3...

Page 35: ...wer Connector Pin Definition Pin Definition 1 GND 12 GND 2 SATA_TXP1 13 GND 3 SATA_TXN1 14 5V 4 GND 15 5V 5 SATA_RXN1 16 5V 6 SATA_RXP1 17 GND 7 GND 18 GND 8 3 3V 19 GND 9 3 3V 20 12V 10 3 3V 21 12V 1...

Page 36: ...Chapter 3 System Setup...

Page 37: ...g chassis bottom cover 1 Turn the system upside down Unscrew the 4 screws on the bottom cover 2 Now you can remove the bottom cover 37 Chapter 3 System Setup In order to prevent electric shock or syst...

Page 38: ...crews on the chassis one screw on front panel one screw on system left side and one screw on system right side 2 Hold the chassis top cover Pull the system main body following the below direction so t...

Page 39: ...main body and top cover separated 4 Insert memory module from 45 degree direction 5 Press the memory module vertically downward until you hear the click sound Make sure the memory module is firmly in...

Page 40: ...BCO 1000 l User s Manual 3 4 Installing SATA HDD SSD 1 Remove HDD bracket by unscrewing the four screws 2 Lock the 2 5 HDD with HDD bracket using four screws 40 Chapter 3 System Setup...

Page 41: ...User s Manual 3 Insert the entire bracket following the below direction so the SATA connector is firmly plugged into the HDD 4 Fasten the four screws to lock the HDD bracket in place 41 Chapter 3 Sys...

Page 42: ...y upside down so you can see the 2x mini card socket Mini PCIe 2 CN3 can support mSATA 2 Insert mini PCIe card or mSATA module from 45 degree direction 3 Press the mini PCIe card or mSATA module down...

Page 43: ...BCO 1000 l User s Manual 3 6 Installing antenna 1 Remove antenna hole cover on the system panel 2 Have antenna jack penetrate through the hole 43 Chapter 3 System Setup...

Page 44: ...er s Manual 3 Put on washer and fasten the nut with antenna jack 4 Assemble the antenna and antenna jack together 5 Attach the RF connector at the cable end onto the communication module 44 Chapter 3...

Page 45: ...BCO 1000 l User s Manual 3 7 Assemble chassis bottom cover 1 Place the bottom cover according to the below direction 2 Lock the bottom cover with the four screws 45 Chapter 3 System Setup...

Page 46: ...SIM card 1 SIM card socket is located on the front panel of the system 2 Now you can insert SIM card into the socket 3 To uninstall SIM card simply press the installed SIM card and then the card will...

Page 47: ...Chapter 4 BIOS Setup...

Page 48: ...up Control Keys Select Screen Select Item Enter Select Page Up Increases the numeric value or makes changes Page Down Decreases the numeric value or makes changes F1 General Help F2 Previous Value F3...

Page 49: ...screen is showed as following when the setup utility is entered System Date Time is set up in the Main Menu Chapter 4 BIOS Setup 4 2 1 System Date Set the system date Please use Tab to switch between...

Page 50: ...BCO 1000 l User s Manual 50 4 3 Advanced Setup Chapter 4 BIOS Setup 4 3 1 Trusted Computing Optional Security Device Support Enable or disable TPM function...

Page 51: ...ows you to enable or disable BIOS ACPI Auto Configuration Enable Hibernation This item allows you to enable or disable system ability to hibernate ACPI Sleep State This item selects the highest ACPI s...

Page 52: ...or the Super IO Configuration and change the value of the selected option Serial Port This item allows you to enable or disable serial port Change Settings This item allows you to change the address I...

Page 53: ...e Type Select Change the Serial interface Select RS232 RS422 Full Duplex or RS485 Half Duplex interface Serial Port 3 Configuration Serial Port This item allows you to enable or disable serial port Ch...

Page 54: ...e Type Select Change the Serial interface Select RS232 RS422 Full Duplex or RS485 Half Duplex interface Serial Port 5 Configuration Chapter 4 BIOS Setup Serial Port This item allows you to enable or d...

Page 55: ...the Serial interface Select RS232 RS422 Full Duplex or RS485 Half Duplex interface Watch Dog Function This setting allows you to setup the system watch dog timer a hardware timer that generates a res...

Page 56: ...tems display the current status of all monitored hardware devices components such as voltages and temperatures 4 3 5 Serial Port Console Redirection Console Redirection These items allows you to enabl...

Page 57: ...Intel Virtualization Technology Virtualization enhanced by Intel Virtualization Technology will allow a platform to run multiple operating systems and applications in independent partitions With virt...

Page 58: ...or disables Intel CPU Enhanced Halt C1E function a CPU power saving function in system halt state When enabled the CPU core frequency and voltage will be reduced during system halt state to decrease p...

Page 59: ...ort Change the SATA Speed Select Gen1 or Gen2 speed SATA Mode This item allows you to select IDE or AHCI Mode Mini Serial ATA Port 0 This item allows you to enable or disable Serial ATA Port 0 Serial...

Page 60: ...ng systems that only support UEFI option ROM This item is configurable only when CSM Support is set to Enabled PXE Function This item allows you to enable or disable PXE function Storage This setting...

Page 61: ...mines whether to enable XHCI USB3 0 Hand off feature for an operating system without XHCI USB3 0 Hand off support EHCI Hand off Determines whether to enable EHCI Hand off feature for an operating syst...

Page 62: ...BCO 1000 l User s Manual 62 4 4 Chipset 4 4 1 North Bridge This section provides information on the installed memory size and memory onboard graphics related configuration options Chapter 4 BIOS Setup...

Page 63: ...o Video Control Select Disabled LITE Mode or SERPENT Mode DVMT Pre Allocated This item selects DVMT 5 0 Pre Allocated Fixed Graphics Memory size used by the Internal Graphics Device Select 64M 96M 128...

Page 64: ...Controller Enabled Azalia will be unconditionally enabled Disabled Azalia will be unconditionally disabled USB Configuration XHCI Mode This item allows you to enable or disable the USB XHCI controlle...

Page 65: ...ge the PCIe Port Speed Select AUTO Gen 2 or Gen 1 High Precision Timer Enable or disable High Precision Event Timer HPET in the operating system Restore AC Power Loss This item specifies whether your...

Page 66: ...urity menu allow you to change administrator password and user password settings 4 5 1 Administrator Password This item allows you to set Administrator Password 4 5 2 User Password This item allows yo...

Page 67: ...ate This item selects the keyboard NumLock state Select On or Off 4 6 3 Full Screen Logo Show This item allows you to enable or disable Full Screen Logo Show function 4 6 4 Boot Option Priorities The...

Page 68: ...after saving the changes 4 7 2 Discard Changes and Reset Select this option to quit Setup without making any permanent changes to the system configuration 4 7 3 Restore Defaults This selection allows...

Page 69: ...Copyright C T Solution Inc All Rights Reserved www candtsolution com...

Reviews: