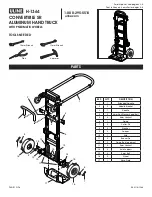
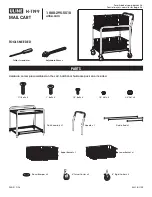
background image

12


d)

Install


lower


bolt


(B)


with


(1)


metal


washer


(M)

and


(1)


plastic


washer


(Q)


through


hole


as


shown


in

diagram.


Once


the


bolt


is


through


spring


cartridge,


install

(1) plastic


washer


(Q)


and


(1)


metal


washer


(M)


followed

by


nut


(I).

5. Upper


Extension


Arms


Assembly

(1) Upper


Extension


Arm


with


upper


hole


in


main


pole.

Install


bolt


(F)


with


(1)


metal


washer


(N)


and


(1)


plastic

washer


(R)


through


hole


as


shown


in


diagram.


Once


the


bolt


is


through


the


main


pole,


install


the


other


upper


extension


arm


with


(1)


plastic


washer


(R)


and


(1)


metal


washer


(N)


followed


by


nut


(J).


6. Backboard


Assembly

a)

Raise


backboard


so


front


of


backboard


is


facing

the


playing


surface


as


shown


in


diagram.


Align


the


holes

behind


the


rim


with


the


holes


at


the


end


of


the


lower

extension


arms.


Install


bolt


(G)


with


(1)


metal


washer


(N)

and


(1)


plastic


washer


(R)


through


designated


holes.


Once

the


bolt


is


through


backboard


frame


and


lower


extension

arms,


install


(1)


plastic


washer


(R)


and


(1)


metal


washer

(N) followed


by


nut


(J).


Do


not


fully


tighten


nut


until

instructed


to


do


so


later


in


the


installation


process

.

b)

Raise


front


of


backboard


to


be


perpendicular


to

playing


surface.


Align


Upper


Extension


Arms


with


Upper

Backboard


Attachments


and


install


bolts


(H),


metal

washers


(M),


plastic


washers


(Q),


and


nuts


(I)


as


shown


in

Version 2.0

CANAM HOOPS © all rights reserved.

Summary of Contents for Flextreme Silver 54

Page 1: ...Silver 54 Installation Instructions Version 2 0 CANAM HOOPS all rights reserved...

Page 2: ...oid corrosion Please use caution when performing Hoop Do not climb on any part of the basketball system as it was not intended for this activity Do not use the basketball system as a lift or to hoist...

Page 3: ...m Kit 10mm Lock Washer 4 pieces Rim Kit 5 2 10 x 1 screw 2 pieces Rim Kit 10mm Hex Bolt 4 pieces Rim Kit 3 Parts Included Within Rim Kit F B A H 14mm x 1 5 Hex Bolt 2 Pieces 14mm x 4 5 Hex Bolt 14mm x...

Page 4: ...ARE LIST 16mm x 12 Hex Bolt 4 Pieces C D E G Rubber Gasket for Rim Attachment W 10 Safety Pin Not Actual Size X J Bolt 4 Pieces Rebar 4 Pieces Y Z Not Actual Size Version 2 0 CANAM HOOPS all rights re...

Page 5: ...pieces 16mm Hex Nut 17 pieces 14mm Flat Washer 8 pieces 16mm Flat Washer 18 pieces 14mm Plastic Washer 8 pieces 16mm Plastic Washer 10 pieces I J M N U 16mm Lock Washer 4 pieces Q R 5 Version 2 0 CAN...

Page 6: ...Always ould be locate to enable a sa ted prior to se ead power s of the pole to front 6 ATION TIM consists of t HASE 2 Anchor Syst Concrete concrete to concrete to concrete to EPARATI rior to digging...

Page 7: ...Concrete Mixer optional 15 17 80 lbs bags of concrete or 20 23 60 lbs bag of concrete Garden Hose 2 x4 lumber 6 Stakes to secure form boards Hammer and nails Level Tape Measure 2 Large Crescent Wrenc...

Page 8: ...ION PH of e c barrow half ful ensure includ square d flush w cemen e point w top of t f will for HASE 2 Mix 15 17 w or cement m ll Agitate co e proper fill P ed in middle e in the middl Pour the re wi...

Page 9: ...that the anchor is square to the playing surface h Use a level to verify that anchor plate is level from front to back and side to side i Allow the concrete to cure for a minimum of 3 Days Version 2 0...

Page 10: ...uts may be req ounting the m metal washe pole as shown aying surface e plate follow nd tighten M g surface CANAMHOOPS nuts on ancho playing surfac quired to pro main pole ers N on top n in diagram w...

Page 11: ...tate handle to lengthen the actuator to point where the lower holes are properly aligned with the holes on the welded extension plate on back of pole Install bottom bolt A metal washers M plastic wash...

Page 12: ...ard Assembly a Raise backboard so front of backboard is facing the playing surface as shown in diagram Align the holes behind the rim with the holes at the end of the lower extension arms Install bolt...

Page 13: ...tic washers 4 metal washers 4 lock washers and 4 nuts as shown in diagram Check rim for level and tighten all four nuts b Install Rim Plate on base of rim with 2 machine screws and tighten c Install n...

Page 14: ...use can eventually cause the system to require periodic maintenance Failure to do so could result in system failure property damage or even personal injury a Keep all organic materials grass clippings...

Page 15: ...tion inspection service or replacement of the Product or replacement of component parts shall be the responsibility of the original retail consumer WARRANTY CLAIMS Proof of purchase by the original re...

Reviews: