Camsoy Smart Life Camera S1 User Manual Download Page 11

8.Working Mode Switching

After initialization succeed, press Confirmation Button K1 once, the camera turns into

standby mode. Then press Mode Button K2 once to change a working mode, in turn, they are:
Full Time Video / Photo / Motion Detection.
1. Full Time Video Mode

After initialization succeed, camera starts recording automatically, if the camera working in

AP mode, blue indicator flashes slowly, if the camera working in IP mode, red indicator flashes
slowly. Press Confirmation Button K1 once, the camera turns into Full Time Video Standby Mode
and blue indicator keeps on(AP mode) or red indicator keeps on(IP mode).
2. Photo Mode

In Full Time Video Standby Mode, press Mode Button K2 once, blue indicator(AP mode)

flashes 3 times quickly or red indicator(IP mode) flashes 3 times quickly and then keeps on, the
camera turns into Photo Standby Mode. Press Confirmation Button K1 once, the camera turns into
photo mode and takes one photo every 15 seconds, at the same time, blue indicator(AP mode) or
red indicator(IP mode) flashes once. Press Confirmation Button K1 again, the camera turns into
Photo Standby Mode.
3. Motion Detection Mode

In Photo Standby Mode, press Mode Button K2 once, red & blue indicator keeps on, the

camera turns into Motion Detection Standby Mode. When the camera detects object moving, blue
indicator keeps on & red indicator flashes slowly(AP mode) or red indicator keeps on & blue
indicator flashes slowly(IP mode), the camera starts recording automatically.
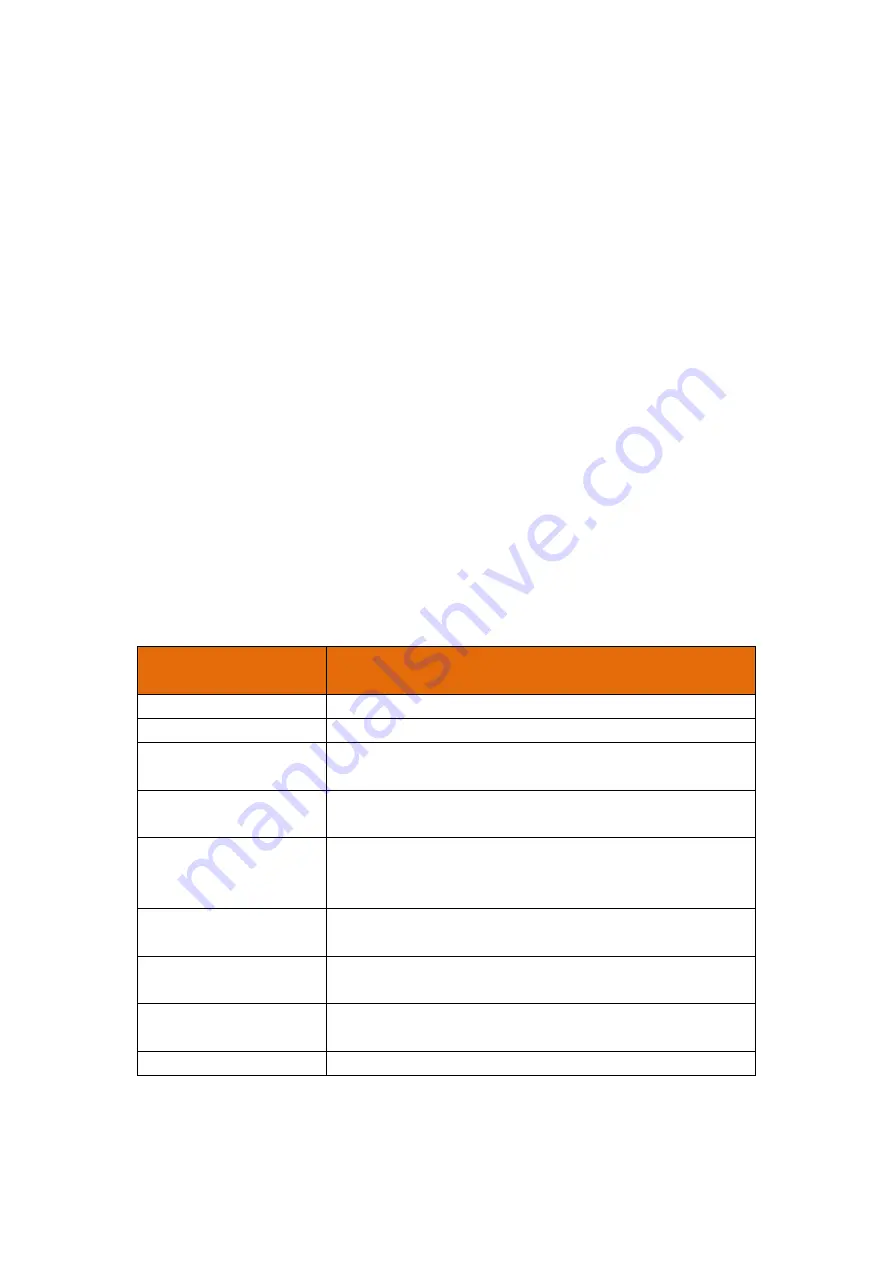
9. Indicators

Camera Mode

Indicator Status

AP Connection Mode

Blue Indicator

IP Connection Mode

Red Indicator

Full Time Video Mode

Working/Standby

Indicator Flashes / Indicator keeps on

Photo Mode

Working /Standby

Indicator Flashes once every 15 seconds/ Indicator Flashes 3

times quickly and then keeps on

Motion Detection Mode

Working /Standby

Blue Indicator keeps on& Red Indicator Flashes; Red Indicator
keeps on& Blue Indicator Flashes /Red & Blue Indicator keeps

on

No Memory Card

Blue & Red Indicator Flashes at the same time

Connect USB &

insufficient electricity

Yellow indicator keeps on

Connect USB & Sufficient

quantity of electricity

Yellow indicator keeps off

Unconnected USB

Yellow indicator keeps off

10.FAQ

1. What should do if Red & Blue indicator always flashing after power on?

Summary of Contents for Smart Life Camera S1

Page 1: ...l QR code Youtube video You can scan the OR code to check the install video on Youtube If you don t know how to install it or other questions please contact us by this e mail Support_Jayol 163 com Please read user manual before using ...

Page 2: ...ra to power supply or long press confirmation button K1 for 3 seconds Red Blue indicator keeps on and then continuous scintillation camera starts to initialize it takes around 60 seconds After initialization succeed Blue indicator flashes slowly camera enters AP connection mode and starts recording automatically Press confirmation button once to stop video recording blue indicator keeps on and the...

Page 3: ...wer is connected 3 IP Connection Mode 3 1 After initialization succeed Switch on Wi Fi WLAN choose iCooky_ from available networks and type in password 12345678 P 3 1 P 3 1 Choose iCooky_ Warm Prompt The effective range of the WiFi signal iCooky_ sent by the camera is within 10 meters When the mobile phone exceeds the range it will be disconnected from the WiFi signal 3 2 Log into iCookyCam APP cl...

Page 4: ... if wrong password were typed in blue indicator flashes slowly in AP mode Please click Delete on APP and withdraw from APP check out APP and add a device again 2 In order to improve the stability and success rate of WiFi connection try to be close to the wireless router 3 For initial use the device requires a certain amount of time for IP connection Please wait patiently About 1 3 minutes based on...

Page 5: ...onds at the same time APP automatically returns to the device list interface and successfully adds the camera to the list Red indicator flashes slowly after the camera reboots and the camera turns into IP connection mode click the camera in the list to preview image and control the camera P 3 3 1 3 3 2 P 3 3 1 Device list P 3 3 2 Viewing interface 4 AP Connection Mode 4 1 If you need only AP conne...

Page 6: ...ort distance preview image IP connection mode Camera connect to router for unlimited distance preview image 5 Add the camera manually If the camera has been connected to the Internet to work in IP remote mode when you want to add the camera to other people s APP please open APP on the other s phone click the in the middle or below the interface select the Been connected to the router and enter to ...

Page 7: ...an be added successfully P 5 1 1 5 1 2 P 5 1 1 Select a camera P 5 1 2 Input the device password 5 2 Scanning QR code addition Open the APP that has already added the camera find the camera that needs to be added in the device list and click the share button in the lower right corner to automatically generate a camera QR code Open the APP on the phone that needs to add the camera enter the Lan Sea...

Page 8: ...P 5 2 5 Input the device password 5 3 Manual input addition Open the APP that needs to add the camera enter the Lan Search interface to select the manual add button in the lower right corner and input the correct device UID and password in the Add Device interface to be added successfully P 5 3 1 5 3 2 ...

Page 9: ...P 5 3 1 Click Manual addition button P 5 3 2 Input UID password 6 Interface introduction 6 1 Device list interface Menu Device name Check video and Photo taken by APP Add a device QR code button ...

Page 10: ...oot automatically after successful reset P W It takes about 1 minute Please wait patiently Device name Resolution display Liste n Image Flip Night Vision On Off Online Offline Time display Setting Video Screen Video On Off Full screen Check video and Photo taken by APP Snapshot Resolution setting Mobile detection setting Change password Device information Wi Fi setting Device indicator on off Rest...

Page 11: ...ce Press Confirmation Button K1 again the camera turns into Photo Standby Mode 3 Motion Detection Mode In Photo Standby Mode press Mode Button K2 once red blue indicator keeps on the camera turns into Motion Detection Standby Mode When the camera detects object moving blue indicator keeps on red indicator flashes slowly AP mode or red indicator keeps on blue indicator flashes slowly IP mode the ca...

Page 12: ... sensor 5 Avoid working under extreme conditions such as moisture dust extreme cold extreme heat etc Degree 5 C 50 C do not place strong electromagnetic radiation and other places 6 Avoid heat accumulation please do not artificially block the ventilation near the camera keep a good cooling ring territory 7 Please strictly abide by the relevant laws and decrees of the state and shall not use this p...

Reviews: