4
ofr13gr / ofr13bl
EN
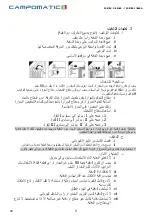
Take out the warmer and all the parts from packing carton.
1. Make the warmer be on its head
2. Place the footplate on the top of both radiation
fi
ns
3. Secure the footplate on the warmer with speci
fi
ed U type bolt and wing nut
4. Tighten the screw
5. Make the warmer stand erect
Placing:
The warmer should be away from the wall or other objects such as furniture,
curtain at least 90cm; do ensure that the power supply corresponds to that on
the nameplate; th
e temperature controller switch and power switch are at “OFF”
position; plug in the attaching plug.
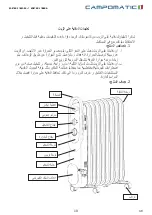
1. The temperature controller can regulate room temperature. Turn the
temperature controller clockwise to increase the temperature; turn it
anti-clockwise to reduce the temperature until appropriate temperature is
reached.
2. Power switch is pressed switch:
a> With power switch
Ⅰ
pressed, the indicator “ON” indicates Level
Ⅰ
power.
b> With power switch
Ⅱ
pressed, the indicator “ON” indicates Level
Ⅱ
power.
c> With both power switch
Ⅰ
and
Ⅱ
pressed, the indicator “ON”
indicates Level
Ⅲ
power.
Note: the oil radiator operates via heat elimination of heat conduction oil, and the oil cools out
slowly after the oil radiator is turned off, so do not move the oil radiator unless the oil has
cooled out, and move the oil radiator with the handle.
Cleaning
1. Please disconnect power supply before cleaning.
2. Wipe the outside of the oil radiator with wet cloth at
fi
rst, and then dry it with
a piece of soft cloth.
Do not use waxes or brush polish, since these will react with the oil radiator, resulting in
discoloration.
Safety protection
1. Do not cover the oil radiator during operating; otherwise it will result in
fi
re.
2. The oil radiator should be away from the wall or other
fl
ammable objects such
as furniture, curtain, bed sheet or clothes at least 90cm.
3. Do not disassemble radiation
fi
n.
4. Take care of your children when they are near or use the oil radiator.
6. Do not let power line contact damp or hot objects; do not wind or let child
come near the power line.
III. Operation instruction
Mounting:


