


27
INSTALLATION OF YOUR OVEN
Check if the electrical installation is proper to bring the appliance in
operating condition. If electricity installation is not suitable, call an
electrician and plumber to arrange the utilities as necessary. Manufacturer
shall not be held responsible for damages caused by operations
performed by unauthorized persons.
WARNING:
It is customer's responsibility to prepare the location the
product shall be placed on and also to have the electrical installation
prepared.
WARNING:
The rules in local standards about electrical installations
shall be followed during product installation.
WARNING:
Check for any damage on the appliance before installing it.
Do not have the product installed if it is damaged. Damaged products
cause a risk for your safety.
Right Place for Installation and Important Warnings
Appliance feet should not stay on soft surfaces such as carpets. The
kitchen floor shall be durable to carry the unit weight and any other
kitchenware that may be used on the oven.
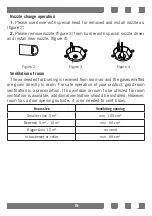
The appliance is suitable for use on both side walls, without any support,
or without being installed in a cabinet. If a hood or aspirator will be
installed above the cooker, follow the instructions of the manufacturer for
height of mounting. (min. 650 mm)
Summary of Contents for 90X60
Page 46: ...2012 19 WEEE 42 SA...
Page 47: ...1 2 3 4 5 6 1 2 3 4 5 6 7 41...
Page 48: ...3 2 40 SA...
Page 49: ...39...
Page 50: ...1 29 2 30 3 31 4 5 6 29 30 31 38 SA...
Page 51: ...240 220 15 240 220 25 15 G9 E14 27 28 4 3 2 1 37...
Page 52: ...24 26 25 3 2 24 25 26 1 2 36 SA...
Page 53: ...1 23 2 23 3 23 4 23 2 23 1 23 2 23 1 23 23 35...
Page 54: ...1 2 3 4 5 6 7 8 9 10 22 21 20 34 SA...
Page 56: ...0 32 SA...
Page 58: ...FFD 1 15 2 3 10 5 4 5 FFD 19 18 30 SA...
Page 59: ...1 5 2 3 1 2 17 29...
Page 60: ...1 15 2 1 60 45 240 2 3 4 5 6 28 SA...
Page 61: ...5 6 7 8 1 2 3 4 1 2 3 4 5 6 7 8 240 40 09 0 27...
Page 62: ...14 1 15 16 2 3 14 16 15 26 SA...
Page 63: ...650 5 6 5 6 25...
Page 64: ...650 24 SA...
Page 68: ...20 SA...
Page 70: ...7 8 9 11 10 12 13 9 7 8 12 13 10 11 18 SA...
Page 71: ...1 2 3 7 6 4 5 7 6 7 6 17...
Page 72: ...3 1 5 4 2 5 2 100 2 10 2 5 2 50 10 2 65 2 3 4 16 SA...
Page 73: ...1 1 1 15...
Page 74: ...1 2 3 4 5 6 15 6 7 300 8 9 125 10 11 14 SA...
Page 76: ...1 2 3 4 5 10 6 12 SA...
Page 77: ...10 CO 11 1 2 3 4 5 6 7 8 11...
Page 78: ...1 2 3 4 5 15 15 6 7 NG 8 9 10 SA...
Page 79: ...9 10 11 12 13 14 15 16 17 18 Y 19 20 III 9...
Page 80: ...55 56 57 58 59 06 61 62 1 2 3 4 5 6 7 8 8 SA...
Page 81: ...42 43 44 45 46 47 48 49 50 51 52 53 54 7...
Page 82: ...29 30 31 32 33 34 35 36 37 38 39 40 41 6 SA...
Page 83: ...8 17 18 19 8 20 8 21 22 23 24 25 26 27 28 5...
Page 84: ...1 2 3 8 4 5 6 7 8 9 10 11 12 13 14 15 16 4 SA...
Page 85: ...3 WEEE...
Page 86: ...4 13 14 19 20 21 23 26 27 28 29 30 32 33 34 35 36 36 37 37 38 39 41 41 42 42 2 SA...
Page 87: ......
Page 88: ...USER MANUAL GB SA 90X60 gas electrical oven with bottle compartment 60x90...