


Referance only
, do not print.
gB
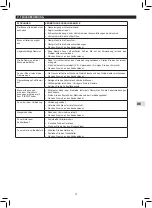
V. TROuBleSHOOTIng
Problems
Probable causes / remedies
The burner will not light
y
Lack of gas supply.
y
Regulator does not work.
y
Hose, valve, Venturi tube or burner openings are blocked.
y
Venturi tube not seated over jet.
Burner ‘pops’ or blows
itself out
y
Check gas supply.
y
Check hose connections.
y
Contact the After Sales Service.
Sputtering unsteady flames
y
New bottle may contain air. Continue use and the problem will disappear.
y
Contact the After Sales Service.
Large flames on surface
of burner
y
Jet nozzle badly connected to Venturi tube. Adjust the Venturi tube.
y
The Venturi tube is clogged (e.g.: cobwebs). Clean Venturi tube.
y
Contact the After Sales Service.
Flame low on jet
y
The bottle is almost empty. Change bottle and the problem will disappear.
y
Contact the After Sales Service.
Excessive grease flare-up
y
Clean the protective plate above the burner.
y
Grill temperature too high: Lower flame.
y
Clean the grease drip tray.
Burners light with a match,
but not with the “PIEZO”
igniter
y
Faulty igniter button, wire or electrode. Check igniter cable connections.
y
Check condition of electrode and connection wire.
y
Contact the After Sales Service.
Fire at any connection
y
Leaking connection.
y
Turn off gas supply immediately.
y
Contact the After Sales Service.
Lack of heat
y
Clogged jet or Venturi tube.
y
Contact the After Sales Service.
Fire behind control knob
y
Defective tap unit.
y
Turn off appliance.
y
Contact the After Sales Service.
Fire under control panel
y
Turn off appliance.
y
Close gas cylinder.
y
Contact the After Sales Service.
25


