NL110 NTCIP Interface
5
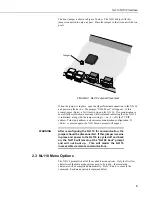
The boot jumper is shown in Figure 2 below. The NL110 ships with this
jumper connected to only one post. Place the jumper so that it connects the two
posts.
FIGURE 2. NL110 Jumper Placement
When the jumper is in place, open the HyperTerminal connection to the NL110
and power up the device. The prompt "NL100 boot" will appear. At this
prompt, press <Enter> a few times to ring up the NL110. If communication is
successfully established, a message will be returned indicating that the NL110
is initialized, along with the jumper setting (1 = on, 0 = off), the TCP/IP
address, Telnet port address, and current communication configuration. If
<Enter> is pressed again, the NL110 menu prompt will appear.
After reconfiguring the NL110 for communication, the
jumper should be disconnected. If this jumper remains
in place and power to the NL110 is cycled off and back
on, the NL110 will remain at the "NL100 boot" prompt
and will not boot up. This will render the NL110
inaccessible via remote communications.
2.3 NL110 Menu Options
The NL110 prompt lists all of the available menu options. Only the first few
characters of the main menu options need to be typed – the remaining
characters will be completed automatically. Press <Enter> to execute the
command. Each menu option is explained below.
WARNING
Jumper
Summary of Contents for NL110
Page 4: ...This is a blank page...
Page 18: ...NL110 NTCIP Interface 14 This is a blank page...
Page 20: ...This is a blank page...
Page 22: ...This is a blank page...
Page 24: ...This is a blank page...
Page 28: ...This is a blank page...
Page 29: ...This is a blank page...

