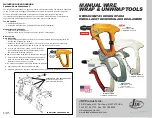
Model NB0050
SINGLE CYCLE MODE
This method is rec-
ommended when
precise nail place-
ment is required.
The single cycle pin
must be installed
in the nailer. This mode requires the
trigger to be pulled each time a nail is
driven. The nailer can be actuated by
depressing the WCE against the work
surface followed by pulling the trigger.
Or the nailer can be actuated by pulling
the trigger and then depressing the
WCE against the work surface.
The trigger must be released to reset
the tool before another nail can be dri-
ven.
If the tool is in bottom trip mode
because the single cycle pin has previ-
ously been removed, reinstall the single
cycle pin to convert the tool back to sin-
gle cycle mode.
BOTTOM TRIP MODE
This method is recommended when less
precise nail place-
ment is required.
The single cycle pin
must be removed
from the nailer.
Remove the pin by
removing the o-
ring on one end and pushing the pin
out. Replace the o-rings on the pin
after removing the pin from the nailer
and keep the pin assembly for later use.
Bottom trip opera-
tion requires the
trigger to be
pulled with the
nailer off the work
surface. Then, the
nose of the nailer is tapped against the
work surface causing a nail to be dri-
ven.
3
Operating Instructions
Using The Nailer
Read this manual and understand
all safety warnings and instruc-
tions before operating the nailer.
LUBRICATION
This nailer requires lubrication before
using the nailer for the first time and
before each use. If an inline oiler is
used, manual lubrication through the
air inlet is
not
required on a daily basis.
The work surface
can become dam-
aged by excessive lubrication. Proper
lubrication is the owner’s responsibil-
ity. Failure to lubricate the nailer prop-
erly will dramatically shorten the life
of the nailer and void your warranty.
1. Disconnect the
air supply from
the nailer to
add lubricant.
2. Turn the nailer
so the air inlet
is facing up and
put 4-to-5
drops of 30 W
non-detergent
oil into air inlet. Do not use deter-
gent oil or oil additives. Run the nail-
er briefly after adding oil and wipe
off excessive oil at the exhaust.
RECOMMENDED HOOKUP
The illustration below shows the
recommended hookup for the nailer.
1. The air com-
pressor must
be able to
maintain a
minimum of 70
PSI when the
nailer is being
used. An inadequate air supply can
cause a loss of power and inconsis-
tent driving.
!
NOTICE
2. An oiler can be
used to provide
oil circulation
through the
nailer. A filter
can be used to
remove liquid
and solid impurities which can rust
or “gum up” internal parts of the
nailer.
3. Use 3/8” air hoses with a minimum
working pressure of 150 PSI. Use
1/2” air hoses for 50’ run or longer.
For better performance, install a
3/8” quick plug with (1/4” NPT
threads) with an inside diameter of
.315 (8mm) on the nailer and a 3/8”
quick coupler on the air hose.
4. Use a pressure regulator on the
compressor, with an operating pres-
sure of 0 - 125 PSI. A pressure regu-
lator is required to control the oper-
ating pressure of the nailer.
Operational Modes
The NB0050 finish nailer may be oper-
ated in the “Single Cycle” or the
“Bottom Trip” mode. The nailer comes
delivered in the
single cycle mode.
A pin when in
place in the nailer
allows you to
operate in the sin-
gle cycle mode.
When the pin is removed, the nailer
will operate in the bottom trip mode.
Always know the
operational mode
of the nailer before using. Failure to
know the operational mode could
result in death or serious personal
injury.
70 PSI
Min.
Quick Plug
(Optional)
Quick
Coupler
Quick
Coupler
(Optional)
Oiler
Air
Hose
Regulator
Filter
Quick
Plug
Recommended Hookup
Single Cycle Pin
OIL
Pin Out
110 PSI
Max.