background image

注意事项

为了您更方便快捷的使用CAMMUS  C5,请您在安装使用前务

必认真阅读本说明手册,它包含重要的产品与安全信息;请保留此
手册以便后续有需要进行参考。

严禁将设备和电源置于潮湿或雨水环境中,以避免造成短路/触电导
致设备损坏和火灾,休克的危险。

安全用电

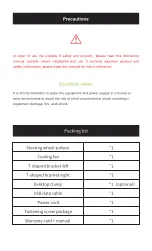
方向盘盘面

散热风扇

T形支架(左)

T形支架(右)

桌面夹

USB数据线

电源线

紧固螺丝包

保修卡+说明书

*1

*1

*1

*1

                  *1(选配)

*1

*1

*1

*1

包装清单

Summary of Contents for C5

Page 1: ...CAMMUS C5 USER S MANUAL...

Page 2: ...100 240V 100 240V 60 USBz...

Page 3: ...18 CAMMUS CAMMUS CAMMUS CAMMUS CAMMUS...

Page 4: ...CAMMUS C5 T T USB 1 1 1 1 1 1 1 1 1...

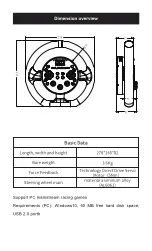
Page 5: ...278 265 82 3 6Kg 5Nm AL6061 PC PC Windows10 50 MB USB 2 0 82 35 67 278 265 1 5 0...

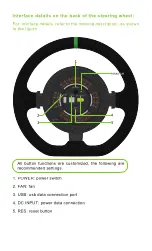
Page 6: ...1 POWER 2 FAN 3 USB usb 4 DC INPUT 5 RES 1 2 4 5 3...

Page 7: ...2 10 LED 12 3 12 1 2 3 4 5 6 7 8...

Page 8: ......

Page 9: ...4 2 M6X10 4 1 2 2 2 1 2...

Page 10: ...M3X20 2 M6X10 4 6 2 6105 3 6105 M3X20 4 4 M6X10 5 6 3 4 5 10...

Page 11: ...2 M6X10 4 M6X12 4 USB 6 4 M6X12 7 4 M6X10 8 UBS 6 7 8...

Page 12: ...APP CAMMUS http cammus com cn http cammus com cn 0755 26641539...

Page 13: ...1 CAMMUS...

Page 14: ...30 CAMMUS www cammus com CAMMUS CAMMUS...

Page 15: ...he base power switch is turned off then insert the power adapter plug into the base and then insert the 100 240V three pin plug When disassembling the base steering wheel or other accessories please m...

Page 16: ...he terms and contents of this document Users promise to be responsible for their actions and all consequences arising therefrom The user promises to use this product only for legitimate purposes and a...

Page 17: ...surface Cooling fan T shaped bracket left T shaped bracket right Desktop clamp USB data cable Power cord Fastening screw package Warranty card manual 1 1 1 1 1 optional 1 1 1 1 Packing list Precautio...

Page 18: ...s10 50 MB free hard disk space USB 2 0 portb Dimension overview Basic Data Length width and height Bare weight Force Feedback Steering wheel main 278 265 82 3 6Kg material aluminum alloy AL6061 Techno...

Page 19: ...igure Interface details on the back of the steering wheel 1 POWER power switch 2 FAN fan 3 USB usb data connection port 4 DC INPUT power data connection 5 RES reset button All button functions are cus...

Page 20: ...ntrol button area Display screen 10 LEDs 12 band knob 3 Programmable button 12 Direction key area All key functions are customized The following are recommended Settings 1 The direction button is up 2...

Page 21: ...paddle shifter...

Page 22: ...with pressing sheet Adjustable handle screw 2 1 Put the 2 pieces of desktop brackets on the appropriate position on the desktop And tighten the adjustable handle screw through two five star handle sc...

Page 23: ...10 hexagon socket head screws The lower plate of the desk top support 5 Adjust the angle direction of the mounting flange of the desktop support through the three screw holes on the lower plate of the...

Page 24: ...er ing wheel 6 Fasten and connect the steering wheel with the base flange through 4 M6X12 hexa gon socket head screws 7 Insert the connected steering wheel assembly into the mounting flange of the des...

Page 25: ...uidelines cammusracing com Contact customer service at the designated sales outlets and channels of CAMMUS to obtain the download file To ensure the best user experience please update your firmware to...

Page 26: ...th the product warranty card valid invoice or and other valid certificates for purchasing the product users can enjoy the product within the valid period to warranty service In order for you to enjoy...

Page 27: ...official information release platform www cammus com If you have any questions or suggestions about this instruc tion manual and all CAMMUS products please contact us through information channels Tha...

Page 28: ...Product number Inspector Production Date CERTIFICATE...

Page 29: ...ns pickupdate customersignature Dateofpurchase Productnumber Address Remark Customername Contactinformation Warranty record Warranty card For the sake of your warranty rights please be sure to fill ou...

Page 30: ......

Reviews: