Pa
g.
3
-
Ma
nu
al
c
od
e:
11
9
G
U
74
E
N
11
9
G
U
74
E
N
ve
r.
2
0
9
/2
01
5
© C
A
M
E S
.p.
A
. -
Th
e d
ata a
nd i
nf
or
m
ati
on r
ep
orte
d i
n th
is
in
sta
lla
tio
n m
an
ua
l a
re s
us
ce
pti
bl
e to c
ha
ng
e at a
ny ti
m
e a
nd w
ith
ou
t o
bl
ig
ati
on
o
n C
A
M
E S
.p.
A
. to n
otify u
se
rs.
ENGLISH
6 Installation
Installation must be carried out by expert qualified personnel and in full compliance with current regulations.
Make sure you have all the tools and materials you will need for the installation at hand to work in total safety and compliance with
the current standards and regulations. The following figure illustrates the minimum equipment needed by the installer.
6.2 Tools and materials
Before installing, do the following:
• Make sure you have a suitable omnipolar cut-off device with contacts more than 3 mm apart, and independent (sectioned off)
power supply;
• Make sure you have suitable tubing and conduits for the electrical cables to pass through and be protected against mechanical
damage;
• Fit tubing to drain away any water leaks which may cause oxidation;
• Check that any connections inside the container (that provide continuity to the safety circuit) are fitted with additional insula-
tion compared to other internal live parts;
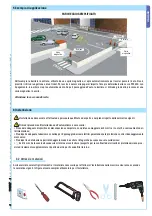
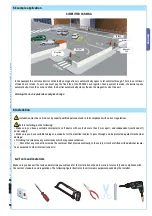
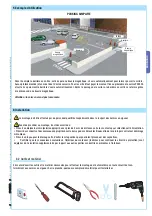
5 Example application
PS5000
Barrier
Magnetic
coil
Barrier
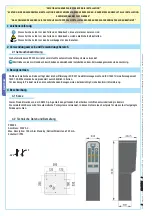
In the example the entrance barrier, activated by a magnetic coil, automatically opens to let vehicles through. There is no retrieval
of token nor of stubs. To exit, one must pay the fixed fee at the PS5000 cash register. Once payment is made, the barrier opens
automatically. Once the car has exited, the barrier automatically closes thanks the magnetic coil at the exit.
Warning: the cash register does not give change.
SIMPLIFIED PARKING
Magnetic
coil


