background image

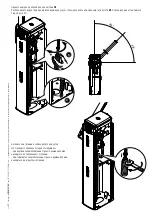
~1°

~89°

+

-

+

-

~1°

~89°

+

-

+

-

Ст

р.


17

 - Р

ук

ов

од

ст

во

FA

00

13

2-

RU

 - в

ер

3

 - 04/

20

17 - © C

AM

E S

.p.

A.

 - С

од

ерж

ан

ие

 д

ан

но

го ру

ко

во

дс

тв

а м

оже

т б

ыт

ь и

зм

ен

ен

о в л

юб

ое в

ре

мя б

ез п

ред

ва

ри

те

ль

но

го у

вед

ом

ле

ни

я.

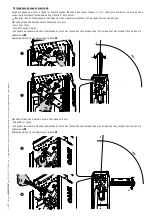
Для корректировки горизонтального положения стрелы:
- поднимите стрелу; 
- поверните механический упор закрывания по часовой стрелке для увеличения хода стрелы или против часовой стрелки для его 
уменьшения 

.

Зафиксируйте упор с помощью контргайки 

.

Регулировка крайних положений

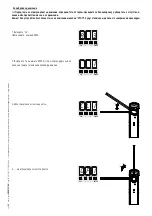
Закройте дверцу на ключ и подайте электропитание. Включив шлагбаум, убедитесь, что стрела располагается горизонтально в 
закрытом (опущенном) положении и под углом 89° в открытом.

 Все действия по открыванию и закрыванию стрелы должны выполняться при закрытой на ключ дверце!

Для корректировки вертикального положения стрелы:
- опустите стрелу; 
- откройте дверцу тумбы;
- поверните механический упор открывания по часовой стрелке для увеличения хода стрелы или против часовой стрелки для его 
уменьшения 

.

Зафиксируйте упор с помощью контргайки 

.

Summary of Contents for G4040E

Page 1: ...English EN RU Italiano IT Fran ais FR FA00132M04 MANUALE DI INSTALLAZIONE G4040E G4040IE BARRIERE AUTOMATICHE...

Page 2: ...DEVE ESSERE COLLEGATA AD UN EFFICACE IMPIANTO DI MESSA A TERRA REALIZZATO A NORMA IL PRODUTTORE DECLINA OGNI RESPONSABILIT PER L IMPIEGO DI PRODOTTI NON ORIGINALI QUESTO IMPLICA INOLTRE LA DECADENZA D...

Page 3: ...accessori Destinazione d uso La barriera automatica stata progettata per l utilizzo in parcheggi privati o pubblici Ogni installazione e uso difformi da quanto indicato nel seguente manuale sono da co...

Page 4: ...di protezione anticesoiamento 6 Armadio 7 Tirante 8 Quadro comando 9 Fermo meccanico di registro asta 10 Braccio leva 11 Motoriduttore con encoder 12 Sportello di ispezione 13 Staffa di ancoraggio 14...

Page 5: ...tubazioni e canaline per il passaggio dei cavi elettrici garantendone la protezione contro il danneggiamento meccanico Attrezzi e materiali Assicurarsi di avere tutti gli strumenti e il materiale nec...

Page 6: ...fino a completo fissaggio Preparazione della piastra di fissaggio Se la pavimentazione presente non consente un fissaggio solido e stabile dell armadio preparare una piazzola di cemento Fare lo scavo...

Page 7: ...a predisposta per l installazione a sinistra Nel caso di installazione a destra invertire il senso di apertura dell asta procedendo nel seguente modo togliere il perno di ancoraggio dal braccio leva s...

Page 8: ...astra attacco con una vite La vite va lasciata allentata per facilitare il successivo inserimento dell asta Per il montaggio con asta G03750 necessario inserire il rinforzo G03756 Piastra attacco Pias...

Page 9: ...obbligo di preavviso Inserire l asta nel corpi attacco asta e fissarla con le viti Tagliare i profili copri cava della lunghezza necessaria e inserirli nelle canaline dell asta su entrambi i lati Ins...

Page 10: ...65 A B B C C Asta con cordone luminoso 001G028401 e rastrelliera 001G0465 A B B C C Asta con profilo antiurto e appogio mobile 001G02808 A B B C Asta con profilo antiurto cordone luminoso 001G028401 e...

Page 11: ...ntrodado e ribloccare il motoriduttore Veri care il corretto funzionamento della molla Con asta posizionata in verticale la molla non in tensione Con asta posizionata in orizzontale la molla in tensio...

Page 12: ...re per scheda AF 14 Morsettiera per antenna 15 Morsettiera per dispositivi di comando e sicurezza 16 Morsettiera per collegamento in abbinato bussola CRP 17 Morsettiera per selettore a tastiera 18 Mor...

Page 13: ...i accessori a 24 V AC normalmente a 24 V DC quando intervengono le batterie d emergenza Potenza complessiva consentita 40 W Trasformatore Rosso Bianco Blu Arancione Motoriduttore 24 V DC con encoder I...

Page 14: ...la funzione F 1 Funzione APRE CHIUDE INVERSIONE passo passo da dispositivo di comando contatto NO Selettore a tastiera Transponder o lettore tessere Inserire la scheda di decodifica R700 per far ricon...

Page 15: ...zza C9 chiusura immediata con attesa ostacolo in chiusura Chiusura dell asta dopo il passaggio di un veicolo nel raggio di azione dei dispositivi di sicurezza Durante la fase di chiusura i dispositivi...

Page 16: ...suscettibili di modifica in qualsiasi momento senza obbligo di preavviso Sleep Mode La funzione Sleep Mode consente la riduzione del consumo energetico delle fotocellule in stand by Selezionare 1 dal...

Page 17: ...Determinazione dei punti di finecorsa Chiudere lo sportello d ispezione e dare tensione all impianto Azionare la barriera per verificare che l asta sia parallela al piano stradale in posizione di chiu...

Page 18: ...nu spostarsi con le frecce Per aumentare o diminuire il valore usare le frecce per uscire dal menu attendere 10 secondi o premere ESC poi premere ENTER per confermare Navigazione menu poi premere ENTE...

Page 19: ...seriale F 50 Salvataggio dati nella memory roll F 51 Lettura dati dalla memory roll F 52 Passaggio parametri da Master a Slav F 60 Funzione Sleep Mode F 61 Funzione prelampeggio U 1 Tipo di comando da...

Page 20: ...e accesa dal momento in cui la barriera inizia l apertura no alla completa chiusura compreso il tempo di chiusura automatica Nel caso non venga inserita la chiusura automatica rimane accesa solo duran...

Page 21: ...ntamento F37 Punto rallentamento apertura 40 40 della corsa 60 60 della corsa Regolazione in percentuale sulla corsa totale dell asta del punto di inizio del rallentamento in apertura Attenzione La pe...

Page 22: ...parametri di velocit rallentamento e taratura Questo per garantire il corretto funzionamento dell automazione A 2 Test motore 0 Disattivata 1 Attivata Per verificare il corretto senso di rotazione del...

Page 23: ...e l operazione di taratura automatica della corsa Taratura corsa Prima di effettuare la taratura della corsa de nire il tipo di asta veri care che l asta sia bilanciata e controllare che l area di man...

Page 24: ...ENTER per confermare 2 Selezionare un comando da associare all utente I comandi sono passo passo apre chiude 1 apre 3 apertura parziale pedonale 4 Il comando di apertura parziale pedonale appare solo...

Page 25: ...agli utenti e alla configurazione dell impianto per poi riutilizzarli con un altra scheda elettronica anche in un altro impianto SBLOCCO DELL ASTA L operazione deve essere effettuata in assenza di te...

Page 26: ...utomatica sul quadro dell automazione SLAVE Memorizzazione Eseguire la procedura di inserimento utente con comando SOLO APRE e APERTURA PARZIALE PEDONALE sul quadro MASTER Con gurazione dell automazio...

Page 27: ...e Selezionare 2 bussola e premere ENTER Passaggio parametri da MASTER a SLAVE Selezionare la funzione F 52 sul quadro MASTER Selezionare 1 e premere ENTER Programmazione Impostare su entrambe le barri...

Page 28: ...e e i fusibili La barriera non effettua la chiusura automatica 11 12 13 4 I contatti NC sono aperti La barriera non funziona con il trasmettitore 2 14 16 6 Disattivare la funzione MASTER SLAVE L asta...

Page 29: ...i momento senza obbligo di preavviso Manutenzione periodica Prima di qualsiasi operazione di manutenzione togliere la tensione per evitare possibili situazioni di pericolo causate da accidentali movim...

Page 30: ...____________________________________________________ Timbro installatore Nome operatore Data intervento Firma tecnico Firma committente Intervento effettuato __________________________________________...

Page 31: ...maltiti senza alcuna difficolt semplicemente effettuando la raccolta differenziata per il riciclaggio Prima di procedere sempre opportuno verificare le normative specifiche vigenti nel luogo d install...

Page 32: ...eviso Treviso Italy 33079 Sesto al Reghena Sesto al Reghena Pordenone Pordenone Italy 39 0422 4940 39 0422 4941 39 0434 698111 39 0434 698434 Italiano Italiano Codice manuale FA00132 IT FA00132 IT ver...

Page 33: ...AUTOMATIC BARRIERS FA00132 EN English EN INSTALLATION AND OPERATION G4040E G4040IE...

Page 34: ...HE MAINS DATA THE AUTOMATIC BARRIER MUST BE CONNECTED TO AN EFFECTIVE EARTHING SYSTEM THAT COMPLIES WITH LEGAL STANDARDS THE MANUFACTURER DECLINES ALL LIABILITY FOR USE OF NON ORIGINAL PROD UCTS WHICH...

Page 35: ...up to fit accessories Intended use The automatic barrier is designed to be used in public and private parking facilities Any installation and use other than that specified in this manual is forbidden...

Page 36: ...m attachment cover 5 Anti shearing protective cover 6 Cabinet 7 Rod 8 Control panel 9 Boom adjustment mechanical stop 10 Lever arm 11 Gearmotor with encoder 12 Inspection hatch 13 Anchoring bracket 14...

Page 37: ...electric cables to pass through making sure they are protected from any mechanical damage Tools and materials Make sure you have all the tools and materials you need to install the product in complete...

Page 38: ...g plate If the flooring does not provide a sturdy surface to fasten the cabinet to use a cement slab Dig a hole for the foundation frame Prepare the corrugated tubes needed for making the connections...

Page 39: ...is set up for installing on the left If it is installed on the right invert the boom opening direction following the procedure below remove the anchoring pin from the lever arm release the gearmotor...

Page 40: ...ate with a screw Leave the screw loose to make it easier to insert the boom For assemblies with the G03750 boom you must insert the G03756 reinforcement Attachment plate Intermediate plate Boom attach...

Page 41: ...ice Fit the boom into the attachment cover and fasten it using the screws Cut the groove covers to the required length and insert them in the boom conduits on both sides Insert the shockproof rubber p...

Page 42: ...Boom with 001G0465 skirt A B B C C Boom with 001G028401 luminous cord and 001G0465 skirt A B B C C Boom with shockproof profile and 001G02808 swing rest A B B C Boom with shockproof profile 001G02840...

Page 43: ...r nut and lock the gearmotor again Check the spring is working properly With the boom positioned vertically the spring is not taut With the boom positioned horizontally the spring is taut Hook the eye...

Page 44: ...connector 14 Terminal board for antenna 15 Terminals for control and safety devices 16 Terminal board for paired alternate CRP connection 17 Terminal board for keypad selector 18 Terminal board for tr...

Page 45: ...ing up accessories a 24 V AC normally a 24 V DC when the emergency batteries are operating Overall allowed power 40 W Transformer Red White Blue Orange 24 V DC gearmotor with encoder The gearmotor is...

Page 46: ...ect 0 Disabled from the function F 1 OPEN CLOSE INVERT step by step function from control device N O contact Keypad selector Transponder or card reader Insert the decoding card R700 for the TSP00 sens...

Page 47: ...devices C9 immediate closure with obstacle stand by during closing Closing the boom after a vehicle has passed through the operating area of the safety devices During closing the devices also run func...

Page 48: ...4 2017 Came S p A The manual s contents may be edited at any time without notice Sleep mode The Sleep mode function reduces the energy consumption of the photocells in stand by Select 1 from the funct...

Page 49: ...ing a counter nut Establishing the limit switch points Close the inspection hatch and power the system Activate the barrier to check whether the boom is parallel to the road surface when closed and at...

Page 50: ...row keys for the submenus To increase or decrease a value use the arrow keys to exit the menu wait 10 seconds or press ESC then press ENTER to confirm Menu navigation then press ENTER The ESC key is f...

Page 51: ...F 50 Save data to the memory roll F 51 Read data on the memory roll F 52 Parameter transfer from Master to Slave F 60 Sleep mode F 61 Pre flashing function U 1 Type of command to associate with user...

Page 52: ...stays on from the moment the barrier begins to open until it is fully closed including automatic closing time Where the automatic closing function is not inserted it stays on only during barrier movem...

Page 53: ...t of opening slow down for the boom as a percentage of the total travel Warning The percentage varies depending on the type of boom for booms with a joint between 2 m and 4 m set the percentage from 4...

Page 54: ...ed slow down and calibration parameters This is so as to ensure that the operator functions correctly A 2 Motor test 0 Deactivated 1 Activated To check that the gearmotors rotate in the right directio...

Page 55: ...ENTER to confirm the automatic travel calibration Travel calibration Before calibrating the travel identify the type of boom check that the boom is balanced and check that the manoeuvring area is clea...

Page 56: ...ct a command to associate with the user The commands are step by step open close 1 open 3 partial pedestrian opening 4 The partial pedestrian command only appears if function F 49 is active Press ENTE...

Page 57: ...saves the user and system configuration data so that they can be reused with another electronic circuit board including in another system RELEASING THE BOOM This procedure must be done with the mains...

Page 58: ...the SLAVE operator Saving Follow the procedure for entering a user with the OPEN and PARTIAL PEDESTRIAN OPENING command on the MASTER panel Configuring the MASTER operator Select function F 49 Press E...

Page 59: ...ternate and press ENTER Parameter transfer from MASTER to SLAVE Select function F 52 on the MASTER panel Select 1 and press ENTER Programming Set the following functions on both barriers motor type A1...

Page 60: ...e power supply and fuses The barrier does not close automatically 11 12 13 4 The N C contacts are open The barrier does not work with the transmitter 2 14 16 6 Deactivate the MASTER SLAVE function The...

Page 61: ...e edited at any time without notice Periodic maintenance Before doing any maintenance disconnect the power supply to prevent any hazardous situations caused by the boom moving accidentally Periodic ma...

Page 62: ...Fitter s stamp Name of operator Job performed on date Technician s signature Requester s signature Job performed ______________________________________________________________________________________...

Page 63: ...mply separated from other waste for recycling Always make sure you comply with local laws before dismantling and disposing of the product DISPOSE OF THE PRODUCT RESPONSIBLY DISMANTLING AND DISPOSAL Ou...

Page 64: ...ier Dosson di Casier Treviso Treviso Italy 33079 Sesto al Reghena Sesto al Reghena Pordenone Pordenone Italy 39 0422 4940 39 0422 4941 39 0434 698111 39 0434 698434 English English Manual code FA00132...

Page 65: ...MANUEL D INSTALLATION G4040E G4040IE BARRI RES AUTOMATIQUES FA00132 FR Fran ais FR...

Page 66: ...ET CONFORME AUX NORMES EN VIGUEUR LE PRODUCTEUR D CLINE TOUTE RESPONSABILIT EN CAS D UTILISATION DE PRO DUITS NON ORIGINAUX CE QUI IMPLIQUE EN OUTRE L ANNULATION DE LA GARANTIE TOUTES LES COMMANDES EN...

Page 67: ...r vue La barri re automatique a t con ue pour une utilisation dans des parkings priv s ou publics Toute installation et toute utilisation autres que celles qui sont indiqu es dans ce manuel sont inter...

Page 68: ...ection anti cisaillement 6 F t 7 Tirant 8 Armoire de commande 9 But e m canique de r glage de la lisse 10 Bras du levier 11 Motor ducteur avec encodeur 12 Porte de visite 13 Bride de fixation 14 Plaqu...

Page 69: ...age des c bles lectriques afin de les prot ger contre la d t rioration m canique Outils et mat riel S assurer de disposer de tous les instruments et de tout le mat riel n cessaire pour effectuer l ins...

Page 70: ...ent par cons quent de ne pas s y appuyer tant qu elle n est pas compl tement fix e Pr paration de la plaque de fixation Si le sol ne permet pas une fixation solide et stable de l armoire pr parer un b...

Page 71: ...t pr vue pour une installation gauche En cas d installation droite inverser le sens d ouverture de la lisse de la fa on suivante enlever le goujon de fixation du bras du levier d bloquer le motor duct...

Page 72: ...tion l aide d une vis Ne pas serrer la vis de mani re faciliter ensuite l introduction de la lisse En cas de montage avec lisse G03750 introduire le renfort G03756 Plaque de fixation Plaque interm dia...

Page 73: ...lisse dans le cache plaque et la fixer l aide des vis Couper les profil s couvre joint selon la longueur n cessaire et les introduire dans les rainures de la lisse des deux c t s Introduire le profil...

Page 74: ...vec tablier 001G0465 A B B C C Lisse avec c ble lumineux 001G28401 et tablier 001G0465 A B B C C Lisse avec profil anti choc et support mobile 001G02808 A B B C Lisse avec profil anti choc c ble lumin...

Page 75: ...rebloquer le motor ducteur Contr ler le bon fonctionnement du ressort Avec lisse positionn e dans le sens vertical le ressort n est pas tendu Avec lisse positionn e dans le sens horizontal le ressort...

Page 76: ...teur pour carte AF 14 Bornier pour antenne 15 Bornier pour dispositifs de commande et de s curit 16 Bornier pour connexion vis vis SAS CRP 17 Bornier pour clavier code 18 Bornier pour dispositifs tran...

Page 77: ...n des accessoires 24 VAC sur secteur 24 VDC durant l intervention des batteries de secours Puissance totale admise 40 W Transformateur Rouge Blanc Bleu Orange Motor ducteur 24 V CC avec encodeur Le mo...

Page 78: ...iv depuis la fonction F 1 Fonction OUVERTURE FERMETURE INVERSION pas pas depuis un dispositif de commande contact NO Clavier code Transpondeur ou lecteur de cartes Ins rer la carte de codage R700 pour...

Page 79: ...attente obstacle en phase de fermeture fermeture de la lisse apr s le passage d un v hicule dans le rayon d action des dispositifs de s curit Durant la phase de fermeture les dispositifs ex cutent ga...

Page 80: ...tout moment et sans aucun pr avis Mode Sommeil La fonction Mode Sommeil permet de r duire la consommation d nergie des photocellules en standby S lectionner 1 au moyen de la fonction F 60 Connexion de...

Page 81: ...ints de fin de course Fermer la porte de visite et mettre l installation sous tension Actionner la barri re pour s assurer que la lisse est bien parall le la surface de la route en position de fermetu...

Page 82: ...er dans les sous menus Se servir des fl ches pour augmenter ou diminuer la valeur pour sortir du menu attendre 10 secondes ou appuyer sur ESC puis appuyer sur ENTER pour confir mer Navigation menu pui...

Page 83: ...oire memory roll F 51 Lecture donn es de la m moire F 52 Passage param tres de Ma tre Esclave F 60 Fonction Mode Veille F 61 Fonction pr clignotement U 1 Enregistrement d un utilisateur U 2 limination...

Page 84: ...de l ouverture de la barri re jusqu la fermeture totale y compris le temps de fermeture automatique d faut d activation de la fermeture automatique elle ne reste allum e que durant le mouvement La lam...

Page 85: ...tissement F37 Point ralentissement ouverture 40 40 de la course 60 60 de la course R glage en pourcentage sur la course totale de la lisse du point de d but du ralentissement en phase d ouverture Atte...

Page 86: ...ralentissement et r glage Il est ainsi possible de garantir le bon fonctionnement de l automatisme A 2 Test moteur 0 D sactiv e 1 Activ e Pour contr ler le bon sens de rotation de la lisse voir paragr...

Page 87: ...rmer l op ration de r glage automatique de la course Auto apprentissage course Avant de r gler la course d nir le type de lisse s assurer que la lisse est bien quilibr e et que la zone de man uvre ne...

Page 88: ...ner une commande associer l utilisateur Les commandes sont pas pas ouverture fermeture 1 ouverture 3 ouverture partielle pi tonni re 4 La commande d ouverture partielle pi tonne n appara t que si la f...

Page 89: ...sateurs et la configuration de l installation de mani re ce qu elles soient r utilisables sur une autre carte lectronique voire une autre installation D BLOCAGE DE LA LISSE Mettre hors tension avant d...

Page 90: ...orisation Ex cuter la proc dure d insertion utilisateur avec la commande OUVERTURE UNIQUEMENT et OUVERTURE PARTIELLE PI TONNE sur l armoire MA TRE Con guration de l automatisme MA TRE S lectionner la...

Page 91: ...e MA TRE ESCLAVE S lectionner la fonction F 52 sur l armoire MA TRE S lectionner 1 et appuyer sur ENTER Programmation Con gurer sur les deux barri res les fonctions suivantes con guration du type de m...

Page 92: ...les La barri re n effectue pas la fermeture automatique 11 12 13 4 Les contacts NF sont ouverts La barri re ne fonctionne pas avec l metteur 2 14 16 6 D sactiver la fonction MA TRE ESCLAVE La lisse in...

Page 93: ...t et sans aucun pr avis Entretien p riodique Avant toute autre op ration d entretien il est conseill de mettre hors tension pour viter toute situation de danger provoqu e par des d placements accident...

Page 94: ...___________________________ Timbre installateur Nom op rateur Date intervention Signature technicien Signature client Intervention effectu e ___________________________________________________________...

Page 95: ...lt en proc dant tout simplement la collecte diff renci e pour le recyclage Avant d effectuer ces op rations il est toujours recommand de v rifier les normes sp cifiques en vigueur sur le lieu d instal...

Page 96: ...asier Treviso Treviso Italy 33079 Sesto al Reghena Sesto al Reghena Pordenone Pordenone Italy 39 0422 4940 39 0422 4941 39 0434 698111 39 0434 698434 Fran ais Fran ais Code manuel FA00132 FR FA00132 F...

Page 97: ...G4040E G4040IE FA00132 RU RU...

Page 98: ...2 FA00132 RU 3 04 2017 CAME S p A CAME S P A 2 5 20 1 8 1 5 EN 12453 EN12445 8...

Page 99: ...MAX 3 FA00132 RU 3 04 2017 CAME S p A AISI 304 G4040E G4040IE 3 75 G4040E G4040IE IP 54 50 60 230 24 15 300 200 90 2 6 C 20 55 i 1 202 I 55...

Page 100: ...3 2 4 5 6 1 8 12 15 14 11 10 7 9 13 1 2 3 4 5 7 6 8 9 11 10 4 FA00132 RU 3 04 2017 CAME S p A 1 2 3 4 5 6 7 8 9 10 11 12 13 14 15 1 2 3 4 5 6 7 8 9 10 11...

Page 101: ...5 FA00132 RU 3 04 2017 CAME S p A CAME 3 III 1 15 15 30 230 H05RN F 3G x 1 5 2 3G x 2 5 2 FROR CEI 20 22 CEI EN 50267 2 1 2 x 0 5 2 4 x 0 5 2 2 x 0 5 2 RG58 10 CEI EN 60204 1...

Page 102: ...5 0 0 3 4 0 400 r 40 6 FA00132 RU 3 04 2017 CAME S p A 24...

Page 103: ...1 N M 4 2 3 7 FA00132 RU 3 04 2017 CAME S p A 90 M N 600...

Page 104: ...UNI5931 M8x20 G03756 G03750 8 FA00132 RU 3 04 2017 CAME S p A G03750 G03756...

Page 105: ...UNI5931 M8x12 UNI5931 M8x20 L 1 3 4 2 UNI6954 2 9x13 UNI6954 3 9x19 9 FA00132 RU 3 04 2017 CAME S p A...

Page 106: ...1G06080 55 1 5 1 75 1 75 2 25 2 25 2 75 2 75 3 25 3 25 3 5 3 5 3 75 A A A B B C 001G028401 A A B B B C 001G0465 A B B C C 001G028401 001G0465 A B B C C 001G02808 A B B C 001G028401 001G02808 A B B C 0...

Page 107: ...45 4 5 4 5 11 FA00132 RU 3 04 2017 CAME S p A 45...

Page 108: ...14 13 9 7 16 2 10 11 12 6 21 3 8 22 3 26V 0V 230 0 20 1 15 12 FA00132 RU 3 04 2017 CAME S p A 1 2 3 4 5 6 7 8 9 10 11 R700 R800 12 RSE 13 AF 14 15 16 CRP 17 18 19 20 21 22 24 ZL39 3 15 A F 120 1 6 A F...

Page 109: ...L N L1T L2T M N FC FA F E 10 11 E1 E6 26V 0V 230 0 24V 0 THERMAL L N L1T L2T 13 FA00132 RU 3 04 2017 CAME S p A 24 24 40 24 230 50 60...

Page 110: ...10 11 E1 E6 Rx Tx 1 2 3 3P 4 5 7 CX CY A B GND A B S1 GND CAME ACCESS CONTROL AF R700 R800 14 FA00132 RU 3 04 2017 CAME S p A 2 4 RG58 0 F1 R700 TSP00 LT001 R800 AF R800 AF 2 3...

Page 111: ...CX CY RX TX 10 11 E1 E6 Rx Tx 1 2 3 3P 4 5 7 CX CY RX TX 10 11 E1 E6 Rx Tx 1 2 3 3P 4 5 7 CX CY 15 FA00132 RU 3 04 2017 CAME S p A DIR DELTA S DELTA CX CY EN 12978 CX F2 CY F3 C1 C4 5 9 C4 CX CY 24 3...

Page 112: ...TX C NC DIR DELTA S 10 11 E1 E6 Rx Tx 1 2 3 3P 4 5 7 CX CY N O N C C DELTA 10 11 E1 E6 Rx Tx 1 2 3 3P 4 5 7 CX CY FUSIBILE 200mA TX 2 TX 2 10 2 TX C NC DIR DELTA S 10 11 E1 E6 Rx Tx 1 2 3 3P 4 5 7 CX...

Page 113: ...1 8 9 1 8 9 17 FA00132 RU 3 04 2017 CAME S p A 89...

Page 114: ...F i F i F 2 F 3 0 i 0 3 i 3 S1 GND 18 FA00132 RU 3 04 2017 CAME S p A ENTER 1 ENTER 10 ESC ENTER ENTER ESC ENTER...

Page 115: ...F 14 F 15 F 18 F 19 F 21 F 22 F 25 F 28 F 29 F 30 F 31 F 33 F 34 F 35 F 37 F 38 F 49 F 50 F 51 F 52 Master Slave F 60 F 61 U 1 U 2 U 3 A 1 A 2 A 3 A 4 A 5 H 1 FUNCTIONS F1 1 2 0 1 1 2 F2 2 CX 0 1 C1 4...

Page 116: ...Y F6 0 1 2 3 2 4 F9 0 1 F10 0 1 10 5 F11 0 1 F FC FA F14 0 1 F 15 0 1 F18 0 1 2 10 E1 180 F25 F19 0 1 1 2 2 180 180 1 180 F21 0 1 1 5 5 10 E1 1 10 F22 5 5 120 120 5 120 F25 5 5 120 120 5 120 F28 70 10...

Page 117: ...40 4 20 30 6 8 15 40 F31 15 40 2 20 40 4 20 30 6 15 30 8 15 20 F33 20 20 40 40 F34 10 100 F35 10 100 F37 40 40 60 60 2 4 40 60 6 8 60 70 F38 20 20 75 75 2 20 40 4 40 60 6 60 70 8 65 75 F49 0 1 2 F50...

Page 118: ...NTER 2 a ESC ENTER ESC ENTER o P I 22 FA00132 RU 3 04 2017 CAME S p A U1 1 2 3 4 5 B1 B2 25 U 2 U 3 0 1 A 1 0 2 2 4 4 6 6 8 8 A 2 0 1 A 3 0 1 A 4 0 1 A 5 0 1 1000 100 100000 999 999 000 H 1 1 2 ENTER...

Page 119: ...ESC ENTER a 3 ESC ENTER i ESC ENTER c l i ESC ENTER o p I 23 FA00132 RU 3 04 2017 CAME S p A 1 3 ENTER 2 1 ENTER 3 4...

Page 120: ...ENTER C L ESC ENTER I ESC ENTER I U ESC E ENT E EN NT ESC ENTER 8 ACCESS CONTROL 24 FA00132 RU 3 04 2017 CAME S p A 1 U2 ENTER 2 ENTER 3 CLr 1 U1 ENTER 2 1 3 4 F 49 ENTER 3 1 25 25 1 2 3 4 5 6 7 8 9...

Page 121: ...10 11 1 E 10 11 1 E ZL 38 4 25 FA00132 RU 3 04 2017 CAME S p A...

Page 122: ...E MASTER SLAVE MASTER SLAVE 26 FA00132 RU 3 04 2017 CAME S p A RSE dip OFF CAT 5 1 000 A A B B GND GND MASTER F 19 SLAVE MASTER MASTER F 49 ENTER 1 ENTER MASTER SLAVE F 52 MASTER 1 ENTER A1 2 F1 A3 MA...

Page 123: ...VE MASTER 27 FA00132 RU 3 04 2017 CAME S p A RSE dip OFF CAT 5 1 000 A A B B GND GND 2 3 2 7 MASTER 2 3P SLAVE F 19 MASTER SLAVE MASTER F 49 ENTER 2 ENTER MASTER SLAVE F 52 MASTER 1 ENTER A1 2 F1 A3 M...

Page 124: ...RU 3 04 2017 CAME S p A Er1 Er3 Er4 Er5 Er6 Er7 Er8 C0 1 2 C1 C4 C5 C9 1 2 3 4 6 8 13 18 1 4 7 2 4 7 3 11 12 13 4 2 14 16 6 7 18 7 22 8 12 23 24 11 4 12 13 13 7 14 AF 7 15 15 7 15 16 8 25 26 18 7 22...

Page 125: ...29 FA00132 RU 3 04 2017 CAME S p A 6...

Page 126: ...________________ __________________________________________________________________________________________________ _ __________________________________________________________________________________...

Page 127: ...31 FA00132 RU 3 04 2017 CAME S p A CAME S p A UNI EN ISO 14001...

Page 128: ...ella Libert 15 Via Cornia 1 b 1 c 31030 Dosson di Casier Dosson di Casier Treviso Treviso Italy 33079 Sesto al Reghena Sesto al Reghena Pordenone Pordenone Italy 39 0422 4940 39 0422 4941 39 0434 6981...

Reviews: