background image

3

CX

R120/200

ENGLISH

For your own safety please read the following important safety instructions 
carefully before attempting to connect this unit to the mains power supply. 
They will also enable you to get the best performance from and prolong the 
life of the unit:

  1. Read these instructions.

  2. Keep these instructions. 

  3. Heed all warnings. 

  4. Follow all instructions. 

  5. Do not use this apparatus near water. 

  6. Clean only with a dry cloth. 

 7.  

Do not block any ventilation openings. Install in accordance with the 

THU\MHJ[\YLYZPUZ[Y\J[PVUZ

 8.  

Do not install near any heat sources such as radiators, heat registers, 

Z[V]LZVYV[OLYHWWHYH[\ZPUJS\KPUNHTWSPÄLYZ[OH[WYVK\JLOLH[

 9.  

Do not defeat the safety purpose of the polarized or grounding-type 
plug. A polarized plug has two blades with one wider than the other. A 
grounding-type plug has two blades and a third grounding prong. The 
wide blade or the third prong are provided for your safety. If the provided 

WS\N KVLZ UV[ Ä[ PU[V `V\Y V\[SL[ JVUZ\S[ HU LSLJ[YPJPHU MVY YLWSHJLTLU[

of the obsolete outlet. 

10.  Protect the power cord from being walked on or pinched, particularly at 

plugs, convenience receptacles and the point where they exit from the 
apparatus. 

6US`\ZLH[[HJOTLU[ZHJJLZZVYPLZZWLJPÄLKI`[OLTHU\MHJ[\YLY

12.  Unplug this apparatus during lightning storms or when unused for long 

periods of time. 

9LMLY HSS ZLY]PJPUN [V X\HSPÄLK ZLY]PJL WLYZVUULS :LY]PJPUN PZ YLX\PYLK

when the apparatus has been damaged in any way, such as the power-
supply cord or plug having been damaged, liquid has been spilled or 

VIQLJ[ZOH]LMHSSLUPU[V[OLHWWHYH[\Z[OLHWWHYH[\ZOHZILLUL_WVZLK

to rain or moisture, does not operate normally, or has been dropped.

WARNING: TO REDUCE THE RISK OF FIRE OR ELECTRIC SHOCK, DO 
NOT EXPOSE THIS APPARATUS TO RAIN OR MOISTURE AND OBJECTS 
FILLED WITH LIQUIDS, SUCH AS VASES, SHOULD NOT BE PLACED ON 
THIS APPARATUS.

Batteries (battery pack or batteries installed) shall not be exposed to 

H[FHVVLYHKHDWVXFKDVVXQVKLQHðUHRUWKHOLNH

TO COMPLETELY DISCONNECT THIS APPARATUS FROM THE AC 
MAINS, DISCONNECT THE POWER SUPPLY CORD PLUG FROM THE AC 

9,*,7;(*3, 76<9 +,*655,*;,9 *6473,;,4,5; 3(77(9,03 +<
9,:,(<+(304,5;(;065+,*655,*;,93,*69+65+(304,5;(;065

DE LA PRISE MURALE.

THE MAINS PLUG OF THE POWER SUPPLY CORD SHALL REMAIN 

9,(+03@ (**,::0)3, 3( 790:, +< 9,:,(< +(304,5;(;065 +60;

DEMEURER AISEMENT ACCESSIBLE”

Only use the mains cord supplied with this unit.

Important safety instructions 

;OL SPNO[UPUN ÅHZO ^P[O [OL HYYV^OLHK Z`TIVS ^P[OPU HU LX\PSH[LYHS [YPHUNSL
PZ PU[LUKLK [V HSLY[ [OL \ZLY [V [OL WYLZLUJL VM \UPUZ\SH[LK KHUNLYV\Z
]VS[HNL^P[OPU[OLWYVK\J[ZLUJSVZ\YL[OH[TH`ILVMZ\ɉJPLU[THNUP[\KL[V

constitute a risk of electric shock to persons.

The exclamation point within an equilateral triangle is intended to alert the 
user to the presence of important operating and maintenance instructions in 
the service literature relevant to this appliance.

The symbol on this product indicates that it is of CLASS II (double 
insulated) construction.

WEEE symbol

The crossed-out wheeled bin is the European Union symbol 
for indicating separate collection for electrical and electronic 
equipment. This product contains electrical and electronic 
equipment which should be reused, recycled or recovered and 
should not be disposed of with unsorted regular waste. Please 

return the unit or contact the authorised dealer from whom you purchased 
this product for more information.

CE mark

This product complies with European Low Voltage (2006/95/
EC), Electromagnetic Compatibility (2004/108/EC) and 

Environmentally-friendly design of Energy-related Products (2009/125/EC) 
Directives when used and installed according to this instruction manual. 
For continued compliance only Cambridge Audio accessories should be 

\ZLK ^P[O [OPZ WYVK\J[ HUK ZLY]PJPUN T\Z[ IL YLMLYYLK [V X\HSPÄLK ZLY]PJL

personnel.

C-Tick mark

;OPZ WYVK\J[ TLL[Z [OL (\Z[YHSPHU *VTT\UPJH[PVUZ (\[OVYP[`Z

Radio communications and EMC requirements. 

CU-TR Mark

This product meets Russia, Byelorussia and Kazakhstan electronic 
safety approvals.

Caution: Hot Surface. Do Not Touch

The top surface over the internal heat sink may become hot when 
operating this product continuously. Do not touch hot areas, 
especially around the "Hot surface mark" and the top panel.

FCC regulations

NOTE: THE MANUFACTURER IS NOT RESPONSIBLE FOR ANY RADIO 
OR TV INTERFERENCE CAUSED BY UNAUTHORIZED MODIFICATIONS 
TO THIS EQUIPMENT. SUCH MODIFICATIONS COULD VOID THE USER 
AUTHORITY TO OPERATE THE EQUIPMENT.

This equipment has been tested and found to comply with the 
limits for a Class B digital device, pursuant to Part 15 of the FCC 
Rules. These limits are designed to provide reasonable protection 
against harmful interference in a residential installation. This 

equipment generates, uses and can radiate radio frequency energy and, if 
not installed and used in accordance with the instructions, may cause harmful 
interference to radio communications. However, there is no guarantee that 
interference will not occur in a particular installation.

If this equipment does cause harmful interference to radio or television 

YLJLW[PVU^OPJOJHUILKL[LYTPULKI`[\YUPUN[OLLX\PWTLU[VɈHUKVU[OL

user is encouraged to try to correct the interference by one or more of the 
following measures:

-  Re-orient or relocate the receiving antenna.

-  Increase the separation between the equipment and receiver.

*VUULJ[[OLLX\PWTLU[PU[VHUV\[SL[VUHJPYJ\P[KPɈLYLU[MYVT[OH[[V^OPJO

the receiver is connected.

-  Consult the dealer or an experienced radio/TV technician for help.

Summary of Contents for CXR120

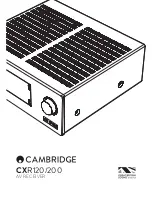
Page 1: ...CXR120 200 AV RECEIVER...

Page 2: ...Main remote control 6 Loudspeaker connections 7 Analogue audio connections 7 Digital audio connections 8 5 1 7 1 direct in 8 HDMI connections 9 4K video resolution 9 Aerial connections 10 Using the tu...

Page 3: ...hock to persons The exclamation point within an equilateral triangle is intended to alert the user to the presence of important operating and maintenance instructions in the service literature relevan...

Page 4: ...PSH PVU UZ YL OH ZTHSS VIQLJ Z KV UV MHSS OYV NO HU LU PSH PVU NYPSSL 0M OPZ OHWWLUZ Z P JO V PTTLKPH LS KPZJVUULJ MYVT OL THPUZ Z WWS HUK contact your dealer for advice Please ensure there is ample...

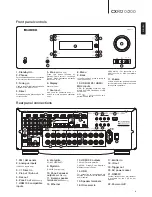
Page 5: ...a HDMI source or MHL compatible device 11 Volume VS TL HUK ZLSLJ I VU SZV ZLK for character entry Rotate to browse through the characters CXR200 HDMI 8 MHL 1 2 3 8 9 10 11 4 5 7 6 1 FM AM aerials 2 A...

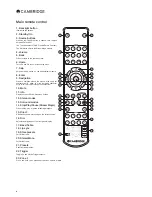
Page 6: ...play or pause streaming playback 15 Direct Disables any audio processing on the current source 16 Dim KQ Z Z OL IYPNO ULZZ VM OL MYVU WHULS KPZWSH 17 Bass Treble 18 Lip sync 19 Store presets For FM A...

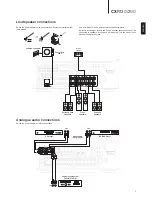
Page 7: ...ne will be active This can be set in the WLHRLY VU N YH PVU TLU Surround Back Height Speaker Impedance Nominal 8 Ohms Right Left Front Right Front Left Centre Surround Right Surround Left SW1 7 1 5 1...

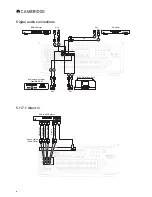
Page 8: ...CD player Audio player recorder Tape MD CD R iD100 Digital iPod Dock Out Out OR 2 1 OR 1 2 OR 1 2 2 1 OR Out Out 5 1 7 1 direct in Pre Out Sub Out DVD A SACD player Phono cables 2RCA 2RCA Front Left...

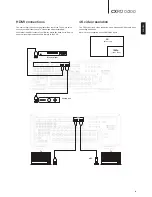
Page 9: ...nections 4K video resolution The source resolution cannot be greater than that of the TV you are using JVUZ S V Y 40 ZV YJL HUK THU HS HUK HKQ Z HJJVYKPUNS UZ YL OH OL 40 V W VM V Y S YH WSH LY OHZ IL...

Page 10: ...JVKPUN YLJVTTLUKLK or can be decoded by some Blu ray players internally and sent to the CXR as multi channel PCM In both cases an HDMI connection is required to the CXR and a suitable Blu ray player a...

Page 11: ...lby Pro Logic Dolby Pro Logic II is a technology where 5 channels Front Left Front Right Centre Surround Left Surround Right are encoded into a Stereo mix by an analogue matrix process Dolby Pro Logic...

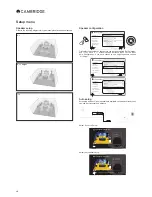
Page 12: ...figuration Metres Subwoofer1 Subwoofer2 Surround Back CXR Setup Menu Speaker Setup Input Setup Zone 2 Settings Network Setup General Settings HDMI Output Setup Advanced Setup Speaker Configuration Aut...

Page 13: ...OL YLTV L V TV L MYVT ZWLHRLY V ZWLHRLY HUK HKQ Z OL SL LS U PS HSS HYL H the same volume using either the Front Left or Right as a reference CXR Speaker Configuration Menu Exit C FL SW1 FL SL SBL FR...

Page 14: ...one 2 Controlling zone 2 You can use the main remote handset the buttons on the front of the unit P ZLSM VY OL HTIYPKNL VUULJ WW V JVU YVS VS TL ZV YJL HUK T L From the remote press and hold the Zone...

Page 15: ...L MVY L_HTWSL PM V HU V ZL V Y Z ZWLHRLYZ TV ARC HDMI out 1 ARC allows a TV to send audio back down its incoming HDMI so that you can play back the audio from a TV source whilst you watch its picture...

Page 16: ...Save current settings Saves settings to internal memory If the current settings have not been saved it is advisable to save the current settings before a software update is performed Load saved settin...

Page 17: ...3 1 A 2015 Cambridge Audio Ltd Cambridge Audio is a brand of Audio Partnership Plc 9LNPZ LYLK 6 JL HSSLY V Y HURL 7SHJL London SE1 4BB United Kingdom Registered in England No 2953313 www cambridge aud...

Page 18: ...CXR120 200 AV RECEIVER...

Page 19: ...WH LU Z ZLL O W WH LU Z K Z JVT 4HU MHJ YLK UKLY SPJLUZL MYVT 3PJLUZPUN 3PTP LK OL TIVS HUK OL TIVS VNL OLY HYL YLNPZ LYLK YHKLTHYRZ HUK 4HZ LY KPV PZ H YHKLTHYR VM 0UJ 0UJ SS 9PNO Z 9LZLY LK 4HU MHJ...

Page 20: ...SH LYHS YPHUNSL PZ PU LUKLK V HSLY OL ZLY V OL WYLZLUJL VM PTWVY HU VWLYH PUN HUK THPU LUHUJL PUZ Y J PVUZ PU OL ZLY PJL SP LYH YL YLSL HU V OPZ HWWSPHUJL OL Z TIVS VU OPZ WYVK J PUKPJH LZ OH P PZ VM...

Page 21: ...JVSV YLK 9 5 336 T Z IL JVUULJ LK V OL LYTPUHS OPJO PZ THYRLK P O OL SL LY VY JVSV YLK 9 5 0M V Y TVKLS KVLZ UV OH L HU LHY O PYL OLU KPZYLNHYK OPZ PUZ Y J PVU 0M H Z HUKHYK HTW WS N PZ ZLK H HTW M ZL...

Page 22: ...S JSLHY UVIZ Y J LK SPUL VM ZPNO IL LLU OL YLTV L JVU YVS HUK OL ZLUZVY PZ YLX PYLK 9 Menu 7YLZZ V LU LY OL L W TLU 10 Back 0U OL L W TLU WYLZZ V YL YU V OL WYL PV Z TLU P LT 11 USB MP3 HDMI MHL Input...

Page 23: ...HYLH LL AVUL ZLJ PVU PU OPZ THU HS MVY KL HPSZ 7 HDMI inputs 40 PUW Z JVTWH PISL P O OL 40 Z HUKHYK L_JLW MVY 4 3 40 PUW VU 9 OPJO PZ 40 VUS VY TVYL PUMVYTH PVU ZLL PKLV 0UW ZLJ PVU VM OPZ THU HS Not...

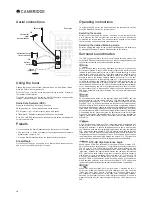
Page 24: ...ULJ V SV KZWLHRLYZ P O H UVTPUHS PTWLKHUJL VM VOTZ VY SLZZ JVUULJ PVUZ JHU IL THKL 16 IR Receiver In SSV Z TVK SH LK 09 JVTTHUKZ MYVT 09 YLWLH LY Z Z LTZ V IL YLJLP LK I OL 9 17 Emitter in SSV Z TVK S...

Page 25: ...L HUK 6U 3 Source buttons 7YLZZ OL JVYYLZWVUKPUN I VU V JOHUNL OL PUW ZV YJL 7YLZZPUN OL ULY 4 4 I VU H ZLJVUK PTL VNNSLZ IL LLU 4 HUK 4 TVKLZ 7YLZZPUN OL I VU ZLSLJ Z 9 KPV 9L YU OHUULS 7YLZZPUN OL 4...

Page 26: ...HISL Note SS JVUULJ PVUZ HYL THKL PH SV KZWLHRLY JHISL L_JLW PM ZPUN HU HJ P L Z I VVMLY OPJO V SK IL JVUULJ LK PH H Z HUKHYK 9 WOVUV JHISL Loudspeaker connections HUHUH 7S NZ TT Z HUKHYK JVUULJ LK V...

Page 27: ...WOVUV 9 JHISLZ VUL MVY YLJVYKPUN VUL MVY SPZ LUPUN Digital audio connections V WLZ VM KPNP HS H KPV JVUULJ PVUZ JHU IL THKL V OL 9 6W PJHS VZSPUR VH_PHS 7 0 Note 6US VUL JVUULJ PVU WL ZOV SK IL ZLK W...

Page 28: ...PISL P O YVT S YH WSH LYZ 40 JHU HSZV JHYY OL SH LZ VSI PNP HS 7S Z HUK Y L MVYTH Z HZ LSS HZ PNO 9LZVS PVU HUK 4HZ LY KPV UZ YL OH OL 40 V W VM V Y WSH LY OHZ ILLU ZL V P Z YLHT VY 9H V WHZZ OL MVYTH...

Page 29: ...UZ PSS IL ZLK MVY OL ILZ ZV UK X HSP HUK UV 7 WYVJLZZPUN VY HZZ HUK YLISL HKQ Z TLU PU OL 9 PZ WVZZPISL VY WSH LYZ JHU IL JVUULJ LK V OL 9 PH P Z PYLJ PUW Z HSSV PUN T S P JOHUULS T ZPJ WSH IHJR MYVT...

Page 30: ...OLZL V JOHUULSZ OL Z I VVMLY V W Z HYL ZLK MVY H HJOPUN H WV LYLK Z I VVMLY PM ULLKLK OL 9LJ V 3LM HUK 9PNO ZVJRL Z WYV PKL H KPYLJ 3LM HUK 9PNO V W MYVT H Z LYLV PUW VY H KV UTP_ Z LYLV HUHSVN L V W...

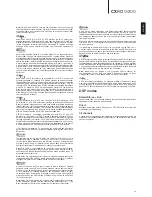
Page 31: ...Y OL HUK HYYV I VUZ VU OL YLTV L V ZLSLJ OL Z H PVU V HU V SPZ LU V 0M ULJLZZHY OL MYLX LUJ PUJYLTLU Z MVY THU HS UPUN JHU IL HS LYLK MVY 4 HUK 4 KLWLUKPUN VU NLVNYHWOPJ SVJH PVU 5H PNH L V LULYHS L P...

Page 32: ...KPZJ V LY 40 0U ZVTL JPYJ TZ HUJLZ ZLL HISLZ WYLZZPUN OL I VU HNHPU PSS Z P JO V HU HS LYUH P L KLJVKPUN VW PVU VSI 7YV 3VNPJ HUK 5LV HYL IV O H HPSHISL PU HYPV Z N PZLZ V KLJVKL HWWYVWYPH LS LUJVKLK...

Page 33: ...2 0 2 SS JOHUULSZ 4 2 VSI 7YV 3VNPJ 00 4V PL VSI 7YV 3VNPJ 00 4 ZPJ 5LV PULTH 5LV 4 ZPJ DTS 5 1 5 1 76 6 0DWUL 4H YP_ DTS ES Discrete 6 1 PZJYL L DTS 96 24 5 1 5 1 Multi Channel PCM 5 1 4 S P 7 4 5 1...

Page 34: ...0a LPNO DTS 96 24 5 1 5 1 VSI 7YV 3VNPJ 00a LPNO Multi Channel PCM 5 1 4 S P 7 4 5 1 4 S P 7 4 VSI 7YV 3VNPJ 00a LPNO Multi Channel PCM 7 1 4 S P 7 4 4 S P 7 4 VSI 7YV 3VNPJ 00a LPNO Dolby Digital Plu...

Page 35: ...PJ DTS 2 0 2 2 SS OHUULSZ 4 VSI 7YV 3VNPJ 00_ 4V PL VSI 7YV 3VNPJ 00_ 4 ZPJ 5LV PULTH 5LV 4 ZPJ DTS 5 1 5 1 VSI 7YV 3VNPJ 00_ 4V PL VSI 7YV 3VNPJ 00_ 4 ZPJ 76 6 0DWUL 4H YP_ 4H YP_ VSI 7YV 3VNPJ 00_ 4...

Page 36: ...er setup Key all tables 0UKPJH LZ H KLJVKL VM VY TH LYPHS WOHU VT IHJR JLU YL 0UKPJH LZ H V W JYLH LK I H KLJVKL WVZ WYVJLZZLK V 0UKPJH LZ H V W JYLH LK I H VY KLJVKL WVZ WYVJLZZLK V 0UKPJH LZ H KLJVK...

Page 37: ...HUK OL KLJVKL TVKL ZLSLJ LK LMVYL L KLZJYPIL OV V VWLYH L OL 9 ILSV PZ H IYPLM N PKL V OL YYV UK V UK MVYTH Z OH OL 9 PZ JVTWH PISL P O MVY YLMLYLUJL VSI Z SVZZSLZZ H KPV LJOUVSVN KL LSVWLK WYPTHYPS...

Page 38: ...L MVYTH SS WVZ WYVJLZZPUN SPRL VSI 7YV 3VNPJ 00 HUK 5LV PSS IL KPZHISLK Multi channel PCM VTL WSH IHJR KL PJLZ PU WHY PJ SHY S YH WSH LYZ HYL HISL V KLJVKL ZVTL VM OL HIV L MVYTH Z OLTZLS LZ PU LYUHSS...

Page 39: ...KLZ KLWLUKHU UV VUS VU OL ZV YJL TH LYPHS I HSZV OL ZWLHRLY WHJRHNL P RUV Z V OH L Enter CXR Setup Menu Speaker Setup Input Setup Zone 2 Settings Network Setup General Settings HDMI Output Setup Advan...

Page 40: ...L PU LYTZ VM SV KULZZ WYLZZ OL VTL I VU HNHPU V ZH L OL ZL PUNZ HUK L_P OL TLU L PUN LHJO ZWLHRLY HSSV Z OL 9 V WLYMVYT OH PZ JHSSLK HZZ 4HUHNLTLU HUK V KPYLJ SV MYLX LUJ IHZZ MYVT T ZPJ HUK OL 3V YLX...

Page 41: ...Y ZPaL HUK JYVZZV LY MYLX LUJPLZ MVY OL W YWVZL VM IHZZ THUHNLTLU HUK OLPY KPZ HUJLZ MYVT OL SPZ LUPUN WVZP PVU LMVYL WLYMVYTPUN OPZ WYVJLK YL THRL Z YL V JVUULJ HUK JVYYLJ S WVZP PVU HSS VM V Y ZWLHR...

Page 42: ...r Configuration Menu Exit C FL SW1 SL SBL FR SR SBR SW1 SW1 SW1 Test Tone Off Accept Setup OK OK OK T T T T T Te Test T T Test Test Test R SBR SR SR SBR SBR Speaker Configuration 7 1Ch FL Front Left S...

Page 43: ...VM OL ZV YJL J YYLU S ZLSLJ LK PU OL 4HPU AVUL V AVUL V OLY PZL OL Z LYLV H KPV PZ ZLK KPYLJ S 0M H KP LYLU ZV YJL PZ ZLSLJ LK MVY AVUL OLU OL aVUL ZV YJL T Z OH L H Z LYLV PUW H KPV ZLSLJ LK 0 PZ UV...

Page 44: ...V H VPK U HU LK KPZY W PVU HZ OL OPNO KH H YH L VM OLZL SLZ PZ IL VUK TVZ P P UL VYR Z JHWHIPSP 0M V Y PYLSLZZ UL VYR PZ JVU N YLK V ZL PYLK X P HSLU 7YP HJ 7 VY P P 7YV LJ LK JJLZZ 7 KH H LUJY W PVU...

Page 45: ...NL VUULJ HWW AM Tuner Steps OHUNL OL 4 ULY Z LWZ HJJVYKPUN V V Y JV U Y VM VYPNPU OL VW PVUZ HYL R a HUK R a FM Tuner Steps OHUNL OL 4 ULY Z LWZ HJJVYKPUN V V Y JV U Y VM VYPNPU OL VW PVUZ HYL R a HUK...

Page 46: ...VNPJ 00 VY VSI 7YV 3VNPJ 00_ KLJVKPUN Dolby DRC Dynamic Range Control OPZ ZL PUN JVU YVSZ OL K UHTPJ YHUNL VM VSI PNP HS TV PL ZV UK YHJRZ I JVTWYLZZPUN OL H KPV V SPTP OL KP LYLUJL PU SL LS IL LLU SV...

Page 47: ...OL PUJVTPUN WVZZPIPSP PLZ V JVU N YH PVU VY OLYL HYL V HS LYUH P L ZWLHRLY ZL W V TPNO OH L OLZL JVYYLZWVUK V JVU N YH PVU HUK JVU N YH PVU HZ HIV L LYL V ULLK V LSS OL 9 OPJO JVU N YH PVU ILZ TH JOL...

Page 48: ...ce OL 9 JHU ZL W ZVTL P LTZ MYVT H LI IYV ZLY OPZ PU LYMHJL HSSV Z OL ZLY V Z VTPZL OL UP UHTL KPZWSH LK PU OL 7SH LYZ SPZ PU OL HTIYPKNL VUULJ HWW HUK PU OL WV PM VUULJ KL PJL SPZ L W OL PYLSLZZ UL V...

Page 49: ...VU YVSSLK I 0 Z Z LTZ 0U HKKP PVU OL UP MLH YLZ KPYLJ 09 VU YVS JVKLZ HZ LSS HZ VNNSL JVKLZ MVY ZVTL MLH YLZ V ZPTWSPM WYVNYHTTPUN J Z VT PUZ HSSH PVU Z Z LTZ WLJPHS KPYLJ 6U 6 HUK 4 L 6U 6 JVTTHUKZ J...

Page 50: ...7 HTIYPKNL KPV 3 K HTIYPKNL KPV PZ H IYHUK VM KPV 7HY ULYZOPW 7SJ 9LNPZ LYLK 6 JL HSSLY V Y HURL 7SHJL 3VUKVU UP LK 2PUNKVT 9LNPZ LYLK PU UNSHUK 5V www cambridge audio com...

Page 51: ...EACH ZONE 3 PRE OUT CONNECTION TO ZONE 2 PLAYING THE SAME AUDIO IN BOTH ZONES 4 PRE OUT CONNECTION TO ZONE 2 PLAYING DIFFERENT AUDIO IN EACH ZONE 5 SPEAKER CONNECTION TO ZONE 2 PLAYING THE SAME AUDIO...

Page 52: ...Zone 2 Settings Network Setup General Settings HDMI Output Setup Advanced Setup Zone 2 Power Zone 2 Source Zone 2 Power On Volume On Follow Main Zone 30 dB Any multi channel audio source eg Blu ray m...

Page 53: ...own mixed to stereo in Zone 2 if you are not using the Follow Main feature If the selected Zone 2 Source has a stereo audio signal eg 2 0CH satellite signal FM Stream Magic the Zone 2 TV will be able...

Page 54: ...Speaker Setup Input Setup Zone 2 Settings Network Setup General Settings HDMI Output Setup Advanced Setup Zone 2 Power Zone 2 Source Zone 2 Power On Volume On Follow Main Zone 30 dB Any multi channel...

Page 55: ...f the selected Zone 2 Source has a multi channel audio signal eg BD player 5 1 satellite signal this cannot be output to Zone 2 if the Follow Main feature is not being used Notes 0U AVUL V H JO SPZ LU...

Page 56: ...s playing in the Main Zone will be duplicated and sent to Zone 2 CXR Setup Menu Speaker Setup Input Setup Zone 2 Settings Network Setup General Settings HDMI Output Setup Advanced Setup Zone 2 Power Z...

Page 57: ...one 2 Source has a multi channel audio signal eg BD player 5 1 satellite signal this cannot be sent to Zone 2 if the Follow Main feature is not being used ZONE 2 Up to 5 2 speaker connection HDMI MAIN...

Page 58: ...DOORZLQJ DXGLR WR EH V DSW RU 3 OXHWRRWK 7ZR 0 FRPSDWLEOH WR PRELOH GHYLFHV 7ZLQ VXEZRRIHU RXWSX V VWHPV 7ZLQ 0 RXWSXWV IR RXWSXW 56 FRQWURO 5 QS RXWSXWV FRXVWLFDOO GDPSHG IXO EUXVKHG DOXPLQLXP IURQ U...

Page 59: ...CXR200 AV Receiver...

Page 60: ......

Page 61: ......

Page 62: ......

Reviews: