background image

5


4.  Reassembling the front standard 


Figure 4. Installing the spacers.(Left, Actus-B, Right, Actus-G and Actus-DB) 

Before fixing the tilt unit to the front standard, 

make sure the tilt unit is fixed 

in  the  0º  position

.  Keep  the  tilt  unit  fixed  in  0º  position  at  all  time  during 

assembly. 

For the Actus-B

 place the front tilt unit [8] below the front standard 

and  fix  the  tilt  unit  to  the  front  standard  with  the  supplied  M3x12  DIN7991 
bolts [9] by using the supplied 2mm Allen key [10].  After fixing the tilt unit to 
the  front  standard,  use  the  earlier  removed  M3x16  ISO14581  Torx  screws  [2] 
and the Torx T10 key [3] to fix the tilt unit to the Actus rail. 

For the Actus-G and 

–DB

,  after  fixing  the  tilt  unit  to  the  front  standard,  fix  the  tilt  unit  and  the 

16,3mm spacer to the Actus rail with the earlier removed M3x30 ISO14581 Torx 
screws [11] using Torx T10 key [3]  

Summary of Contents for AC-373

Page 1: ...AC 373 Dual Base Tilt For Actus B G and DB INSTRUCTION MANUAL EN Please read this manual carefully before using the AC 373 Version 1 00 ...

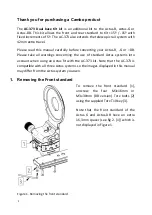
Page 2: ...l warnings concerning the use of standard Actus systems into account when using an Actus fit with the AC 373 kit Note that the AC 373 is compatible with all three Actus systems so the images displayed in this manual may differ from the Actus system you own 1 Removing the Front standard To remove the front standard 1 unscrew the four M3x16mm or M3x30mm DB version Torx bolts 2 using the supplied Tor...

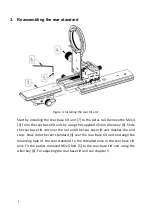
Page 3: ...3 2 Removing the rear standard Figure 2 Removing the rear standard To remove the rear standard 4 from the Actus simply slide the rear standard over the front end of the rail ...

Page 4: ...d 1 5mm Allen key 6 Slide the rear base tilt unit over the rail until the rear base tilt unit reaches the end stop Now slide the rear standard 4 over the rear base tilt unit and align the mounting hole of the rear standard to the threaded hole in the rear base tilt unit Fit the earlier removed M2x4 bolt 5 to the rear base tilt unit using the Allen key 6 For adjusting the rear base tilt unit see ch...

Page 5: ... 8 below the front standard and fix the tilt unit to the front standard with the supplied M3x12 DIN7991 bolts 9 by using the supplied 2mm Allen key 10 After fixing the tilt unit to the front standard use the earlier removed M3x16 ISO14581 Torx screws 2 and the Torx T10 key 3 to fix the tilt unit to the Actus rail For the Actus G and DB after fixing the tilt unit to the front standard fix the tilt ...

Page 6: ...ws 12 should be tightened using Allen key 6 To avoid stalling loosen the set screws 12 Note these adjustments come very close do not over tighten the set screws To complete the full base tilt kit the bottom tilt unit See fig 6 14 can be fit to the Actus rail using the Arca compatible clamp The bottom of the bottom tilt unit is fit with an Arca compatible dove tail to fit any Arca compatible tripod...

Page 7: ...crements of 5º Note that you should always support the front and rear standard when you unlock the base tilt unit The installed rear base tilt unit also allows for an extra 42mm of telescopic travel 13 If you will use this extra travel to its maximum extend for the Actus B the standard AC 210 bellow should be replaced by the AC 214 long bellow For the Actus DB or Actus G with DB module the ACDB 25...

Page 8: ...h care although no responsibility financial or otherwise is accepted for any consequences related the information stated in this instruction manual All specifications in this instruction manual are subject to change without notice For more information please visit the Cambo web site www cambo com ...

Reviews: