CalreC
Putting Sound in the Picture
Please observe the following:
This equipment must be EARTHED
Only suitably trained personnel should
service this equipment
Please read and take note of all
warning and informative labels
Before starting any servicing
operation, equipment must be isolated
from the AC supply (mains)
Fuses should only be replaced with
ones of the same type and rating as
that indicated
Operate only in a clean, dry and
pollutant-free environment
Do not operate in an explosive
atmosphere
Do not allow any liquid or solid objects
to enter the equipment. Should this
accidentally occur then immediately
switch off the unit and contact your
service agent
Do not allow ventilation slots to be
blocked
Do not leave the equipment powered
up with the dust cover fitted
The rack mounting parts of this
equipment must be fitted into an
enclosure which complies with local
regulations
Cleaning
For cleaning the front panels of the
equipment we recommend anti-static
screen cleaner sprayed onto a soft cloth to
dampen it only.
•
•
•
•
•
•
•
•
•
•
•
HealtH and safety
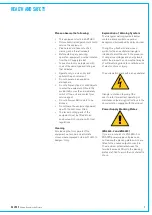
Explanation of Warning Symbols
The triangular warning symbols below
contain a black symbol on a yellow
background, surrounded by a black border.
The lightning flash with arrow head
symbol within an equilateral triangle is
intended to alert the user to the presence
of dangerous voltages and energy levels
within the product’s enclosure that may be
of sufficient magnitude to constitute a risk
of electric shock or injury.
The exclamation mark within an equilateral
triangle is intended to prompt the
user to refer to important operating or
maintenance (servicing) instructions in the
documentation supplied with the product.
Power Supply Blanking Plates
(ZN4849-3 and ZN6020)
If you are in receipt of a ZN4849-3 or
ZN6020 power supply unit please do
not remove the blanking plates which are
fitted to the unused output connectors.
The maximum potential between the
terminals exceeds 60 volts, the blanking
plates are fitted to avoid the risk of electric
shock.
Summary of Contents for OMEGA
Page 7: ...calrec com OMEGA Putting Sound in the Picture Overview...
Page 13: ...calrec com OMEGA Putting Sound in the Picture Frame Options and Dimensions...
Page 18: ...18 OMEGA with Bluefin...
Page 19: ...calrec com OMEGA Putting Sound in the Picture Equipment Installation...
Page 37: ...calrec com OMEGA Putting Sound in the Picture Hydra Audio Networking...
Page 51: ...calrec com OMEGA Putting Sound in the Picture Audio I O Interfaces...


