California Trimmer RL205HC Operator'S Manual Download Page 6


REEL MOWER OPERATOR

’S MANUAL (RL205H/207H) 

Evergreen Turf Equipment

, LLC • 1028 4

th

 St. SW, Bldg. A 

• Auburn, Washington 98001 • caltrimmer.com


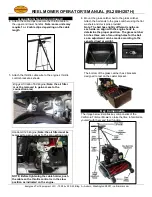
Operating Controls (continued) 

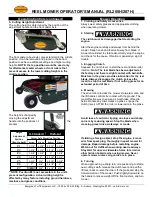
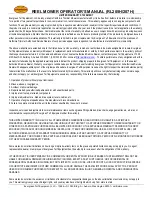
5.  Cutting Height Adjustment 

The cutting height is determined by the position of the 
adjustment handle and the front caster axle. 


The front caster wheel axle comes standard in the middle 
position. It can be removed and placed in the bottom 
position to achieve additional settings and higher cutting 
heights. 

NOTE: the top position would be used only 

for aftermarket caster wheels or front rollers that 
prevent access to the lower cutting heights in the 
middle position. 


The height is changed by 
moving the adjustment 
handle into the positions of 

the 

bracket. 


**NOTE: 

Position #8 is not accessible in the unit’s 

present configuration. Actual cutting height is 
affected by many factors including ground hardness, 
levelness and grass conditions. 
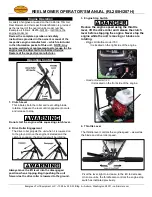
 

Mower Operation 

1.  Clothing and Safety Accessories 

Always wear safety glasses and appropriate clothing 
when operating mower. 
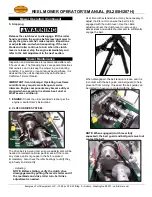
 

2.  Starting 


The clutch must be disengaged before starting the 
engine. 

 
Start the engine carefully and always from behind the 
mower. Keep hands and feet well away from blade. If 
mower should start to vibrate abnormally, stop the engine 
and check for the cause. Vibration is generally a sign of 
trouble. 

3.  Engaging Clutch 

Squeeze the clutch lever to start the reel and drive roller 
rotation.  

Note: The reel blade has been adjusted at 

the factory and there is slight contact with bed-knife. 
Moisture in the grass provides lubrication for the reel 
blade. Always disengage the clutch (release the 
lever) to stop the reel blade if not cutting grass for an 
extended period of time.
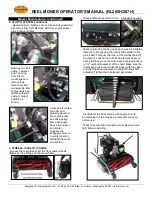


4.  Mowing 

The drive roller 

provides the mower’s forward motion and 

the lift handle controls its contact with the ground. The 
most effective way to ensure a smooth take off and to 
help eliminate any roller marks on grass, engage the 
clutch (lever) AFTER the roller is lowered onto the grass.  


Avoid loss of control or tipping on slopes and sharp 
corners by reducing speed. Stop the blade when 
crossing gravel drive, walkways or roads.  


If striking a foreign object, stop the engine, remove 
wire from spark plug, thoroughly inspect mower for 
damage. Repair damage before restarting engine. 
Watch out for traffic when working near roadways. 
Stay alert for uneven sidewalks, holes in terrain or 
other hidden hazards when using mower. Never 
operate mower unless all guards are in place. 


4.  Turning 

When approaching a sharp turn or repositioning to start a 
new cutting swath, release the clutch lever and pull the 
lift lever back to raise the roller off the grass and stop the 
forward motion of the mower. Push slightly downward on 
the handle to relieve weight off the front casters, and turn 
mower. 


Bottom

Middle

Bottom

Middle

#1

1-7/8"

1-3/8"

2-1/4"

1-7/8"

#2

1-3/4"

1-1/4"

2-1/8"

1-5/8"

#3

1-5/8"

1-1/8"

2"

1-3/8"

#4

1-3/8"

1"

1-7/8"

1-1/4"

#5

1-1/4"

3/4"

1-5/8"

1-1/8"

#6

1"

5/8"

1-3/8"

1"

#7

N/A

3/8"

1-1/4"

3/4"

Height 

Adjustment 

Position

(front to back)

H-Standard

High-Cut

Caster Axle Mounting Position

Summary of Contents for RL205HC

Page 1: ...Evergreen Turf Equipment LLC 1028 4th St SW Bldg A Auburn Washington 98001 caltrimmer com Precision Reel Mowers OPERATOR S MANUAL Models RL205H RL207H RL205HC RL207HC ...

Page 2: ...ts In addition to this manual the following are included California Trimmer Reel Lawnmower California Trimmer Product Registration Card Engine Owner s Manual Engine Emission System Warranty Upper Handle Assembly including clutch engagement lever and attached cable roller lift handle rod and fasteners to attach it to the lower handle Catcher Assembly including bail rod washers cotter pins for attac...

Page 3: ...ction area NOTE Before tightening the cable holder push the cable so the throttle control is in the slow position as indicated on the engine 6 Mount the grass catcher bail to the grass catcher Attach the bail ends to the grass catcher using the flat washers and clevis pins provided Note The bail has slightly different lengths on each side so align with the engine hook to determine the proper posit...

Page 4: ...lly Be thoroughly familiar with the controls and proper use of the equipment 2 Never allow children to operate mower 3 Never try to mow across steep terrain 4 Keep area of operation clear of all persons particularly small children and pets 5 Never operate the mower without proper guards shields in place 6 Thoroughly train anyone using the mower Make sure all mower operators know the safety operati...

Page 5: ...ngagement occurs and release to stop Do not start the engine while squeezing clutch lever 2 Drive Roller Engagement The drive roller propels the unit when it is lowered on to the ground Once the engine is started and the clutch is engaged the drive roller will be rotating Always move the lift lever into the disengaged position when stopping Begin pushing the unit forward as the drive roller is low...

Page 6: ...blade has been adjusted at the factory and there is slight contact with bed knife Moisture in the grass provides lubrication for the reel blade Always disengage the clutch release the lever to stop the reel blade if not cutting grass for an extended period of time 4 Mowing The drive roller provides the mower s forward motion and the lift handle controls its contact with the ground The most effecti...

Page 7: ...y or plugged when operating in extreme heat dust or other severe conditions 1 ENGINE Check the oil level and air cleaner per the engine manufacturer s instructions 2 CLUTCH DRIVE SYSTEM The drive belt is a wear item so some adjustments will be needed to maintain optimum performance If there are any cracks splits or gouges in the belt replace it immediately Also check the idler bearings to verify t...

Page 8: ...unction Reinstall the cover and tighten 3 WHEELS SHAFTS CHAINS Grease the reel blade shaft the front caster wheels fittings and the fittings on the rear wheels Check shaft and reel drive chain lubricate if needed Check roller chain tension once each week To tighten raise the roller aligning the roller shaft parallel to the drive shaft This puts the roller at the furthest point of movement Loosen t...

Page 9: ...the reel increasing or decreasing the clearance and should be moved as evenly as possible Turning the adjuster clockwise reduces the clearance between the bed knife and reel blade while turning it counter clockwise increases the clearance When properly adjusted there should be slight contact between the reel blade and bed knife across the full width With the unit tipped back slightly and secured i...

Page 10: ...ty This warranty will cover only defects arising under normal usage and shall not apply nor will Evergreen Turf Equipment assume any responsibility if the failure was caused by the following 1 Operation of product without proper lubrication 2 Misuse abuse or negligence 3 Accident or physical damage 4 Repairs made by unauthorized parties and or with unauthorized parts 5 Improper unit set up or alte...

Reviews: