Caliber RCD110 Instruction Manual Download Page 12

10. USB DRIVE OPERATIONS

START THE USB DEVICE MODE

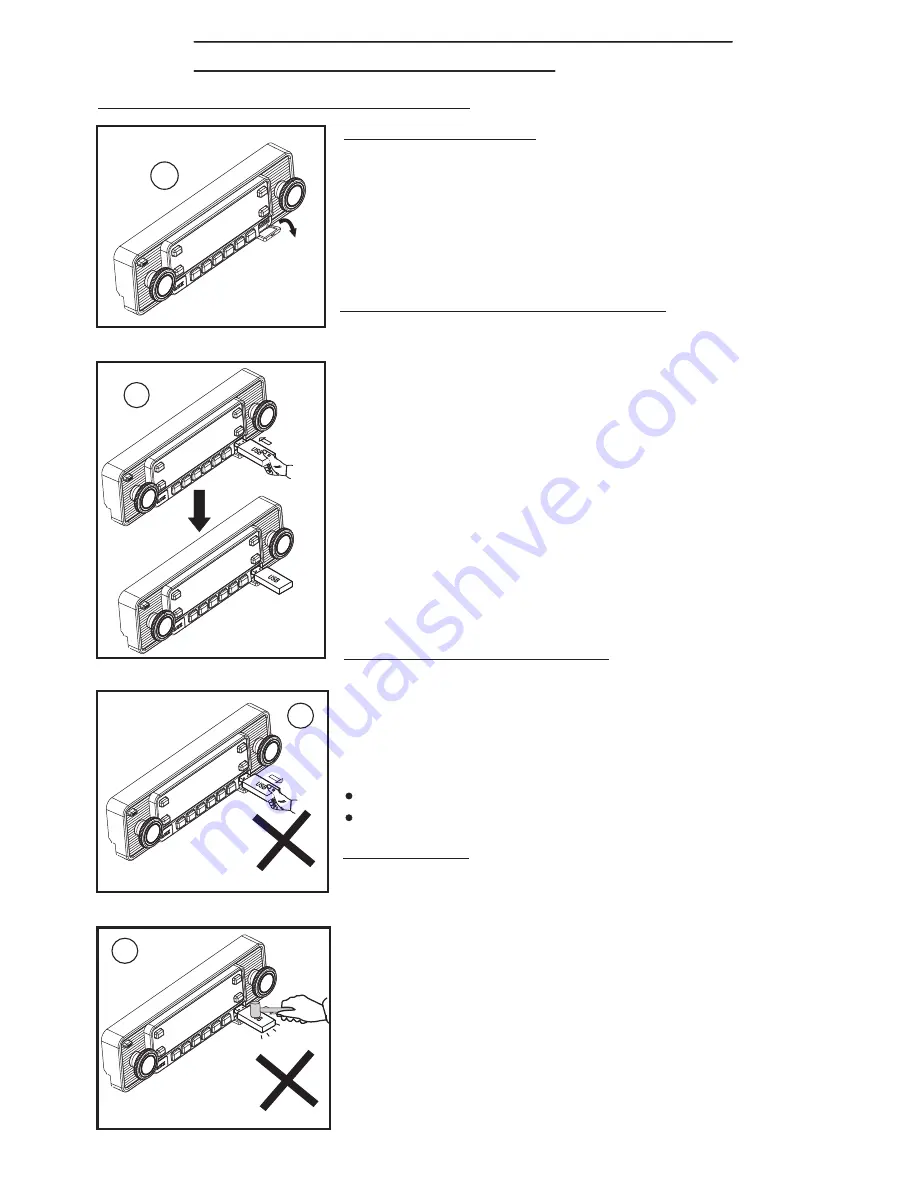
2. Plug in the USB drive / device completely as indicated  in picture 2

(P.2)


and  display  will  show  “USB  PLAY”  to  indicate  that  the  USB  drive  / 
device is being plugged in correctly & the download has begun.

3.Does not matter the unit is in what mode (TUNER, CDC, CD, SD 

etc), once a USB drive / device is being plugged into the unit, unit 
will automatically switch to USB mode.

4.All the USB files playback function is same as normal CD or MP3 

disc playback.(Please refer to section CD operations & MP3 
operations)

1.  Always unplugged the USB gently from the unit, excessive force 

used will cause permanent & serious damage to the unit & the 
USB drive / device.

(P.3)

TO STOP USB PLAYBACK

1.The USB drive / device is unplugged, the unit automatically switch 

to radio mode. Or user can use mode button to switch to other 
mode.

2.User can use the mode button to choose USB mode (only if USB 

drive / device is inserted in the unit ) or any other modes, when they 
are in any mode.

WARNING

COMPATIBILITY

Due to the fast changing technology world, this unit may or may not 
be compatible to all the USB drive / device available with all the future 
technology, especially those USB drive / device which require to 
install a driver. Always choose a compatible USB drive / device which 
is compatible with this unit.

1.The USB socket is covered by the USB plastic cover as  indicated in 

picture 1 

 (P.1).

 Flip open the USB plastic cover, and the USB 

socket will become accessible.

E - 12

USB 1.1 > 320KBPS
FILE MANAGE: FAT12 / FAT16/ FAT 32

NOTE:

This unit is not compatible with portable Hard-Disk.

PLEASE READ THIS INSTRUCTION CAREFULLY 
BEFORE OPERATING THE UNIT 

2.  Please never intentionally or accidentally hit on the USB drive / 

device when it is plugged in. This will cause permanent & serious 
damage to the unit & USB drive / device.

(P4)

3.   Please never try to plug in any USB drive / device with excessive 

weight or excessive size into the unit. Please always use USB drive / 
device with reasonable weight & size which will not overload the unit, 
which will not make performing normal operation on the front panel 
impossible. Excessive weight or size USB drive / device may cause 
permanent & serious damage to the unit. And may cause access to 
the buttons / knobs on the front panel impossible.

The unit may take a while to detect or download the USB files, detect & 
download time may vary depends on the type of  USB drive / device.

NOTE:

P.3

P.1

P.2

P.4

Summary of Contents for RCD110

Page 1: ...BUTTON 4 PRESET MEMORY BUTTONS 5 ENCODER TUNING UP DOWN TRACK UP DOWN BUTTON 6 POWER MUTE BUTTON 7 MODE BUTTON 8 BAND BUTTON PTY BUTTON 9 AUTOMATICALLY STORE PRESET SCAN AS PS BUTTON 10 DISPLAY BUTTON...

Page 2: ...kers Do not stick paper or tape on the disc P 2 Before playing clean the discs with an optional cleaning cloth Wipe each disc from the centre out P 4 Do not use solvents such as benzine thinner commer...

Page 3: ...angle exceeds 30 from horizontal the unit might not give its optimum performance Avoid installing the unit where it would be subject to high temperature such as from direct sunlight or from hot air f...

Page 4: ...2 4 3 2 5 a Frame b Insert fingers into the groove in the front of frame and pull out to remove the frame When re attaching the frame point the side with a groove down wards and attach it c Insert th...

Page 5: ...ase and be careful not to drop it or subject it to strong shocks When the release button is pressed and the D C P is unlocked the car s vibrations may cause it to fall To prevent damage to the D C P a...

Page 6: ...CK WHITE BLACK VIOLET WHITE GREY B1 B5 B4 B3 B2 B8 GREEN B7 B6 A5 A4 PIN BLACK A8 RED A7 BLUE LEFT FRONT SPEAKER LEFT REAR SPEAKER LEFT REAR SPEAKER RIGHT REAR SPEAKER RIGHT FRONT SPEAKER LEFT FRONT S...

Page 7: ...t will automatically switch to radio mode Press this button to view Clock Programme Type PTY and Frequency of the station in listening DUAL COLOR ILLUMINATION BUTTON DISP Press DISP button more than 3...

Page 8: ...P User has 5 seconds to use the encoder volume knobto adjust the desired Treble level range from 6 to 6 User has 5 seconds to use the encoder volume knob to adjust the Balance between the right and le...

Page 9: ...O SEARCH tuning mode the radio will tune up or down to the next station and remain on the frequency 2 Press these buttons more than 2 seconds operate as MANUAL SEARCH buttons under this mode the tunin...

Page 10: ...urrent station it is shown on the display AF Alternative Frequencies List The list s of Alternative Frequencies give information on the various transmitters broadcasting the same program in the same o...

Page 11: ...to skip to previous skip Press and hold Track Up Down Button to fast forward or fast reverse CD player starts when you release the button E 11 9 CD OPERATIONS 13 CD SLOT Insert the disc into CD slot T...

Page 12: ...drive device available with all the future technology especially those USB drive device which require to install a driver Always choose a compatible USB drive device which is compatible with this uni...

Page 13: ...P3 disc playback Please refer to section CD operations MP3 operations 1 Please make sure to insert the SD card in the correct direction orientation as indicated in picture P 9 Wrong insert will cause...

Page 14: ...ay shows MP3 T enter the desired track number directly then press MP3 ENTER BUTTON to confirm The distribution of the number are listed as follow SEARCH TRACK NUMBER BY USING ENCODER VOLUME KNOB Rotat...

Page 15: ...BUTTON to select the desired directory The display will show To select the tracks under the selected directory by Rotate ENCODER VOLUME KNOB ROTATE ANTI CLOCKWISE First then press MP3 ENTER BUTTON to...

Page 16: ...B at S N 30 dB 25 dB at 1KHz 50 dB 13 SPECIFICATIONS CD PLAYER REMARK Specifications subject to change without notice RADIO SECTION FM System Usable disc Sampling frequency No of quantization bits Fre...

Page 17: ...n Leave the player to off for an hour or so then try again Volume is in minimum Adjust volume to a desired level Wiring is not properly connected Check wiring connection The operation keys do not work...

Reviews: