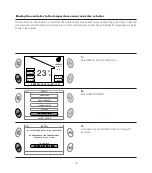
1.
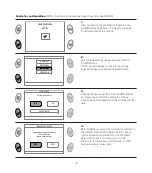
Select TEMPERATuRE SENSOR from the ADD menu.
1a.
Press any button to start the binding procedure.
LIVING ROOM
ADD
THU
24/04/14
14:48
WINDOW SENSOR
TEMPERATURE SENSOR
ACTUATOR
TEMPERA
24/04/14
THU
TURE SENSOR
14:48
LIVING ROOM
WINDOW SENSOR
TOR
ACTUA
ATOR
PERA
ATURE SENSOR
ADD
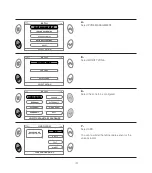
2.
Press the sensor button within two minutes.
For binding use a thin pointed
object, for example, a paper
clip. Insert the tip in the
dedicated hole on the rear of
the temperature sensor.
LIVING ROOM
YOU ARE ADDING A SENSOR
THU
24/04/14
14:48
NOW PRESS THE SENSOR BUTTON
WITHIN 2 MINUTES
USING A SUITABLE TOOL
USING A SUIT
NOW PRESS THE SENSOR BUTTON
24/04/14
THU
ABLE TOOL
SING A SUIT
TABLE TOOL
WITHIN 2 MINUTES
NOW PRESS THE SENSOR BUTTON
14:48
LIVING ROOM
YOU ARE ADDING A SENSOR
YOU ARE ADDING A SENSOR
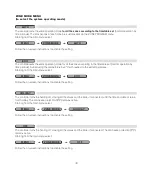
3.
If the operation was successful, a confirmation
message is displayed. If binding failed, an alarm
signal is displayed. In this case, repeat the
procedure or consult the section ERRORS/ALARMS.
LIVING ROOM
PRESS ANY BUTTON
THU
24/04/14
14:48
YOU HAVE SUCCESSFULLY
BOUND THE TEMPERATURE
SENSOR IN THE ZONE: LIVING ROOM
SENSOR IN THE ZONE: LIVING ROOM
BOUND THE TEMPERA
YOU HA
24/04/14
THU
SENSOR IN THE ZONE: LIVING ROOM
TURE
UND THE TEMPERA
ATURE
Y
VE SUCCESSFULL
LY
U HA
AVE SUCCESSFULL
14:48
LIVING ROOM
PRESS ANY BUTTON
Binding the controller to the temperature sensor
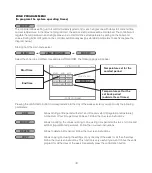
4.
Mount the sensor on the wall using the both sides adhesive tape provided or a flat
screw using the dedicated hole on the baseplate.
The temperature sensor is supplied completely discharged but needs to
have a charge level sufficient to be bound to the controller. It is however
sufficient to position it in an illuminated environment
for 2 hours
to reach
the minimum charge level necessary for binding. Direct exposure to
sunlight or heat source falsifies the actual ambient temperature reading.
Position the sensor far away from doors, windows, radiators and indirect
heating sources, possibly at a height between 1,2 and 1,5 metres from the
ground.
14

