background image

10/12/13

LMU-3xx Hardware & Installation Guide - PULS Wiki

https://puls.calamp.com/wiki/LMU-3xx_Hardware_%26_Installation_Guide

23/37

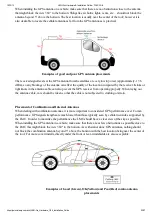
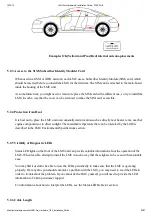
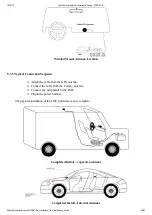
Examples OK(Yellow) and Poor(Red) internal antenna placements

5.2.3 Access to the SIM (Subscriber Identity Module) Card

When used in a GSM or iDEN network, each LMU uses a Subscriber Identity Module (SIM) card, which
should be inserted before you install the LMU for the first time. The SIM card is attached to the main-board
inside the housing of the LMU unit.

At some future time, you might need or want to replace the SIM card with a different one, so try to install the
LMU in such a way that the cover can be removed to make the SIM card accessible.

5.2.4 Protection from Heat

It is best not to place the LMU unit in an unusually warm location such as directly near heater vents, near hot
engine components or in direct sunlight. The maximum temperature that can be tolerated by the LMU is
described in the LMU Environmental Specifications section.

5.2.5 Visibility of Diagnostic LEDs

Status LED lights on the front of the LMU unit can provide valuable information about the operation of the
LMU. When feasible, attempt to install the LMU in such a way that these lights can be seen with reasonable
ease.

You may find it useful to be able to view the LEDs periodically to make sure that the LMU is operating
properly. If at any time you should encounter a problem with the LMU, you may need to read the LEDs in
order to troubleshoot the problem. If you cannot fix the LMU yourself, you will need to provide the LED
information to CalAmp customer support.

For information about how to interpret the LEDs, see the Status LED Behavior section.

5.2.6 Cable Length

Summary of Contents for LMU-3 Series

Page 1: ...cation Messaging Unit 3xx 3 3 LMU 3xx Connectors 3 3 1 Primary Connector 3 3 2 Serial Adapter 4 Configuration and Activation 4 1 Quick Start General Config 4 2 Auto provisioning of GSM or HSPA LMUs 4...

Page 2: ...ITED WARRANTY AND REGULATORY INFORMATION 1 Introduction Welcome to the LMU 3xx Hardware and Installation Guide This manual is intended to give you information on the basic setup and installation of th...

Page 3: ...asset tracking markets private wireless networks public safety communications and critical infrastructure and process control applications For additional information please visit the Company s websit...

Page 4: ...determine its location or status and do something meaningful with that information This could include displaying the vehicle location on a map performing an address look up providing real time driving...

Page 5: ...lite systems or local area networks Contact the CalAmp sales team for the networks available to the LMU 3xx 2 2 2 LMU 3xx The LMU 3xx is responsible for delivering the location and status information...

Page 6: ...owing Display location database on reports received from the LMU 3xx in a variety of formats Present historic information received from the LMU 3xx typically in a report chart style format Request loc...

Page 7: ...or the most sensitive component therefore the following classifications apply Class 1B Human Model 1 kV Class M1 Machine Model 100V When handling the LMU 3xx s main board i e sub assembly by itself or...

Page 8: ...vehicles including wide temperature extremes voltage transients and potential interference from other vehicle equipment To ensure proper operation in such an environment the LMU 3xx was subjected to s...

Page 9: ...compliant for a ground vehicle environment Operating Voltage Range 7 16VDC Power Consumption Active Standby 60mA at 12VDC Sleep on Network 10 mA at 12VDC Deep Sleep 2mA at 12VDC Back up Battery Optio...

Page 10: ...ry Connector The LMU 3xx uses up to 6 22AWG leads for its power and I O connections The product part number mapping table indicates the number of wires in the harness so these leads are mapped as foll...

Page 11: ...PEG script has already been created and is being managed through LMU Manager or PULS the CalAmp Maintenance System We are making three assumptions to simplify the setup process You have created instal...

Page 12: ...the publicly addressable IPV4 address of your LM Direct server and ppppp is the UDP port number 4 Alternatively if a URL has been set up for your LM Direct server the LMU may be programmed with A T A...

Page 13: ...e new SIM card s defaults if the MCC and MNC values change The current list of supported MCC and MNC combinations are AT T formerly AT T Wireless or Cingular Blue MCC 310 MNC 38 o APN 0 PROXY o APN 1...

Page 14: ...C 272 MNC 01 o APN 0 1 isp vodafone ie o Username vodafone o Password vodafone Vodafone New Zealand MCC 530 MNC 01 o APN 0 1 internet o Username guest o Password guest Vodafone UK MCC 234 MNC 15 o APN...

Page 15: ...ore information If you do happen to have a SIM the operator will ask for the IMSI and ICC ID Integrated Circuit Card Identifier along with the IMEI of the LMU Again in return you should get a list of...

Page 16: ...5 Activating a CDMA LMU 3xx Check with the CalAmp Sales team for availability of the LMU 3xx with CDMA modems For CDMA devices the activation sequence you will use varies from carrier to carrier Each...

Page 17: ...onfigured you may verify that the LMU 3xx s modem has registered to the CDMA network Enter A T A P P C O M M S T A T U S The response should be similar to C D M A S e r v i c e I S 2 0 0 0 C o n n e c...

Page 18: ...sponse should be similar to C D M A S e r v i c e I S 2 0 0 0 C o n n e c t i o n Y e s R S S I 8 0 d B m C h a n n e l 0 B a n d S i d e 8 0 0 B B a s e S t a t i o n I D 0 N e t w o r k I D 0 S y s...

Page 19: ...Program in the network username using A T A P P P A R A M 2 3 1 4 0 P h o n e N u m b e r 1 x b e l l c a 6 Verify the above settings with A T A P P P P P The LMU 3xx should return the following P P...

Page 20: ...to be installed A power harness GPS Antenna for external devices Comm Antenna for external devices Optional Components Input and output cables Relays LMU peripherals i e Serial adapter jPOD TetheredL...

Page 21: ...Environmental Specifications for the exact measurements and specifications of the LMU 3xx Typical installations will place the LMU under the vehicle dash board or in the trunk Make sure you can get a...

Page 22: ...cable can also prevent the GPS receiver from operating properly When laying out the antenna cable care should be taken so that the cable is not subjected to crushing or strain Placement of Combinatio...

Page 23: ...in an unusually warm location such as directly near heater vents near hot engine components or in direct sunlight The maximum temperature that can be tolerated by the LMU is described in the LMU Envir...

Page 24: ...ling the LMU in a Vehicle This section provides instructions for installing an LMU in a vehicle Be sure to consider the design decisions described in the previous sections When you are ready to begin...

Page 25: ...for example the roof of a car Make sure that there are no obstructions close to the antenna that might block the view 360 to the horizon Air horns lights vents etc should not block the antenna beyond...

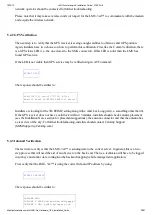
Page 26: ...w Mount Antenna Location 5 3 5 Typical Connection Sequence Attach the cable from the GPS antenna Connect the cable from the Comm antenna Connect any peripherals to the LMU Plug in the power harness Th...

Page 27: ...is LED is solid then the LMU has registered to the network and established a data session If the LED is not visible then Comm may be verified using an AT Command A T I C Depending on the wireless netw...

Page 28: ...D R T I M E H D O P 1 3 0 n S a t s 7 Installers are looking for the 3D RTIME setting along with a valid Lat Long pair i e something other than 0 If the GPS receiver does not have a valid lock within...

Page 29: ...ived an Event Report with Event Code 255 Assuming that all three sections have passed the installation can be considered to be complete 5 4 4 Verification via SMS The current Comm GPS and Inbound stat...

Page 30: ...st cold boot i e power cycle but not the last warm boot App Restart or Sleep The upper case A will be present if the LMU has received an ACK since the last warm boot A Indicates no acknowledgement has...

Page 31: ...resents the state of input 7 where the right most represents the state of input 0 i e the ignition A value of 1 indicates the input is currently in the high state A value of 0 indicates it is currentl...

Page 32: ...ls either contained on the media provided to you by or from CalAmp or which you have received or downloaded electronically Application means a compiled or executable software program created by Develo...

Page 33: ...Developer Software and Documentation may be installed onto a hard disk drive or a Server access to which is restricted to Developers for which a Developer License has been purchased and may also be s...

Page 34: ...or Site License purchased CalAmp grants the Customer the right to distribute Applications on a single Server or at a single Site as the case may be accessible to the number of individual users not co...

Page 35: ...R A PERIOD OF NINETY 90 DAYS FROM THE DATE OF DEVELOPER LICENSE PURCHASE CalAmp s entire liability and your exclusive remedy as to defective media Documentation or Related Material s shall be replacem...

Page 36: ...nt with or adds to the terms and conditions of this License and those superseded purchase order terms and conditions shall be null and void 4 You agree to assure that copies of this License Agreement...

Page 37: ...means that the device is designed to be used in other than fixed locations and generally in such a way that a separation distance of at least 20 cm is normally maintained between the transmitter s ant...

Reviews: