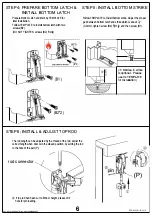
STEP 4: PREPARE BOTTOM LATCH &
INSTALL BOTTOM LATCH
Prepare Bottom Latch and Mark by TEMPLATE for
later installation .
Follow TEMP LA TE to install bottom latch with two
screws(B2).
(DO NOT TIGHTEN screws (B2) firmly)
---
---
(82*2)
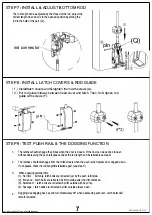
STEP 6: INSTALL & ADJUST TOP ROD
STEP 5: INSTALL BOTTOM STRIKE
Follow TEMPLATE to install bottom strike. Adjust the proper
gap between bottom latch and strike which is about
½"
(3.0mm), tighten screw (B2) firmly and then screw (B1).
�
�
g
........._
__ _
..............
..............
.............
..............
.............
.............
.............
............
(* Mortise-in strike
is optional. Please
use its TEMPLATE
for installation)
The rod length can be adjusted by the thread of the rod, adjust the
correct length when door is in the closed position, by aiming the rod
to the hole of the part (P).
rod connector
*
If top rod had been cut to fit door height, please drill
hole for pin loading.
CAL•ROYAL PRODUCTS, INC. USA I VERSION 2022
(P)
CD
6
EDG-404
5
-01/23-
6
of
8


