


23
12345678901234567890123456789012123456789012345678
12345678901234567890123456789012123456789012345678
12345678901234567890123456789012123456789012345678
12345678901234567890123456789012123456789012345678
12345678901234567890123456789012123456789012345678
12345678901234567890123456789012123456789012345678
12345678901234567890123456789012123456789012345678
12345678901234567890123456789012123456789012345678
12345678901234567890123456789012123456789012345678
12345678901234567890123456789012123456789012345678
12345678901234567890123456789012123456789012345678
12345678901234567890123456789012123456789012345678
12345678901234567890123456789012123456789012345678
12345678901234567890123456789012123456789012345678
PRO FARMER TRIPLEX
PRO FARMER TRIPLEX
PRO FARMER TRIPLEX
PRO FARMER TRIPLEX
PRO FARMER TRIPLEX
PRO FARMER / TS • GENIUS
PRO FARMER / TS • GENIUS
PRO FARMER / TS • GENIUS
PRO FARMER / TS • GENIUS
PRO FARMER / TS • GENIUS
STANDARD FOX
STANDARD FOX
STANDARD FOX
STANDARD FOX
STANDARD FOX
USO E MANUTENZIONE
USO E MANUTENZIONE
USO E MANUTENZIONE
USO E MANUTENZIONE
USO E MANUTENZIONE
OPERATING AND SERVICE
OPERATING AND SERVICE
OPERATING AND SERVICE
OPERATING AND SERVICE
OPERATING AND SERVICE
Rev. 02
Fig. 3
Fig. 4
Fig. 5
!
A
INITIAL INSTRUCTIONS FOR USE
OF THE SPRAYER
In order to assure a long life and a trouble-free
operation of the sprayer, you should read care-
fully the below-mentioned instructions, before con-
necting the sprayer P.T.O. with the tractor.
1)
The sprayer should be be coupled with a
tractor of suitable weight, able to guar-
antee a safe transport and stop (even at
full load).
ISTRUZIONI INIZIALI PER
L’UTILIZZO DEL
POLVERIZZATORE
Per assicurare la massima durata ed un funzio-
namento privo di intoppi, leggere attentamente
le seguenti istruzioni, prima di collegare la pre-
sa di forza del polverizzatore al trattore.
1)
Il polverizzatore deve essere aggan-
ciato ad una trattrice di peso idoneo a
garantire un trasporto ed un arresto di
tutta sicurezza (anche a pieno carico).
2)
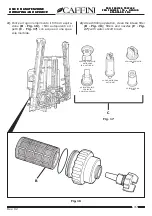
Prima di inserire il cardano, assicurarsi che sia
in ottime condizioni di scorrimento (control-
lare periodicamente ed ingrassare i tubi e le
crociere del cardano, ovviamente a macchi-
na ferma).
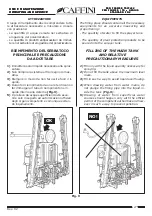
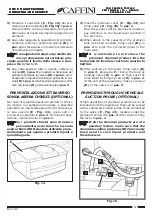
Controllare inoltre la lunghezza dell’albero
cardanico, misurando dapprima la distanza
(A)
tra le 2 scanalature del trattore e del
polverizzatore
(Fig. 3)
.
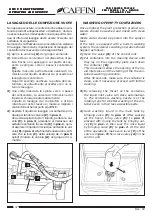
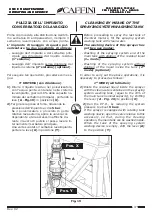
Eseguire la stessa misura tra i pulsanti del
giunto cardanico quando questo è completa-
mente chiuso e verificare l’esistenza di una
corsa libera di almeno 50 mm sul tubo di pro-
tezione del cardano, per evitare l’appoggio e
la spinta dello stesso sulla pompa
(Fig. 4)
.
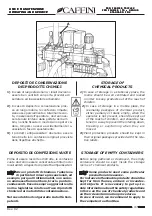
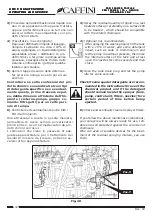
Nel caso il cardano fosse corto, assicurarsi che
esista un accoppiamento fra i tubi telescopici di
almeno 1/3 della loro lunghezza
(Fig. 5).
2)
Before connecting the cardan shaft, make su-
re that it is in very good sliding conditions
(check and lubricate regularly pipes and cross-
journals of the cardan shaft (obviously when
the machine is out of operation). Check also
the lenght of the cardan shaft, by measuring
first the distance
(A)
between the two splines
of the tractor and of the sprayer
(Fig. 3)
.
Carry out the same measurement between
the push-buttons of the universal joint, when
this latter is completely closed, and check
that there is a free stroke of at least 50 mm
on the cardan shaft protection tube, in order
to avoid its resting and thrust on the pump
(Fig. 4)
.
If the cardan shaft is too short, check that
there ist a coupling between the telescopic
pipes of at least 1/3 of their length
(Fig. 5)
.


