GETTING STARTED
- qIDmini NF Technical Informati on Manual
12
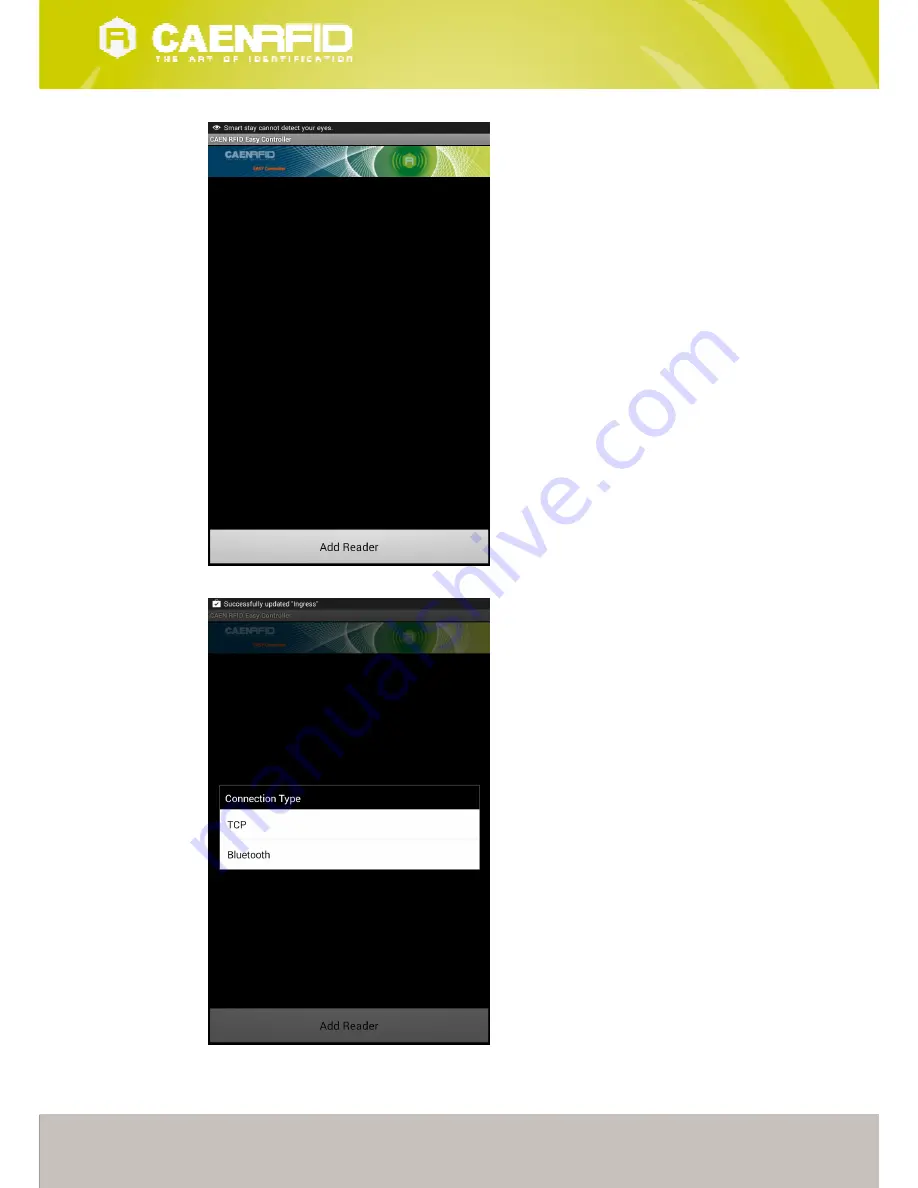
3.
Click on “
Add reader
”:
4.
Bluetooth”
in the
“Connection Type”
window:
Page 1: ...TECHNICAL INFORMATION MANUAL Revision 0 1 05 July 2016 R1170INF Keyfob Bluetooth UHF NF RFID Reader ...
Page 2: ...rfid com Preliminary Product Information This document contains information for a new product CAEN RFID reserves the right to modify this product without notice Preliminary product information describes products that are ready for production but for which full characterization data is not yet available CAEN RFID believes that the information contained in this document is accurate and reliable Howe...
Page 3: ...Disposal of the product Do not dispose the product in municipal or household waste Please check your local regulations for disposal recycle of electronic products ...
Page 4: ...ation Setup 24 Connecting the qIDminiNF using the Easy Controller for Windows 26 4 qIDminiNF HID PROFILE 28 Introduction 28 HID profile options 28 FORMAT 28 DISPLAY 28 APPLEKB 28 Android devices 29 Bluetooth Communication Setup 29 Windows PCs 31 Bluetooth Communication Setup 31 USB Communication Setup 34 iOS devices 36 Bluetooth Communication Setup 36 5 qIDminiNF OFFLINE PROFILE 38 Introduction 38...
Page 5: ...anel 7 Fig 1 3 qIDminiNF R1170INF Accessories 9 List of Tables Tab 1 1 qIDminiNF R1170INF Front Panel LEDs and Buttons 7 Tab 1 2 qIDminiNF R1170INF Power LED Status Table 7 Tab 1 3 qIDminiNF R1170INF Bluetooth LED status table 7 Tab 7 1 qIDminiNF R1170INF ConfigurationMenu 42 Tab 9 1 qIDminiNF R1170INF Technical Specifications Table 48 Tab 9 2 qIDminiNF R1170INF Reader to tag link profiles 49 ...
Page 6: ...antenna of the qIDminiNF reader permits to read those small tags even when embedded in small parts like watches jewels or mechanic parts For this reason the combination of the miniaturized near field tags and the qIDminiNF reader is a great tool to retrieve the serial numbers in small objects and check the originality of parts The reader can also operate in Offline Mode allowing to store EPC codes...
Page 7: ... to scroll hold down for a few seconds to activate an option 5 Power button Press the button to switch on the reader press for at least 2 seconds to switch it off Menu mode press to return to the main menu Tab 1 1 qIDminiNF R1170INF Front Panel LEDs and Buttons Status Description Green Reader is active and the battery charge is in the range 35 100 Orange Reader is active and the battery charge is ...
Page 8: ...N In case that the battery is fully discharged the display may not turn on when the charger is connected In this case you have to leave the reader connected to the charger for at least 5 minutes then disconnect the USB cable perform the reset procedure see RESET THE qIDminiNF READER page 40 switch off the reader by pressing the power button and then connect the USB cable again USB connector A micr...
Page 9: ...CTION qIDminiNF Technical Information Manual 9 Accessories Check for the supplied accessories below No 1 USB cable No 1 Power supply No 1 Lanyard No 1 Retractable Roller Fig 1 3 qIDminiNF R1170INF Accessories ...
Page 10: ...ions Code Description Reader WR1170IENFHP R1170IENFHP qIDmini Keyfob Bluetooth UHF NF RFID Reader ETSI with HID profile WR1170IUNFHP R1170IUNFHP qIDmini Keyfob Bluetooth UHF NF RFID Reader FCC with HID profile Customization WPE1170NFACN R1170IUNFHP China Customization ...
Page 11: ...ad communication protocol Select this option in order to control the reader using the CAEN RFID Easy Controller Application or the SDK Software Development Kits library For details on the use with the EASY2RD profile please refer to QIDMININF EASY2RD PROFILE chapter page 16 HID choosing this option you select the keyboard emulation protocol For details on the use on the HID profile please refer to...
Page 12: ...GETTING STARTED qIDminiNF Technical Information Manual 12 3 Click on Add reader 4 Click on Bluetooth in the Connection Type window ...
Page 13: ...GETTING STARTED qIDminiNF Technical Information Manual 13 5 Click on yes to confirm the Bluetooth permission request 6 Select the qIDminiNF R1170INF reader from the list of Bluetooth devices ...
Page 14: ... STARTED qIDminiNF Technical Information Manual 14 7 Confirm the passkey 8 Once the connection is established the Bluetooth blue light turns on 9 To start using your qIDminiNF R1170INF click on the reader line ...
Page 15: ...GETTING STARTED qIDminiNF Technical Information Manual 15 10 Click on Start Inventory 11 A list of the read tags is shown ...
Page 16: ...er the EASY2READ profile options DISPLAY DISPLAY Hold down the trigger button to enter the Display Option CONTROL Hold down the trigger button to enter the CONTROL options LOCAL the qIDminiNF display shows the EPC of the read tags and the date and time if enabled in the clock menu REMOTE the display is controlled by a PC a smartphone etc using the function PrintScreen So with this option you can c...
Page 17: ...sen option will begin to flash Once activated the device returns to the main menu The currently active state is marked with an asterisk By default the CONTROL is set to LOCAL Android devices Bluetooth Communication Setup using the Easy Controller for Android 1 Download the CAEN RFID Easy Controller for Android App from the qIDmini R1170I web page by clicking on the Android App on Google Play icon ...
Page 18: ...qIDminiNF EASY2RD PROFILE qIDminiNF Technical Information Manual 18 4 Click on Bluetooth in the Connection Type window 5 Click on yes to confirm the Bluetooth permission request ...
Page 19: ...qIDminiNF EASY2RD PROFILE qIDminiNF Technical Information Manual 19 6 Select the qIDminiNF R1170INF reader from the list of Bluetooth devices 7 Confirm the passkey ...
Page 20: ...RD PROFILE qIDminiNF Technical Information Manual 20 8 Once the connection is established the Bluetooth blue light turns on 9 To start using your qIDminiNF R1170INF click on the reader line 10 Click on Start Inventory ...
Page 21: ...qIDminiNF EASY2RD PROFILE qIDminiNF Technical Information Manual 21 11 A list of the read tags is shown ...
Page 22: ...echnical Information Manual 22 Windows PCs Bluetooth Communication Setup 1 In case of Windows 8 Operating System Right click on the Bluetooth icon in the taskbar Add a Bluetooth Device Select the qID mini R1170INF reader and click on Pair ...
Page 23: ...umber Pass key 1234 2 Once the connection is established the Bluetooth blue light turns on Now you can use the CAEN RFID Easy Controller Application to control the reader For details refer to Connecting the qIDminiNF using the Easy Controller for Windows page 26 Warning Note that in the EASY2RD profile holding down the trigger button activates the tag inventory only if the continuous mode is activ...
Page 24: ... the reader plug the USB cable into the qIDminiNF USB port and then power ON the reader again 2 In order to connect the qIDminiNF reader to the PC you need to install the VCP Virtual Com Port drivers for your operating system You can download VCP drivers for Windows based systems from the CAEN RFID Web Site from the qIDmini R1170I web page SW FW section or from the Software and Firmware download a...
Page 25: ... Application to control the reader For details refer to Connecting the qIDminiNF using the Easy Controller for Windows page 26 Warning Note that in the EASY2RD profile holding down the trigger button activates the tag inventory only if the continuous mode is active see the function EventInventoryTag Method in the CAEN RFID API Reference Manual that can be download from qIDmini R1170I web page Docu...
Page 26: ...ation of the EASY2RD profile is required to connect the qIDminiNF using the Easy Controller application for Windows Follow the steps below to connect the qIDminiNF reader using the Easy Controller for Windows via Bluetooth 1 Download from the CAEN RFID web site the latest version of the CAEN RFID Easy Controller for Windows software and install it 2 Connect the qIDminiNF reader to your PC using ei...
Page 27: ...lick on Connect 9 Place a tag in front of the reader and click on Start Inventory to see the tag information displayed on the main window For more information on the CAEN RFID Easy Controller for Windows application usage please refer to the relevant user manual you can download it from the qIDmini R1170I web page Documents Section from the CAEN RFID Easy Controller for Windows web page or in the ...
Page 28: ...C string 96 bits long is represented by 12 characters The currently active format is marked with an asterisk By default the EPC HID format is set to HEX To activate a different format scroll through the FORMAT options by pressing quickly the trigger button until HEX or ASCII is displayed Hold down the trigger button for a few seconds the chosen option will begin to flash Once activated the device ...
Page 29: ...d enable the Bluetooth A list of the Bluetooth available devices is shown 2 Click on the qIDminiNF R1170INF reader and wait while the pairing is completed 3 Once the connection is established the Bluetooth blue light turns on 4 Launch a text editing App or any other App accepting keyboard input 5 Start an inventory cycle by pressing the trigger button ...
Page 30: ...en configured in HID profile and paired to a device the qIDminiNF will automatically reconnect to the same device every time the Bluetooth link is active qIDminiNF switched ON and Bluetooth activated on the host You can verify this behaviour looking at the blue LED that in this case turns ON automatically as soon as you switch on the qIDminiNF ...
Page 31: ...hnical Information Manual 31 Windows PCs Bluetooth Communication Setup 1 In case of Windows 8 Operating System Right click on the Bluetooth icon in the taskbar Add a Bluetooth Device Select the qID mini R1170INF reader and click on Pair ...
Page 32: ...evice name and paired using the pass key both parameters are provided below Bluetooth device name qIDmini device serial number Pass key 1234 2 Once the connection is established the Bluetooth blue light turns on 3 Launch a text editing App or any other App accepting keyboard input 4 Start an inventory cycle by pressing the trigger button 5 On the text editing window you will see the EPCs of the ta...
Page 33: ...D profile and paired to a device the qIDminiNF will automatically reconnect to the same device every time the Bluetooth link is active qIDminiNF switched ON and Bluetooth activated on the host You can verify this behavior looking at the blue LED that in this case turns ON automatically as soon as you switch on the qIDminiNF ...
Page 34: ...der plug the USB cable into the qIDminiNF USB port and then power ON the reader again 2 In order to connect the qIDminiNF reader to the PC you need to install the VCP Virtual Com Port drivers for your operating system You can download VCP drivers for Windows based systems from the CAEN RFID Web Site from the qIDmini R1170I web page SW FW section or from the Software and Firmware download area 3 Op...
Page 35: ...nfigured in the HID profile and connected via USB to a PC sends the EPCs of the detected tags on the serial port as ASCII characters So in order to operate with the reader in this configuration follow these steps 1 Launch a terminal emulator application e g Hyperterminal 2 Connect the terminal emulator application to the virtual COM port assigned to the qIDminiNF reader 3 Press the trigger button ...
Page 36: ...F HID PROFILE qIDminiNF Technical Information Manual 36 iOS devices Bluetooth Communication Setup 1 On your iOS device go to Setting and enable the Bluetooth 2 A list of the Bluetooth available devices is shown ...
Page 37: ... and wait while the pairing is completed 4 Once the connection is established the Bluetooth blue light turns on 5 Launch a text editing App or any other App accepting keyboard input 6 Start an inventory cycle by pressing the trigger button 7 On the text editing App window you will see the EPCs of the tags ...
Page 38: ...he reader works in stand alone mode You can download data or see the stored tags list by entering the OFFLINE profile options 1 Turn on the reader the display shows information on the currently active profile OFFLINE and then the message ready informs you that the reader is operating 2 Press quickly the power button to enter the OFFLINE profile options that are DWNLOAD ERASE VIEWTAG BTSCAN LOGOPT ...
Page 39: ...ckly the trigger button until the desired Bluetooth device and then hold down the trigger button for a few seconds the name of the Bluetooth device will begin to flash Once activated the device returns to the main menu LOGOPT Hold down the trigger button to enter the Log Option 1 TIMESTP Time Stamp permits to associate date and time to the EPC of the read tags To enable disable the TimeStp hold do...
Page 40: ...eously for about six seconds and then release the buttons The reader restarts by itself Warning Note that the reader SHALL NOT be connected to the USB port or to the battery charger during the reset otherwise the reader enters in the firmware upgrade state If by mistake you entered in the firmware upgrade state in order to restore the normal reader operation disconnect the USB cable and repeat the...
Page 41: ...oduction To access the main menu turn on the device and hold down the trigger button within two second To scroll through the main menu press quickly the trigger button The qIDminiNF R1170INF menu options are the following PROFILE BEEP VIBRATE POWER CLOCK To select a menu option hold down the trigger button ...
Page 42: ...l 42 The complete structure of the qIDminiNF R1170INF menu is the following EASY2RD PROFILE HID OFFLINE PWR UP BEEP PWR DOWN SCAN TAG PWR UP VIBRATE PWR DOWN SCAN TAG 25 mW 50 mW POWER 100 mW 200 mW 500 mW DATE CLOCK TIME Tab 7 1 qIDminiNF R1170INF Configuration Menu ...
Page 43: ...file please refer to qIDminiNF HID PROFILE chapter page 28 OFFLINE choosing this option you select the stand alone mode and the reader stores EPC codes into the internal memory when the communication links USB or Bluetooth are not available The EASY2RD and HID profiles require the presence of a nearby host that controls the reader pc tablet while in the OFFLINE profile the reader works in stand al...
Page 44: ...r can be active on more than one option simultaneously To return to the main menu quickly press the power button VIBRATE Access the configuration menu as explained in the Introduction paragraph page 41 To scroll through the menu options press quickly the trigger button The VIBRATE menu is the third option of the menu To select it hold down the trigger button The VIBRATE submenu options are the fol...
Page 45: ...CK menu is the last option of the menu To select it hold down the trigger button in this way you will enter its sub menu The CLOCK submenu options are the following Date the date is the first option of the clock submenu To set the date hold down the trigger button for a few seconds The date is shown in the format dd mmm yy e g 28 Oct 15 Press quickly the trigger button to change the day value Then...
Page 46: ... free at the qIDmini R1170I web page of the CAEN RFID Web Site SW FW section In order to upgrade the firmware follow the steps described below 1 Connect the qIDminiNF reader to the USB port of the PC 2 Press simultaneously the trigger and the power button for about six seconds 3 Open the FW upgrade program 4 Click on Next button 5 In the window you will see the message Found 1 device if the messag...
Page 47: ...le by clicking on the Browse button 7 Click on the Upgrade Firmware button and wait for the upgrade process to be completed 8 At the end of procedure if the upgrade has been successfully performed you will see the messages reported in the image below and the module is ready for normal operation ...
Page 48: ... 2 with output power 4dBm e i r p Virtual COM port parameters Baudrate up to 230 400kbps Databits 8 Stopbits 1 Parity none Flow control none User Interface Button 1 ON OFF Button 2 Trigger Led 1 power indication and battery status green high red low Led 2 communication activity blue Bluetooth orange USB Buzzer bitonal for events signalling Vibration for events signalling Display LCD Alphanumeric 8...
Page 49: ...o EPC Class1 Gen2 protocol RD1 All profiles that have been tested for the compliance with ETSI and FCC regulations are reported in the following table Link profile Regulation Modulation Return Link 0 ETSI FCC PR ASK f 40kHz FM0 f 40kHz 1 ETSI FCC PR ASK f 40kHz Miller M 4 f 256kHz 2 2 ETSI FCC PR ASK f 40kHz Miller M 4 f 320kHz Tab 9 2 qIDminiNF R1170INF Reader to tag link profiles 2 Default value...
Page 50: ...ng the equipment off and on the user is encouraged to try to correct the interference by one of the following measures a Reorient or relocate the receiving antenna b Increase the separation between the equipment and receiver c Connect the equipment into an outlet on a circuit different from that to which the receiver is connected d Consult the dealer or an experienced radio TV technician for help ...