background image

39

vEGA - sIRE

3

 pLUs - DoGE

3

 pLUs - sFERA

3

 - sFERA

3

 pLUs - pRINCE

3

 - pRINCE

3

 pLUs - GLoBE - tREND - ELIsE

3

 pLUs

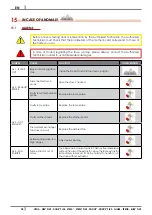
EN

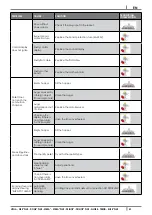
ALARM

CAUsE

soLUtIoN

INtERvENtIoN

AL 5 - FAILED 

IGNITION

Empty hopper

Full the hopper.

The burning pot has not 

been cleaned

Clean the burning pot.

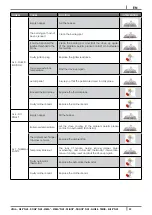
It has not reached the 

ignition threshold to the 

probe

Clean  the  burning  pot  and  start  the  stove  up  again. 

(If  the  problem  persists  please  contact  an  Authorized 

Technician).

Faulty ignition plug

Replace the igniter resistance.

Too severe external 

temperature

Start the stove up again,

Humid pellet

Assure you that the pellets are stored in a dry place.

Blocked thermal probe

Replace the thermal probe.

Faulty mother board

Replace the mother board.

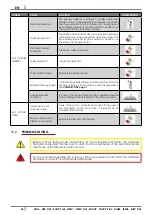
AL 6 - NO 

PELLET

Empty hopper

Fill the hopper.

AL 7 - THERMAL 

SAFETY

Boiler overtemperature

Let  the  stove  cooling.  (If  the  problem  persists  please 

contact an Authorized Technician).

The ambient exchanger 

fan does not work

Replace the ambient fan.

Temporary blackout

The  lack  of  tension  during  running  implies  boiler 

overheating  and  automatic  thermostat  intervention. 

Leave it cooling, reset and start the stove up again.  

Faulty automatic 

thermostat

Replace the automatic thermostat.

Faulty mother board

Replace the mother board.

Summary of Contents for DOGE3 PLUS

Page 1: ...ce manual vEGA sIRE3 pLUs DoGE3 pLUs sFERA3 sFERA3 pLUs pRINCE3 pRINCE3 pLUs ELIsE3 pLUs GLoBE tREND C A MERA STAGNA C H A M B R E É T A N C H E S E A L E D C H A M B E R E S TANCA HERMETISCH G E S L O T E N K A M E R C Â M A R A E S T A N Q U E Σ Φ Ρ Α Γ Ι Σ Μ Έ Ν Ο Σ Θ Ά Λ Α Μ Ο Σ T E STED 50 PA EN 16 5 1 0 ...

Page 2: ...SYSTEM VEGA TREND SIRE3 PLUS DOGE3 PLUS SFERA3 PLUS ELISE3 PLUS PRINCE3 PLUS MODELS 24 11 13 USING THE STOVE WITHOUT DUCTING 25 12 UsE 25 12 1 INTRODUCTION 25 12 2 CONTROL PANEL 26 12 3 USER MENU 27 12 4 START UP 27 12 5 STOVE ADJUSTMENT 27 12 6 FAILED IGNITION 28 12 7 POWER FAILURE 28 12 8 TEMPERATURE SETTING 28 12 9 FUME TEMPERATURE 28 12 10 SWITCHING OFF 28 12 11 CLOCK SETTING 28 12 12 DAILY PR...

Page 3: ...ct with foods Dir 2006 95 CEE for low tension Dir 2004 108 EC for Electromagnetic compatibility Read carefully the instruction contained in this manual to obtain the best efficiency This instruction manual is an integral part of the product make sure it is delivered with the appliance also in case of sold to others In case of loss please ask a copy to your local Technical Assistance Service In Ita...

Page 4: ...ctrical cable must not get in touch with the fume exhaust pipe and nor with every other part of the stove The user or whoever is operating the product must read and fully understand the contents of this installation and use guide before performing any operation Errors or incorrect settings can cause hazardous conditions and or poor operation The type of fuel to use is only the pellets Do not use t...

Page 5: ... manual are observed and therefore the product is used correctly The replacement of the entire system or the repair of one of its components does not extend the guarantee period and the original expiry date remains unchanged The guarantee covers the replacement or free repair of parts recognised as being faulty at source due to manufacturing defects To benefit from the guarantee in the event of a ...

Page 6: ...pecifying Appliance model Serial number Type of problem Use only original spare parts which you can find at our Technical Assistance Services 7 WARNINGs FoR tHE CoRRECt DIsposAL oF tHE pRoDUCt The owner is the sole party responsible for demolishing and disposing of the product This must be performed in compliance with laws related to safety and environmental protection in force in his her country ...

Page 7: ...has been drawn up in cooperation with Assocosma www assocosma org and is based on European Standards EN 15287 EN 13384 EN 1856 EN 1443 and UNI 10683 2012 It provides instructions for a good and correct execution of the chimney flue but it does not absolutely replace the current standards which the qualified manufacturer installer should comply with 9 2 CHIMNEY FLUE Fig 2 Chimney Flues LEGEND Fig 2...

Page 8: ...e in the adjacent room and it must be provided with a solid and condensation collection chamber under the entrance accessible through the sealed metal gate Auxiliary exhaust fans cannot be installed neither along the chimney nor on the chimney pot The inner section of the chimney flue can be round the best one or square and the jointed sides must have a minimum radius of 20 mm The section dimensio...

Page 9: ... of the system Not cleaning compromise safety 9 6 CHIMNEY pot Fig 5 Anti wind chimney pots The chimney pot is important for the correct running of the heating appliance We recommend using an anti wind chimney pot see Fig 5 page 9 The hole width for fumes exhaust must be the double of the chimney flue width and fitted in a way that the fume exhaust is assured also in case of wind It should prevent ...

Page 10: ...id surface is to widen if inside the room there are other activated appliances for example electric ventilators for foul air suction cooker hoods other stoves etc which depress the environment At switched on appliance it is necessary to check that the pressure fall between the room and the outside does not exceed 4 0 Pa value if necessary widen the air inlet EN 13384 The air inlet must be realized...

Page 11: ...g the combustible air inlet if present they must be applied In some countries and or regions the installation with sealed chamber is obligatory in case of doubt please follow the most restrictive regulations How to connect to the stove in the sealed chamber with concentric system Fig 9 Phase1 Fig 10 Phase 2 Fig 11 Phase 3 Original position with completely embedded tube see Fig 9 page 11 Pull out t...

Page 12: ...ces also at open top The fume conduit must be placed at a distance of minimum 500 mm from flammable or heat susceptible components It is prohibited to connect more than one wood pellet or any other type of appliance vent cowling to the same flue unless there are national derogations for instance in Germany which under suitable conditions allow for the installation of several appliances in the same...

Page 13: ...pected and the type of insulating material The aforesaid regulations are valid also for holes made on the wall EN 13501 EN 13063 EN 1856 EN 1806 EN 15827 10 FUEL 10 1 FUEL Use top quality pellets because they have influence in the calorific value and in ash remains Pellets features are dimension Ø6 7mm D06 Class maximum lenght 40 mm calorific value 5kWh kg humidity 10 ash remains 0 7 they must be ...

Page 14: ...ition must be chosen depending on environment outlet chimney flue Check with local authorities if there are any restrictive regulations which regard the combustible air inlet room ventilation fume exhaust system together with chimney flue and chimney pot Check if there is the combustible air inlet Check the probable presence of other stoves or appliances which could depress the room Check at switc...

Page 15: ...2 cm 11 32 cm 12 7 5 cm 13 34 cm 14 Exhaust fumes d 8 cm 15 Hole combustion air inlet d 6 cm 16 Ducting outlet Fig 16 General dimensions Sire3 Plus LEGEND Fig 16 page 15 1 54 4 cm 2 104 8 cm 3 52 3 cm 4 7 1 cm 5 5 8 cm 6 7 1 cm 7 5 8 cm 8 7 7 cm 9 21 7 cm 10 21 6 cm 11 30 3 cm 12 7 7 cm 13 34 cm 14 Exhaust fumes d 8 cm 15 Hole combustion air inlet d 6 cm 16 Ducting outlet ...

Page 16: ...END ELIsE3 pLUs EN Fig 17 General dimensions Doge3 Plus LEGEND Fig 17 page 16 1 55 4 cm 2 105 6 cm 3 54 cm 4 8 3 cm 5 8 5 cm 6 8 3 cm 7 8 5 cm 8 8 3 cm 9 21 7 cm 10 22 2 cm 11 30 3 cm 12 8 3 cm 13 34 cm 14 Exhaust fumes d 8 cm 15 Hole combustion air inlet d 6 cm 16 Ducting outlet ...

Page 17: ...REND ELIsE3 pLUs EN Fig 18 General dimensions Sfera3 Sfera3 Plus Globe LEGEND Fig 18 page 17 1 53 6 cm 2 104 cm 3 57 cm 4 45 5 5 5 cm 6 30 3 cm 7 22 7 cm 8 11 7 cm 9 5 5 cm 10 21 7 cm 11 Exhaust fumes d 8 cm 12 Hole combustion air inlet d 6 cm 13 Ducting outlet Sfera3 Plus model ...

Page 18: ...E3 pLUs EN Fig 19 General dimensions Prince3 Prince3 Plus LEGEND Fig 19 page 18 1 54 cm 2 105 cm 3 54 cm 4 7 5 cm 5 8 cm 6 7 5 cm 7 8 cm 8 7 5 cm 9 22 cm 10 22 cm 11 32 cm 12 7 5 cm 13 34 cm 14 Exhaust fumes d 8 cm 15 Hole combustion air inlet d 6 cm 16 Ducting outlet Prince3 Plus model ...

Page 19: ... pLUs EN Fig 20 General dimensions Elise3 Plus LEGEND Fig 20 page 19 1 65 cm 2 108 cm 3 60 3 cm 4 45 5 5 5 cm 6 30 3 cm 7 22 7 cm 8 11 7 cm 9 8 2 cm 10 22 cm 11 Exhaust fumes d 8 cm 12 Hole combustion air inlet d 6 cm 13 Ducting outlet 11 3 GENERAL INstALLAtIoN Fig 21 General installation ...

Page 20: ...sary please install a fire resistant plate on the concerned walls In some countries also masonring load bearing walls are considered flammable 11 4 FRoNtAL pANEL AssEMBLY vEGA tREND pRINCE3 pRINCE3 pLUs MoDELs For frontal panel installation proceed as follows Fig 22 Frontal panel assembly Fig 23 Frontal panel position Fig 24 Frontal panel fixing Hook the frontal panel cogs at its specific holes se...

Page 21: ... panel at its specific cogs at the back of stove see Fig 29 page 21 For Sfera3 Plus model with lateral duction open the hole as shown in Fig 30 page 21 Fig 31 Place the bracket Fig 32 Screw the bracket Place the bracket between the colored panels in the upper part to lock the sides see Fig 31 page 21 Blocking the bracket with the screw see Fig 32 page 21 11 7 FRoNtAL pANEL AssEMBLY vEGA stoNE MoDE...

Page 22: ...correct position see Fig 37 page 22 Fix the frontal panel by tightening two screws in the lower part see Fig 38 page 22 11 8 FRoNt pANEL ADJUstMENts ELIsE3 pLUs MoDEL You can adjust the top and bottom panels to bring them flush with the side panels Proceed as follows top pANEL Fig 39 Adjustment 1 Fig 40 Adjustment 2 Loosen the bottom screw see Fig 39 page 22 and the top screw with a screwdriver se...

Page 23: ...ove on otherwise it is advisable to keep it off Do not use extension cables If the feeder cable is damaged it must be replaced by an authorized technician When the stove is not going to be used for a long period of time it advisable to remove the plug from the socket on the wall 11 10 CoNNECtIoN to tHE EXtERNAL tHERMostAt The stove works through a thermostat probe placed in its inner If you desire...

Page 24: ...LIsE3 pLUs pRINCE3 pLUs MoDELs The stove is fitted with 1 hot air outlet Fig 45 Upper pipe position Fig 46 Upper hot air outlet Fig 47 Back pipe position Fig 48 Back hot air outlet The hot air can be forced in ducts in the upper part see Fig 45 page 24 and Fig 46 page 24 Or make the air exit from the rear see Fig 47 page 24 and Fig 48 page 24 Fig 49 Ducting system example ...

Page 25: ... while the remaining 1 2 are conveyed through the left ducting pipe system Balance heat output with air capacity to obtain the best performance see FAN ADJUstMENt page 29 The operation above must be carried out by an authorised technician 11 13 UsING tHE stovE WItHoUt DUCtING The stove can be used without ducting the air to other environments In this case assemble the environment diffuser in the s...

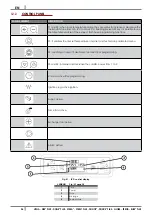
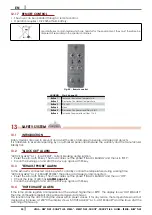
Page 26: ...ble to see the fume temperature at the exhaust Both have programming functions P3 it enables to enter set temperature and User and Technician parameters menu P4 switching on and off alarm reset and exit from programming P5 and P6 increase and decrease the calorific power from 1 to 5 Chrono active time programming Ignition plug active ignition Auger active Fume fan active Exchanger fan active Alarm...

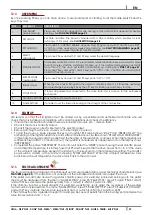
Page 27: ... regulations and checks the efficiency If inside the combustion chamber there are booklets manuals etc remove them Check if the door is correctly closed Check if the stove is correctly inserted in the electric socket Before switching the stove on assure you the burning pot is clean To start the stove up keep pressed P4 key for an instant till it will be shown START and PREHEAT WAIT the preheating ...

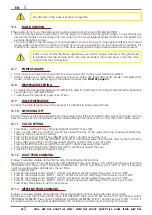
Page 28: ...ens always independently if the stove is hot or cold Then OFF will be shown 12 11 CLoCK sEttING Press P3 key and then P5 key till underlining SET CLOCK menu 02 Press once P3 DAY and with P1 and P2 keys select the day of the week Monday Tuesday Wednesday Thursday Friday Saturday Sunday Press for the second time P3 key HOURS and with P1 and P2 keys set the hour Press for the third time P3 key MINUTE...

Page 29: ...et ON or OFF Press P5 the display shows THURSDAY PROG 1 with P1 and P2 keys set ON or OFF Press P5 the display shows FRIDAY PROG 1 with P1 and P2 keys set ON or OFF Press P5 the display shows SATURDAY PROG 1 with P1 and P2 keys set ON or OFF Press P5 the display shows SUNDAY PROG 1 with P1 and P2 keys set ON or OFF Now press P5 and repeat all the previous instructions for Prog 2 Prog 3 Prog 4 To e...

Page 30: ...ll 13 2 BLACK oUt ALARM ACTIVE ALARM AL 1 BLACK OUT current breaking during ignition Reset the error with P4 key The stove carries out the phase FINAL CLEANING and then is in OFF Clean the burning pot and start the stove up again with P4 key 13 3 EXHAUst pRoBE ALARM To the exhaust is connected a probe which contantly controls the temperature during working time ACTIVE ALARM AL 2 EXHAUST PROBE the ...

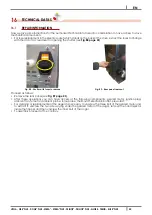
Page 31: ...tch as ALARMs page 38 Unscrew the black cap press the button and screw the cap again Clean the burning pot and start the stove up again with P4 key 13 9 FAILURE DEpREss ALARM To the boiler is connected a pressostat which control the depression and in some stove models on the fire door id installed a microswitch which registers the opening ACTIVE ALARM AL 8 FAILURE DEPRESS the pressostat and or fir...

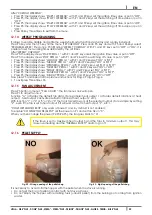
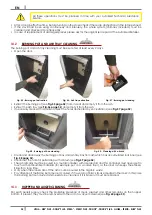
Page 32: ...t from the ash If necessary clean with a pointed object the holes obstructed by encrustations see Fig 57 page 32 Fig 58 Burning pot box cleaning Fig 59 Cleaning with a brush Clean and drain away the burning pot box and ash tray box from ash which has accumulated in its inner see Fig 58 page 32 Clean also the hole for pellet drop with a brush see Fig 59 page 32 The ash remains must be poured in a m...

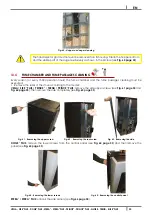
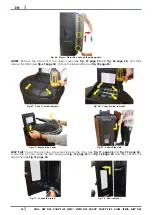
Page 33: ...mber and the fume passages cleaning must be executed Remove the sides of the stove according to the model vEGA sIRE 3 pLUs pRINCE 3 tREND pRINCE 3 pLUs remove the side upper screws see Fig 61 page 33 and Fig 62 page 33 then remove the side completely see Fig 63 page 33 Fig 61 Removing the upper screw Fig 62 Removing the rear screw Fig 63 Removing the side DoGE 3 pLUs remove the lower screws from t...

Page 34: ...he latter see Fig 69 page 34 Unhook the lateral sides see Fig 70 page 34 Fig 67 Cover 1 screw removal Fig 68 Cover 2 screw removal Fig 69 Remove the cover Fig 70 Unhook the side ELIsE3 pLUs loosen the door stop screw and remove the door see Fig 71 page 34 and Fig 72 page 34 Loosen the 2 screws inside the side panel see Fig 73 page 35 and Fig 74 page 35 and then unhook the side panel see Fig 75 pag...

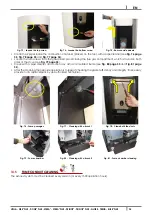
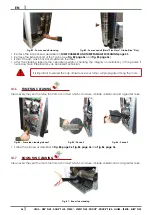
Page 35: ...nt which is found on both sides of the stove see Fig 79 page 35 Clean with a pipe cleaner and suction any ash accumulated inside see Fig 80 page 35 and Fig 81 page 35 After the cleaning the opposite operation is to repeat checking the gasket efficiency and integrity if necessary provide for its replacement by an Authorized Technician Fig 76 Fume passages Fig 77 Cleaning with a brush 1 Fig 78 Clean...

Page 36: ...ite operation checking the integrity and eficiency of the gasket if necessary have it replaced by an Autorized Technician It is important to sealed the cap othrwise noxiuous fumes will propagate among the room 14 6 FUME FAN CLEANING Clean every the year the fume fan from ash or dust which can cause a blade unbalance and a greater noise Fig 84 Fume fan cleaning phase1 Fig 85 Phase 2 Fig 86 Phase 3 ...

Page 37: ...ted metal panels use a soft cloth Do not use degreasant agents like alcool diluents acetone gasoline because these could irremediably damage the varnish 14 11 CLEANING oF CERAMIC AND stoNE pANELs Some stove models has an external lining made up of ceramic or stone These pieces are handmade therefore they could inevitably present crazings seedinesses shadings To clean ceramic or stone panels use a ...

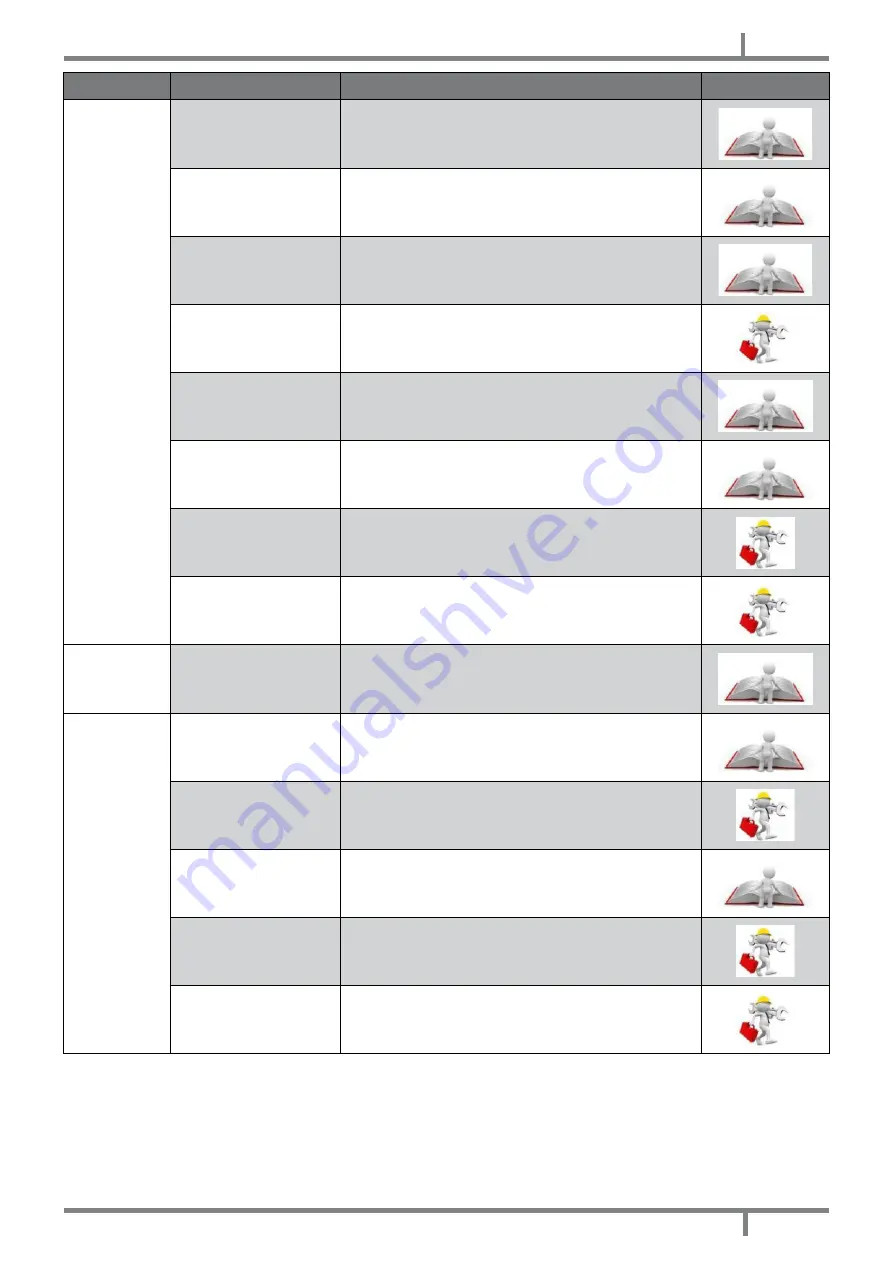
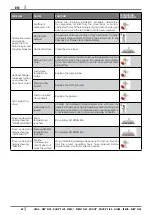
Page 38: ...IoN AL 1 BLACK OUT Black out during ignition step Clean the fire pot and start the stove up again AL 2 EXHAUST PROBE Disconnected fume probe Have the stove checked Faulty fume temperature probe Replace the fume probe AL 3 HOT EXHAUST Faulty fume probe Replace the fume probe Faulty mother board Replace the mother board The ambient exchanger fan does not work Replace the ambient fan Pellet loading v...

Page 39: ...tart the stove up again Humid pellet Assure you that the pellets are stored in a dry place Blocked thermal probe Replace the thermal probe Faulty mother board Replace the mother board AL 6 NO PELLET Empty hopper Fill the hopper AL 7 THERMAL SAFETY Boiler overtemperature Let the stove cooling If the problem persists please contact an Authorized Technician The ambient exchanger fan does not work Rep...

Page 40: ...r board Replace the mother board Extreme chimney lenght Contact a Specialized Stove repairer and check that the exhaust chimney is in accordance with the regulations see CHIMNEY FLUE page 7 Adverse weather conditions In case of strong wind there can be a negative pressure to the chimney Check it and start the stove up again AL 9 DOOR OPEN The fire door is not correctly closed Close the fire door c...

Page 41: ...amber Empty hopper Fill the hopper Auger blocked by a foreign object for example nails Clean the auger Auger motorreducer out of order Replace the motorreducer Check on the display if there is an active alarm ACTIVE ALARM Have the stove overhauled Fire extinguishes and stove stalls Empty hopper Fill the hopper Auger blocked by a foreign object for example nails Clean the auger Poor quality pellet ...

Page 42: ... immediately It can be harmful to health to run the stove without fume exhaust fan Heat exchanger fan keeps turning even when the stove has cooled Faulty fume temperature probe Replace the fume probe Faulty mother board Replace the mother board Ash nearby the stove Faulty or broken door gaskets Replace the gaskets Fume pipes not sealed Contact an Autorized Stove repairer who will seal the gaskets ...

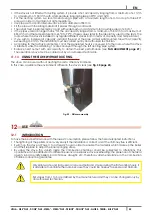
Page 43: ...r see Fig 88 page 43 Fig 88 Shutter with fuses to remove Fig 89 Rear panel removal Proceed as follows Remove the rear panel see Fig 89 page 43 After these operations you can have access at the following components geared motor ignition plug ambient fan fume fan ambient probe fume probe thermostat electronic board pressostat For cleaning or replacemente of the auger it is necessary to unscrew the t...

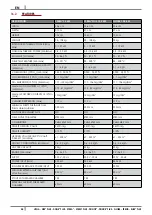
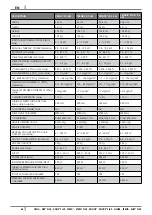
Page 44: ...m3 Medium CO CONTENTS at 13 O2 Min Max 375 67 mg Nm3 375 83 mg Nm3 375 83 mg Nm3 Medium POWDER CONTENTS at 13 O2 Max 12 mg Nm3 12 mg Nm3 12 mg Nm3 CHIMNEY DEPRESSION Max 11 Pa 11 Pa 11 Pa MINIMUM SAFETY DISTANCE from flammable materials 300 mm 300 mm 300 mm ON SHARED CHIMNEY FLUE NO NO NO FUME OUTLET DIAMETER Ø80 mm Ø80 mm Ø80 mm COMBUSTIBLE Pellet Ø6 7 mm Pellet Ø6 7 mm Pellet Ø6 7 mm PELLETS HEA...

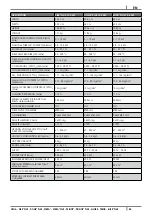
Page 45: ...3 Medium CO CONTENTS at 13 O2 Min Max 375 83 mg Nm3 375 83 mg Nm3 375 83 mg Nm3 Medium POWDER CONTENTS at 13 O2 Max 12 mg Nm3 12 mg Nm3 12 mg Nm3 CHIMNEY DEPRESSION Max 11 Pa 11 Pa 11 Pa MINIMUM SAFETY DISTANCE from flammable materials 300 mm 300 mm 300 mm ON SHARED CHIMNEY FLUE NO NO NO FUME OUTLET DIAMETER Ø80 mm Ø80 mm Ø80 mm COMBUSTIBLE Pellet Ø6 7 mm Pellet Ø6 7 mm Pellet Ø6 7 mm PELLETS HEAT...

Page 46: ...TS at 13 O2 Min Max 375 83 mg Nm3 375 83 mg Nm3 375 77 mg Nm3 375 83 mg Nm3 Medium POWDER CONTENTS at 13 O2 Max 12 mg Nm3 12 mg Nm3 11 mg Nm3 12 mg Nm3 CHIMNEY DEPRESSION Max 11 Pa 11 Pa 11 Pa 11 Pa MINIMUM SAFETY DISTANCE from flammable materials 300 mm 300 mm 300 mm 300 mm ON SHARED CHIMNEY FLUE NO NO NO NO FUME OUTLET DIAMETER Ø80 mm Ø80 mm Ø80 mm Ø80 mm COMBUSTIBLE Pellet Ø6 7 mm Pellet Ø6 7 m...

Page 47: ...NOTE ...
Page 48: ...y Cadel Via Foresto Sud 7 31025 Santa Lucia di Piave TV ITALY tel 39 0438 738669 fax 39 0438 73343 www cadelsrl com Partner of pellet stoves wood stoves wood cooking stoves thermostoves pellet fireplace inserts Rev 03 2015 ...

Reviews: