


21
ATENA3 PLUS 12/14 - DUKE 12/14 AIRTIGHT - SABA 12/14 - MITHOS3 PLUS 12/14
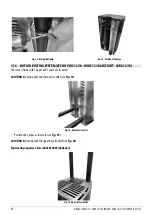
• Remove the cap at the back of the cover (see
Fig. 48
or
Fig. 49
).
• Connect a Tee fitting as shown in
Fig. 50
.
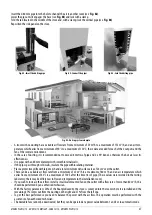
Fig. 51 - Lower the support
Fig. 52 - Connect the pipes
Fig. 53 - Rear fume exhaust mounted
• Bend the support at the back of the stove and insert the fume exhaust pipe (see
Fig. 51
).
• Connect the 2 pipes (see
Fig. 52
and secure it all with the clamp (see
Fig. 53
).
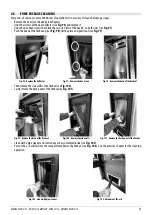
5.15 CONCENTRIC PIPE-KIT ASSEMBLY (ATENA
3
PLUS 12/14 - DUKE 12/14 AIRTIGHT - SABA 12/14)
The stove is designed to be connected to a concentric pipe by means of a dedicated kit.
The upper exhaust with concentric pipe requires 1 kit code 5020004 (optional).
To assemble the kit, proceed as follows:
• Take the kit (see
Fig. 54
) and couple the pipe to the outlet of the fume exhaust of the stove (see
Fig. 55
).
• Insert the flexible pipe into the combustion air inlet pipe of the stove (see
Fig. 56
).
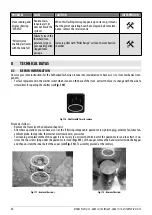
Fig. 54 - Concentric kit
Fig. 55 - Insert pipe d.80 mm
Fig. 56 - Insert combustion air pipe
• Secure the kit to the back of the stove with a clamp (see
Fig. 57
).
• The stove is ready to be connected to the flue (see
Fig. 58
).


