


FREQUENCY CHANNEL CHANGE
When the trolley isn’t moving smoothly by operating remote control, the
frequency may be experiencing interference condition, this may be
caused by the use of a similar frequency nearby. If this happens, use
the following steps to adjust the frequency channel.
Only change frequency channel when
trolley is stopped
.
With one thumb to press
Code
button (keep press and hold) and use
another thumb or finger to press
plus
or
minus
button (minimum
press twice) for select another frequency channel. (The reverse led
light will flash during this operation)
The new channel from this frequency change will show on led speed
indicator.
There are total 16 channels be available for FCC (U.S) and 6 for CE
(Europe).
Press the
brake
button, your frequency channel change has been
completed.
If you still find the remote trolley isn’t working smoothly, taking
another step of setting a frequency scan, or try changing another
frequency channel again.
FREQUENCY SCAN
If you press the button from remote transmitter by mistake or the trolley
doesn’t to operate smoothly after frequency changed, try the following
process to make frequency scan.
Only set frequency scan when
trolley is stopped,
the On /Off switch
must on OFF with potentiometer on “0” zero position.
Press the
Code
button
twice
within one second. (You will see the
battery indicator led lights on transmitter flash intermittently).
Switch the On/Off switch to ON and back to OFF position (one cycle)
within one second and continue 3 cycles within 3 seconds.
The yellow or green led light on handle grip will flash and change to
green rapid flashing when a frequency is paired.
The Green, Yellow, and Red lights from battery indicator of transmitter
will flash intermittently when scanning and duration for 60 seconds.
- 13 -
Press
Code
button after frequency paired.
Press the
Brake
button to continue.
NOTE:
In case your trolley stops while using the remote control or it doesn’t
respond well to commands from transmitter or remote signal not well,
then go straight to set frequency scan.
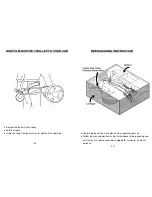
TRIM ALIGNMENT FOR MOVING STRAIGHT
Your trolley has been factory set to go for a straight line. However,
minor adjustments can be made by using the following process.
This must be operated only when your trolley is
stopped
. (Press
Brake
button)
Press
Align.
Button with one thumb (keep press and hold button) and
use another thumb or finger to press
Left
or
Right
button to adjust
motor deviation, do not keep on press of Left or Right button, you will
need to press and release the button multiple times (not hold it down).
If your trolley is going to the left, press the
Right
button to adjust the
motor deviation.
Press the
Brake
button to continue. You may need to repeat these
steps if your trolley still not going straight.
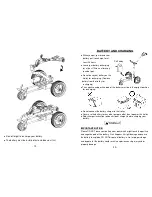
PAIRING FOR NEW REMOTE TRANSMITTER
When a new remote transmitter needs to be replaced, follow these
steps to pair it with the receiver.
Have ON/OFF switch (on handle grip) on
OFF
, potentiometer on
“0”
zero
position and then
connect the battery
. (If the battery is
connected, disconnect first)
Turn ON/OFF switch to
ON
and back to
OFF
position (one cycle),
continue
3 cycles (total)
within one minute from battery connection.
(Green led light on the handle grip shows flashes faster.)
Press
Code
button
twice
within one second (You will see the battery
indicator led lights on transmitter flash intermittently). Then the green
light (on handle grip) will flash rapidly after frequency paired.
Press the
Brake
button to continue.
The new transmitter is now be paired successfully.
- 14 -


