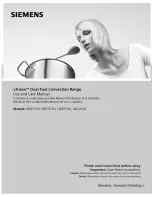
background image


5

3.  CONTROL PANEL  


3.1 TIME DIAL 


To operate your oven for a set time

, you must first turn the time dial 

clockwise

 to the time you choose, 

from 0 to 60 minutes (if you’re facing the oven, it is the dial on the left side of the control panel). Line up 
your desired time (on the dial) with the indentation in the control panel above the time dial. 


When set cooking time is over, the dial turns to “0” position, the oven turns off, and a buzzer sounds.


To operate the oven continuously

 instead of for a set time, turn the time dial 

counterclockwise

 until 

the hand icon (   ) on the dial lines up with the indentation in the control panel above the time dial. The 
oven will operate continuously until you manually turn the dial back to “0”. 


Whether you have chosen to set an actual time, or have set the time dial for continuous “on”, the fan will 
begin spinning. 


3.2 TEMPERATURE DIAL 


The temperature inside the cooking chamber is set by the temperature dial (if you’re facing the oven, it is 
the dial on the right side of the control panel).   


Turn the dial clockwise and set your desired temperature.  At this time the green 
pilot light, located just to the right of the temperature dial, will turn on.  This 
indicates that the oven is preheating.   


Please note: 

the green pilot light will fluctuate on and off throughout the cooking 

cycle.  This indicates that the heating element is turning on and off to help keep 
the actual temperature within 5-10 degrees of the set temperature.


Always preheat oven before placing food into it.    


4. CLEANING YOUR NEW OVEN 


WARNING: Before starting any maintenance or cleaning operation, it is necessary to disconnect 
the electrical power supply and wait for your oven to cool down. 


4.1 BEFORE USING YOUR NEW OVEN


Clean the metal parts with hot soapy water and rinse thoroughly. 


With cooking cavity empty, heat the oven for about 30 minutes at a temperature of 350°F to “burn it in”. 


Never wash the cooking chamber with acids, abrasives, or aggressive detergents. 


The oven should never be cleaned with direct water from a hose. Never use anything more powerful than a 
spritz bottle to clean your oven, to avoid damaging the electrical components and voiding your warranty

.


4.2 CLEANING THE COOKING CAVITY


Make sure to wipe up any and all spills as they occur.  


At the end of the day (or as needed), clean the cavity using only proper products.  


Never clean the stainless steel with acids, caustic detergents, abrasives or any products containing 
chlorine. 


The appliance should never be cleaned with direct water from a hose. Never use anything more 
powerful than a spritz bottle to clean your oven, to avoid damaging the electrical components and 
voiding your warranty

.


4.3


CLEANING THE OUTSIDE OF YOUR OVEN


Wipe up spills, as they occur, with a damp cloth. 


Never use a spray of water to clean the outside of your oven. This may damage the electrical 
components and void your warranty. 

GREEN PILOT LIGHT 

TIME 

TEMPERATURE

INDENTATIONS 

Summary of Contents for UNOX OV-003

Page 1: ...NUAL Convection Ovens Instruction Manual Quarter Size Model Model OV 003 Quarter Size 3 Shelves 120 Volt Half Size Models Model OV 013 Half Size 3 Shelves 120 Volt Model OV 023 Half Size 4 Shelves 208...

Page 2: ...1 Instruction For The Operator 4 2 Notes For Use 4 3 Control Panel 5 3 1 Time Dial 5 3 2 Temperature Dial 5 4 Cleaning Oven 5 5 Turning Off In Case Of Breakdown 6 III Cooking Principles 6 1 Cooking Mo...

Page 3: ...rical connections before installing the oven Refer to the illustrations in the separate technical data document for your model 3 2 FEET ASSEMBLY You will find the feet packed inside your oven s cookin...

Page 4: ...r ceiling of your oven A simple cleaning with soap and water is usually enough to keep your oven spotless and in like new condition for years Your oven should never be cleaned with a water hose or any...

Page 5: ...on and off to help keep the actual temperature within 5 10 degrees of the set temperature Always preheat oven before placing food into it 4 CLEANING YOUR NEW OVEN WARNING Before starting any maintenan...

Page 6: ...50 F lower than what you would have set it at in a conventional oven Let the food tell you what it needs if it browns too fast turn the oven temperature down If you experience uneven cooking the solu...

Page 7: ...the power supply system and let it cool down Remove the side rails Unscrew the glass cover and replace the lamp with an identical bulb Screw the glass cover back on Reassemble the side rails 2 2 RESE...

Page 8: ...bake a fresh Pizza on the heat plate The plates are made from alloys which provide a superior heat sink and produce fast even cooking of both top and bottom of the food product simultaneously Aluminu...

Page 9: ...its down position move door in a closing direction until door safety lock stops the closing action as in Fig 5 Hold door as shown in Fig 6 Fig 6 Fig 7 Slightly lift and swing door out of unit as shown...

Page 10: ...n temperature down 25 30 F Let the product tell you if it needs more or less heat Aluminum foil can get pulled into the fan and cause damage Don t overload the oven Maintain a minimum 2 between the pr...

Page 11: ...kie will spread flatten out during baking Dough baked from frozen produces a thicker better looking cookie than ones that are baked from refrigerated or room temperature which will spread out and ther...

Page 12: ...2 parts shortening approx 1 part water Add a little salt and a four finger pinch of sugar The Cadco Convection Oven was preheated to 325 F and the pies were baked for 45 minutes to an hour depending o...

Page 13: ...ven for about 10 to 12 minutes Hamburger should be cooked to an internal temperature of 165 F to be safe according to HACCP guidelines Try cooking your burgers at 250 F for 15 to 20 minutes and notice...

Page 14: ...e 30 day warranty on glass If required call Cadco directly for warranty replacement of these items within first 90 days ALL CONVECTION OVEN MOTORS ARE BACKED BY A ONE YEAR WARRANTY WARRANTY PROCEDURES...

Reviews: