background image


34 


Step 
No. 

Description 

Picture 

12 

Setting

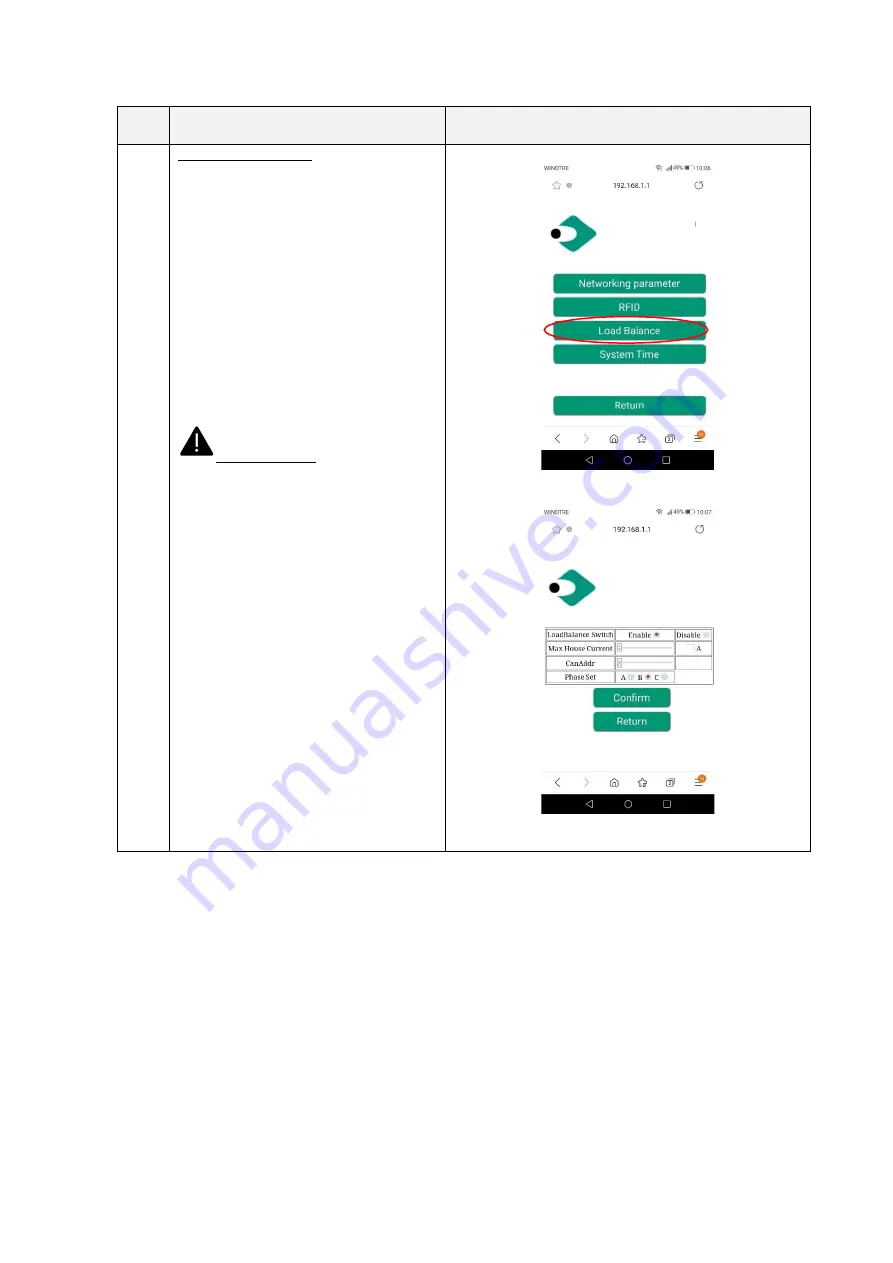
/Load Balance: 

In  this  page  the  load  balancing  can  be 
configured 


LoadBalance 

Switch

load 

balancing activation 


Max  House  Current

:  sets  the 

maximum 

available 

current 

(power) 


CANAddr

:  sets  the  CAN  address 

for  master/slave  communication 
between two chargers 


Phase Set

: selects the phase to be 

measured  


Important  note

:  these  parameters 

shall be configured by qualified personnel 
only 


Summary of Contents for PLUS EV

Page 1: ...Cabur PLUS EV Smart Chargers Installation and operating manual...

Page 2: ...against residual current 11 6 5 Overvoltage protection 11 6 6 Installation cables 11 6 7 Supported power supply systems 11 6 8 Installation steps 12 6 9 Installation on stand 15 7 Operations 19 7 1 O...

Page 3: ...2 11 Load balancing 43 12 System upgrade 45 13 Language configuration 47 Markings Point of contact under Directive 2014 35 EU Cabur S r L Localit Isola Grande 45 17041 Altare SV Italy www cabur it...

Page 4: ...0 3 13 07 2021 Cabur Technical Office System upgrade and language configuration info added 1 0 13 07 2021 Cabur Technical Office New name Cabur_EV_PLUS_Installation_Instruction_Manual 1 1 19 07 2021...

Page 5: ...ucer has the right to apply changes to the product whenever needed The reproduction of this manual is not allowed without the written authorization by Cabur s r l 2 1 2 About safety The product confor...

Page 6: ...s prohibited to apply modifications to the charger It is prohibited to reconfigure or modify the product The product may only be operated in perfect conditions 2 1 3 About maintenance Do not open the...

Page 7: ...he producer is also not liable for damage caused by the actions of third parties atmospheric discharges overvoltage and events related to chemical influences The warranty does not apply to the replace...

Page 8: ...ted under the operating conditions specified in the documentation This documentation is mandatorily to be read by qualified personnel for installation and initial operation as well as by the user for...

Page 9: ...PC ASA UL94 V0 PC ASA UL94 V0 PC ASA UL94 V0 Cooling system Integrated fan Integrated fan Integrated fan Integrated fan Mounting Wall Stand Wall Stand Wall Stand Wall Stand Electrical Data Mains Volta...

Page 10: ...e WIFI system upgrade Reports Charge reports Fault reports Charge reports Fault reports Charge reports Fault reports Charge reports Fault reports Protection Function Overcurrent protection Overvoltage...

Page 11: ...be kept away from moisture dust flammable gas flammable liquid etc away from heat sources and corrosive environments The altitude of the installation site must be 2000 m 6 2 Installation accessories T...

Page 12: ...5 Overvoltage protection The charger is compliant to the Overvoltage Category III 6 6 Installation cables The cable for connecting the mains supply to the charger must have a section in the following...

Page 13: ...t the charger four expansion screws a mounting template a mounting metal bracket already attached to the charger rear side one rubber gland for the input cable 2 Lean the mounting template against the...

Page 14: ...Fix the wall mount bracket on the wall with the expansion screws 5 Hang the charger on the wall mounted bracket This is done just sliding from top to bottom the charger into the bracket binaries Then...

Page 15: ...device for fixing the input cable so you must leave enough space for the cable to avoid the cable from being pulled by external forces or you can add a cable fixing device which stabilize the input ca...

Page 16: ...r PVC conduit embedded below the base The top part of the platform must be flat to have a safe and stable installation avoiding dangerous breaks of the stand In case of newly poured concrete platform...

Page 17: ...the concrete platform An M6x20 bolt needs to be added to the stainless steel nut at the bottom of the stand to provide ground protection 5 Remove the wall mounted metal plate that comes with the char...

Page 18: ...ure the input cable is not powered Open the wire cover circled in the picture insert the power supply cables into the bottom hole and connect the cables according to the signs as specified on the wire...

Page 19: ...screw up the wire cover with 4 screws 9 Close the front cover and the installation is finished Important note the front cover must be correctly installed and closed before using the charger Do not us...

Page 20: ...s AREA1 AREA2 AREA3 on its front side Each AREA has its own function as in the following table Display Area Type Function description AREA1 Digital character display It displays the following informat...

Page 21: ...character display AREA1 The following table shows the format of the information presented by the frontal display Display string format Letter c single character Unit Description ccc 0 V Where ccc Inp...

Page 22: ...Missing power phase fault In case of system upgrade operations the display can show the following messages Display string format Description 100 UP Upgrade successful E01 UP Upgrade unsuccessful E02...

Page 23: ...ent mode connected Steady Red Damaged WiFi module Plug status Depending on its colour and on its behaviour blinking or steady it gives the following different information Status Colour Information Ste...

Page 24: ...s the area where the RFID card is operative The RFID card is used to start or stop the charging process In order to perform these operations the user should lay the card on the tap rectangular area in...

Page 25: ...two possible WiFi modes WiFi AP Access Point WiFi CLIENT mode The WiFi AP mode is the default one The dedicated button on the front black display area under the black frontal cover must be pushed for...

Page 26: ...necessary to setup the connection between the user device PC tablet smartphone and the charger Step No Description Picture 1 The WiFi interface must be in AP mode The Wi Fi LED indicator on the front...

Page 27: ...e charger it should have an SSID name similar to ACPILE_xx or represented by a numeric string 4 Now the connecting device is connected to the charger AP The WiFi LED indicator starts blinking confirmi...

Page 28: ...he following URL http 192 168 1 1 The home page of the web app is shown 2 Using card button This button indicates the status of the charging process with its label Using card means the charger is not...

Page 29: ...can access other pages by clicking the 6 buttons at the top of the page These buttons will be explained later in the document System parameter settings In this page the main system parameters can be...

Page 30: ...Client Mode The list of the networks is shown automatically after entering this page Or the user can set it To connect to a particular SSID select it insert the password in the proper field and click...

Page 31: ...e 6 Clicking on the Setting button a new setting page is presented with the following menus Network parameter RFID settings Load Balance System time Important note these parameters shall be configured...

Page 32: ...31 Step No Description Picture 7 Clicking on the History button the user can access the historical logs of the device 8 Clicking on the Report button the user can access the reports of the device...

Page 33: ...these parameters shall be configured by qualified personnel only 10 Setting Network parameters Settings for the OCPP server address to support OCPP based management The format of the OCPP server addr...

Page 34: ...y be performed when the charger is in stand by mode The new card to be associated must be read before To read it the user should click on the Read button put the card near to the RFID tap area see 6 1...

Page 35: ...oadBalance Switch load balancing activation Max House Current sets the maximum available current power CANAddr sets the CAN address for master slave communication between two chargers Phase Set select...

Page 36: ...m time can be set The correct time is automatically read from the connecting device and is shown in the Current time field Clicking the Confirm button the time setting is saved as the charger time Imp...

Page 37: ...l only 8 1 3 WiFi CLIENT mode When in CLIENT mode the charger can be connected to an available WiFi network The charger control can be achieved by a server which supports the OCPP protocol The current...

Page 38: ...server 4 is eventually connected 8 1 4 WiFi CLIENT mode operations OCPP support When connected in WiFi CLIENT mode the charger is able to interface to the OCPP server This allows for network based man...

Page 39: ...Cache o Reserve Now o Cancel Reservation o Clear Charging Profile o Set Charging Profile Operation initiated by the charge point o Boot Notification o Status Notification o Heartbeat o Authorize o St...

Page 40: ...D belt light changes from steady blue to blinking blue the charger is ready and starts charging the EV battery The plug cannot be disconnected when the charging process is running To stop the charging...

Page 41: ...s able to inform the charger about the available amount of charging power in the main supply network This means the charger knows in every moment the amount of power left by the other loads that can b...

Page 42: ...terminal blocks The RS 485 wires are connected to the bus connector terminal block on the charger as presented in the picture 2 The RS 485 signals from the meter shall be connected as in the picture w...

Page 43: ...available power and the value of the power which is already used by the rest of the loads in the same networks this information is provided by the external power meter through the RS 485 interface As...

Page 44: ...work The limit of two chargers is due to the maximum rated current of the external power meter i e in case of 32A charger and 80A rated meter two chargers are allowed in case the meter can support up...

Page 45: ...44 ENERGY METER RS 485 CAN...

Page 46: ...own 2 Clicking on the Configuration button a new setting page is presented as in the attached picture Important note these parameters shall be configured by qualified personnel only 3 The upgrade proc...

Page 47: ...ool is a software application which runs on PCs used to generate the verification code for login and to automatically generate the MD5 checksum to validate the upgrade file integrity Drag and drop the...

Page 48: ...ans successful upgrade Do not restart the system otherwise and contact the manufacturer 13 Language configuration The charger is configured with its factory default language Other languages can be con...

Page 49: ...ribed in chapter 12 will upload the charger firmware file with the selected language This makes the app interface pages displayed in the language preferred by the user Important notes these parameters...

Reviews: