background image

Operation

3-4

System Management Buses

There are two management channels within the SmartSwitch 9000 system: the 
SMB-1 and the SMB-10. These buses provide side-band management and inter-
module management communication.

SMB-1 Bus

The SMB-1 is a 1Mbs management bus located within the SmartSwitch 9000. This 
bus is utilized by all diagnostic controllers in the system including connectivity 
modules, power supply modules and the environmental module. The SMB-1 
transports inter-chassis information between system components, such as power 
and environmental information, as well as diagnostic messages. Periodic loop-
back test are performed by all modules that share this bus to ensure the validity of 
SMB-1. In the event a failure is detected on SMB-1, the SMB-10 may be used as an 
alternate communication channel.

SMB-10 Bus

The SMB-10 is a 10Mbs management bus located within the SmartSwitch 9000. 
This bus is used for inter-chassis communication of modules as well as serving as 
an side-band management channel into the SmartSwitch 9000. 

The SMB-10 is externalized from the chassis via an optional Ethernet Port 
Interface Module (EPIM) located on the front of the Environmental Module. 
Through an EPIM connection, full SNMP management of the SmartSwitch 9000 is 
available side-band from user data. Modules that share the SMB-10 bus 
periodically send out loop-back packets to ensure the validity of SMB-10. If a fault 
is detected on the SMB-10, the SMB-1 can be used as an alternate communication 
channel by the modules.

System Diagnostic Controller

This diagnostic controller is composed of a Z-80 microprocessor and its 
supporting logic. The diagnostic controller is designed to control the power-up 
sequencing of modules, monitor the module input and output power parameters, 
keep watch over the main host processor, monitor the temperature, and control 
the SMB LANVIEW diagnostic LEDs. Although the system diagnostic controller 
and the main host processor can operate independently of each other if needed, 
they exchange information about each others status and overall module 
condition. The information gathered by the diagnostic controller is available to 
the network manager via local/remote management and the LCD located on the 
environment module. The module is designed to continue functioning in the 
event of a diagnostic controller fault.

Summary of Contents for FlowPoint 2100 12

Page 1: ...903number SmartSwitch 9000 9E428 12 36 and 9E429 12 36 User s Guide...

Page 2: ......

Page 3: ...WHATSOEVER INCLUDING BUT NOT LIMITED TO LOST PROFITS ARISING OUT OF OR RELATED TO THIS MANUAL OR THE INFORMATION CONTAINED IN IT EVEN IF CABLETRON SYSTEMS HAS BEEN ADVISED OF KNOWN OR SHOULD HAVE KNO...

Page 4: ...se harmful interference to radio communications Operation of this equipment in a residential area is likely to cause interference in which case the user will be required to correct the interference at...

Page 5: ...in the Radio Interference Regulations of the Canadian Department of Communications Le pr sent appareil num rique n met pas de bruits radio lectriques d passant les limites applicables aux appareils nu...

Page 6: ...Equipment for use in a Commercial or Light Industrial Environment We the undersigned hereby declare under our sole responsibility that the equipment packaged with this notice conforms to the above dir...

Page 7: ...Module DIP Switch 2 3 Installing the Module in the SmartSwitch 9000 Chassis 2 5 The Reset Switch 2 7 Chapter 3 Operation ENIB 3 2 SmartSwitch ASIC 3 3 i960 Core 3 3 INB NIB 3 3 System Management Buse...

Page 8: ...Contents vi Chapter 5 Specifications Technical Specifications 5 1 CPU 5 1 Memory 5 1 Standards 5 1 Network Interfaces 5 1 Safety 5 2 Service 5 2 Physical 5 2 Dimensions 5 2 Weight 5 2 Environment 5 3...

Page 9: ...switch using 802 1d standards with a high speed backbone connection or as a Secure Fast Switch SFS with 12 36 Ethernet connections Each port can be configured to operate in the Full Duplex mode This...

Page 10: ...MIBs These modules also offer you a wide variety of statistical network management information to enhance network planning and troubleshooting The 9E428 12 36 and 9E429 12 36 provide information for e...

Page 11: ...heme that ensures that no one can get the backplane for more than one time slice at a time The ITDM RAM contains 256 4 bit locations This RAM is used to hold slot numbers of modules participating in I...

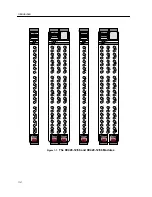
Page 12: ...RX RX RX RX RX RX TX TX TX TX TX TX TX TX RX RX RX RX RX RX RX RX RX RX RX RX TX TX TX TX TX TX TX TX INB 9E428 36 10 BASE T SMB CPU RX RX RX RX RX RX RX RX RX RX RX RX TX TX TX TX TX TX TX TX SMB CP...

Page 13: ...service contract number A description of the failure A description of any action s already taken to resolve the problem e g changing mode switches rebooting the unit etc The serial and revision numbe...

Page 14: ...Introduction 1 6...

Page 15: ...box and packing materials in the event the module must be reshipped 2 Remove the module from the plastic bag Observe all precautions to prevent damage from Electrostatic Discharge ESD 3 Carefully exa...

Page 16: ...n eight position dip switch explained in the next section replaceable PROMs and sockets for memory and flash upgrades These will be used for future upgrades Instructions for installing the components...

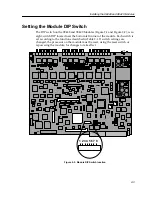
Page 17: ...is an eight switch DIP located near the bottom left corner of the module Each switch is set according to the functions described in Table 2 1 If switch settings are changed the processor on the modul...

Page 18: ...oggle this switch and then reset the module s processor Once the module resets factory default parameters are placed in NVRAM You can use the default parameters or if desired enter new parameters To e...

Page 19: ...proper airflow and cooling 2 Attach one end of the ESD wrist strap packaged with the SmartSwitch 9000 chassis to your wrist Plug the other end into the jack for the ESD Wrist Strap in the lower right...

Page 20: ...e 2 3 Installing the Module Metal Back Panel Module Guides Module Jack for ESD Wrist Strap Plastic Tab Warning Ensure that the circuit card is between the card guides Lock down the top and bottom plas...

Page 21: ...wn the module or restarting the module To reset the i960 processor press the reset switch twice within three seconds To shut down the module press and hold the reset switch down for three or more seco...

Page 22: ...Installing the 9E428 and 9E429 Modules 2 8...

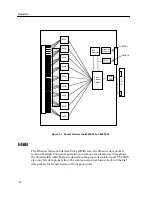
Page 23: ...ASIC while the Internal Network Bus Network Interface Block INB NIB converts data packets received from the INB into a canonical format before forwarding to the SmartSwitch ASIC All data packets desti...

Page 24: ...canonical format that allows the SmartSwitch ASIC Engine to determine the proper destination port The ENIB also converts data packets from the common canonical format back to Ethernet data packets fo...

Page 25: ...provides the network administrator with the ultimate network security without the performance degradation found when using routers or bridges with special filtering capabilities The SmartSwitch 9000 h...

Page 26: ...chassis via an optional Ethernet Port Interface Module EPIM located on the front of the Environmental Module Through an EPIM connection full SNMP management of the SmartSwitch 9000 is available side...

Page 27: ...hold slot numbers of modules participating in INB backplane arbitration The arbitration engine accesses this RAM once every time slice to get a slot number That slot number will be granted access on...

Page 28: ...ng access to the backplane If the owner of the token is not requesting then the lowest slot number requesting will be granted access This ensures that a time slice will not be idle if there are module...

Page 29: ...6 modules Figure 4 1 The LANVIEW LEDs The functions of the two System Status LEDs System Management Bus SMB and CPU Central Processing Unit are listed in Table 4 1 Table 4 1 System Status SMB and CPU...

Page 30: ...g Link port disabled Yellow Flashing Link activity port enabled Flashing to steady on indicates rate Red INB fault not synchronized with the Monarch Off No link no activity port enabled Table 4 3 INB...

Page 31: ...link port disabled Table 4 5 Port Transmit LEDs LED Color State Green Flashing Data activity flashing to steady on indicates rate Yellow Blinking Port in standby state Red Flashing Collision with col...

Page 32: ...LANVIEW LEDs 4 4...

Page 33: ...tions CPU Intel i960 RISC based microprocessor Memory 4 Mb Local RAM expandable to 32 Mb 4 Mb Flash Memory expandable to 32 Mb 2 Mb Packet RAM 16 Mb DRAM Standards IEEE 802 1D IEEE 802 3j 10BASE FL Ne...

Page 34: ...ESD IEC 801 3 Radiated susceptibility IEC 801 4 EFT Service MTBF MHBK 217E 200 000 hrs MTTR 0 5 hr Physical Dimensions 35 0 D x 44 0 H x 6 0 W centimeters 13 8 D x 17 4 H x 1 2 W inches Weight Unit 1...

Page 35: ...5 3 Specifications Environment Operating Temperature 5 to 40 C Storage Temperature 30 to 90 C Relative Humidity 5 to 95 non condensing...

Page 36: ...Specifications 5 4...
Reviews: