


26
Operation
On power up, the KNV2108D and KNV2116D are in Idle mode
broadcasting VGA signal from the selected computer and detecting
for keyboard and mouse activity. User LEDs (marked with reverse
white
A
and
B
) are both red indicating the KVM Switch is not in use.
When keyboard or mouse activity is detected at one
CONSOLE
, the
KVM Switch immediately disables the other
CONSOLE
from
accessing the computer. Only one User LED, at the front panel,
remains lit indicating the KVM Switch is under user operation. In
the mean time, keyboard LEDs (Num/Caps/Scroll Lock) of the other
CONSOLE
start to flash as its access is denied and the monitor is
blocked from VGA signal for security reason. After the user has
finished his operation for a period of time (i.e.,
User Timeout
), the
multi-access KVM Switch returns to Idle mode.
User Timeout
has
four options,
5 sec
,
30 sec
,
60 sec
and
HOLD
. Select
HOLD
when
you plan to access the KVM Switch for a long time. Pressing the
<Scroll Lock> twice forces the KVM Switch return to Idle mode
immediately regardless of the
User Timeout
setting.
The
User Timeout
is available in the OSD menu by pressing the
Function key <F4>, under the sub-menu
More
. Note:
Keyboard
Speed
option is not available for multi-access models.
Configuration
To expand the number of computers under control, you may connect
CONSOLE
port of another KVM Switch to "
PC 1
" ~ "
PC 8
" port.
Refer to the chapter
Cascade Configuration
for more detail. There
are rules to apply for Master/Slave configuration. When KNV2108D
is a Master, its slave includes KNV104, KNV104D, KNV108 and
KNV108D. When KNV2116D is a Master, its slave includes all the
above and KNV116D. These multi-access KVM Switches already
come with OSD menu, their Slaves do not have to be OSD equipped.
27
------------------------
------------------------
------------------------
------------------------
Appendices
Appendices
Appendices
Appendices
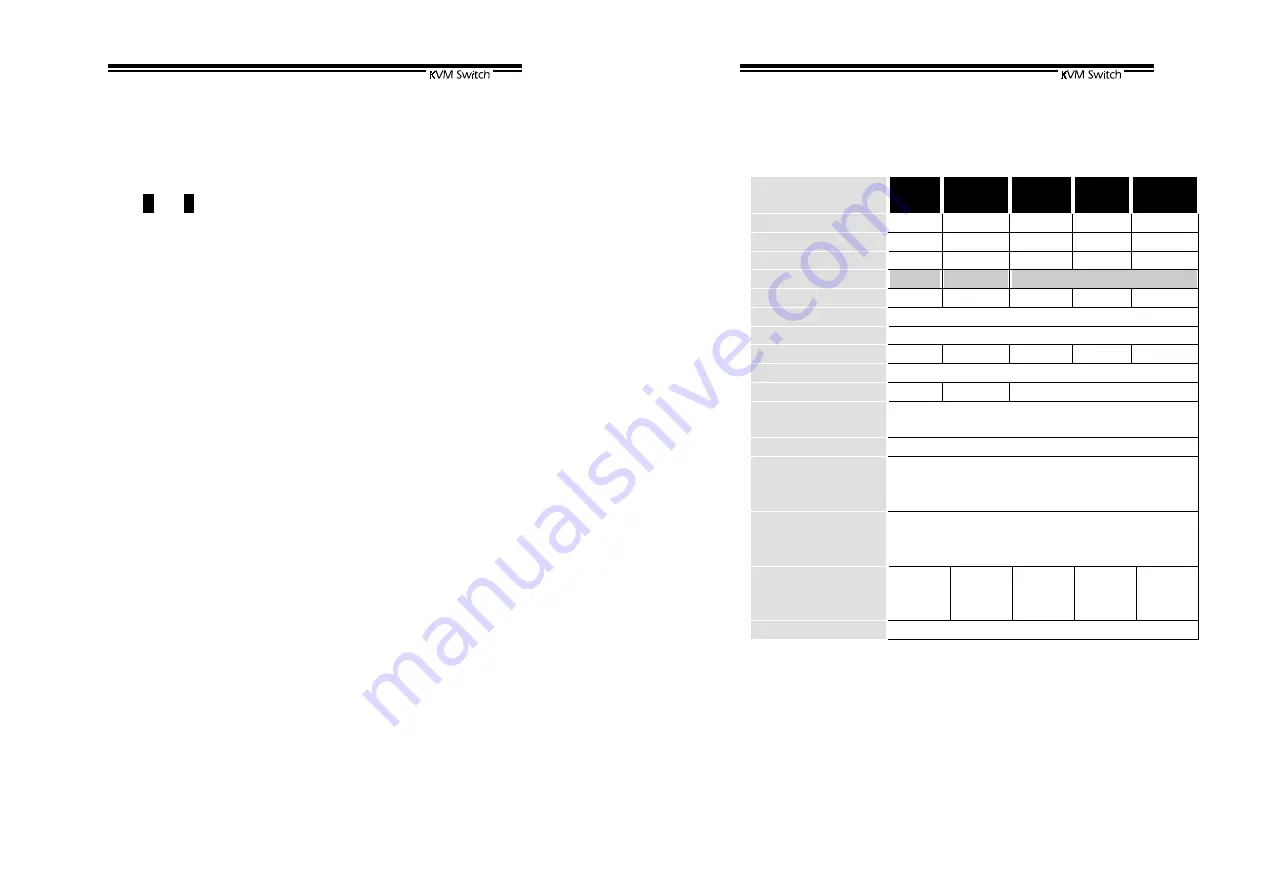
Specifications:
Specifications
KNV104
KNV104D
KNV108
KNV108D
KNV116D
KNV2108D
KNV2116D
User port number
1 1 1 2 2
Computer port number
4 8 16 8 16
Cascade control PC number Up to 16*
Up to 64*
Up to 136*
Up to 64*
Up to 136*
On-screen display (OSD)
KNV104D KNV108D
Yes
Front panel button control
4 8 16 8 16
Hot plug-and-play
Yes
Hot-key control
Yes
Rack-mount kit
RMK04 RMK08 RMK16 RMK08 RMK16
Automatic scan interval
3, 8, 15, 30 seconds
Programmable scan patter n KNV104D KNV108D
Yes
Cable length (Max)
30M (100ft) at CONSOLE
30M (100ft) at PC ports
VGA
1600 x 1200, DDC2B
keyboard
Computer mouse connector
monitor
PS/2
PS/2, serial (with adapter)
HD-DB-15 male
keyboard
Console mouse connector
monitor
PS/2
PS/2
HD-DB-15 female
H x W x D (mm)
(in.)
size
44x220x130
1.7x8.7x5.1
Compact
44x436x180
1.7x17.2x7.0
1U
88x436x220
3.5x17.2x8.7
2U
44x436x180
1.7x17.2x7.0
1U
88x436x220
3.5x17.2x8.7
2U
Power supply (min)
9V DC, 500mA
* Cascaded with KVM Switches supporting the same number of PC ports. You can
mix different models in cascade applications.


