Edition 10/03
Blow Applicator with Swing Cylinder
Type 3100 / Type 3100H
Part-No. 5535914 / 5537966
Operating Instructions
Page 1: ...Edition 10 03 Blow Applicator with Swing Cylinder Type 3100 Type 3100H Part No 5535914 5537966 Operating Instructions...
Page 2: ...Stra e 14 D 76131 Karlsruhe Telefon 0721 66 26 0 Telefax 0721 66 26 249 copyright by cab 900 8146 xxx xx Angaben zu Lieferumfang Aussehen Leistung Ma en und Gewicht entsprechen unseren Kenntnissen zum...
Page 3: ...Unit on the Apollo 13 Adjusting the Level and the Sides of the Cylinder Unit on the Hermes 14 Tuning the Blow Tube 15 5 2 Pneumatic Adjustments 16 Control Valves 16 Throttle Valves at the Cylinder 17...
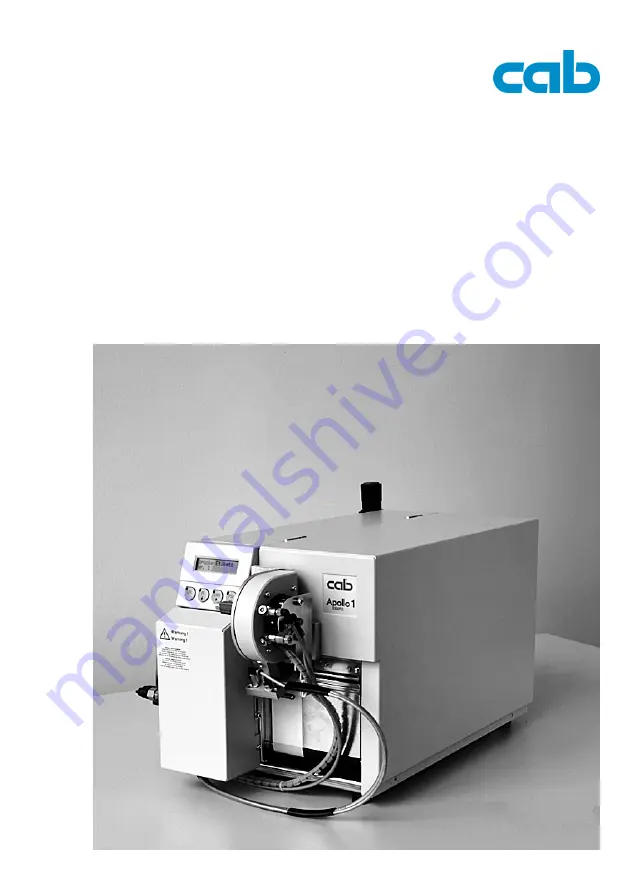
Page 4: ...the pad by a vacuum via drillings at the bottom of the pad For support the label is also blown against the pad with an air current coming from a blow tube The correct transfer from the label is contro...
Page 5: ...he Transfer Printer Apollo incl 4 Cylinder head Screws 4 Washers 4 Spring Washers incl Blow Pad Unit customized Pad Blow Tube 2 Blow Applicator with Swing Cylinder Type 3100H for the Transfer Printer...
Page 6: ...ell as the shutoff valve at the applicator are closed while installing the delivered components CAUTION In operation moving parts are easily accessible Therefore keep long hair loose clothes and jewel...
Page 7: ...Applicator on the Apollo 1 Dismantle the casing of the manifold 2 by loosening the screws two on the left and one on the right 2 Fasten the applicator at the front of the Apollo using the four supplie...
Page 8: ...applicator with its two hinges 1 into the hinges 2 of the Hermes 3 Turn the applicator towards the Hermes as far as necessary to plug the connector of the applicator electronics into the peripheral co...
Page 9: ...Blow Applicator with Swing Cylinder cab Produkttechnik GmbH Co KG 9 Fig 4c Fastening the Blow Applicator 5 Attach the applicator on the Hermes by screwing the knurled screw 2 into the hole 1 2 1...
Page 10: ...stallation of the Service Unit on the Apollo Fig 4e Installation of the Service Unit on the Hermes 1 Fasten the service unit 1 at the back of the Apollo and or the Hermes using the washers and the scr...
Page 11: ...hutoff valve 5 is closed lever at the valve is turned vertical 4 The connector 2 for the compressed air supply is located at the service unit 1 at the rear of the printer The connector is suitable for...
Page 12: ...tings which have an influence on the application rate Fig 5 1a Adjusting the Angle of the Pad in the Starting Position In the position where the label is picked up starting position the pad 6 is swung...
Page 13: ...n the screws 4 Level Adjustment 1 Loosen both upper screws 1 on the rear side of the mounting plate 5 of the blow applicator type 3100 2 Move the cylinder unit until in its upper starting position the...
Page 14: ...Adjustment on the Hermes 1 Loosen both screws 2 on the front side of the blow applicator type 3100H 2 Move the cylinder unit within the longish holes 1 until in its upper starting position the pad 3...
Page 15: ...udinal axis Change the direction of the air current Hold the slotted screw 4 with a screwdriver and loosen the counter nut 1 Adjust the tube 3 until the air current is aligned with the dispense edge o...
Page 16: ...hen the valve is switched off the pad is kept in the starting position Switching the valve on will move the pad into the labelling position Normally the disconnection of the valve is controlled by the...
Page 17: ...rews Turning clockwise will close the valves A wider opening of the bottom valve 3 speeds up the pad moving from the starting position to the labelling position a wider opening of the top valve 1 acce...
Page 18: ...usted Turn the throttle screw to adjust the valve Turning clockwise will close the valve The valve has to be tuned in such a way that the label is blown onto the pad without turning or swinging Thrott...
Page 19: ...g cycle is finished Operation Mode Labelling Printing Waiting in the Starting Position Before starting the mode labelling printing the printing and picking up of the first label has to be released sep...
Page 20: ...l At the same moment the vacuum at the pad as well as the supporting air blow tube are switched on After the label has been printed and picked up by the pad the supporting air is switched off 2 nd hal...
Page 21: ...b only the movements of the pad as described for the second part of the labelling cycle are carried out pressing the key The first half cycle of the labelling process can also be released by pressing...
Page 22: ...t of the labelling process by changing certain time delays If any one of the settings is changed the actual value is briefly shown in the printer display Potentiometer 2 tB blowing time 0 2 5 s This p...
Page 23: ...e locking time tSP Potentiometer 6 tVS start delay 0 2 5 s The parameter tVS determines the time period between the start signal and the start of the labelling process With this delay it is possible t...
Page 24: ...e Press key repeatedly to view the other pages When an applicator is installed this display is extended by another five pages After the standard pages the following parameters are shown start delay lo...
Page 25: ...the shutoff valve 6 Switch into the present mode of the printer during programming and set the peel position to remove the labels from the carrier ribbon corresponding to the size of the label 7 Befor...
Page 26: ...Blow Applicator with Swing Cylinder 26 cab Produkttechnik GmbH Co KG This page is intentionally left blank...
Page 27: ...LC Interface PIN Signal Direction Function 1 XSTRT input start signal 2 XSTP input stop signal 3 XDREE input print first label 4 XDNB output printer not ready 5 XEDG output no existing print job 6 XSA...
Page 28: ...PIN11 XDREER Circuit Diagrams of Inputs and Outputs The inputs are optocouplers with a current limiting resistor of 2 4kW in the input circuit For each signal X IN there is a separate reverse line X...
Page 29: ...realized through solid state relays which outputs are connected among one another one sided The joint line is lead to the plug connector as R L signal The switch function of the outputs is to open or...
Page 30: ...rror does not show message during print process PIN3 XDREE Print first label When current flows between PIN3 and PIN11 the print of the first label and its picking up by the pad is released within the...
Page 31: ...n this state the contact between PIN6 and PIN14 is opened PIN7 XSOE Pad in starting position The signal is active when the pad is in the starting position where it picks up the label from the printer...
Page 32: ...inder moves back up message of the vacuum sensor The type of fault is shown in the display of the printer In this state the contact between PIN13 and PIN14 is opened After fault correction the print o...
Page 33: ...D Releasing Switch Applicator PIN1 PIN9 PIN15 24V PIN8 GND blue white black brown Sensor with pnp output Applicator Examples for Circuits to Creating a Start Signal Fig A 4 Example with releasing swit...
Page 34: ...Interface A 8 cab Produkttechnik GmbH Co KG Fig A 6 Example for an optical sensor with npn output dependent on the used sensor PIN1 PIN9 PIN15 24V PIN8 GND blue brown Sensor with npn output Applicato...
Page 35: ...rrection is quit with the key an additional label feed has to be released using the key This synchronizes the process of printing and labelling Possibly dispensed blank labels have to be removed manua...
Page 36: ...manually if interrupted by an XSTP stop necessary signal via PLC interface Refl sensor blk There has been no change of the Check the sensor service switch state at the upper control sensor at the cyli...
Page 37: ...nik GmbH Co KG 1 3 2 Appendix C Function of the LEDs of the Electronics PLC Port PCB Fig C 1 LED on the PLC port PCB LED No Colour Function Active state 1 green PLC signal XSTRT ON 2 green PLC signal...
Page 38: ...Control Table C 2 LED on the applicator control PCB Fig C 2 LED on the Applicator Control PCB LED Nr Colour Function Active state 4 red Sensor signals that pad OFF is in labelling position 5 red Senso...
Page 39: ...al error message A 5 H Host stop error A 4 B 2 L Labelling position 4 16f 19f Labelling Printing 19 23 Label not deposited B 2 LED C 1f Level adjustment 13f Locking time 23f Lower position B 2 M Manif...
Page 40: ...tment 13f Signals PLC A 1f C 1 SPI interface 4 Start delay 24f Starting position 4 12f 15f 19f C 2 Start signal A 4 Stop signal A 4 Supporting air 4 15 16ff 19ff 23f Switch off delay supporting air 22...
Page 41: ...23 EEC Data and Office Machine Safety EN60950 1992 A1 1993 EN 60950 A2 1993 A3 1995 A4 1997 EC Electromagnetic Compatibility Regulations 89 336 EEC Threshold values for the Interference EN 55022 1998...