background image

HS-898

Instruction Booklet

OPERATING YOUR SCOOTER

15

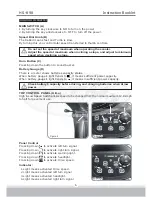
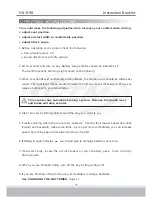
You could make the following adjustments to increase your comfort when driving.

adjust seat position.

adjust armrest width to comfortable position.

adjust tiller's angle.

This scooter has automatic braking system.  Release the thumb lever

and brake will stop scooter.

1.Before operating your scooter, check the following:

  •

free-wheeling lever in D

  •

speed dial knob is at turtle picture.

2.Sit on scooter and turn on key, Battery Gauge meter should be indicate at F.

   The Self-Diagnostic Warning Light should not be blinking.

3.When your hands rest comfortably on handlebars, the thumb levers should be within easy

reach.  The right lever moves scooter forward, the left one moves it backward.  When you

   release both levers, scooter will stop.

4.Steer scooter by turning tiller toward the way you want to go.

5.Practice driving where there are is No obstacle.  Start at the slowest speed and drive

forward and backward; make some turns.  As you get more comfortable, you can increase

   speed by turning speed dial toward picture of rabbit.

6.If Battery Gauge indicates      , you should plan to recharge batteries very soon.

7.If scooter stops, locate the circuit breaker on top of battery pack.  Push it and try

  driving again.

8.When you are finished riding, turn off the key before getting off.

9.If you are finished riding for the day, immediately recharge batteries.

See CHARGING THE BATTERIES

, page 11.

Summary of Contents for HS-898

Page 1: ...HS 898 Instruction Booklet C T M MOBILITY SCOOTER C T M MOBILITY SCOOTER C T M MOBILITY SCOOTER...

Page 2: ...PRECAUTIONS ELECTROMAGNETIC INTERFERENCE AND WARNINGS IDENTIFICATION OF PARTS CHARGING THE BATTERIES DISASSEMBLING YOUR SCOOTER ASSEMBLING YOUR SCOOTER CARE AND MAINTENANCE OPERATING YOUR SCOOTER TRO...

Page 3: ...ation on purchasing your new C T M Mobility Scooter It is designed to provide you with transportation ability indoors and outdoors We pride ourselves on providing safe and comfortable products Our goa...

Page 4: ...when crossing roads Do not drive on slope exceeding 10 degree and take extreme care when turning on slope Do not use full power when turning to sharp corner Take great care and drive in low speed when...

Page 5: ...ease its brakes move by itself or move in unintended directions It can also permanently damage the motorized scooter control system The intensity of the interfering EM energy can be measured in volts...

Page 6: ...ngs listed below should reduce the chance of unintended brake release or motorized scooter movement which could result in serious injury 1 Do not operate hand held transceivers transmitters receivers...

Page 7: ...el Figure 3 HS 898 Rear View IDENTIFICATION OF PARTS 5 Before attempting to drive this scooter on your own it is important that you familiarize yourself with the controls and how to operate Battery Ga...

Page 8: ...Pressing down to activate left turn signal Pressing down to activate right turn signal Pressing down to activate warning light Pressing down to activate headlight Pressing down to activate Hi Lo speed...

Page 9: ...Characteristic Sound of turn signal stop low voltage reversing can be set as on or off Description of Volume Setting Steps 1 Ensure power is turned off 2 Pressing left and right turn signal buttons d...

Page 10: ...Default Turn Signal Warning Sound Mid Stop Warning Light Warning Sound Mid Low Voltage Warning Sound Mid Reversing Warning Sound Mid Horn Volume Loud 8 Table of Warning Sound Settings Function Volume...

Page 11: ...These are also your accelerator The further you depress them the faster you go Subject to the position of the Rabbit Turtle control Tiller Angle Adjustment Pulling the tiller adjustment G downwards t...

Page 12: ...m width tighten again to lock in at desired position 2 Adjust the attached screw J s height to control armrest s angle 10 Anti tip wheels M Helps keep scooter from tipping over Free Wheeling Lever L W...

Page 13: ...nge light when it turns to green light that means well charged 5 LED indication LED POWER GREEN LIGHT ON Power On LED CHARGE ORANGE LIGHT ON Charging GREEN LIGHT ON Fully Charged 6 Charger Trouble Sho...

Page 14: ...gure 14 Figure 14 Figure 15 Figure 15 Figure 16 Figure 16 12 DISASSEMBLING YOUR SCOOTER Disassembling Basket By lifting the basket O upwards Disassembling Seat By lifting lever H and seat a upward Rea...

Page 15: ...mbly directions in reverse Abbreviated directions are given below Refer to Figures on pages 12 to locate parts 1 Use the tiller adjustment to move tiller up and out of the way 2 Place front basket 3 P...

Page 16: ...intenance and repair of scooter should be done by an authorized dealer The following areas required periodic inspection Tire pressure between 30 35 lbs All electrical connections are firmly attached S...

Page 17: ...lebars the thumb levers should be within easy reach The right lever moves scooter forward the left one moves it backward When you release both levers scooter will stop 4 Steer scooter by turning tille...

Page 18: ...curbs or uneven surfaces Other Operating Information Hill climbing You may need to use a higher speed Turn to lower speed before going downhill Down slopes proceed with downward slopes slowly and set...

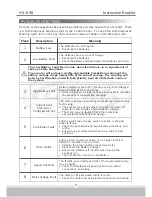
Page 19: ...avelling down a slope reduce your speed to minimize the amount of regenerative charging 4 Current Limit Time out or Controller too hot The motor has been exceeding its maximum current rating for too l...

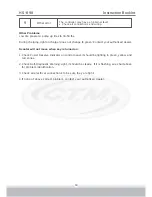
Page 20: ...reen Contact your authorized dealer Scooter will not move when key is turned on 1 Check Power Reserve Indicator on control panel it should be lighting in green yellow and red zones 2 Check Self Diagno...

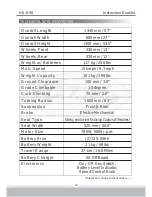
Page 21: ...Width Motor Size Battery Size Battery Weight Travel Range Battery Charger Electronics 1440 mm 57 680 mm 27 1360 mm 53 5 330 mm 13 330 mm 13 117 kg 258 Ibs 15 kmph 9 3 mph 181 kg 399 Ibs 100 mm 3 9 10...

Reviews: